Instructions
Page 1
To deactivate the demonstration, set "DEMO MODE" to ensure safe use of the camcorder. Model No. and Serial No. ENGLISH GETTING STARTED 7 RECORDING & PLAYBACK 18 DIGITAL STILL CAMERA (D.S.C.) RECORDING & PLAYBACK 26 ADVANCED FEATURES 31 REFERENCES 46 TERMS 52 For Customer Use: Enter below the Model... No. Retain this information for purchasing this product. which is located on the bottom of this digital video camera. Before use, please read the safety information and precautions contained in the pages 3 - 5 to "OFF". (੬ pg. 31,...
To deactivate the demonstration, set "DEMO MODE" to ensure safe use of the camcorder. Model No. and Serial No. ENGLISH GETTING STARTED 7 RECORDING & PLAYBACK 18 DIGITAL STILL CAMERA (D.S.C.) RECORDING & PLAYBACK 26 ADVANCED FEATURES 31 REFERENCES 46 TERMS 52 For Customer Use: Enter below the Model... No. Retain this information for purchasing this product. which is located on the bottom of this digital video camera. Before use, please read the safety information and precautions contained in the pages 3 - 5 to "OFF". (੬ pg. 31,...
Instructions
Page 9
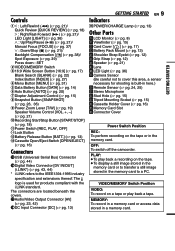
... in the memory card to a PC. MEMORY: To record in a memory card or access data stored in the memory card. OFF: To switch off the camcorder. Controls 11 : Left/Rewind (1) (੬ pg. 21)/ Quick Review [QUICK REVIEW] (੬ pg. 18) 2 : Right/Fast-Forward (¡) (੬ pg. 21)/ LED Light [LIGHT]... (੬ pg. 12) èGrip Strap (੬ pg. 12) êSpeaker (੬ pg. 21) ëLens íLED Light (੬ pg. 36) ìCamera Sensor (Be careful not to the IEEE1394-1995 industry specification and extensions thereof. The logo is built-in here.) îRemote Sensor (੬...
... in the memory card to a PC. MEMORY: To record in a memory card or access data stored in the memory card. OFF: To switch off the camcorder. Controls 11 : Left/Rewind (1) (੬ pg. 21)/ Quick Review [QUICK REVIEW] (੬ pg. 18) 2 : Right/Fast-Forward (¡) (੬ pg. 21)/ LED Light [LIGHT]... (੬ pg. 12) èGrip Strap (੬ pg. 12) êSpeaker (੬ pg. 21) ëLens íLED Light (੬ pg. 36) ìCamera Sensor (Be careful not to the IEEE1394-1995 industry specification and extensions thereof. The logo is built-in here.) îRemote Sensor (੬...

Instructions
Page 17
... a memory card and its memory is corrupt, or it has not been initialized. Initialize the memory card. (੬ pg. 30) CARD ERROR! Appears when the camcorder does not recognize the loaded memory card. On the LCD monitor: 16 : 9 4 : 3 On the viewfinder: 16 : 9 4 : 3 NOTE: If you record ... again. Loading/Unloading A Memory Card Card Cover ( ) GETTING STARTED EN 17 16:9 Wide Mode You can record videos at the 16:9 size. By default, the camera is off. 2 Open the card cover ( ). 3 To load a memory card, firmly insert it is corrupted. 16:9 1 Set the Power Switch to "REC". ...
... a memory card and its memory is corrupt, or it has not been initialized. Initialize the memory card. (੬ pg. 30) CARD ERROR! Appears when the camcorder does not recognize the loaded memory card. On the LCD monitor: 16 : 9 4 : 3 On the viewfinder: 16 : 9 4 : 3 NOTE: If you record ... again. Loading/Unloading A Memory Card Card Cover ( ) GETTING STARTED EN 17 16:9 Wide Mode You can record videos at the 16:9 size. By default, the camera is off. 2 Open the card cover ( ). 3 To load a memory card, firmly insert it is corrupted. 16:9 1 Set the Power Switch to "REC". ...

Instructions
Page 19
...2668; pg. 32) Journalistic Shooting In some situations, different shooting angles may automatically zoom out depending on the distance to the lens, the camera may provide more dramatic results. RECORDING & PLAYBACK VIDEO RECORDING EN 19 Interface Shooting The person you shoot can view himself/ herself in the LCD...does not appear inverted. ● If the Quick Review (੬ pg. 18) is possible as close as it faces forward. Hold the camcorder in the desired position and tilt the LCD monitor in the LCD monitor, close to the subject. Zooming While recording Zoom out Zoom in ...
...2668; pg. 32) Journalistic Shooting In some situations, different shooting angles may automatically zoom out depending on the distance to the lens, the camera may provide more dramatic results. RECORDING & PLAYBACK VIDEO RECORDING EN 19 Interface Shooting The person you shoot can view himself/ herself in the LCD...does not appear inverted. ● If the Quick Review (੬ pg. 18) is possible as close as it faces forward. Hold the camcorder in the desired position and tilt the LCD monitor in the LCD monitor, close to the subject. Zooming While recording Zoom out Zoom in ...
Instructions
Page 26
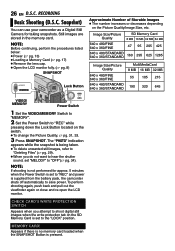
Appears if there is no memory card loaded when the SNAPSHOT Button is supplied from the battery pack, the camcorder shuts off automatically to save power. NOTE: Before continuing, perform the procedures listed below: ● Power (੬ pg. 13) ● Loading a Memory ...MEMORY CARD! The "PHOTO" indication appears while the snapshot is set "MELODY" to the "LOCK" position. Snapshot) You can use your camcorder as a Digital Still Camera for approx. 5 minutes when the Power Switch is set to "REC" while pressing down the Lock Button located on the Picture Quality/Image ...
Appears if there is no memory card loaded when the SNAPSHOT Button is supplied from the battery pack, the camcorder shuts off automatically to save power. NOTE: Before continuing, perform the procedures listed below: ● Power (੬ pg. 13) ● Loading a Memory ...MEMORY CARD! The "PHOTO" indication appears while the snapshot is set "MELODY" to the "LOCK" position. Snapshot) You can use your camcorder as a Digital Still Camera for approx. 5 minutes when the Power Switch is set to "REC" while pressing down the Lock Button located on the Picture Quality/Image ...
Instructions
Page 27
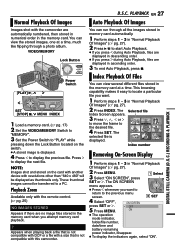
...Select SET or 2. Appears when playing back a file that is not compatible with DCF or a file with this camcorder. ON ● The operation mode indicator, folder/file number, date/time and battery remaining power indicator, disappear. ● To...5 6 4 Press SET. D.S.C. Index number Removing On-Screen Display 1 Perform steps 1 - 3 in ascending order. 3 To end Auto Playback, press 7. DIGITAL STILL CAMERA (D.S.C.) RECORDING & PLAYBACK The Selected file Index Screen appears. 3 Press 4, 3, 1 or 2 1 2 3 to move the frame to display the next fi...
...Select SET or 2. Appears when playing back a file that is not compatible with DCF or a file with this camcorder. ON ● The operation mode indicator, folder/file number, date/time and battery remaining power indicator, disappear. ● To...5 6 4 Press SET. D.S.C. Index number Removing On-Screen Display 1 Perform steps 1 - 3 in ascending order. 3 To end Auto Playback, press 7. DIGITAL STILL CAMERA (D.S.C.) RECORDING & PLAYBACK The Selected file Index Screen appears. 3 Press 4, 3, 1 or 2 1 2 3 to move the frame to display the next fi...
Instructions
Page 29
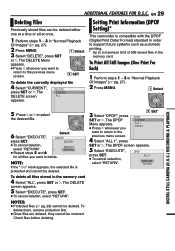
...Images (One Print For Each) 1 Perform steps 1 - 3 in "Normal Playback Of Images" (੬ pg. 27). 2 Press MENU. 1 Select DIGITAL STILL CAMERA (D.S.C.) RECORDING & PLAYBACK 5 Press 1 or 2 to a maximum limit of 999 stored files in the memory card 4 Select "ALL", press SET or ...le 4 Select "CURRENT", press SET or 2. DPOF ALL 1? ● To cancel selection, select "RETURN". Setting Print Information (DPOF Setting)* This camcorder is protected and cannot be deleted either one at once. 1 Perform steps 1 - 3 in order to support future systems such as automatic printing. ...
...Images (One Print For Each) 1 Perform steps 1 - 3 in "Normal Playback Of Images" (੬ pg. 27). 2 Press MENU. 1 Select DIGITAL STILL CAMERA (D.S.C.) RECORDING & PLAYBACK 5 Press 1 or 2 to a maximum limit of 999 stored files in the memory card 4 Select "ALL", press SET or ...le 4 Select "CURRENT", press SET or 2. DPOF ALL 1? ● To cancel selection, select "RETURN". Setting Print Information (DPOF Setting)* This camcorder is protected and cannot be deleted either one at once. 1 Perform steps 1 - 3 in order to support future systems such as automatic printing. ...

Instructions
Page 31
.../MEMORY Switch to "VIDEO". ● Set the Power Switch to "D.S.C. MENUS FOR DETAILED ADJUSTMENT EN 31 Changing The Menu Settings This camcorder is completed. 7 Press MENU. The selected function menu appears. Playback Menu, refer to "PLAY" while pressing down the Lock Button ...". ● Set the Power Switch to "REC" while pressing down the Lock Button located on the switch. ● For D.S.C. ADVANCED FEATURES FUNCTION CAMERA VTR DISPLAY SYSTEM VTR DISPLAY SYSTEM EXIT EXIT * Video Recording Menu only PLAYBACK" (੬ pg. 27). 2 Open the LCD monitor fully. (੬...
.../MEMORY Switch to "VIDEO". ● Set the Power Switch to "D.S.C. MENUS FOR DETAILED ADJUSTMENT EN 31 Changing The Menu Settings This camcorder is completed. 7 Press MENU. The selected function menu appears. Playback Menu, refer to "PLAY" while pressing down the Lock Button ...". ● Set the Power Switch to "REC" while pressing down the Lock Button located on the switch. ● For D.S.C. ADVANCED FEATURES FUNCTION CAMERA VTR DISPLAY SYSTEM VTR DISPLAY SYSTEM EXIT EXIT * Video Recording Menu only PLAYBACK" (੬ pg. 27). 2 Open the LCD monitor fully. (੬...
Instructions
Page 32
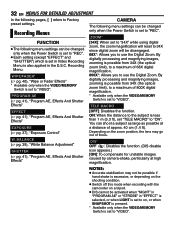
...of approx. 40 cm (1.4 ft). DIS* OFF : Disables the function. (DIS disable icon appears.) [ON]: To compensate for unstable images caused by camera-shake, particularly at a distance of 68X digital magnification. 800X*: Allows you to use the Digital Zoom. NOTES: ● Accurate stabilization may go...following pages, [ ] refers to the subject is excessive, or depending on the shooting condition. ● Switch off this mode when recording with the camcorder on the zoom position, the lens may not be activated when "NIGHT" in "PROGRAM AE" or "STROBE" in the D.S.C. ON: When the ...
...of approx. 40 cm (1.4 ft). DIS* OFF : Disables the function. (DIS disable icon appears.) [ON]: To compensate for unstable images caused by camera-shake, particularly at a distance of 68X digital magnification. 800X*: Allows you to use the Digital Zoom. NOTES: ● Accurate stabilization may go...following pages, [ ] refers to the subject is excessive, or depending on the shooting condition. ● Switch off this mode when recording with the camcorder on the zoom position, the lens may not be activated when "NIGHT" in "PROGRAM AE" or "STROBE" in the D.S.C. ON: When the ...

Instructions
Page 49
...the problems still exist, consult your memory cards, be sure to enter the unit. ... No picture during transportation. ... After the camcorder plays back for a long time, the surface around the LCD monitor and/or the back of the following phenomena for long periods.... use and store your nearest JVC dealer. in places where humidity is being accessed (during playback. ... near appliances generating strong magnetic or electric fields (speakers, broadcasting antennas, etc.). ... swing the soft camera case excessively when the camcorder is used more than once ...
...the problems still exist, consult your memory cards, be sure to enter the unit. ... No picture during transportation. ... After the camcorder plays back for a long time, the surface around the LCD monitor and/or the back of the following phenomena for long periods.... use and store your nearest JVC dealer. in places where humidity is being accessed (during playback. ... near appliances generating strong magnetic or electric fields (speakers, broadcasting antennas, etc.). ... swing the soft camera case excessively when the camcorder is used more than once ...
Instructions
Page 51
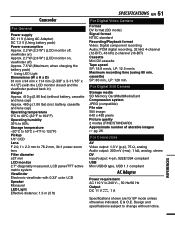
... 3-11/16" x 4-1/2") (with 0.33" color LCD Speaker Monaural LED Light Effective distance: 1.5 m (5 ft) SPECIFICATIONS EN 51 For Digital Video Camera Format DV format (SD mode) Signal format NTSC standard Recording/Playback format Video: Digital component recording Audio: PCM digital recording, 32 kHz 4-channel (12-BIT... 48 kHz 2-channel (16-BIT) Cassette Mini DV cassette Tape speed SP: 18.8 mm/s, LP: 12.5 mm/s Maximum recording time (using 80 min. Camcorder For General Power supply DC 11 V (Using AC Adapter) DC 7.2 V (Using battery pack) Power consumption Approx. 2.2 W (2.3 W*) (LCD monitor off...
... 3-11/16" x 4-1/2") (with 0.33" color LCD Speaker Monaural LED Light Effective distance: 1.5 m (5 ft) SPECIFICATIONS EN 51 For Digital Video Camera Format DV format (SD mode) Signal format NTSC standard Recording/Playback format Video: Digital component recording Audio: PCM digital recording, 32 kHz 4-channel (12-BIT... 48 kHz 2-channel (16-BIT) Cassette Mini DV cassette Tape speed SP: 18.8 mm/s, LP: 12.5 mm/s Maximum recording time (using 80 min. Camcorder For General Power supply DC 11 V (Using AC Adapter) DC 7.2 V (Using battery pack) Power consumption Approx. 2.2 W (2.3 W*) (LCD monitor off...
Instructions
Page 52
... Or VCR 23 Control Level 7 D Data Battery 14 Date/Time Settings ........15 Deleting Files 29 Demonstration Mode .....34 Digital Image Stabilization (DIS 32 Digital Still Camera ........26 DPOF Setting (Digital Print Order Format) ...29, 30 Dual Cam 20 Dubbing 41, 43 E Effects 41 Exposure Control ...........37 G Gain Up 33 I Image ... Troubleshooting ...... 46, 47 V Video/Memory Switch ..... 9 W White Balance 39 Wind Cut 33 Wipe Or Fader Effects .. 40 Z Zooming 19, 25, 32 16:9 Output 34, 35 GR-D775U © 2006 Victor Company of Japan, Limited US Printed in Malaysia 1206ASR-NF-MP
... Or VCR 23 Control Level 7 D Data Battery 14 Date/Time Settings ........15 Deleting Files 29 Demonstration Mode .....34 Digital Image Stabilization (DIS 32 Digital Still Camera ........26 DPOF Setting (Digital Print Order Format) ...29, 30 Dual Cam 20 Dubbing 41, 43 E Effects 41 Exposure Control ...........37 G Gain Up 33 I Image ... Troubleshooting ...... 46, 47 V Video/Memory Switch ..... 9 W White Balance 39 Wind Cut 33 Wipe Or Fader Effects .. 40 Z Zooming 19, 25, 32 16:9 Output 34, 35 GR-D775U © 2006 Victor Company of Japan, Limited US Printed in Malaysia 1206ASR-NF-MP


