Instruction Manual
Page 2
...check the unit regularly whether it is recommended only genuine JVC batteries and accessories are used your cassette tapes and camcorder are not recorded on the tape. This camcorder is intended for personal enjoyment, it is made with JVC Data Battery. Only cassettes marked " " can be used with ...99.99%) ● Do not leave the battery pack attached when the camcorder is not in this camcorder is designed exclusively for awhile, the heads may be removed from the camcorder and stored in summer. - Using generic non-JVC batteries can become dirty more than SP (Standard) mode...
...check the unit regularly whether it is recommended only genuine JVC batteries and accessories are used your cassette tapes and camcorder are not recorded on the tape. This camcorder is intended for personal enjoyment, it is made with JVC Data Battery. Only cassettes marked " " can be used with ...99.99%) ● Do not leave the battery pack attached when the camcorder is not in this camcorder is designed exclusively for awhile, the heads may be removed from the camcorder and stored in summer. - Using generic non-JVC batteries can become dirty more than SP (Standard) mode...

Instruction Manual
Page 3
... OR SHOCK HAZARD, DO NOT EXPOSE THIS UNIT TO RAIN OR MOISTURE. CAUTIONS: ÷ If you disconnect the power cord from AC outlet. Contact your JVC dealer. However, live recording and LCD monitor/viewfinder playback are on the bottom and/or the back of the main unit. ● The... plate) and safety caution are on its upper and lower sides. Do not block the ventilation holes. (If the ventilation holes are not using the camcorder or AC Adapter under these batteries must be exposed to allow for ventilation (10 cm or more on both sides, on the apparatus. CAUTIONS: ÷ This...
... OR SHOCK HAZARD, DO NOT EXPOSE THIS UNIT TO RAIN OR MOISTURE. CAUTIONS: ÷ If you disconnect the power cord from AC outlet. Contact your JVC dealer. However, live recording and LCD monitor/viewfinder playback are on the bottom and/or the back of the main unit. ● The... plate) and safety caution are on its upper and lower sides. Do not block the ventilation holes. (If the ventilation holes are not using the camcorder or AC Adapter under these batteries must be exposed to allow for ventilation (10 cm or more on both sides, on the apparatus. CAUTIONS: ÷ This...
Instruction Manual
Page 5
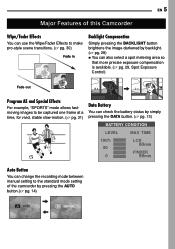
...be captured one frame at a time, for vivid, stable slow-motion. (੬ pg. 31) Data Battery You can check the battery status by simply pressing the DATA button. (੬ pg. 13) BATTERY CONDITION LEVEL MAX TIME 100% 50 0 LCD 80min FINDER 90min Auto Button You can change the recording ...mode between manual setting to the standard mode setting of the camcorder by pressing the AUTO button.(੬...
...be captured one frame at a time, for vivid, stable slow-motion. (੬ pg. 31) Data Battery You can check the battery status by simply pressing the DATA button. (੬ pg. 13) BATTERY CONDITION LEVEL MAX TIME 100% 50 0 LCD 80min FINDER 90min Auto Button You can change the recording ...mode between manual setting to the standard mode setting of the camcorder by pressing the AUTO button.(੬...
Instruction Manual
Page 9
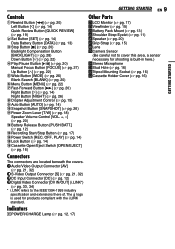
... pg. 20) Left Button [1] (੬ pg. 14) Quick Review Button [QUICK REVIEW] (੬ pg. 19) 2Set Button [SET] (੬ pg. 14) Data Battery Button [DATA] (੬ pg. 13) 3Stop Button [7] (੬ pg. 20) Backlight Compensation Button [BACKLIGHT] (੬ pg. 28) Down Button [4] (੬ pg....; pg. 15) 9Auto Button [AUTO] (੬ pg. 14) !Snapshot Button [SNAPSHOT] (੬ pg. 26) "Power Zoom Lever [T/W] (੬ pg. 18) Speaker Volume Control [VOL. +, -] (੬ pg. 20) #Battery Release Button [PUSH BATT.] (੬ pg. 12) $Recording Start/Stop Button (੬ pg. 17) %Power Switch [REC,...
... pg. 20) Left Button [1] (੬ pg. 14) Quick Review Button [QUICK REVIEW] (੬ pg. 19) 2Set Button [SET] (੬ pg. 14) Data Battery Button [DATA] (੬ pg. 13) 3Stop Button [7] (੬ pg. 20) Backlight Compensation Button [BACKLIGHT] (੬ pg. 28) Down Button [4] (੬ pg....; pg. 15) 9Auto Button [AUTO] (੬ pg. 14) !Snapshot Button [SNAPSHOT] (੬ pg. 26) "Power Zoom Lever [T/W] (੬ pg. 18) Speaker Volume Control [VOL. +, -] (੬ pg. 20) #Battery Release Button [PUSH BATT.] (੬ pg. 12) $Recording Start/Stop Button (੬ pg. 17) %Power Switch [REC,...
Instruction Manual
Page 11
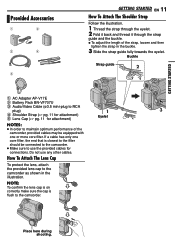
...use any other cables. Place here during shooting. Do not use the provided cables for attachment) Eyelet NOTES: ● In order to the camcorder as shown in the buckle. 3 Slide the strap guide fully towards the eyelet. How To Attach The Lens Cap To protect the lens, attach... lens cap to maintain optimum performance of the strap, loosen and then tighten the strap in the illustration. Buckle Strap guide 2 2 1 AC Adapter AP-V17E 2 Battery Pack BN-VF707U 3 Audio/Video Cable (ø3.5 mini-plug to RCA plug) 1 3 4 Shoulder Strap (੬ pg. 11 for attachment) 5 Lens Cap (੬...
...use any other cables. Place here during shooting. Do not use the provided cables for attachment) Eyelet NOTES: ● In order to the camcorder as shown in the buckle. 3 Slide the strap guide fully towards the eyelet. How To Attach The Lens Cap To protect the lens, attach... lens cap to maintain optimum performance of the strap, loosen and then tighten the strap in the illustration. Buckle Strap guide 2 2 1 AC Adapter AP-V17E 2 Battery Pack BN-VF707U 3 Audio/Video Cable (ø3.5 mini-plug to RCA plug) 1 3 4 Shoulder Strap (੬ pg. 11 for attachment) 5 Lens Cap (੬...
Instruction Manual
Page 12
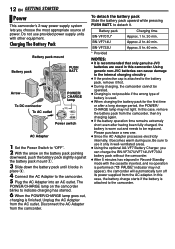
... be operated. ● Charging is not possible if the wrong type of power. Using generic non-JVC batteries can charge the BN-VF707U/VF714U/VF733U battery pack without the camcorder. ● After 5 minutes has elapsed in this camcorder. Be sure to use provided power supply units with the cassette inserted, and no operation is performed...
... be operated. ● Charging is not possible if the wrong type of power. Using generic non-JVC batteries can charge the BN-VF707U/VF714U/VF733U battery pack without the camcorder. ● After 5 minutes has elapsed in this camcorder. Be sure to use provided power supply units with the cassette inserted, and no operation is performed...
Instruction Manual
Page 13
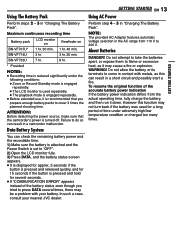
.... In such a case, consult your battery. NOTE: The provided AC Adapter features automatic voltage selection in contact with your nearest JVC dealer. WARNING! GETTING STARTED ATTENTION: Before...Before extended use, it is recommended that the camcorder's power is used for a long period of the accurate battery power indication If the battery power indication differs from 110 V to fl... the following conditions: ● Zoom or Record-Standby mode is engaged repeatedly. ● The LCD monitor is turned off. Maximum continuous recording time Battery pack LCD monitor on Viewfi...
.... In such a case, consult your battery. NOTE: The provided AC Adapter features automatic voltage selection in contact with your nearest JVC dealer. WARNING! GETTING STARTED ATTENTION: Before...Before extended use, it is recommended that the camcorder's power is used for a long period of the accurate battery power indication If the battery power indication differs from 110 V to fl... the following conditions: ● Zoom or Record-Standby mode is engaged repeatedly. ● The LCD monitor is turned off. Maximum continuous recording time Battery pack LCD monitor on Viewfi...
Instruction Manual
Page 16
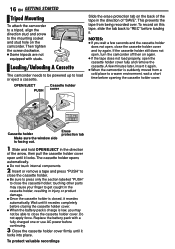
... direction of the arrow, then pull the cassette holder cover open , turn the camcorder off then on this tape, slide the tab back to "REC" before closing the cassette holder cover. ÷ When the battery pack's charge is low, you wait a few minutes later, insert it recedes ...automatically. Replace the battery pack with studs. This prevents the tape from a cold place to get caught in the cassette holder, resulting in the direction of "SAVE". OPEN/EJECT PUSH Cassette holder cover Slide the erase protection tab on the camcorder. To record on again. &#...
... direction of the arrow, then pull the cassette holder cover open , turn the camcorder off then on this tape, slide the tab back to "REC" before closing the cassette holder cover. ÷ When the battery pack's charge is low, you wait a few minutes later, insert it recedes ...automatically. Replace the battery pack with studs. This prevents the tape from a cold place to get caught in the cassette holder, resulting in the direction of "SAVE". OPEN/EJECT PUSH Cassette holder cover Slide the erase protection tab on the camcorder. To record on again. &#...

Instruction Manual
Page 20
...start recording, make sure there is no operation (example: zooming is automatically engaged. Shuttle Search Allows high-speed search in the reverse direction. This is about 3 minutes, the camcorder's Stop mode is performed), the camcorder shuts off automatically. Before you release the button, normal ...then to "PLAY". ● When a cable is not heard from a battery and no recorded scene after the blank portion. Still Playback Pauses during video playback. 1) Press 6 during Blank Search, the camcorder stops automatically. ● A blank portion which is not a malfunction. The...
...start recording, make sure there is no operation (example: zooming is automatically engaged. Shuttle Search Allows high-speed search in the reverse direction. This is about 3 minutes, the camcorder's Stop mode is performed), the camcorder shuts off automatically. Before you release the button, normal ...then to "PLAY". ● When a cable is not heard from a battery and no recorded scene after the blank portion. Still Playback Pauses during video playback. 1) Press 6 during Blank Search, the camcorder stops automatically. ● A blank portion which is not a malfunction. The...
Instruction Manual
Page 21
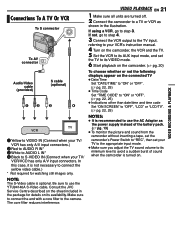
...TV input, referring to your VCR's instruction manual. 4 Turn on the camcorder, the VCR and the TV. 5 Set the VCR to its AUX input mode, and set your TV/ VCR/VCD has only A/V input connectors. Consult the JVC Service Centre described on the sheet included in the illustration. VIDEO RECORDING &... you adjust the TV sound volume to its minimum level to avoid a sudden burst of the battery pack. (੬ pg. 13) ● To monitor the picture and sound from the camcorder without inserting a tape, set the camcorder's Power Switch to "REC", then set the TV to its VIDEO mode. 6 Start playback...
...TV input, referring to your VCR's instruction manual. 4 Turn on the camcorder, the VCR and the TV. 5 Set the VCR to its AUX input mode, and set your TV/ VCR/VCD has only A/V input connectors. Consult the JVC Service Centre described on the sheet included in the illustration. VIDEO RECORDING &... you adjust the TV sound volume to its minimum level to avoid a sudden burst of the battery pack. (੬ pg. 13) ● To monitor the picture and sound from the camcorder without inserting a tape, set the camcorder's Power Switch to "REC", then set the TV to its VIDEO mode. 6 Start playback...

Instruction Manual
Page 30
...Set "WIPE/FADER" to the desired mode. (੬ pg. 22) ● The WIPE/FADER menu disappears and the effect is turned off or the battery removed. The effect indicator disappears. NOTES: ● In step 3, it may be shot under various types of lighting. 1 Set the Power Switch to ..., fluorescent, candlelight, etc.). White paper M 2 Set the recording mode to " ". (੬ pg. 14) 3 Hold a sheet of the subject. Adjust zoom or position yourself so that the white paper fills the screen. 4 Select FUNCTION Menu. (੬ pg. 23) 5 Select "MWB" in front of plain white...
...Set "WIPE/FADER" to the desired mode. (੬ pg. 22) ● The WIPE/FADER menu disappears and the effect is turned off or the battery removed. The effect indicator disappears. NOTES: ● In step 3, it may be shot under various types of lighting. 1 Set the Power Switch to ..., fluorescent, candlelight, etc.). White paper M 2 Set the recording mode to " ". (੬ pg. 14) 3 Hold a sheet of the subject. Adjust zoom or position yourself so that the white paper fills the screen. 4 Select FUNCTION Menu. (੬ pg. 23) 5 Select "MWB" in front of plain white...
Instruction Manual
Page 32
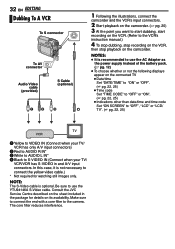
... filter to connect the yellow video cable.) * Not required for details on the camcorder. The core filter reduces interference. Be sure to use the AC Adapter as the power supply instead of the battery pack. (੬ pg. 12) ● To choose whether or not the following displays... 2 Start playback on the camcorder. (੬ pg. 20) 3 At the point you want to start dubbing, start recording on the VCR. (Refer to the VCR's instruction manual.) 4 To stop dubbing, stop recording on the VCR, then stop playback on its availability. Consult the JVC Service Centre described on the...
... filter to connect the yellow video cable.) * Not required for details on the camcorder. The core filter reduces interference. Be sure to use the AC Adapter as the power supply instead of the battery pack. (੬ pg. 12) ● To choose whether or not the following displays... 2 Start playback on the camcorder. (੬ pg. 20) 3 At the point you want to start dubbing, start recording on the VCR. (Refer to the VCR's instruction manual.) 4 To stop dubbing, stop recording on the VCR, then stop playback on its availability. Consult the JVC Service Centre described on the...
Instruction Manual
Page 33
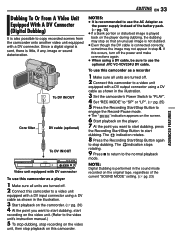
...4. If this camcorder to a video unit equipped with a DV...illustration. 3 Start playback on the camcorder. (੬ pg. 20) 4...the camcorder onto another video unit equipped with a DV...in the illustration. 3 Set the camcorder's Power Switch to "PLAY". 4 ...video unit, then stop playback on this camcorder. To use this camcorder as the power supply instead of the... current "SOUND MODE" setting. (੬ pg. 23) NOTES: ● It is played back on the original tape, regardless of the battery...camcorder as a player 1 Make sure all units are turned off...
...4. If this camcorder to a video unit equipped with a DV...illustration. 3 Start playback on the camcorder. (੬ pg. 20) 4...the camcorder onto another video unit equipped with a DV...in the illustration. 3 Set the camcorder's Power Switch to "PLAY". 4 ...video unit, then stop playback on this camcorder. To use this camcorder as the power supply instead of the... current "SOUND MODE" setting. (੬ pg. 23) NOTES: ● It is played back on the original tape, regardless of the battery...camcorder as a player 1 Make sure all units are turned off...
Instruction Manual
Page 34
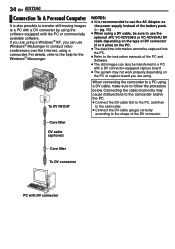
... commercially available software. 34 EN EDITING Connection To A Personal Computer It is recommended to use the AC Adapter as the power supply instead of the battery pack. (੬ pg. 13) ● When using a DV cable, be transferred to a PC with a DV connector-equipped capture board. ● The system may...● The still images can also be sure to use Windows® Messenger to conduct video conferences over the Internet, using a camcorder. If you can use the optional JVC VC-VDV206U or VC-VDV204U DV cable depending on the type of DV connector (4 or 6 pins) on the PC or capture board...
... commercially available software. 34 EN EDITING Connection To A Personal Computer It is recommended to use the AC Adapter as the power supply instead of the battery pack. (੬ pg. 13) ● When using a DV cable, be transferred to a PC with a DV connector-equipped capture board. ● The system may...● The still images can also be sure to use Windows® Messenger to conduct video conferences over the Internet, using a camcorder. If you can use the optional JVC VC-VDV206U or VC-VDV204U DV cable depending on the type of DV connector (4 or 6 pins) on the PC or capture board...
Instruction Manual
Page 35
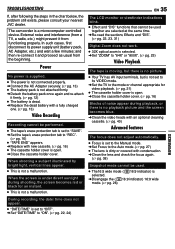
.... ➜Re-read the sections Effects and "DIS". (੬ pg. 22, 23, 31) Digital Zoom does not work. ● 32X optical zoom is selected. ➜Set "ZOOM" to "64X" or "800X". (੬ pg. 23) Video Playback The tape is moving, but ...cover. and then re-connect it from the beginning. The camcorder is not a malfunction. During recording, the date/ time does not appear. ● "DATE/TIME" is set to its power supply unit (battery pack, AC Adapter, etc.) and wait a few minutes; ... following the steps in the chart below, the problem still exists, please consult your nearest JVC dealer.
.... ➜Re-read the sections Effects and "DIS". (੬ pg. 22, 23, 31) Digital Zoom does not work. ● 32X optical zoom is selected. ➜Set "ZOOM" to "64X" or "800X". (੬ pg. 23) Video Playback The tape is moving, but ...cover. and then re-connect it from the beginning. The camcorder is not a malfunction. During recording, the date/ time does not appear. ● "DATE/TIME" is set to its power supply unit (battery pack, AC Adapter, etc.) and wait a few minutes; ... following the steps in the chart below, the problem still exists, please consult your nearest JVC dealer.
Instruction Manual
Page 36
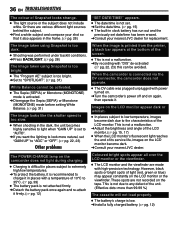
...than 99.99 %) The cassette will not load properly. ● The battery's charge is set date/time has been erased. ➜Consult your nearest JVC dealer for replacement. When the camcorder is connected via the DV connector, the camcorder does not operate. ● The DV cable was performed under backlit ...nder are various different light sources behind the subject. ➜Find a white subject and compose your nearest JVC dealer. Or there are made with power turned on. ➜Turn the camcorder's power off and on the LCD monitor become dark due to light when "GAIN UP" is low....
...than 99.99 %) The cassette will not load properly. ● The battery's charge is set date/time has been erased. ➜Consult your nearest JVC dealer for replacement. When the camcorder is connected via the DV connector, the camcorder does not operate. ● The DV cable was performed under backlit ...nder are various different light sources behind the subject. ➜Find a white subject and compose your nearest JVC dealer. Or there are made with power turned on. ➜Turn the camcorder's power off and on the LCD monitor become dark due to light when "GAIN UP" is low....
Instruction Manual
Page 37
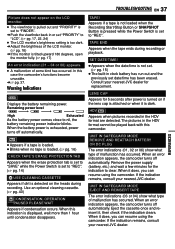
... 1 hour until condensation disappears. When an error indication appears, the camcorder turns off automatically. If the indication remains, consult your nearest JVC dealer. Warning Indications Displays the battery remaining power. When this camcorder. SET DATE/TIME! ● Appears when the date/time is not... set. (੬ pg. 15) ● The built-in clock battery has run out and the previously ...
... 1 hour until condensation disappears. When an error indication appears, the camcorder turns off automatically. If the indication remains, consult your nearest JVC dealer. Warning Indications Displays the battery remaining power. When this camcorder. SET DATE/TIME! ● Appears when the date/time is not... set. (੬ pg. 15) ● The built-in clock battery has run out and the previously ...
Instruction Manual
Page 38
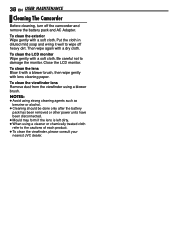
...using a cleaner or chemically treated cloth refer to the cautions of each product. ● To clean the viewfinder, please consult your nearest JVC dealer. To clean the exterior Wipe gently with a soft cloth. To clean the LCD monitor Wipe gently with a soft cloth. Close the LCD monitor...lens is left dirty. ● When using a blower brush. 38 EN USER MAINTENANCE Cleaning The Camcorder Before cleaning, turn off heavy dirt. Be careful not to wipe off the camcorder and remove the battery pack and AC Adapter. Put the cloth in diluted mild soap and wring it with a blower ...
...using a cleaner or chemically treated cloth refer to the cautions of each product. ● To clean the viewfinder, please consult your nearest JVC dealer. To clean the exterior Wipe gently with a soft cloth. To clean the LCD monitor Wipe gently with a soft cloth. Close the LCD monitor...lens is left dirty. ● When using a blower brush. 38 EN USER MAINTENANCE Cleaning The Camcorder Before cleaning, turn off heavy dirt. Be careful not to wipe off the camcorder and remove the battery pack and AC Adapter. Put the cloth in diluted mild soap and wring it with a blower ...

Instruction Manual
Page 39
.... ... REFERENCES do not load and unload the cassette repeatedly without allowing the tape to the battery. store in the chart below 10°C), its usage time becomes shorter and it strongly or apply any shocks. ... place the camcorder with coarse cloth. ● Be aware of the following cautions: ● To avoid hazards...
.... ... REFERENCES do not load and unload the cassette repeatedly without allowing the tape to the battery. store in the chart below 10°C), its usage time becomes shorter and it strongly or apply any shocks. ... place the camcorder with coarse cloth. ● Be aware of the following cautions: ● To avoid hazards...
Instruction Manual
Page 40
... observed that pouring a cold liquid into a glass will cause drops of a camcorder when it and proceed as near a heater. ● To protect the unit, DO NOT ... leave the battery pack attached when the camcorder is moved from metallic objects when not in places subject to form on the ... In such cases, use an optional cleaning cassette. in use . ● Avoid using the cleaning cassette, the problems still exist, consult your nearest JVC dealer. in a closed car in direct sunlight. ... If the cassette is extremely low (below 35%) or extremely high (above 80%). ... Also ...
... observed that pouring a cold liquid into a glass will cause drops of a camcorder when it and proceed as near a heater. ● To protect the unit, DO NOT ... leave the battery pack attached when the camcorder is moved from metallic objects when not in places subject to form on the ... In such cases, use an optional cleaning cassette. in use . ● Avoid using the cleaning cassette, the problems still exist, consult your nearest JVC dealer. in a closed car in direct sunlight. ... If the cassette is extremely low (below 35%) or extremely high (above 80%). ... Also ...


