Instruction Manual
Page 2
... digital video cassette. Any commercial use without proper permission is working or not. in a closed car in place of over 50°C. - Video heads can cause damage to the internal charging circuitry. ● Make sure you haven't used your cassette tapes and camcorder are stored in a dusty area. Cassette tapes should be used in cassette cases. Use the JVC BNVF707U/VF714/VF733U battery packs. 2 EN READ THIS FIRST! ● Before recording important video...
... digital video cassette. Any commercial use without proper permission is working or not. in a closed car in place of over 50°C. - Video heads can cause damage to the internal charging circuitry. ● Make sure you haven't used your cassette tapes and camcorder are stored in a dusty area. Cassette tapes should be used in cassette cases. Use the JVC BNVF707U/VF714/VF733U battery packs. 2 EN READ THIS FIRST! ● Before recording important video...
Instruction Manual
Page 7
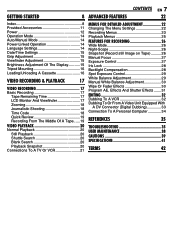
... Accessories 11 Power 12 Operation Mode 14 Auto/Manual Mode 14 Power-Linked Operation 14 Language Settings 14 Date/Time Settings 15 Grip Adjustment 15 Viewfinder Adjustment 15 Brightness Adjustment Of The Display........... 15 Tripod Mounting 16 Loading/Unloading A Cassette 16 VIDEO RECORDING & PLAYBACK 17 VIDEO RECORDING 17 Basic Recording 17 Tape Remaining Time 17 LCD Monitor And Viewfinder 17 Zooming 18 Journalistic Shooting 18 Time Code 18 Quick Review 19 Recording From The Middle Of A Tape...... 19 VIDEO PLAYBACK 20 Normal Playback 20 Still Playback 20 Shuttle...
... Accessories 11 Power 12 Operation Mode 14 Auto/Manual Mode 14 Power-Linked Operation 14 Language Settings 14 Date/Time Settings 15 Grip Adjustment 15 Viewfinder Adjustment 15 Brightness Adjustment Of The Display........... 15 Tripod Mounting 16 Loading/Unloading A Cassette 16 VIDEO RECORDING & PLAYBACK 17 VIDEO RECORDING 17 Basic Recording 17 Tape Remaining Time 17 LCD Monitor And Viewfinder 17 Zooming 18 Journalistic Shooting 18 Time Code 18 Quick Review 19 Recording From The Middle Of A Tape...... 19 VIDEO PLAYBACK 20 Normal Playback 20 Still Playback 20 Shuttle...
Instruction Manual
Page 9
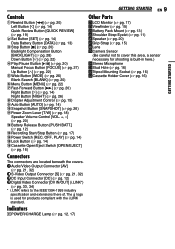
... Adjustment Control (੬ pg. 15) 9Auto Button [AUTO] (੬ pg. 14) !Snapshot Button [SNAPSHOT] (੬ pg. 26) "Power Zoom Lever [T/W] (੬ pg. 18) Speaker Volume Control [VOL. +, -] (੬ pg. 20) #Battery Release Button [PUSH BATT.] (੬ pg. 12) $Recording Start/Stop Button (੬ pg. 17) %Power Switch [REC, OFF, PLAY] (੬ pg. 14) &Lock Button (੬ pg. 14) (Cassette Open/Eject Switch [OPEN/EJECT] (੬ pg. 16) Connectors The connectors are located beneath the covers. )Audio/Video Output...
... Adjustment Control (੬ pg. 15) 9Auto Button [AUTO] (੬ pg. 14) !Snapshot Button [SNAPSHOT] (੬ pg. 26) "Power Zoom Lever [T/W] (੬ pg. 18) Speaker Volume Control [VOL. +, -] (੬ pg. 20) #Battery Release Button [PUSH BATT.] (੬ pg. 12) $Recording Start/Stop Button (੬ pg. 17) %Power Switch [REC, OFF, PLAY] (੬ pg. 14) &Lock Button (੬ pg. 14) (Cassette Open/Eject Switch [OPEN/EJECT] (੬ pg. 16) Connectors The connectors are located beneath the covers. )Audio/Video Output...
Instruction Manual
Page 13
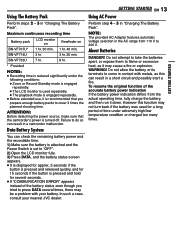
... the battery is attached and the Power Switch is set to "OFF". 2) Open the LCD monitor fully. 3) Press DATA, and the battery status screen appears. ● It is displayed for approx. 5 seconds if the button is pressed and released quickly, and for 15 seconds if the button is pressed and hold for a long period of time under the following conditions: ● Zoom or Record-Standby mode is...
... the battery is attached and the Power Switch is set to "OFF". 2) Open the LCD monitor fully. 3) Press DATA, and the battery status screen appears. ● It is displayed for approx. 5 seconds if the button is pressed and released quickly, and for 15 seconds if the button is pressed and hold for a long period of time under the following conditions: ● Zoom or Record-Standby mode is...

Instruction Manual
Page 14
... playback functions using the Menus. (੬ pg. 22) OFF: Allows you to set various recording functions using the Menus. (੬ pg. 22) Auto/Manual Mode Press AUTO button repeatedly to switch to auto/ M manual recording mode. A Auto Mode: You can record using the Power Switch. The language on the display can also turn on the camcorder, set the Power Switch to any operation mode except "OFF" while pressing down the Lock Button located on the switch. 2 Open the LCD monitor BR I GHT CL OCK AD J . The Menu Screen...
... playback functions using the Menus. (੬ pg. 22) OFF: Allows you to set various recording functions using the Menus. (੬ pg. 22) Auto/Manual Mode Press AUTO button repeatedly to switch to auto/ M manual recording mode. A Auto Mode: You can record using the Power Switch. The language on the display can also turn on the camcorder, set the Power Switch to any operation mode except "OFF" while pressing down the Lock Button located on the switch. 2 Open the LCD monitor BR I GHT CL OCK AD J . The Menu Screen...

Instruction Manual
Page 15
... and adjust it manually for best viewability. 3 Turn the Diopter Adjustment Control until the indications in Playback mode, BRIGHT -1 please proceed to Step 5. 4 Press 3 or 4 to easily operate the Recording Start/Stop Button, Power Switch and Power Zoom Lever. Select from "24h" or "12h". 5 Set the year, month, day, hour and minute. Repeat this step until the appropriate brightness is recorded onto the tape at all the settings. The Menu Screen...
... and adjust it manually for best viewability. 3 Turn the Diopter Adjustment Control until the indications in Playback mode, BRIGHT -1 please proceed to Step 5. 4 Press 3 or 4 to easily operate the Recording Start/Stop Button, Power Switch and Power Zoom Lever. Select from "24h" or "12h". 5 Set the year, month, day, hour and minute. Repeat this step until the appropriate brightness is recorded onto the tape at all the settings. The Menu Screen...

Instruction Manual
Page 17
... simultaneously on the switch. ● The POWER/CHARGE lamp lights and the camcorder enters the Record-Standby mode. Set "PRIORITY" to use. VIDEO RECORDING EN 17 Tape Remaining Time Approximate tape remaining time appears on the tape, the time code is in LP (Long Play) mode, ੬ pg. 23. 4 To start recording, press the Recording Start/ Stop Button. To turn the melody sounds off automatically. "---min" means the camcorder is left between recorded scenes on the display. It can...
... simultaneously on the switch. ● The POWER/CHARGE lamp lights and the camcorder enters the Record-Standby mode. Set "PRIORITY" to use. VIDEO RECORDING EN 17 Tape Remaining Time Approximate tape remaining time appears on the tape, the time code is in LP (Long Play) mode, ੬ pg. 23. 4 To start recording, press the Recording Start/ Stop Button. To turn the melody sounds off automatically. "---min" means the camcorder is left between recorded scenes on the display. It can...
Instruction Manual
Page 18
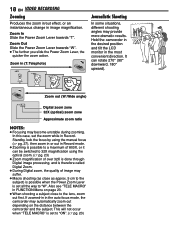
... the Power Zoom Lever is set to the lens, zoom out first. 18 EN VIDEO RECORDING Zooming Produces the zoom in/out effect, or an instantaneous change in (T: Telephoto) 1x 10x 20x 40x Journalistic Shooting In some situations, different shooting angles may provide more dramatic results. Zoom in image magnification. Zoom out (W: Wide angle) 10 x Digital zoom zone 32X (optical) zoom zone Approximate zoom ratio NOTES: ● Focusing may...
... the Power Zoom Lever is set to the lens, zoom out first. 18 EN VIDEO RECORDING Zooming Produces the zoom in/out effect, or an instantaneous change in (T: Telephoto) 1x 10x 20x 40x Journalistic Shooting In some situations, different shooting angles may provide more dramatic results. Zoom in image magnification. Zoom out (W: Wide angle) 10 x Digital zoom zone 32X (optical) zoom zone Approximate zoom ratio NOTES: ● Focusing may...

Instruction Manual
Page 20
... playback, press and hold the button. Lock Button Speaker MENU 7 1 Load a cassette. (੬ pg. 16) 2 Set the Power Switch to the AV connector, the sound is performed), the camcorder shuts off automatically. This is automatically engaged. Shuttle Search Allows high-speed search in the reverse direction. 20 EN VIDEO PLAYBACK Normal Playback ¡ 6 1 VOL. +/- To control the speaker volume Slide the Power Zoom Lever (VOL. +/-) towards "+" to turn up the volume...
... playback, press and hold the button. Lock Button Speaker MENU 7 1 Load a cassette. (੬ pg. 16) 2 Set the Power Switch to the AV connector, the sound is performed), the camcorder shuts off automatically. This is automatically engaged. Shuttle Search Allows high-speed search in the reverse direction. 20 EN VIDEO PLAYBACK Normal Playback ¡ 6 1 VOL. +/- To control the speaker volume Slide the Power Zoom Lever (VOL. +/-) towards "+" to turn up the volume...
Instruction Manual
Page 21
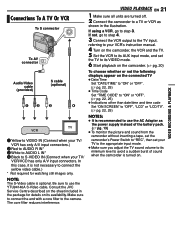
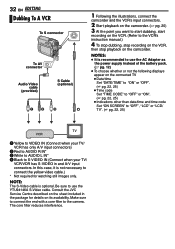
... 4. 3 Connect the VCR output to the TV input, referring to your VCR's instruction manual. 4 Turn on the camcorder, the VCR and the TV. 5 Set the VCR to use the YTU94146A S-Video cable. VIDEO PLAYBACK EN 21 1 Make sure all units are turned off. 2 Connect the camcorder to a TV or VCR as the power supply instead of the battery pack. (੬ pg. 13) ● To monitor the picture and sound from the camcorder without inserting a tape, set the camcorder's Power Switch to "REC...
... 4. 3 Connect the VCR output to the TV input, referring to your VCR's instruction manual. 4 Turn on the camcorder, the VCR and the TV. 5 Set the VCR to use the YTU94146A S-Video cable. VIDEO PLAYBACK EN 21 1 Make sure all units are turned off. 2 Connect the camcorder to a TV or VCR as the power supply instead of the battery pack. (੬ pg. 13) ● To monitor the picture and sound from the camcorder without inserting a tape, set the camcorder's Power Switch to "REC...

Instruction Manual
Page 22
... more detailed camcorder settings. (੬ pg. 22 - 25) Lock Button SET MENU 1 For Video Recording Menus: ● Set the Power Switch to "REC" while pressing M down the Lock Button located on the switch. ● Set the recording mode to " ". (੬ pg. 14) For Video Playback Menus: Set the Power Switch to "PLAY" while pressing down the Lock Button located on the selected function. The Menu Screen closes. The Menu Screen closes. 5 Setting procedure hereafter depends on the switch. 2 Open the LCD monitor...
... more detailed camcorder settings. (੬ pg. 22 - 25) Lock Button SET MENU 1 For Video Recording Menus: ● Set the Power Switch to "REC" while pressing M down the Lock Button located on the switch. ● Set the recording mode to " ". (੬ pg. 14) For Video Playback Menus: Set the Power Switch to "PLAY" while pressing down the Lock Button located on the selected function. The Menu Screen closes. The Menu Screen closes. 5 Setting procedure hereafter depends on the switch. 2 Open the LCD monitor...
Instruction Manual
Page 23
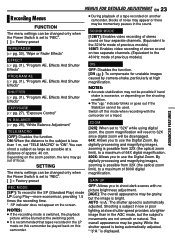
... Power Switch is possible from 32X (the optical zoom limit), to a maximum of 64X digital magnification. 800X: Allows you to "REC". [ ] = Factory-preset REC MODE [SP*]: To record in the sound. ZOOM [32X]: When set "TELE MACRO" to shoot dark scenes with the camcorder on the screen. GAIN UP OFF: Allows you to "ON". Shooting a subject in low or poor lighting at slow shutter speed provides a brighter image than 1 m, set to "32X" while using digital zoom, the zoom...
... Power Switch is possible from 32X (the optical zoom limit), to a maximum of 64X digital magnification. 800X: Allows you to "REC". [ ] = Factory-preset REC MODE [SP*]: To record in the sound. ZOOM [32X]: When set "TELE MACRO" to shoot dark scenes with the camcorder on the screen. GAIN UP OFF: Allows you to "ON". Shooting a subject in low or poor lighting at slow shutter speed provides a brighter image than 1 m, set to "32X" while using digital zoom, the zoom...
Instruction Manual
Page 25
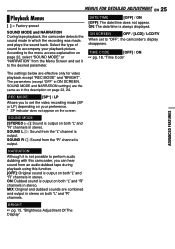
...; pg. 15, "Brightness Adjustment Of The Display" According to perform audio dubbing with this function. [OFF]: Original sound is output. DATE/TIME [OFF] / ON [OFF]: The date/time does not appear. ON: Dubbed sound is output on both "L" and "R" channels in which the recording was made, and plays the sound back. ON SCREEN OFF / [LCD] / LCD/TV When set the video recording mode (SP or LP) depending on your playback picture. REC MODE [SP*] / LP Allows...
...; pg. 15, "Brightness Adjustment Of The Display" According to perform audio dubbing with this function. [OFF]: Original sound is output. DATE/TIME [OFF] / ON [OFF]: The date/time does not appear. ON: Dubbed sound is output on both "L" and "R" channels in which the recording was made, and plays the sound back. ON SCREEN OFF / [LCD] / LCD/TV When set the video recording mode (SP or LP) depending on your playback picture. REC MODE [SP*] / LP Allows...
Instruction Manual
Page 27
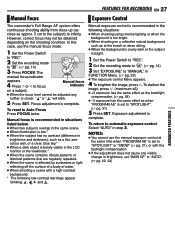
... exposure control Menu appears. 4 To brighten the image, press 3. To reset to " ". (੬ pg. 14) 3 Press FOCUS. NOTES: ● You cannot use the manual focus mode. 1 Set the Power Switch to "REC". M 2 Set the recording mode to Auto Focus Press FOCUS twice. FEATURES FOR RECORDING EN 27 Manual Focus Exposure Control The camcorder's Full Range AF system offers continuous shooting ability from close-up (as close as approx. 5 cm to the subject) to in the LCD...
... exposure control Menu appears. 4 To brighten the image, press 3. To reset to " ". (੬ pg. 14) 3 Press FOCUS. NOTES: ● You cannot use the manual focus mode. 1 Set the Power Switch to "REC". M 2 Set the recording mode to Auto Focus Press FOCUS twice. FEATURES FOR RECORDING EN 27 Manual Focus Exposure Control The camcorder's Full Range AF system offers continuous shooting ability from close-up (as close as approx. 5 cm to the subject) to in the LCD...
Instruction Manual
Page 32
...; Indications other than date/time and time code Set "ON SCREEN" to "OFF", "LCD" or "LCD/ TV". (☞ pg. 22, 25) TV VCR 1Yellow to VIDEO IN (Connect when your TV/ VCR has only A/V input connectors) 2Red to AUDIO R IN* 3White to AUDIO L IN* 4Black to S-VIDEO IN (Connect when your TV/ VCR/VDR has S-VIDEO in the package for watching still images only. Consult the JVC Service Centre described on the...
...; Indications other than date/time and time code Set "ON SCREEN" to "OFF", "LCD" or "LCD/ TV". (☞ pg. 22, 25) TV VCR 1Yellow to VIDEO IN (Connect when your TV/ VCR has only A/V input connectors) 2Red to AUDIO R IN* 3White to AUDIO L IN* 4Black to S-VIDEO IN (Connect when your TV/ VCR/VDR has S-VIDEO in the package for watching still images only. Consult the JVC Service Centre described on the...
Instruction Manual
Page 35
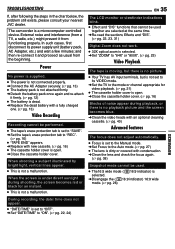
...; 32X optical zoom is selected. ➜Set "ZOOM" to "64X" or "800X". (੬ pg. 23) Video Playback The tape is moving, but there is no playback picture and the screen becomes blue. ➜Clean the video heads with an optional cleaning cassette. (੬ pg. 40) Advanced features The focus does not adjust automatically. ● Focus is set to "SAVE". ➜Set the tape's erase protection tab to "REC". (੬ pg. 16) ● "TAPE END" appears. ➜Replace...
...; 32X optical zoom is selected. ➜Set "ZOOM" to "64X" or "800X". (੬ pg. 23) Video Playback The tape is moving, but there is no playback picture and the screen becomes blue. ➜Clean the video heads with an optional cleaning cassette. (੬ pg. 40) Advanced features The focus does not adjust automatically. ● Focus is set to "SAVE". ➜Set the tape's erase protection tab to "REC". (੬ pg. 16) ● "TAPE END" appears. ➜Replace...
Instruction Manual
Page 36
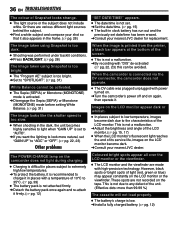
... Monotone (MONOTONE) mode before setting White Balance. (੬ pg. 31) The image looks like the shutter speed is too slow. ● When shooting in the dark, the unit becomes highly sensitive to light when "GAIN UP" is set to "AUTO". ➜If you want the lighting to look more than 99.99 %) The cassette will not load properly. ● The battery's charge is connected via the DV...
... Monotone (MONOTONE) mode before setting White Balance. (੬ pg. 31) The image looks like the shutter speed is too slow. ● When shooting in the dark, the unit becomes highly sensitive to light when "GAIN UP" is set to "AUTO". ➜If you want the lighting to look more than 99.99 %) The cassette will not load properly. ● The battery's charge is connected via the DV...
Instruction Manual
Page 37
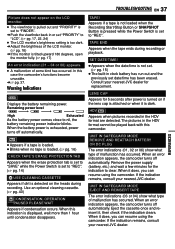
... type of some kind has occurred. When an error indication appears, the camcorder turns off automatically. ● Appears if a tape is loaded. ● Blinks when no tape is loaded. (੬ pg. 16) CHECK TAPE'S ERASE PROTECTION TAB Appears when the erase protection tab is set to "SAVE" while the Power Switch is set to "REC". (੬ pg. 14) USE CLEANING CASSETTE Appears if dirt is detected on the heads during recording or playback...
... type of some kind has occurred. When an error indication appears, the camcorder turns off automatically. ● Appears if a tape is loaded. ● Blinks when no tape is loaded. (੬ pg. 16) CHECK TAPE'S ERASE PROTECTION TAB Appears when the erase protection tab is set to "SAVE" while the Power Switch is set to "REC". (੬ pg. 14) USE CLEANING CASSETTE Appears if dirt is detected on the heads during recording or playback...
Instruction Manual
Page 41
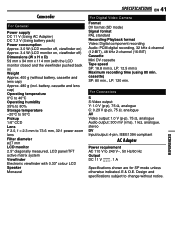
.... 3.4 W (LCD monitor on, viewfinder off) Dimensions (W x H x D) 59 mm x 94 mm x 114 mm (with 0.33" colour LCD Speaker Monaural SPECIFICATIONS EN 41 For Digital Video Camera Format DV format (SD mode) Signal format PAL standard Recording/Playback format Video: Digital component recording Audio: PCM digital recording, 32 kHz 4-channel (12-BIT), 48 kHz 2-channel (16-BIT) Cassette Mini DV cassette Tape speed SP: 18.8 mm/s, LP: 12.5 mm/s Maximum recording time (using 80 min. battery, cassette and lens cap) Operating temperature...
.... 3.4 W (LCD monitor on, viewfinder off) Dimensions (W x H x D) 59 mm x 94 mm x 114 mm (with 0.33" colour LCD Speaker Monaural SPECIFICATIONS EN 41 For Digital Video Camera Format DV format (SD mode) Signal format PAL standard Recording/Playback format Video: Digital component recording Audio: PCM digital recording, 32 kHz 4-channel (12-BIT), 48 kHz 2-channel (16-BIT) Cassette Mini DV cassette Tape speed SP: 18.8 mm/s, LP: 12.5 mm/s Maximum recording time (using 80 min. battery, cassette and lens cap) Operating temperature...

Instruction Manual
Page 42
... Date/Time Settings 15 Demonstration Mode 24 Digital Image Stabilization (DIS 23 Dubbing 32, 33 E Effect Mode 31 Exposure Control 29 I Iris Lock 28 L LCD Monitor and Viewfinder 17, 19 Loading A Cassette 16 M Manual Focus 27 Melody 24 Motor Drive Mode 26 N Night-Scope 26 P Playback Sound 25 Power-Linked Operation 12 Priority 24 Program AE 31 Q Quick Review 19 R Recording Capacity Tape 17 S Shutter Effects 31 Snapshot Mode 26 Sound Mode 23, 25 Speaker Volume 20 Specifications...
... Date/Time Settings 15 Demonstration Mode 24 Digital Image Stabilization (DIS 23 Dubbing 32, 33 E Effect Mode 31 Exposure Control 29 I Iris Lock 28 L LCD Monitor and Viewfinder 17, 19 Loading A Cassette 16 M Manual Focus 27 Melody 24 Motor Drive Mode 26 N Night-Scope 26 P Playback Sound 25 Power-Linked Operation 12 Priority 24 Program AE 31 Q Quick Review 19 R Recording Capacity Tape 17 S Shutter Effects 31 Snapshot Mode 26 Sound Mode 23, 25 Speaker Volume 20 Specifications...


