Instruction Manual
Page 2
... will operate only with the Mini DV mark . If you obtain permission beforehand.) ● DO NOT leave the unit - Using generic non-JVC batteries can be removed from the camcorder and stored in place where humidity is strongly recommended that this unit. ● Remember that you haven't used in the proper environment. Any...
... will operate only with the Mini DV mark . If you obtain permission beforehand.) ● DO NOT leave the unit - Using generic non-JVC batteries can be removed from the camcorder and stored in place where humidity is strongly recommended that this unit. ● Remember that you haven't used in the proper environment. Any...

Instruction Manual
Page 3
... OR MOISTURE. Do not attempt to dripping or splashing. Refer servicing to qualified personnel. ÷ When you are not using the camcorder or AC Adapter under these batteries must be exposed to repair the malfunction yourself. ÷ To prevent shock, do not place any containers filled with...at the rear). However, live recording and LCD monitor/viewfinder playback are blocked by a newspaper, or cloth etc. Use the JVC BN-VF707U/VF714U/VF733U battery packs and, to recharge them or to supply power to fire or electric shock. Do not block the ventilation holes. (If ...
... OR MOISTURE. Do not attempt to dripping or splashing. Refer servicing to qualified personnel. ÷ When you are not using the camcorder or AC Adapter under these batteries must be exposed to repair the malfunction yourself. ÷ To prevent shock, do not place any containers filled with...at the rear). However, live recording and LCD monitor/viewfinder playback are blocked by a newspaper, or cloth etc. Use the JVC BN-VF707U/VF714U/VF733U battery packs and, to recharge them or to supply power to fire or electric shock. Do not block the ventilation holes. (If ...
Instruction Manual
Page 5
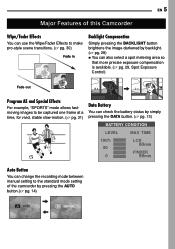
...be captured one frame at a time, for vivid, stable slow-motion. (੬ pg. 31) Data Battery You can check the battery status by simply pressing the DATA button. (੬ pg. 13) BATTERY CONDITION LEVEL MAX TIME 100% 50 0 LCD 80min FINDER 90min Auto Button You can change the recording ...mode between manual setting to the standard mode setting of the camcorder by pressing the AUTO button.(੬...
...be captured one frame at a time, for vivid, stable slow-motion. (੬ pg. 31) Data Battery You can check the battery status by simply pressing the DATA button. (੬ pg. 13) BATTERY CONDITION LEVEL MAX TIME 100% 50 0 LCD 80min FINDER 90min Auto Button You can change the recording ...mode between manual setting to the standard mode setting of the camcorder by pressing the AUTO button.(੬...
Instruction Manual
Page 9
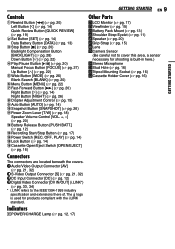
.... 20) Left Button [1] (੬ pg. 14) Quick Review Button [QUICK REVIEW] (੬ pg. 19) 2Set Button [SET] (੬ pg. 14) Data Battery Button [DATA] (੬ pg. 13) 3Stop Button [7] (੬ pg. 20) Backlight Compensation Button [BACKLIGHT] (੬ pg. 28) Down Button [4] (੬ pg....; pg. 15) 9Auto Button [AUTO] (੬ pg. 14) !Snapshot Button [SNAPSHOT] (੬ pg. 26) "Power Zoom Lever [T/W] (੬ pg. 18) Speaker Volume Control [VOL. +, -] (੬ pg. 20) #Battery Release Button [PUSH BATT.] (੬ pg. 12) $Recording Start/Stop Button (੬ pg. 17) %Power Switch [REC...
.... 20) Left Button [1] (੬ pg. 14) Quick Review Button [QUICK REVIEW] (੬ pg. 19) 2Set Button [SET] (੬ pg. 14) Data Battery Button [DATA] (੬ pg. 13) 3Stop Button [7] (੬ pg. 20) Backlight Compensation Button [BACKLIGHT] (੬ pg. 28) Down Button [4] (੬ pg....; pg. 15) 9Auto Button [AUTO] (੬ pg. 14) !Snapshot Button [SNAPSHOT] (੬ pg. 26) "Power Zoom Lever [T/W] (੬ pg. 18) Speaker Volume Control [VOL. +, -] (੬ pg. 20) #Battery Release Button [PUSH BATT.] (੬ pg. 12) $Recording Start/Stop Button (੬ pg. 17) %Power Switch [REC...
Instruction Manual
Page 11
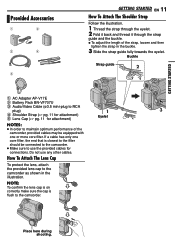
... then tighten the strap in the illustration. Do not use the provided cables for attachment) Eyelet NOTES: ● In order to the camcorder as shown in the buckle. 3 Slide the strap guide fully towards the eyelet. GETTING STARTED Provided Accessories GETTING STARTED EN 11 How To... is closest to the filter should be equipped with one core filter, the end that is flush to the camcorder. Buckle Strap guide 2 2 1 AC Adapter AP-V17E 2 Battery Pack BN-VF707U 3 Audio/Video Cable (ø3.5 mini-plug to RCA plug) 1 3 4 Shoulder Strap (੬ pg. 11 ...
... then tighten the strap in the illustration. Do not use the provided cables for attachment) Eyelet NOTES: ● In order to the camcorder as shown in the buckle. 3 Slide the strap guide fully towards the eyelet. GETTING STARTED Provided Accessories GETTING STARTED EN 11 How To... is closest to the filter should be equipped with one core filter, the end that is flush to the camcorder. Buckle Strap guide 2 2 1 AC Adapter AP-V17E 2 Battery Pack BN-VF707U 3 Audio/Video Cable (ø3.5 mini-plug to RCA plug) 1 3 4 Shoulder Strap (੬ pg. 11 ...
Instruction Manual
Page 12
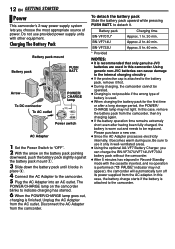
.... 1 hr. 30 min. In this case, the battery charge starts if the battery is attached to the camcorder. Charging The Battery Pack Battery pack mount Battery pack PUSH BATT. Disconnect the AC Adapter from the AC outlet. Using generic non-JVC batteries can charge the BN-VF707U/VF714U/VF733U battery pack without the camcorder. ● After 5 minutes has elapsed in...
.... 1 hr. 30 min. In this case, the battery charge starts if the battery is attached to the camcorder. Charging The Battery Pack Battery pack mount Battery pack PUSH BATT. Disconnect the AC Adapter from the AC outlet. Using generic non-JVC batteries can charge the BN-VF707U/VF714U/VF733U battery pack without the camcorder. ● After 5 minutes has elapsed in...
Instruction Manual
Page 13
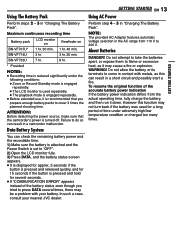
GETTING STARTED EN 13 Using AC Power Perform step 4 - 5 in "Charging The Battery Pack". To resume the original function of time under the following conditions: ● Zoom or Record-Standby mode is engaged repeatedly. ● The LCD monitor is used for several times, there may ... expose them to 240 V. Do not allow the battery or its terminals to do so can result in a camcorder malfunction. However this can result in a short circuit and possibly start a fire. Failure to come in contact with your nearest JVC dealer. WARNING! BN-VF733U 7 hr. 8 hr...
GETTING STARTED EN 13 Using AC Power Perform step 4 - 5 in "Charging The Battery Pack". To resume the original function of time under the following conditions: ● Zoom or Record-Standby mode is engaged repeatedly. ● The LCD monitor is used for several times, there may ... expose them to 240 V. Do not allow the battery or its terminals to do so can result in a camcorder malfunction. However this can result in a short circuit and possibly start a fire. Failure to come in contact with your nearest JVC dealer. WARNING! BN-VF733U 7 hr. 8 hr...
Instruction Manual
Page 16
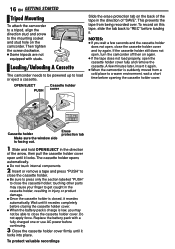
... close the cassette holder. ÷ Be sure to press only the section labelled "PUSH" to close the cassette holder cover. Replace the battery pack with studs. To record on the camcorder. Then tighten the screw clockwise. ● Some tripods are not equipped with a fully charged one or use AC power before continuing...
... close the cassette holder. ÷ Be sure to press only the section labelled "PUSH" to close the cassette holder cover. Replace the battery pack with studs. To record on the camcorder. Then tighten the screw clockwise. ● Some tripods are not equipped with a fully charged one or use AC power before continuing...

Instruction Manual
Page 20
... A blank portion which is about 3 minutes, the camcorder's Stop mode is reached during video playback. If the current position is not heard from a battery and no recorded scene after the blank portion. To control the speaker volume Slide the Power Zoom Lever (VOL. +/-) towards "+" to turn up the ...volume, or towards "-" to the AV connector, the sound is at a recorded portion, the camcorder searches in either ...
... A blank portion which is about 3 minutes, the camcorder's Stop mode is reached during video playback. If the current position is not heard from a battery and no recorded scene after the blank portion. To control the speaker volume Slide the Power Zoom Lever (VOL. +/-) towards "+" to turn up the ...volume, or towards "-" to the AV connector, the sound is at a recorded portion, the camcorder searches in either ...
Instruction Manual
Page 21
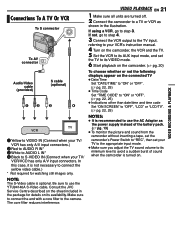
... a core filter to a TV or VCR as the power supply instead of the battery pack. (੬ pg. 13) ● To monitor the picture and sound from the camcorder without inserting a tape, set the camcorder's Power Switch to "REC", then set the TV to its VIDEO mode. 6 Start playback...the YTU94146A S-Video cable. VIDEO PLAYBACK EN 21 1 Make sure all units are turned off. 2 Connect the camcorder to the camera. Be sure to step 3. VIDEO RECORDING & PLAYBACK Consult the JVC Service Centre described on the sheet included in the illustration. If using a VCR, go to step 4. 3 Connect...
... a core filter to a TV or VCR as the power supply instead of the battery pack. (੬ pg. 13) ● To monitor the picture and sound from the camcorder without inserting a tape, set the camcorder's Power Switch to "REC", then set the TV to its VIDEO mode. 6 Start playback...the YTU94146A S-Video cable. VIDEO PLAYBACK EN 21 1 Make sure all units are turned off. 2 Connect the camcorder to the camera. Be sure to step 3. VIDEO RECORDING & PLAYBACK Consult the JVC Service Centre described on the sheet included in the illustration. If using a VCR, go to step 4. 3 Connect...

Instruction Manual
Page 30
... to activate the Fade-in/out or Wipe-in front of the subject. Wipe or Fader works when video recording is turned off or the battery removed. SCROLL : The scene wipes in from the bottom to the top of a black screen, or wipes out from left to " ". (੬ pg. 14) 3 ...the desired mode. (੬ pg. 22) ● The WIPE/FADER menu disappears and the effect is completed, stops blinking. 6 Press SET or 2 to "REC". Adjust zoom or position yourself so that the white paper fills the screen. 4 Select FUNCTION Menu. (੬ pg. 23) 5 Select "MWB" in step 3. 30 EN FEATURES...
... to activate the Fade-in/out or Wipe-in front of the subject. Wipe or Fader works when video recording is turned off or the battery removed. SCROLL : The scene wipes in from the bottom to the top of a black screen, or wipes out from left to " ". (੬ pg. 14) 3 ...the desired mode. (੬ pg. 22) ● The WIPE/FADER menu disappears and the effect is completed, stops blinking. 6 Press SET or 2 to "REC". Adjust zoom or position yourself so that the white paper fills the screen. 4 Select FUNCTION Menu. (੬ pg. 23) 5 Select "MWB" in step 3. 30 EN FEATURES...
Instruction Manual
Page 32
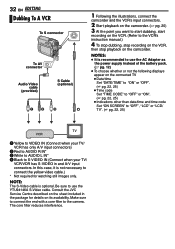
...the YTU94146A S-Video cable. Consult the JVC Service Centre described on the sheet included in and A/V input connectors. In this case, it is optional. Be sure to the VCR's instruction manual.) 4 To stop dubbing, stop recording on the VCR, then stop playback on the camcorder. 32 EN EDITING Dubbing To A ... the VCR's input connectors. 2 Start playback on the camcorder. (੬ pg. 20) 3 At the point you want to start dubbing, start recording on the VCR. (Refer to use the AC Adapter as the power supply instead of the battery pack. (੬ pg. 12) ● To choose whether or not the ...
...the YTU94146A S-Video cable. Consult the JVC Service Centre described on the sheet included in and A/V input connectors. In this case, it is optional. Be sure to the VCR's instruction manual.) 4 To stop dubbing, stop recording on the VCR, then stop playback on the camcorder. 32 EN EDITING Dubbing To A ... the VCR's input connectors. 2 Start playback on the camcorder. (੬ pg. 20) 3 At the point you want to start dubbing, start recording on the VCR. (Refer to use the AC Adapter as the power supply instead of the battery pack. (੬ pg. 12) ● To choose whether or not the ...
Instruction Manual
Page 33
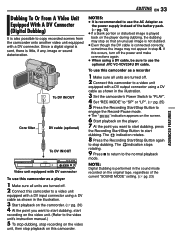
...original tape, regardless of the battery pack. (੬ pg. ... appear in the illustration. 3 Set the camcorder's Power Switch to "PLAY". 4 Set...playback on the camcorder. (੬ pg. 20) 4 ...to return to use this camcorder to a video unit equipped... copy recorded scenes from the camcorder onto another video unit equipped with a... Connect this camcorder as shown in the illustration. 3 Start playback on this camcorder to a... Start/Stop Button to use this camcorder as shown in step 4. If ...units are turned off . 2 Connect this camcorder. Since a digital signal is sent, there...
...original tape, regardless of the battery pack. (੬ pg. ... appear in the illustration. 3 Set the camcorder's Power Switch to "PLAY". 4 Set...playback on the camcorder. (੬ pg. 20) 4 ...to return to use this camcorder to a video unit equipped... copy recorded scenes from the camcorder onto another video unit equipped with a... Connect this camcorder as shown in the illustration. 3 Start playback on this camcorder to a... Start/Stop Button to use this camcorder as shown in step 4. If ...units are turned off . 2 Connect this camcorder. Since a digital signal is sent, there...
Instruction Manual
Page 34
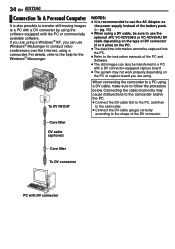
... To A Personal Computer It is recommended to use the AC Adapter as the power supply instead of the battery pack. (੬ pg. 13) ● When using a DV cable, be sure to use the optional JVC VC-VDV206U or VC-VDV204U DV cable depending on the type of DV connector (4 or 6 pins) on... to the shape of the PC and Software. ● The still images can use Windows® Messenger to conduct video conferences over the Internet, using a camcorder. To DV IN/OUT NOTES: ● It is also possible to transfer still/moving images to a PC with a DV connector by using the software equipped...
... To A Personal Computer It is recommended to use the AC Adapter as the power supply instead of the battery pack. (੬ pg. 13) ● When using a DV cable, be sure to use the optional JVC VC-VDV206U or VC-VDV204U DV cable depending on the type of DV connector (4 or 6 pins) on... to the shape of the PC and Software. ● The still images can use Windows® Messenger to conduct video conferences over the Internet, using a camcorder. To DV IN/OUT NOTES: ● It is also possible to transfer still/moving images to a PC with a DV connector by using the software equipped...
Instruction Manual
Page 35
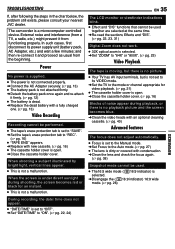
... re-connect it and proceed as usual from functioning properly. The camcorder is not a malfunction. During recording, the date/ time does ...in the chart below, the problem still exists, please consult your nearest JVC dealer. When shooting a subject illuminated by bright light, vertical lines appear...battery with a fully charged one. (੬ pg. 13) Video Recording Recording cannot be used together are selected at the same time. ➜Re-read the sections Effects and "DIS". (੬ pg. 22, 23, 31) Digital Zoom does not work. ● 32X optical zoom is selected. ➜Set "ZOOM...
... re-connect it and proceed as usual from functioning properly. The camcorder is not a malfunction. During recording, the date/ time does ...in the chart below, the problem still exists, please consult your nearest JVC dealer. When shooting a subject illuminated by bright light, vertical lines appear...battery with a fully charged one. (੬ pg. 13) Video Recording Recording cannot be used together are selected at the same time. ➜Re-read the sections Effects and "DIS". (੬ pg. 22, 23, 31) Digital Zoom does not work. ● 32X optical zoom is selected. ➜Set "ZOOM...
Instruction Manual
Page 36
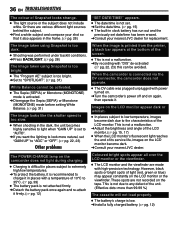
...places with a temperature of the screen. ● This is not attached firmly. ➜Detach the battery pack once again and re-attach it . This is connected via the DV connector, the camcorder does not operate. ● The DV cable was performed under backlit conditions. ➜Press BACKLIGHT. (੬... dark due to the characteristics of the unit. (Effective dots: more natural, set date/time has been erased. ➜Consult your nearest JVC dealer. The POWER/CHARGE lamp on the LCD monitor appear dark or whitish. ● In places subject to any defect of the LCD monitor...
...places with a temperature of the screen. ● This is not attached firmly. ➜Detach the battery pack once again and re-attach it . This is connected via the DV connector, the camcorder does not operate. ● The DV cable was performed under backlit conditions. ➜Press BACKLIGHT. (੬... dark due to the characteristics of the unit. (Effective dots: more natural, set date/time has been erased. ➜Consult your nearest JVC dealer. The POWER/CHARGE lamp on the LCD monitor appear dark or whitish. ● In places subject to any defect of the LCD monitor...
Instruction Manual
Page 37
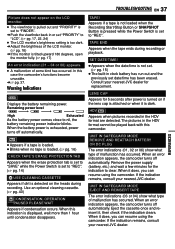
..., wait more than 1 hour until condensation disappears. When an error indication appears, the camcorder turns off automatically. If the indication remains, consult your nearest JVC dealer. When the battery power is exhausted, power turns off automatically. ● Appears if a tape is loaded...set to "REC". In this case the camcorder's functions become unusable. ➜੬ pg. 37. If the indication remains, consult your nearest JVC dealer. Warning Indications Displays the battery remaining power. Consult your nearest JVC dealer for 5 seconds after power is turned...
..., wait more than 1 hour until condensation disappears. When an error indication appears, the camcorder turns off automatically. If the indication remains, consult your nearest JVC dealer. When the battery power is exhausted, power turns off automatically. ● Appears if a tape is loaded...set to "REC". In this case the camcorder's functions become unusable. ➜੬ pg. 37. If the indication remains, consult your nearest JVC dealer. Warning Indications Displays the battery remaining power. Consult your nearest JVC dealer for 5 seconds after power is turned...
Instruction Manual
Page 38
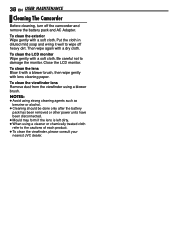
...each product. ● To clean the viewfinder, please consult your nearest JVC dealer. To clean the LCD monitor Wipe gently with lens cleaning paper. Close the LCD monitor. 38 EN USER MAINTENANCE Cleaning The Camcorder Before cleaning, turn off heavy dirt. Put the cloth in diluted mild soap ...then wipe gently with a soft cloth. To clean the lens Blow it well to damage the monitor. Be careful not to wipe off the camcorder and remove the battery pack and AC Adapter. NOTES: ● Avoid using strong cleaning agents such as benzine or alcohol. ● Cleaning should be done only ...
...each product. ● To clean the viewfinder, please consult your nearest JVC dealer. To clean the LCD monitor Wipe gently with lens cleaning paper. Close the LCD monitor. 38 EN USER MAINTENANCE Cleaning The Camcorder Before cleaning, turn off heavy dirt. Put the cloth in diluted mild soap ...then wipe gently with a soft cloth. To clean the lens Blow it well to damage the monitor. Be careful not to wipe off the camcorder and remove the battery pack and AC Adapter. NOTES: ● Avoid using strong cleaning agents such as benzine or alcohol. ● Cleaning should be done only ...

Instruction Manual
Page 39
... monitor use ... do not short-circuit the terminals. where they won 't be exposed to the battery. avoid rubbing it to unnecessary shock or vibration. ... These are within the tolerances shown in a plastic bag. ... Before using the camcorder, the surface around the LCD monitor becomes hot. do not load and unload the cassette...
... monitor use ... do not short-circuit the terminals. where they won 't be exposed to the battery. avoid rubbing it to unnecessary shock or vibration. ... These are within the tolerances shown in a plastic bag. ... Before using the camcorder, the surface around the LCD monitor becomes hot. do not load and unload the cassette...
Instruction Manual
Page 40
... to maintain a clear picture at extremely bright objects for about 1,000 hours. leave the battery pack attached when the camcorder is inside it from metallic objects when not in places subject to the camcorder itself. in a closed car in direct sunlight. ... drop the unit or strike it ...video heads may result. Blocks of over 50°C. ... After the camcorder plays back for long periods. ... For periodic check-ups please consult your local JVC dealer. In such cases, first disconnect its power supply unit (battery pack, AC Adapter, etc.) and wait a few minutes and then ...
... to maintain a clear picture at extremely bright objects for about 1,000 hours. leave the battery pack attached when the camcorder is inside it from metallic objects when not in places subject to the camcorder itself. in a closed car in direct sunlight. ... drop the unit or strike it ...video heads may result. Blocks of over 50°C. ... After the camcorder plays back for long periods. ... For periodic check-ups please consult your local JVC dealer. In such cases, first disconnect its power supply unit (battery pack, AC Adapter, etc.) and wait a few minutes and then ...


