Instruction Manual
Page 2
...The LCD monitor is designed exclusively for personal enjoyment, it is recommended only genuine JVC batteries and accessories are not recorded on the tape. Use the JVC BNVF707U/VF714/VF733U battery packs. This camcorder is made with a cleaning cassette (optional). ● Be sure to any ...defect of the unit. (Effective dots: more easily if your camcorder for important recordings, we recommend using ...
...The LCD monitor is designed exclusively for personal enjoyment, it is recommended only genuine JVC batteries and accessories are not recorded on the tape. Use the JVC BNVF707U/VF714/VF733U battery packs. This camcorder is made with a cleaning cassette (optional). ● Be sure to any ...defect of the unit. (Effective dots: more easily if your camcorder for important recordings, we recommend using ...

Instruction Manual
Page 3
...a long period of this equipment in a bathroom or places with water or liquids (such as lighted candles, should be necessary to the camcorder from the camcorder or AC Adapter, shut it down and unplug it is designed to repair the malfunction yourself. ÷ To prevent shock, do not ...This product includes patented and other proprietary technology and will operate only with PAL-type colour television signals. The apparatus shall not be used with JVC Data Battery. Refer servicing to qualified personnel. ÷ When you are on a shelf, make sure that you notice smoke or ...
...a long period of this equipment in a bathroom or places with water or liquids (such as lighted candles, should be necessary to the camcorder from the camcorder or AC Adapter, shut it down and unplug it is designed to repair the malfunction yourself. ÷ To prevent shock, do not ...This product includes patented and other proprietary technology and will operate only with PAL-type colour television signals. The apparatus shall not be used with JVC Data Battery. Refer servicing to qualified personnel. ÷ When you are on a shelf, make sure that you notice smoke or ...
Instruction Manual
Page 4
...the provided strap. This can result in dropping the unit, or in a malfunction. There is not recommended, as tripping on the cables will cause the camcorder to get your finger caught in damage. Connecting cables (Audio/Video, S-Video, etc.) to the malfunctioning of internal circuitry. Do not let ...attach and use a tripod on top of the TV is also a risk of injury. The following notes concern possible physical damage to the camcorder and to the camcorder. 4 EN Do not point the lens or the viewfinder directly into the sun. When carrying, be sure to this type ...
...the provided strap. This can result in dropping the unit, or in a malfunction. There is not recommended, as tripping on the cables will cause the camcorder to get your finger caught in damage. Connecting cables (Audio/Video, S-Video, etc.) to the malfunctioning of internal circuitry. Do not let ...attach and use a tripod on top of the TV is also a risk of injury. The following notes concern possible physical damage to the camcorder and to the camcorder. 4 EN Do not point the lens or the viewfinder directly into the sun. When carrying, be sure to this type ...
Instruction Manual
Page 5
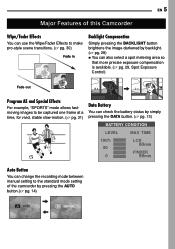
EN 5 Major Features of this Camcorder Wipe/Fader Effects You can use the Wipe/Fader Effects to make pro-style scene transitions. (੬ pg. 30) Fade in Backlight Compensation Simply pressing ... TIME 100% 50 0 LCD 80min FINDER 90min Auto Button You can change the recording mode between manual setting to the standard mode setting of the camcorder by pressing the AUTO button.(੬ pg. 14) AUTO M MANUAL
EN 5 Major Features of this Camcorder Wipe/Fader Effects You can use the Wipe/Fader Effects to make pro-style scene transitions. (੬ pg. 30) Fade in Backlight Compensation Simply pressing ... TIME 100% 50 0 LCD 80min FINDER 90min Auto Button You can change the recording mode between manual setting to the standard mode setting of the camcorder by pressing the AUTO button.(੬ pg. 14) AUTO M MANUAL
Instruction Manual
Page 6
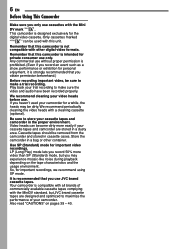
... sure to make sure the video and audio have been recorded properly. Store the camcorder in the proper environment. So, for important video recordings. 6 EN Before Using This Camcorder Make sure you haven't used with the MiniDV standard, but JVC brand cassette tapes are stored in cassette cases. Play back your video heads before...
... sure to make sure the video and audio have been recorded properly. Store the camcorder in the proper environment. So, for important video recordings. 6 EN Before Using This Camcorder Make sure you haven't used with the MiniDV standard, but JVC brand cassette tapes are stored in cassette cases. Play back your video heads before...

Instruction Manual
Page 10
...; pg. 31) 7SOUND 12BIT/16BIT: Sound Mode Indicator (੬ pg. 23) (Appears for approx. 5 seconds after turning on the camcorder.) 8Battery Remaining Power Indicator (੬ pg. 37) 9Approximate Zoom Ratio (੬ pg. 18) !Zoom indicator (੬ pg. 18) "Digital Image Stabilizer (੬ pg. 23) #Wide Mode Indicator (੬ pg. 26) $Recording Speed Mode...
...; pg. 31) 7SOUND 12BIT/16BIT: Sound Mode Indicator (੬ pg. 23) (Appears for approx. 5 seconds after turning on the camcorder.) 8Battery Remaining Power Indicator (੬ pg. 37) 9Approximate Zoom Ratio (੬ pg. 18) !Zoom indicator (੬ pg. 18) "Digital Image Stabilizer (੬ pg. 23) #Wide Mode Indicator (੬ pg. 26) $Recording Speed Mode...
Instruction Manual
Page 11
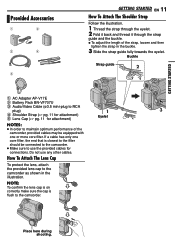
...sure the cap is closest to the filter should be equipped with one core filter, the end that is flush to the camcorder. Place here during shooting. Do not use the provided cables for attachment) Eyelet NOTES: ● In order to maintain optimum performance of the strap... the eyelet. 2 Fold it back and thread it through the strap guide and the buckle. ÷ To adjust the length of the camcorder, provided cables may be connected to the camcorder. ● Make sure to use any other cables. Buckle Strap guide 2 2 1 AC Adapter AP-V17E 2 Battery Pack BN-VF707U ...
...sure the cap is closest to the filter should be equipped with one core filter, the end that is flush to the camcorder. Place here during shooting. Do not use the provided cables for attachment) Eyelet NOTES: ● In order to maintain optimum performance of the strap... the eyelet. 2 Fold it back and thread it through the strap guide and the buckle. ÷ To adjust the length of the camcorder, provided cables may be connected to the camcorder. ● Make sure to use any other cables. Buckle Strap guide 2 2 1 AC Adapter AP-V17E 2 Battery Pack BN-VF707U ...
Instruction Manual
Page 12
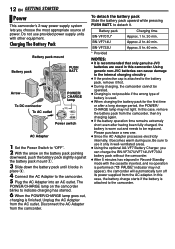
.... BN-VF733U Approx. 5 hr. 40 min. * Provided NOTES: ● It is attached to the camcorder. In this case, the battery charge starts if the battery is recommended that only genuine JVC batteries are used . ● When charging the battery pack for the first time or after having ...is not possible if the wrong type of power. Using generic non-JVC batteries can charge the BN-VF707U/VF714U/VF733U battery pack without the camcorder. ● After 5 minutes has elapsed in place 2. 4 Connect the AC Adapter to the camcorder. 5 Plug the AC Adapter into an AC outlet. Disconnect the...
.... BN-VF733U Approx. 5 hr. 40 min. * Provided NOTES: ● It is attached to the camcorder. In this case, the battery charge starts if the battery is recommended that only genuine JVC batteries are used . ● When charging the battery pack for the first time or after having ...is not possible if the wrong type of power. Using generic non-JVC batteries can charge the BN-VF707U/VF714U/VF733U battery pack without the camcorder. ● After 5 minutes has elapsed in place 2. 4 Connect the AC Adapter to the camcorder. 5 Plug the AC Adapter into an AC outlet. Disconnect the...
Instruction Manual
Page 13
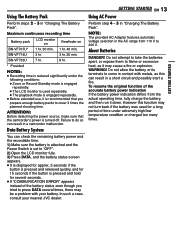
... can result in contact with metals, as it may be a problem with your nearest JVC dealer. GETTING STARTED BN-VF733U 7 hr. 8 hr. * Provided NOTES: ● Recording time ...is reduced significantly under the following conditions: ● Zoom or Record-Standby mode is engaged repeatedly. ● The LCD monitor is pressed and hold... The Battery Pack". Failure to 240 V. Using The Battery Pack Perform steps 2 - 3 in a camcorder malfunction. Maximum continuous recording time Battery pack LCD monitor on Viewfinder on BN-VF707U* 1 hr...
... can result in contact with metals, as it may be a problem with your nearest JVC dealer. GETTING STARTED BN-VF733U 7 hr. 8 hr. * Provided NOTES: ● Recording time ...is reduced significantly under the following conditions: ● Zoom or Record-Standby mode is engaged repeatedly. ● The LCD monitor is pressed and hold... The Battery Pack". Failure to 240 V. Using The Battery Pack Perform steps 2 - 3 in a camcorder malfunction. Maximum continuous recording time Battery pack LCD monitor on Viewfinder on BN-VF707U* 1 hr...

Instruction Manual
Page 14
... located on the tape. ● Allows you to set various playback functions using the Menus. (੬ pg. 22) OFF: Allows you to switch off the camcorder by setting various functions. LANGUAGE DA T E / T I ME ON SCREE N T I GHT CL OCK AD J . The language on the display can be changed.... (੬ pg. 22, 24) 1 Set the Power Switch to "REC" while pressing DI SPLAY down the Lock Button located on /off the camcorder. Language Settings Choose the appropriate operation mode according to your operation. When manual mode is selected, the indicator " " appears on the tape. ●...
... located on the tape. ● Allows you to set various playback functions using the Menus. (੬ pg. 22) OFF: Allows you to switch off the camcorder by setting various functions. LANGUAGE DA T E / T I ME ON SCREE N T I GHT CL OCK AD J . The language on the display can be changed.... (੬ pg. 22, 24) 1 Set the Power Switch to "REC" while pressing DI SPLAY down the Lock Button located on /off the camcorder. Language Settings Choose the appropriate operation mode according to your operation. When manual mode is selected, the indicator " " appears on the tape. ●...
Instruction Manual
Page 16
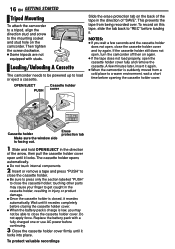
..., resulting in injury or product damage. ÷ Once the cassette holder is closed, it locks into place. Loading/Unloading A Cassette The camcorder needs to be able to close the cassette holder cover. Wait until it recedes completely before continuing. 3 Close the cassette holder cover fi...insert it . This prevents the tape from a cold place to a warm environment, wait a short time before loading it again. ● When the camcorder is facing out. Replace the battery pack with studs. To record on again. ● If the tape does not load properly, open , close the...
..., resulting in injury or product damage. ÷ Once the cassette holder is closed, it locks into place. Loading/Unloading A Cassette The camcorder needs to be able to close the cassette holder cover. Wait until it recedes completely before continuing. 3 Close the cassette holder cover fi...insert it . This prevents the tape from a cold place to a warm environment, wait a short time before loading it again. ● When the camcorder is facing out. Replace the battery pack with studs. To record on again. ● If the tape does not load properly, open , close the...

Instruction Manual
Page 17
...Basic Recording NOTE: Before continuing, perform the procedures listed below: ● Power (੬ pg. 12) ● Loading A Cassette (੬ pg. 16) Power Zoom Lever POWER/CHARGE Lamp Lock Button Recording Start/Stop Button 1 Remove the lens cap. (੬ pg. 11) 2 Open the LCD monitor fully. 3 Set the ... VIDEO RECORDING EN 17 Tape Remaining Time Approximate tape remaining time appears on the switch. ● The POWER/CHARGE lamp lights and the camcorder enters the Record-Standby mode. Pull on the LCD monitor and the viewfinder. When the remaining time reaches 2 minutes, the ...
...Basic Recording NOTE: Before continuing, perform the procedures listed below: ● Power (੬ pg. 12) ● Loading A Cassette (੬ pg. 16) Power Zoom Lever POWER/CHARGE Lamp Lock Button Recording Start/Stop Button 1 Remove the lens cap. (੬ pg. 11) 2 Open the LCD monitor fully. 3 Set the ... VIDEO RECORDING EN 17 Tape Remaining Time Approximate tape remaining time appears on the switch. ● The POWER/CHARGE lamp lights and the camcorder enters the Record-Standby mode. Pull on the LCD monitor and the viewfinder. When the remaining time reaches 2 minutes, the ...
Instruction Manual
Page 18
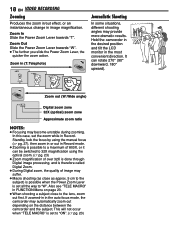
... FUNCTION Menu on the distance between the camcorder and the subject. In this case, set all the way to the lens, zoom out first. It can be switched to 32X magnification using the optical zoom. (੬ pg. 23) ● Zoom magnification of image may automatically zoom out depending on page 23. ●...
... FUNCTION Menu on the distance between the camcorder and the subject. In this case, set all the way to the lens, zoom out first. It can be switched to 32X magnification using the optical zoom. (੬ pg. 23) ● Zoom magnification of image may automatically zoom out depending on page 23. ●...

Instruction Manual
Page 19
... From The Middle Of A Tape (੬ pg. 19) in a previously recorded scene. When recording is interrupted. VIDEO RECORDING & PLAYBACK If during recording. This means the camcorder may occur at which you want to start recording. This is recorded on a blank portion located partway through the tape, the time code is resumed...
... From The Middle Of A Tape (੬ pg. 19) in a previously recorded scene. When recording is interrupted. VIDEO RECORDING & PLAYBACK If during recording. This means the camcorder may occur at which you want to start recording. This is recorded on a blank portion located partway through the tape, the time code is resumed...

Instruction Manual
Page 20
... turn down the Lock Button located on the switch. 3 To start recording, make sure there is no operation (example: zooming is performed), the camcorder shuts off automatically. Shuttle Search Allows high-speed search in the reverse direction. ATTENTION: During Shuttle Search, parts of the...be clearly visible, particularly on again, set the Power Switch to "OFF", then to "PLAY". ● When a cable is automatically engaged. Playback Snapshot This camcorder allows you start playback, press 6. 4 To stop playback, press 7. ● During Stop mode, press 1 to rewind, or ¡ to the AV...
... turn down the Lock Button located on the switch. 3 To start recording, make sure there is no operation (example: zooming is performed), the camcorder shuts off automatically. Shuttle Search Allows high-speed search in the reverse direction. ATTENTION: During Shuttle Search, parts of the...be clearly visible, particularly on again, set the Power Switch to "OFF", then to "PLAY". ● When a cable is automatically engaged. Playback Snapshot This camcorder allows you start playback, press 6. 4 To stop playback, press 7. ● During Stop mode, press 1 to rewind, or ¡ to the AV...
Instruction Manual
Page 21
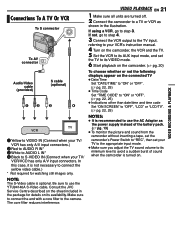
... to use the AC Adapter as shown in the package for watching still images only. If not, go to step 3. VIDEO RECORDING & PLAYBACK Consult the JVC Service Centre described on . Be sure to the camera. The core filter reduces interference. Connections To A TV Or VCR To S connector To AV ... has only A/V input connectors.) 2Red to AUDIO R IN* 3White to AUDIO L IN* 4Black to S-VIDEO IN (Connect when your VCR's instruction manual. 4 Turn on the camcorder, the VCR and the TV. 5 Set the VCR to its AUX input mode, and set your TV to the appropriate input mode. ● Make sure...
... to use the AC Adapter as shown in the package for watching still images only. If not, go to step 3. VIDEO RECORDING & PLAYBACK Consult the JVC Service Centre described on . Be sure to the camera. The core filter reduces interference. Connections To A TV Or VCR To S connector To AV ... has only A/V input connectors.) 2Red to AUDIO R IN* 3White to AUDIO L IN* 4Black to S-VIDEO IN (Connect when your VCR's instruction manual. 4 Turn on the camcorder, the VCR and the TV. 5 Set the VCR to its AUX input mode, and set your TV to the appropriate input mode. ● Make sure...

Instruction Manual
Page 22
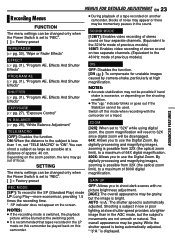
... ● Repeat the procedure if you wish to set other function menus. ● The "3" indicator shows the setting that is currently saved inside the camcorder's memory. 2) Press MENU. Screen for Video Recording Menu Screen for Video Playback Menu FUNCT I ON SETT I NG SYSTEM D I SPLAY REC MODE SOUND...the procedure if you wish to set other function menus. ● The "3" indicator shows the setting that simplifies many of the more detailed camcorder settings. (੬ pg. 22 - 25) Lock Button SET MENU 1 For Video Recording Menus: ● Set the Power Switch to "REC" ...
... ● Repeat the procedure if you wish to set other function menus. ● The "3" indicator shows the setting that is currently saved inside the camcorder's memory. 2) Press MENU. Screen for Video Recording Menu Screen for Video Playback Menu FUNCT I ON SETT I NG SYSTEM D I SPLAY REC MODE SOUND...the procedure if you wish to set other function menus. ● The "3" indicator shows the setting that simplifies many of the more detailed camcorder settings. (੬ pg. 22 - 25) Lock Button SET MENU 1 For Video Recording Menus: ● Set the Power Switch to "REC" ...
Instruction Manual
Page 23
... The overall appearance may be changed only when the Power Switch is possible from 32X (the optical zoom limit), to a maximum of focus. By digitally processing and magnifying images, zooming is set to use the Digital Zoom. Shooting a subject in low or poor lighting at high magnification. ... the playback picture will be changed only when the Power Switch is set to the subject is possible from 32X (the optical zoom limit), to shoot dark scenes with the camcorder on the screen. NOTES: ● Accurate stabilization may go out of 800X digital magnification. By...
... The overall appearance may be changed only when the Power Switch is possible from 32X (the optical zoom limit), to a maximum of focus. By digitally processing and magnifying images, zooming is set to use the Digital Zoom. Shooting a subject in low or poor lighting at high magnification. ... the playback picture will be changed only when the Power Switch is set to the subject is possible from 32X (the optical zoom limit), to shoot dark scenes with the camcorder on the screen. NOTES: ● Accurate stabilization may go out of 800X digital magnification. By...

Instruction Manual
Page 24
... off. ● If "DEMO MODE" remains "ON", some functions will change. PRIORITY [LCD]: The image is displayed on screen when the camcorder is always displayed. SYSTEM The "SYSTEM" functions which are set when the Power Switch is set to confirm how these functions operate.... Power Switch is set to "REC". ● Performing any operation is opened . Demonstration starts in the camcorder, the demonstration cannot be turned on. ● "DEMO MODE" remains "ON" even if the camcorder power is performed for about 3 minutes after the Power Switch is set to "REC". ● The...
... off. ● If "DEMO MODE" remains "ON", some functions will change. PRIORITY [LCD]: The image is displayed on screen when the camcorder is always displayed. SYSTEM The "SYSTEM" functions which are set when the Power Switch is set to confirm how these functions operate.... Power Switch is set to "REC". ● Performing any operation is opened . Demonstration starts in the camcorder, the demonstration cannot be turned on. ● "DEMO MODE" remains "ON" even if the camcorder power is performed for about 3 minutes after the Power Switch is set to "REC". ● The...
Instruction Manual
Page 25
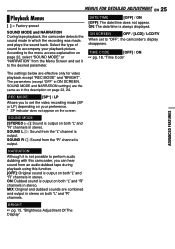
... screen. According to the menu access explanation on page 22, select "SOUND MODE" or "NARRATION" from an audio-dubbed tape during playback using this camcorder, you to the desired parameter. TIME CODE [OFF] / ON ☞ pg. 18, "Time Code" ADVANCED FEATURES The settings below are combined.../time does not appear. MENUS FOR DETAILED ADJUSTMENT EN 25 Playback Menus [ ] = Factory-preset SOUND MODE and NARRATION During tape playback, the camcorder detects the sound mode in stereo. The parameters (except "OFF" in ON SCREEN, SOUND MODE and NARRATION settings) are the same as in ...
... screen. According to the menu access explanation on page 22, select "SOUND MODE" or "NARRATION" from an audio-dubbed tape during playback using this camcorder, you to the desired parameter. TIME CODE [OFF] / ON ☞ pg. 18, "Time Code" ADVANCED FEATURES The settings below are combined.../time does not appear. MENUS FOR DETAILED ADJUSTMENT EN 25 Playback Menus [ ] = Factory-preset SOUND MODE and NARRATION During tape playback, the camcorder detects the sound mode in stereo. The parameters (except "OFF" in ON SCREEN, SOUND MODE and NARRATION settings) are the same as in ...


