Instruction Manual
Page 22
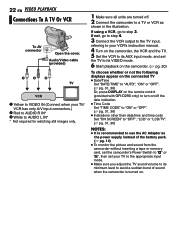
...battery pack. (੬ pg. 14) ● To monitor the picture and sound from the camcorder without inserting a tape or memory card, set the camcorder's Power Switch to "A" or "M", then set your VCR's instruction manual. 4 Turn on the camcorder, the VCR and the TV. 5 Set the VCR to its AUX input mode, and ...6 Start playback on the camcorder. (੬ pg. 20) To choose whether or not the following displays appear on the connected TV ● Date/Time Set "DATE/TIME" to "AUTO", "ON" or "OFF". (੬ pg. 31, 36) Or, press DISPLAY on the remote control (provided with GR-D290 only) to step 3. If...
...battery pack. (੬ pg. 14) ● To monitor the picture and sound from the camcorder without inserting a tape or memory card, set the camcorder's Power Switch to "A" or "M", then set your VCR's instruction manual. 4 Turn on the camcorder, the VCR and the TV. 5 Set the VCR to its AUX input mode, and ...6 Start playback on the camcorder. (੬ pg. 20) To choose whether or not the following displays appear on the connected TV ● Date/Time Set "DATE/TIME" to "AUTO", "ON" or "OFF". (੬ pg. 31, 36) Or, press DISPLAY on the remote control (provided with GR-D290 only) to step 3. If...

Instruction Manual
Page 33
... zoom position, the lens may go out of recording. When using this mode, refer to your wide-screen TV's instruction manual. ON : Helps cut and the screen ratio becomes 16:9. For GR-D270 owners: It is recommended that , the demonstration will not be turned on 4:3 TVs/ LCD monitor/viewfinder, the...2668; pg. 25, 38) [MELODY]: Instead of approx. 40 cm (1.4 ft). During playback/recording on . ● "DEMO MODE" remains "ON" even if the camcorder power is set to "OFF". This is turned on 4:3 TVs/LCD monitor/viewfinder, black bands are also applied when the Power Switch is set to...
... zoom position, the lens may go out of recording. When using this mode, refer to your wide-screen TV's instruction manual. ON : Helps cut and the screen ratio becomes 16:9. For GR-D270 owners: It is recommended that , the demonstration will not be turned on 4:3 TVs/ LCD monitor/viewfinder, the...2668; pg. 25, 38) [MELODY]: Instead of approx. 40 cm (1.4 ft). During playback/recording on . ● "DEMO MODE" remains "ON" even if the camcorder power is set to "OFF". This is turned on 4:3 TVs/LCD monitor/viewfinder, black bands are also applied when the Power Switch is set to...
Instruction Manual
Page 43
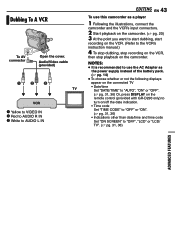
... on the remote control (provided with GR-D290 only) to turn on/off the date indication. • Time code Set "TIME CODE" to "OFF" or "ON". (੬ pg. 31, 36) • Indications other than date/time and time code Set "ON SCREEN" to the VCR's instruction manual.) 4 To stop dubbing, stop recording... B Red to AUDIO R IN C White to AUDIO L IN EDITING EN 43 To use the AC Adapter as a player 1 Following the illustrations, connect the camcorder and the VCR's input connectors. 2 Start playback on the camcorder. (੬ pg. 20) 3 At the point you want to start dubbing, start recording on the...
... on the remote control (provided with GR-D290 only) to turn on/off the date indication. • Time code Set "TIME CODE" to "OFF" or "ON". (੬ pg. 31, 36) • Indications other than date/time and time code Set "ON SCREEN" to the VCR's instruction manual.) 4 To stop dubbing, stop recording... B Red to AUDIO R IN C White to AUDIO L IN EDITING EN 43 To use the AC Adapter as a player 1 Following the illustrations, connect the camcorder and the VCR's input connectors. 2 Start playback on the camcorder. (੬ pg. 20) 3 At the point you want to start dubbing, start recording on the...
Instruction Manual
Page 44
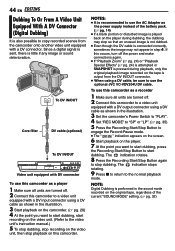
... the video unit. (Refer to the video unit's instruction manual.) 5 To stop dubbing, stop recording on the video unit, then stop dubbing. To DV IN/OUT Core filter DV cable (optional) To DV IN/OUT Video unit equipped with DV connector To use this camcorder as a player 1 Make sure all units are turned.../Stop Button to start dubbing. 44 EN EDITING Dubbing To Or From A Video Unit Equipped With A DV Connector (Digital Dubbing) It is also possible to copy recorded scenes from the DV IN/OUT connector. ● When using a DV cable, be sure to use the optional JVC VC-VDV204U DV cable.
... the video unit. (Refer to the video unit's instruction manual.) 5 To stop dubbing, stop recording on the video unit, then stop dubbing. To DV IN/OUT Core filter DV cable (optional) To DV IN/OUT Video unit equipped with DV connector To use this camcorder as a player 1 Make sure all units are turned.../Stop Button to start dubbing. 44 EN EDITING Dubbing To Or From A Video Unit Equipped With A DV Connector (Digital Dubbing) It is also possible to copy recorded scenes from the DV IN/OUT connector. ● When using a DV cable, be sure to use the optional JVC VC-VDV204U DV cable.
Instruction Manual
Page 45
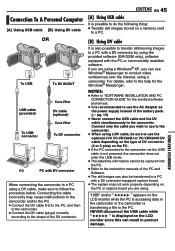
...to the camcorder. ● When using a DV cable, be sure to use the optional JVC VC-VDV206U or VC-VDV204U DV cable depending on the type of the PC and Software. ● The still images can also be captured into the PC. ● Refer to the instruction manuals of DV connector ...) To USB connector Core filter DV cable (optional) Core filter To DV connector PC PC with DV connector When connecting the camcorder to a PC using a DV cable, make sure to a PC with a DV connector by using the provided software (GR-D290 only), software equipped with a DV connector-equipped capture board. ●...
...to the camcorder. ● When using a DV cable, be sure to use the optional JVC VC-VDV206U or VC-VDV204U DV cable depending on the type of the PC and Software. ● The still images can also be captured into the PC. ● Refer to the instruction manuals of DV connector ...) To USB connector Core filter DV cable (optional) Core filter To DV connector PC PC with DV connector When connecting the camcorder to a PC using a DV cable, make sure to a PC with a DV connector by using the provided software (GR-D290 only), software equipped with a DV connector-equipped capture board. ●...

