Instruction Manual
Page 1
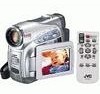
... MODE" to ensure safe use of the camcorder. and Serial No. Retain this information for purchasing this product. DIGITAL VIDEO CAMERA GR-D290 GR-D270 Please visit our Homepage on the bottom of this digital video camera. Serial No. which is located on the World Wide Web for Digital Video Camera: http://www.jvc.co.jp/english/cyber/ For Accessories: http...
... MODE" to ensure safe use of the camcorder. and Serial No. Retain this information for purchasing this product. DIGITAL VIDEO CAMERA GR-D290 GR-D270 Please visit our Homepage on the bottom of this digital video camera. Serial No. which is located on the World Wide Web for Digital Video Camera: http://www.jvc.co.jp/english/cyber/ For Accessories: http...
Instruction Manual
Page 5
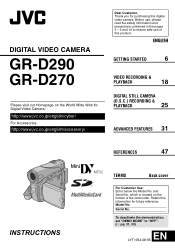
...With Special Effects 42 EDITING 43 Dubbing To A VCR 43 Dubbing To Or From A Video Unit Equipped With A DV Connector (Digital Dubbing 44 Connection To A Personal Computer 45 Audio Dubbing (GR-D290 only 46 Insert Editing (GR-D290 only 46 REFERENCES 47 TROUBLESHOOTING 47 USER MAINTENANCE 51 CAUTIONS 52 SPECIFICATIONS 55 TERMS Back cover Snapshot 25...PLAYBACK 20 Normal Playback 20 Still Playback 20 Shuttle Search 21 Blank Search 21 Connections To A TV Or VCR 22 Playback Using The Remote Control (GR-D290 only 23 DIGITAL STILL CAMERA (D.S.C.) RECORDING & PLAYBACK 25 D.S.C.
...With Special Effects 42 EDITING 43 Dubbing To A VCR 43 Dubbing To Or From A Video Unit Equipped With A DV Connector (Digital Dubbing 44 Connection To A Personal Computer 45 Audio Dubbing (GR-D290 only 46 Insert Editing (GR-D290 only 46 REFERENCES 47 TROUBLESHOOTING 47 USER MAINTENANCE 51 CAUTIONS 52 SPECIFICATIONS 55 TERMS Back cover Snapshot 25...PLAYBACK 20 Normal Playback 20 Still Playback 20 Shuttle Search 21 Blank Search 21 Connections To A TV Or VCR 22 Playback Using The Remote Control (GR-D290 only 23 DIGITAL STILL CAMERA (D.S.C.) RECORDING & PLAYBACK 25 D.S.C.
Instruction Manual
Page 7
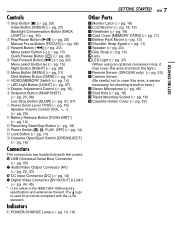
...(੬ pg. 45) Q Audio/Video Output Connector [AV] (੬ pg. 22, 43) R DC Input Connector [DC] (੬ pg. 13) S Digital Video Connector [DV IN/OUT] (i.Link*) (੬ pg. 44, 45) * i.Link refers to cover this area, a sensor necessary for products compliant with the i.Link standard. The... (੬ pg. 37) (When using an optional conversion lens, it may cover this area and block the light.) e Remote Sensor (GR-D290 only) (੬ pg. 23) f Camera Sensor (Be careful not to the IEEE1394-1995 industry specification and extensions thereof. Controls A Stop Button [8] (੬ pg. 20) Index ...
...(੬ pg. 45) Q Audio/Video Output Connector [AV] (੬ pg. 22, 43) R DC Input Connector [DC] (੬ pg. 13) S Digital Video Connector [DV IN/OUT] (i.Link*) (੬ pg. 44, 45) * i.Link refers to cover this area, a sensor necessary for products compliant with the i.Link standard. The... (੬ pg. 37) (When using an optional conversion lens, it may cover this area and block the light.) e Remote Sensor (GR-D290 only) (੬ pg. 23) f Camera Sensor (Be careful not to the IEEE1394-1995 industry specification and extensions thereof. Controls A Stop Button [8] (੬ pg. 20) Index ...

Instruction Manual
Page 15
Language Settings The language on the display can be turned on or off the camcorder by opening/ closing the LCD monitor or pulling out/pushing in the viewfinder. The CAMERA DISPLAY Menu appears. 5 Press + or - ENGLISH CLOCK DEC 2 0 '0 5 ADJ . 5: 0 0 PM "LANGUAGE", and press MENU. The ... The Menu Screen closes. OFF LANGUAGE - to your preference. Be sure to fasten the velcro strip to select the desired language, and CAMERA DISPLAY press MENU. 7 Press + or - INFORMATION: The following explanations in this manual supposes the use the viewfinder, close the LCD ...
Language Settings The language on the display can be turned on or off the camcorder by opening/ closing the LCD monitor or pulling out/pushing in the viewfinder. The CAMERA DISPLAY Menu appears. 5 Press + or - ENGLISH CLOCK DEC 2 0 '0 5 ADJ . 5: 0 0 PM "LANGUAGE", and press MENU. The ... The Menu Screen closes. OFF LANGUAGE - to your preference. Be sure to fasten the velcro strip to select the desired language, and CAMERA DISPLAY press MENU. 7 Press + or - INFORMATION: The following explanations in this manual supposes the use the viewfinder, close the LCD ...

Instruction Manual
Page 16
... holder. ● Be sure to press only the section labeled "PUSH HERE" to clear the brightness control indicator from the display. The CAMERA DISPLAY or VIDEO DISPLAY Menu appears. 5 Press + or - Erase protection tab 1 Slide and hold OPEN/EJECT in the direction of the...HERE" to close the cassette holder; Example: 6 Press + or - until it recedes completely before closing the cassette holder cover. Button located on the camcorder. to "FINDER" (੬ pg. 31, 34). 3 Press MENU. The Menu Screen closes and the brightness control indicator appears. Loading/Unloading A Cassette...
... holder. ● Be sure to press only the section labeled "PUSH HERE" to clear the brightness control indicator from the display. The CAMERA DISPLAY or VIDEO DISPLAY Menu appears. 5 Press + or - Erase protection tab 1 Slide and hold OPEN/EJECT in the direction of the...HERE" to close the cassette holder; Example: 6 Press + or - until it recedes completely before closing the cassette holder cover. Button located on the camcorder. to "FINDER" (੬ pg. 31, 34). 3 Press MENU. The Menu Screen closes and the brightness control indicator appears. Loading/Unloading A Cassette...
Instruction Manual
Page 25
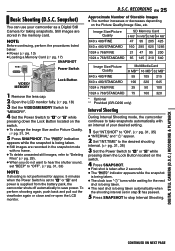
...back and pull out the viewfinder again or close and re-open the LCD monitor. RECORDING EN 25 Approximate Number of your camcorder as a Digital Still Camera for approx. 5 minutes when the Power Switch is set in the snapshot mode with an interval of Storable Images ● .../STANDARD 190 320 645 1024 x 768/FINE 25 50 100 1024 x 768/STANDARD 75 160 320 * Optional ** Provided (GR-D290 only) Interval Shooting During Interval Shooting mode, the camcorder continues to take snapshots automatically with no frame. ● To delete unwanted still images, refer to "Deleting Files" (੬...
...back and pull out the viewfinder again or close and re-open the LCD monitor. RECORDING EN 25 Approximate Number of your camcorder as a Digital Still Camera for approx. 5 minutes when the Power Switch is set in the snapshot mode with an interval of Storable Images ● .../STANDARD 190 320 645 1024 x 768/FINE 25 50 100 1024 x 768/STANDARD 75 160 320 * Optional ** Provided (GR-D290 only) Interval Shooting During Interval Shooting mode, the camcorder continues to take snapshots automatically with no frame. ● To delete unwanted still images, refer to "Deleting Files" (੬...

Instruction Manual
Page 27
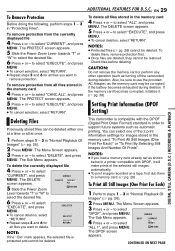
... Images" (੬ pg. 26). 2 Press INDEX. The Index number selected file is displayed. 100-0013 MENU 50m D I SPLAY OFF ON RETURN Battery remaining power indicator DIGITAL STILL CAMERA (D.S.C.) RECORDING & PLAYBACK Index Playback Of Files 1 Perform steps 1 - 3 in ascending order. 3 To end Auto Playback, press 8. Operation mode indicator Folder/file number You can...
... Images" (੬ pg. 26). 2 Press INDEX. The Index number selected file is displayed. 100-0013 MENU 50m D I SPLAY OFF ON RETURN Battery remaining power indicator DIGITAL STILL CAMERA (D.S.C.) RECORDING & PLAYBACK Index Playback Of Files 1 Perform steps 1 - 3 in ascending order. 3 To end Auto Playback, press 8. Operation mode indicator Folder/file number You can...
Instruction Manual
Page 29
...: If the " " mark appears, the selected file is compatible with DPOF, it . (੬ pg. 30) Setting Print Information (DPOF Setting) DIGITAL STILL CAMERA (D.S.C.) RECORDING & PLAYBACK Deleting Files Previously stored files can select one at a time or all at once. 1 Perform steps 1 - 3 in the ... for images stored in "Normal Playback Of Images" (੬ pg. 26). 2 Press MENU. to use the provided AC Adapter, as turning off the camcorder) during deletion. Check files before deleting. to a memory card. (੬ pg. 28) To Print All Still Images (One Print For Each) 1 ...
...: If the " " mark appears, the selected file is compatible with DPOF, it . (੬ pg. 30) Setting Print Information (DPOF Setting) DIGITAL STILL CAMERA (D.S.C.) RECORDING & PLAYBACK Deleting Files Previously stored files can select one at a time or all at once. 1 Perform steps 1 - 3 in the ... for images stored in "Normal Playback Of Images" (੬ pg. 26). 2 Press MENU. to use the provided AC Adapter, as turning off the camcorder) during deletion. Check files before deleting. to a memory card. (੬ pg. 28) To Print All Still Images (One Print For Each) 1 ...
Instruction Manual
Page 31
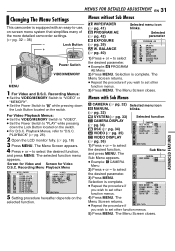
... RETURN you wish to set other function menus. 3) Press MENU. The Menu Screen closes. MENUS FOR DETAILED ADJUSTMENT EN 31 Changing The Menu Settings This camcorder is equipped with Sub Menus m CAMERA (੬ pg. 32) Selected menu icon q MANUAL blinks. (੬ pg. 32) s SYSTEM (੬ pg. 33) Selected function...
... RETURN you wish to set other function menus. 3) Press MENU. The Menu Screen closes. MENUS FOR DETAILED ADJUSTMENT EN 31 Changing The Menu Settings This camcorder is equipped with Sub Menus m CAMERA (੬ pg. 32) Selected menu icon q MANUAL blinks. (੬ pg. 32) s SYSTEM (੬ pg. 33) Selected function...
Instruction Manual
Page 32
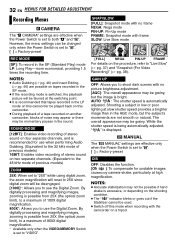
... If the recording mode is switched, the playback picture will be used. ● Switch off this camcorder. ● During playback of a tape recorded on another camcorder, blocks of 800X digital magnification. * Available only when the VIDEO/MEMORY Switch is set to "VIDEO". [FULL] NEGA PIN...The " " indicator blinks or goes out if the Stabilizer cannot be disengaged. [100X]*: Allows you to use the Digital Zoom. 32 EN MENUS FOR DETAILED ADJUSTMENT Recording Menus CAMERA The "m CAMERA" settings are effective only when the Power Switch is set to "M". [ ] = Factory-preset DIS OFF: Disables...
... If the recording mode is switched, the playback picture will be used. ● Switch off this camcorder. ● During playback of a tape recorded on another camcorder, blocks of 800X digital magnification. * Available only when the VIDEO/MEMORY Switch is set to "VIDEO". [FULL] NEGA PIN...The " " indicator blinks or goes out if the Stabilizer cannot be disengaged. [100X]*: Allows you to use the Digital Zoom. 32 EN MENUS FOR DETAILED ADJUSTMENT Recording Menus CAMERA The "m CAMERA" settings are effective only when the Power Switch is set to "M". [ ] = Factory-preset DIS OFF: Disables...
Instruction Manual
Page 34
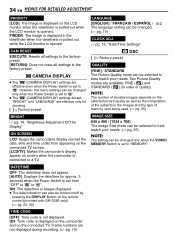
... by pressing the DISPLAY Button on the remote control (provided with GR-D290 only). (੬ pg. 22, 43) TIME CODE [OFF]: Time code is displayed on the camcorder and on the connected TV. ON: Time code is not displayed. CAMERA DISPLAY ● The "n" (CAMERA DISPLAY) settings are not displayed during recording. (੬ pg. 19) LANGUAGE...
... by pressing the DISPLAY Button on the remote control (provided with GR-D290 only). (੬ pg. 22, 43) TIME CODE [OFF]: Time code is displayed on the camcorder and on the connected TV. ON: Time code is not displayed. CAMERA DISPLAY ● The "n" (CAMERA DISPLAY) settings are not displayed during recording. (੬ pg. 19) LANGUAGE...
Instruction Manual
Page 35
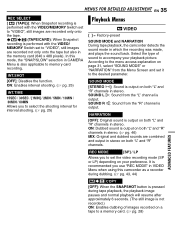
...1MIN] / 2MIN / 5MIN / 10MIN / 30MIN / 60MIN Allows you use "REC MODE" in VIDEO Menu when using this mode, the "SNAP/SLOW" selection in CAMERA Menu is also applicable to memory card recording. SOUND R : Sound from the Menu Screen and set it to the desired parameter. Select the type of...shooting interval for interval shooting. (੬ pg. 25) Playback Menus VIDEO [ ] = Factory-preset SOUND MODE and NARRATION During tape playback, the camcorder detects the sound mode in which the recording was made, and plays the sound back. NARRATION [OFF]: Original sound is output on page 31, select...
...1MIN] / 2MIN / 5MIN / 10MIN / 30MIN / 60MIN Allows you use "REC MODE" in VIDEO Menu when using this mode, the "SNAP/SLOW" selection in CAMERA Menu is also applicable to memory card recording. SOUND R : Sound from the Menu Screen and set it to the desired parameter. Select the type of...shooting interval for interval shooting. (੬ pg. 25) Playback Menus VIDEO [ ] = Factory-preset SOUND MODE and NARRATION During tape playback, the camcorder detects the sound mode in which the recording was made, and plays the sound back. NARRATION [OFF]: Original sound is output on page 31, select...
Instruction Manual
Page 36
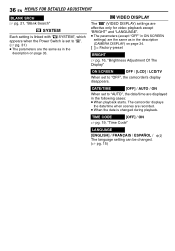
...effective only for video playback except "BRIGHT" and "LANGUAGE". ● The parameters (except "OFF" in ON SCREEN settings) are the same as in the description (CAMERA DISPLAY) on page 33. TIME CODE [OFF] / ON ੬ pg. 19, "Time Code" LANGUAGE [ENGLISH] / FRANÇAIS / ESPAÑOL /... The language setting can be changed during playback. The camcorder displays the date/time when scenes are recorded. ● When the date is set to "M". (੬ pg. 31) ● The parameters are displayed in the...
...effective only for video playback except "BRIGHT" and "LANGUAGE". ● The parameters (except "OFF" in ON SCREEN settings) are the same as in the description (CAMERA DISPLAY) on page 33. TIME CODE [OFF] / ON ੬ pg. 19, "Time Code" LANGUAGE [ENGLISH] / FRANÇAIS / ESPAÑOL /... The language setting can be changed during playback. The camcorder displays the date/time when scenes are recorded. ● When the date is set to "M". (੬ pg. 31) ● The parameters are displayed in the...
Instruction Manual
Page 37
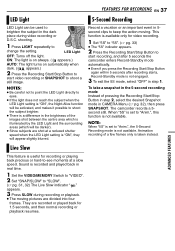
... Recording Start/Stop Button to brighten the subject in the dark place during recording or playback. ● The moving . To take a snapshot in CAMERA Menu (੬ pg. 32), then press SNAPSHOT. ON: The light is on always. ( appears.) AUTO: The light turns on automatically when ...dark. ( appears.) 2 Press the Recording Start/Stop Button to start recording, and after 5 seconds the camcorder enters Record-Standby mode automatically. ● Even if you press the Recording Start/Stop Button again within 5 seconds after recording starts, Record-...
... Recording Start/Stop Button to brighten the subject in the dark place during recording or playback. ● The moving . To take a snapshot in CAMERA Menu (੬ pg. 32), then press SNAPSHOT. ON: The light is on always. ( appears.) AUTO: The light turns on automatically when ...dark. ( appears.) 2 Press the Recording Start/Stop Button to start recording, and after 5 seconds the camcorder enters Record-Standby mode automatically. ● Even if you press the Recording Start/Stop Button again within 5 seconds after recording starts, Record-...
Instruction Manual
Page 38
...prevent this case, use of a tripod is the sound effect of "Program AE With Special Effects" (੬ pg. 42). • "GAIN UP" in CAMERA Menu (੬ pg. 32). • "DIS" in MANUAL Menu (੬ pg. 32). ● During Night-Alive, it is strobing due to the ... clear, blue sky.* ● When a dark object is barely visible in brightness and darkness), such as approx. 5 cm (2") to the subject) to bring the camcorder into focus. to "M". 2 Press FOCUS. However, correct focus may be recorded for approx. 6 seconds, then the normal recording resumes. ● Regardless of water. ...
...prevent this case, use of a tripod is the sound effect of "Program AE With Special Effects" (੬ pg. 42). • "GAIN UP" in CAMERA Menu (੬ pg. 32). • "DIS" in MANUAL Menu (੬ pg. 32). ● During Night-Alive, it is strobing due to the ... clear, blue sky.* ● When a dark object is barely visible in brightness and darkness), such as approx. 5 cm (2") to the subject) to bring the camcorder into focus. to "M". 2 Press FOCUS. However, correct focus may be recorded for approx. 6 seconds, then the normal recording resumes. ● Regardless of water. ...
Instruction Manual
Page 46
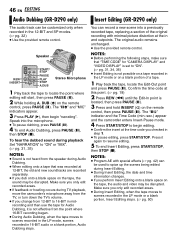
...9679; If you change from 12-BIT to 16-BIT in midrecording and then use the tape for "CAMERA DISPLAY" and "VIDEO DISPLAY" is set to "ON". (੬ pg. 31, 34, 36) ...Dubbing, press PAUSE (9), then STOP (8). The "9I" indicator and the Time Code (min.:sec.) appear and the camcorder enters Insert-Pause mode. 4 Press START/STOP to begin "narrating". To hear the dubbed sound during playback Set "... end Insert Editing, press START/STOP, then STOP (8). 46 EN EDITING Audio Dubbing (GR-D290 only) Insert Editing (GR-D290 only) The audio track can be customized only when recorded in the LP mode or on...
...9679; If you change from 12-BIT to 16-BIT in midrecording and then use the tape for "CAMERA DISPLAY" and "VIDEO DISPLAY" is set to "ON". (੬ pg. 31, 34, 36) ...Dubbing, press PAUSE (9), then STOP (8). The "9I" indicator and the Time Code (min.:sec.) appear and the camcorder enters Insert-Pause mode. 4 Press START/STOP to begin "narrating". To hear the dubbed sound during playback Set "... end Insert Editing, press START/STOP, then STOP (8). 46 EN EDITING Audio Dubbing (GR-D290 only) Insert Editing (GR-D290 only) The audio track can be customized only when recorded in the LP mode or on...

Instruction Manual
Page 53
...for a long time, the surface around the LCD monitor and/or the back of the LCD monitor may result. swing the soft camera case excessively when the camcorder is being accessed (during playback. ... In such cases, use . ... Mechanical moving parts used more than once consecutively, damage ...make sure the memory card bears the SD or MultiMediaCard mark. ... CAUTIONS EN 53 ... For periodic check-ups please consult your nearest JVC dealer. Memory Cards To properly use and store your memory cards, be performed properly. While using the cleaning cassette, the problems still ...
...for a long time, the surface around the LCD monitor and/or the back of the LCD monitor may result. swing the soft camera case excessively when the camcorder is being accessed (during playback. ... In such cases, use . ... Mechanical moving parts used more than once consecutively, damage ...make sure the memory card bears the SD or MultiMediaCard mark. ... CAUTIONS EN 53 ... For periodic check-ups please consult your nearest JVC dealer. Memory Cards To properly use and store your memory cards, be performed properly. While using the cleaning cassette, the problems still ...
Instruction Manual
Page 55
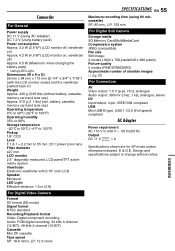
...: 1.0 V (p-p), 75 Ω, analogue Audio output: 300 mV (rms), 1 kΩ, analogue, stereo DV Input/output: 4-pin, IEEE1394 compliant USB Mini USB-B type, USB 1.1/2.0 (Full speed) compliant AC Adapter Power requirement AC 110 V to 55 mm, 25...Digital Video Camera Format DV format (SD mode) Signal format NTSC standard Recording/Playback format Video: Digital component recording Audio: PCM digital recording, 32 kHz 4-channel (12-BIT), 48 kHz 2-channel (16-BIT) Cassette Mini DV cassette Tape speed SP: 18.8 mm/s, LP: 12.5 mm/s SPECIFICATIONS EN 55 Maximum recording time (using 80 min. Camcorder...
...: 1.0 V (p-p), 75 Ω, analogue Audio output: 300 mV (rms), 1 kΩ, analogue, stereo DV Input/output: 4-pin, IEEE1394 compliant USB Mini USB-B type, USB 1.1/2.0 (Full speed) compliant AC Adapter Power requirement AC 110 V to 55 mm, 25...Digital Video Camera Format DV format (SD mode) Signal format NTSC standard Recording/Playback format Video: Digital component recording Audio: PCM digital recording, 32 kHz 4-channel (12-BIT), 48 kHz 2-channel (16-BIT) Cassette Mini DV cassette Tape speed SP: 18.8 mm/s, LP: 12.5 mm/s SPECIFICATIONS EN 55 Maximum recording time (using 80 min. Camcorder...


