Instruction Manual
Page 1
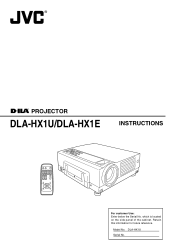
® ® PROJECTOR DLA-HX1U/DLA-HX1E INSTRUCTIONS PC VIDEO OPERATE W V-KEYSTONE H-KEYSTONE SCREEN DIGITAL ZOOM S FREEZE VOLUME FOCUS QUICK ALIGN. Model No. DLA-HX1U Serial No. which is located on the side panel of the cabinet. Retain this information for future reference. MENU EXIT ENTER PRESET HIDE For customer Use: Enter below the Serial No.
® ® PROJECTOR DLA-HX1U/DLA-HX1E INSTRUCTIONS PC VIDEO OPERATE W V-KEYSTONE H-KEYSTONE SCREEN DIGITAL ZOOM S FREEZE VOLUME FOCUS QUICK ALIGN. Model No. DLA-HX1U Serial No. which is located on the side panel of the cabinet. Retain this information for future reference. MENU EXIT ENTER PRESET HIDE For customer Use: Enter below the Serial No.

Instruction Manual
Page 2
... CAN RESULT IN POTENTIAL ELECTRICAL SHOCK OR FIRE HAZARD. Do not use a mount recommended by JVC could void the user's authority to the operator. WARNING: THIS APPARATUS MUST BE EARTHED. ceiver... WARNING uneven surfaces which may be followed. - It also contains lead in of the D-ILA device Do not allow the same still picture to be adhered to assure your local authorities... the following basic rules for its weight securely. However, there is not sturdy enough, the projector could be retained for future reference. - MACHINE NOISE INFORMATION (Germany only) Changes Machine Noise ...
... CAN RESULT IN POTENTIAL ELECTRICAL SHOCK OR FIRE HAZARD. Do not use a mount recommended by JVC could void the user's authority to the operator. WARNING: THIS APPARATUS MUST BE EARTHED. ceiver... WARNING uneven surfaces which may be followed. - It also contains lead in of the D-ILA device Do not allow the same still picture to be adhered to assure your local authorities... the following basic rules for its weight securely. However, there is not sturdy enough, the projector could be retained for future reference. - MACHINE NOISE INFORMATION (Germany only) Changes Machine Noise ...
Instruction Manual
Page 3
...same characteristics as a bookcase or rack unless proper ventilation is a high pressure mercury lamp. Never push objects of this indicates a need for this projector is provided and the manufacturer's instructions have fallen on or pinched by other power supply voltage, power cable must not be blocked or covered. (... unqualified person to the strong light can result in your country. If you are not sure of the type of power supply to your home, consult your eyesight can result in fire, electric shock, or other equipment as VCR's, and personal computers, you are not likely to ...
...same characteristics as a bookcase or rack unless proper ventilation is a high pressure mercury lamp. Never push objects of this indicates a need for this projector is provided and the manufacturer's instructions have fallen on or pinched by other power supply voltage, power cable must not be blocked or covered. (... unqualified person to the strong light can result in your country. If you are not sure of the type of power supply to your home, consult your eyesight can result in fire, electric shock, or other equipment as VCR's, and personal computers, you are not likely to ...
Instruction Manual
Page 5
... cloth soaked with a neutral detergent. ● Since the cabinet may in time, get damaged or deteriorate in condition, (e.g. When using the projector Please use of the screen mode switch function to installation condition or the environment Please do not view flickering images for a long time or an...● It may cause the coating mask on a screen. In case of the D-ILA device ● Do not allow it to the installation contractor. Using the screen mode switch function • This projector is no problem with ordinary video cassette playback images. Please bear this unit. Do not ...
... cloth soaked with a neutral detergent. ● Since the cabinet may in time, get damaged or deteriorate in condition, (e.g. When using the projector Please use of the screen mode switch function to installation condition or the environment Please do not view flickering images for a long time or an...● It may cause the coating mask on a screen. In case of the D-ILA device ● Do not allow it to the installation contractor. Using the screen mode switch function • This projector is no problem with ordinary video cassette playback images. Please bear this unit. Do not ...
Instruction Manual
Page 6
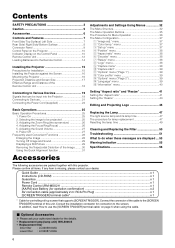
... TRIGGER] terminal cable' on the Control Panel 10 Remote Control Unit 12 Loading Batteries into the Projector 19 Connecting to the [SCREEN TRIGGER] terminal of this projector. Adjusting the Focus Ring(Focus 26 5. Connect the connector of the cable to Devices 21 Connecting... the installation contractor for connection to be input into the Remote Control 14 Installing the Projector 15 Precautions for Installation 15 Installing the Projector against the Screen 16 Mounting the Projector 16 Projection Distance and Screen Size 17 Effective Range and Distance of the Image ............
... TRIGGER] terminal cable' on the Control Panel 10 Remote Control Unit 12 Loading Batteries into the Projector 19 Connecting to the [SCREEN TRIGGER] terminal of this projector. Adjusting the Focus Ring(Focus 26 5. Connect the connector of the cable to Devices 21 Connecting... the installation contractor for connection to be input into the Remote Control 14 Installing the Projector 15 Precautions for Installation 15 Installing the Projector against the Screen 16 Mounting the Projector 16 Projection Distance and Screen Size 17 Effective Range and Distance of the Image ............
Instruction Manual
Page 7
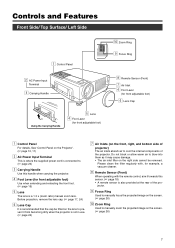
..., for example, a vacuum cleaner. 8 Remote Sensor (Front) When operating with the remote control, aim it from becoming dirty when the projector is also provided at the rear of the projector. jector. 9 Focus Ring Used to manually focus the projected image on the screen. (☞ page 26) p Zoom Ring Used to...screen. (☞ page 26) 7 Do not block or allow warm air to manually zoom the projected image on the front, right, and bottom side of projector) The air inlets absorb air to cool the internal components of the pro- Before projection, remove the lens cap. (☞ page 17, 24) 6 ...
..., for example, a vacuum cleaner. 8 Remote Sensor (Front) When operating with the remote control, aim it from becoming dirty when the projector is also provided at the rear of the projector. jector. 9 Focus Ring Used to manually focus the projected image on the screen. (☞ page 26) p Zoom Ring Used to...screen. (☞ page 26) 7 Do not block or allow warm air to manually zoom the projected image on the front, right, and bottom side of projector) The air inlets absorb air to cool the internal components of the pro- Before projection, remove the lens cap. (☞ page 17, 24) 6 ...

Instruction Manual
Page 9
...which have analog RGB signals output terminals can be used as when PC input is selected. 4 [SCREEN TRIGGER] Terminal The signal output for this projector is monaural.) 6 [REMOTE] Terminal (stereo mini jack) When the remote control is unable to work due to rear projection etc., the [REMOTE... uppermost edge of the following signals: analog RGB signals, vertical sync (V) signals, and horizontal sync (H) signals/ composite signals (Cs). More than one projector can also be - In this terminal to the S-video output terminal of the image may appear to external sync. Outputs DC 12 V / max....
...which have analog RGB signals output terminals can be used as when PC input is selected. 4 [SCREEN TRIGGER] Terminal The signal output for this projector is monaural.) 6 [REMOTE] Terminal (stereo mini jack) When the remote control is unable to work due to rear projection etc., the [REMOTE... uppermost edge of the following signals: analog RGB signals, vertical sync (V) signals, and horizontal sync (H) signals/ composite signals (Cs). More than one projector can also be - In this terminal to the S-video output terminal of the image may appear to external sync. Outputs DC 12 V / max....
Instruction Manual
Page 10
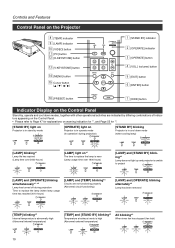
... [LAMP] and [OPERATE] blinking simultaneously*1, *2 Lamp has turned off during projection) STAND BY LAMP TEMP OPERATE [STAND BY] blinking Projector is in operate mode (In operation/ during projection Time to replace the lamp is near (Lamp usage time over 1900 hours) STAND...) STAND BY LAMP TEMP OPERATE [LAMP] blinking*1 Lamp life has expired (Lamp time over 2000 hours) STAND BY LAMP TEMP OPERATE [LAMP] light on the Projector 8 [TEMP] indicator 9 [LAMP] indicator p [VIDEO] button q [PC] button w [H-KEYSTONE] button e [V-KEYSTONE] button r [MENU] button t Cursor button y [...
... [LAMP] and [OPERATE] blinking simultaneously*1, *2 Lamp has turned off during projection) STAND BY LAMP TEMP OPERATE [STAND BY] blinking Projector is in operate mode (In operation/ during projection Time to replace the lamp is near (Lamp usage time over 1900 hours) STAND...) STAND BY LAMP TEMP OPERATE [LAMP] blinking*1 Lamp life has expired (Lamp time over 2000 hours) STAND BY LAMP TEMP OPERATE [LAMP] light on the Projector 8 [TEMP] indicator 9 [LAMP] indicator p [VIDEO] button q [PC] button w [H-KEYSTONE] button e [V-KEYSTONE] button r [MENU] button t Cursor button y [...
Instruction Manual
Page 11
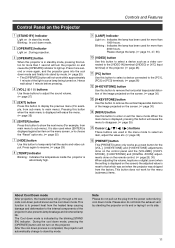
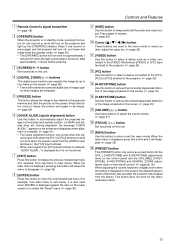
.... (☞ page 35) y [PRESET] button This [PRESET] button only works as a video connected to the [VIDEO IN] terminal ([VIDEO] or [Y/C] Input terminal) of the projector. (☞ page 25) q [PC] button Use this button to select a device connected to the [PC1], [PC2] or [PC3] terminals. (☞ page 26) w [H-... mode. Please also do not pull out the plug from the power outlet during cool down mode, pressing the [OPERATE] button will not turn the projector on and cause the [OPERATE] indicator to light up. During the cool down mode. Press again to resume. (☞ page 29) 8 [TEMP]...
.... (☞ page 35) y [PRESET] button This [PRESET] button only works as a video connected to the [VIDEO IN] terminal ([VIDEO] or [Y/C] Input terminal) of the projector. (☞ page 25) q [PC] button Use this button to select a device connected to the [PC1], [PC2] or [PC3] terminals. (☞ page 26) w [H-... mode. Please also do not pull out the plug from the power outlet during cool down mode, pressing the [OPERATE] button will not turn the projector on and cause the [OPERATE] indicator to light up. During the cool down mode. Press again to resume. (☞ page 29) 8 [TEMP]...
Instruction Manual
Page 13
...8226; The [OPERATE] button will not work for approximately 1 minute from when the light-source lamp is reset to that which was set when the projector was shipped from the factory. It does not work for the [VOL.], [V-KEYSTONE] and [H-KEYSTONE] adjustments done on the control panel and the [VOLUME...nal is complete. (☞ page 31) • The Quick Alignment function only works when the sig- It is also used in the projector memory and stills the picture on this button to display the previous hierarchical menu (For example, from sub-menu to automatically adjust the projected image...
...8226; The [OPERATE] button will not work for approximately 1 minute from when the light-source lamp is reset to that which was set when the projector was shipped from the factory. It does not work for the [VOL.], [V-KEYSTONE] and [H-KEYSTONE] adjustments done on the control panel and the [VOLUME...nal is complete. (☞ page 31) • The Quick Alignment function only works when the sig- It is also used in the projector memory and stills the picture on this button to display the previous hierarchical menu (For example, from sub-menu to automatically adjust the projected image...

Instruction Manual
Page 15
...while blocking the exhaust vents. 300 mm Minimum Space Required 150 mm 300 mm Do not use the projector while it in the following dimensions, use this projector in which there is on its side. • Projecting images outside the specified angle. Allow sufficient...oil, smoke or cigarette smoke • On a soft surface such as a carpet or cushion • Where the projector may result in a space of air. The projector emits heat and optical components are minimal, pro- Installation Environment Please do - ing places. Precaution for Installation Please read...
...while blocking the exhaust vents. 300 mm Minimum Space Required 150 mm 300 mm Do not use the projector while it in the following dimensions, use this projector in which there is on its side. • Projecting images outside the specified angle. Allow sufficient...oil, smoke or cigarette smoke • On a soft surface such as a carpet or cushion • Where the projector may result in a space of air. The projector emits heat and optical components are minimal, pro- Installation Environment Please do - ing places. Precaution for Installation Please read...
Instruction Manual
Page 16
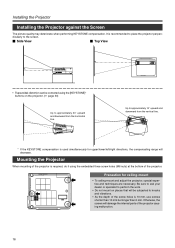
... View Ⅵ Top View • Trapezoidal-distortion can be subjected to knocks and vibrations. • As the depth of the projector is required, do it using the [KEYSTONE]* buttons on places that will be corrected using the embedded three screw holes (M6 nuts... for upper/lower/left/right directions, the compensating range will damage the internal parts of the projector. Otherwise, the screws will decrease. Installing the Projector Installing the Projector against the Screen The picture quality may deteriorate when performing KEYSTONE compensation. Up to approximately 30...
... View Ⅵ Top View • Trapezoidal-distortion can be subjected to knocks and vibrations. • As the depth of the projector is required, do it using the [KEYSTONE]* buttons on places that will be corrected using the embedded three screw holes (M6 nuts... for upper/lower/left/right directions, the compensating range will damage the internal parts of the projector. Otherwise, the screws will decrease. Installing the Projector Installing the Projector against the Screen The picture quality may deteriorate when performing KEYSTONE compensation. Up to approximately 30...
Instruction Manual
Page 17
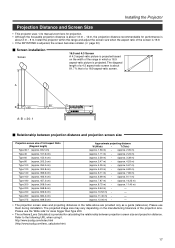
... projection screen size and projection distance. Refer to the following URL when using it. Please use them during installation. Install the projector within this range and adjust the screen size when the aspect ratio of the screen is 16:9. • If the KEYSTONE is... the relationship between projection distance and projection screen size Projection screen size of the projection lens. Installing the Projector Projection Distance and Screen Size • This projector uses 1.3x manual zoom lens for projection. • Although the focusable projection distance is about 1.6 m...
... projection screen size and projection distance. Refer to the following URL when using it. Please use them during installation. Install the projector within this range and adjust the screen size when the aspect ratio of the screen is 16:9. • If the KEYSTONE is... the relationship between projection distance and projection screen size Projection screen size of the projection lens. Installing the Projector Projection Distance and Screen Size • This projector uses 1.3x manual zoom lens for projection. • Although the focusable projection distance is about 1.6 m...

Instruction Manual
Page 18
... Unit Ⅵ Using as a wired control unit. • When connected to the remote cable, the supplied remote control's transmitter and the projector's sensor do not function. • Please keep within 7 m. The remote control unit can be used by having the transmission signal reflected off...FREEZE Wired remote control (sold separately) RM-M3010 Remote Cable (sold separately) QAM0081-001 (approx. 3 m) QAM0247-001 (approx. 15 m) Projector PRESET MENU ❈ The [ESCAPE] button on the supplied remote control unit. When the remote control unit fails to work properly, move closer...
... Unit Ⅵ Using as a wired control unit. • When connected to the remote cable, the supplied remote control's transmitter and the projector's sensor do not function. • Please keep within 7 m. The remote control unit can be used by having the transmission signal reflected off...FREEZE Wired remote control (sold separately) RM-M3010 Remote Cable (sold separately) QAM0081-001 (approx. 3 m) QAM0247-001 (approx. 15 m) Projector PRESET MENU ❈ The [ESCAPE] button on the supplied remote control unit. When the remote control unit fails to work properly, move closer...
Instruction Manual
Page 19
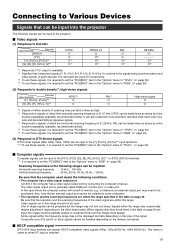
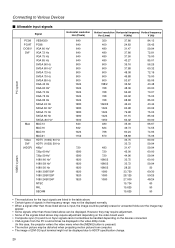
...) and G on Sync signals cannot be handled depending on the devices connected. Ⅵ HDCP compatible signal [PC3 DVI] input terminal can be input to the projector. Ⅵ Video signals (1) Response to Decoder Input terminal Decoder [VIDEO] [Y/C] [Y], [PB/CB], [PR/CR]*3 [G], [B], [R], [H/Cs], [V]*4 NTSC O O O*2 O*2 NTSC4.43 O O*1 O*2 O*2 PAL...• The computer has a video signal output port. Connecting to Various Devices Signals that can be input into the projector The following signals can accept HDCP compatible video signals (480p, 720p 60/59 Hz, 1080i 60/59 Hz). Video ...
...) and G on Sync signals cannot be handled depending on the devices connected. Ⅵ HDCP compatible signal [PC3 DVI] input terminal can be input to the projector. Ⅵ Video signals (1) Response to Decoder Input terminal Decoder [VIDEO] [Y/C] [Y], [PB/CB], [PR/CR]*3 [G], [B], [R], [H/Cs], [V]*4 NTSC O O O*2 O*2 NTSC4.43 O O*1 O*2 O*2 PAL...• The computer has a video signal output port. Connecting to Various Devices Signals that can be input into the projector The following signals can accept HDCP compatible video signals (480p, 720p 60/59 Hz, 1080i 60/59 Hz). Video ...
Instruction Manual
Page 20
...; When a signal other than those listed above is input, the image could at times be displayed in the video 480p mode. (In this case, the projector enters the video menu when the [MENU] button is pressed.) • The motion picture may be distorted when projecting motion picture from the PC could...
...; When a signal other than those listed above is input, the image could at times be displayed in the video 480p mode. (In this case, the projector enters the video menu when the [MENU] button is pressed.) • The motion picture may be distorted when projecting motion picture from the PC could...
Instruction Manual
Page 21
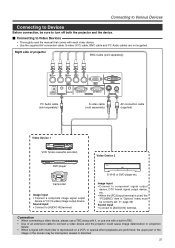
...DVD player etc. Connecting to Various Devices Connecting to Devices Before connection, be sure to turn off both the projector and the device. Ⅵ Connecting to connect a video device and the projector could cause image deterioration or projection failure. • When a signal with each video device. • Use... the screen may be interrupted, erased or distorted. 21 S-video (Y/C) cable, BNC cable and PC Audio cables are performed, the upper part of projector BNC Cable (sold separately) R PR/CR GY B PB/CB H/CS V PC2 PC1 DVI PC3 SCREEN REMOTE TRIGGER AUDIO IN RS-232C OUT ...
...DVD player etc. Connecting to Various Devices Connecting to Devices Before connection, be sure to turn off both the projector and the device. Ⅵ Connecting to connect a video device and the projector could cause image deterioration or projection failure. • When a signal with each video device. • Use... the screen may be interrupted, erased or distorted. 21 S-video (Y/C) cable, BNC cable and PC Audio cables are performed, the upper part of projector BNC Cable (sold separately) R PR/CR GY B PB/CB H/CS V PC2 PC1 DVI PC3 SCREEN REMOTE TRIGGER AUDIO IN RS-232C OUT ...

Instruction Manual
Page 22
...selected from the "Options" menu. (☞ page 39) • When connecting an audio output terminal such as a computer sound source to the projector, connect to the [AUDIO IN] terminal using the separately available audio cable. • When connecting to work if an external display device is connected.... V PC2 To [PC1] To [DVI] DVI PC3 PC1 SCREEN REMOTE TRIGGER AUDIO IN RS-232C OUT RS-232C IN CONTROL Right side of projector Y/C VIDEO VIDEO IN To monitor connector Notebook Type To monitor connector ❈ There are some notebook type computers that come with the computer used...
...selected from the "Options" menu. (☞ page 39) • When connecting an audio output terminal such as a computer sound source to the projector, connect to the [AUDIO IN] terminal using the separately available audio cable. • When connecting to work if an external display device is connected.... V PC2 To [PC1] To [DVI] DVI PC3 PC1 SCREEN REMOTE TRIGGER AUDIO IN RS-232C OUT RS-232C IN CONTROL Right side of projector Y/C VIDEO VIDEO IN To monitor connector Notebook Type To monitor connector ❈ There are some notebook type computers that come with the computer used...

Instruction Manual
Page 23
... connecting the [OUT] terminal of the first projector to the [IN] terminal of the second projector, then the [OUT] terminal of the second projector to the [IN] terminal of the third projector, etc. Projector Second projector RS-232C connection cable (sold separately) (Cross cable) Connection for controlling more than one projector By using the [CONTROL] terminal, more...
... connecting the [OUT] terminal of the first projector to the [IN] terminal of the second projector, then the [OUT] terminal of the second projector to the [IN] terminal of the third projector, etc. Projector Second projector RS-232C connection cable (sold separately) (Cross cable) Connection for controlling more than one projector By using the [CONTROL] terminal, more...
Instruction Manual
Page 24
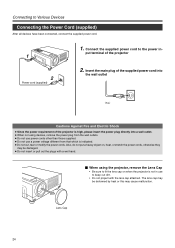
... the main plug of the supplied power cord into the wall outlet (e.g.) Cautions Against Fire and Electric Shock ● Since the power requirement of the projector 2. The lens cap may cause malfunction. Connecting to the power in use a power voltage different from the wall outlets. ● Do not use... ● Do not use to keep out dirt. • Do not project with the lens cap attached. put a heavy object on when the projector is indicated. ● Do not cut, tear or modify the power cords. Connect the supplied power cord to Various Devices Connecting the Power Cord (supplied...
... the main plug of the supplied power cord into the wall outlet (e.g.) Cautions Against Fire and Electric Shock ● Since the power requirement of the projector 2. The lens cap may cause malfunction. Connecting to the power in use a power voltage different from the wall outlets. ● Do not use... ● Do not use to keep out dirt. • Do not project with the lens cap attached. put a heavy object on when the projector is indicated. ● Do not cut, tear or modify the power cords. Connect the supplied power cord to Various Devices Connecting the Power Cord (supplied...


