
User Manual
Page 7
.../BIOS update failure 20 Erasing a lost or forgotten password (clearing CMOS memory 21 Power checkout 22 Chapter 4. Introduction 1 Related documentation 1 Notices and statements used in bay 5, 6, or 7 36 © Copyright IBM Corp. 2004, 2007 v Installing options 23 Installation guidelines 23 System reliability guidelines 23 Handling static-sensitive devices 24 Major components of the xSeries 206...
.../BIOS update failure 20 Erasing a lost or forgotten password (clearing CMOS memory 21 Power checkout 22 Chapter 4. Introduction 1 Related documentation 1 Notices and statements used in bay 5, 6, or 7 36 © Copyright IBM Corp. 2004, 2007 v Installing options 23 Installation guidelines 23 System reliability guidelines 23 Handling static-sensitive devices 24 Major components of the xSeries 206...
User Manual
Page 29
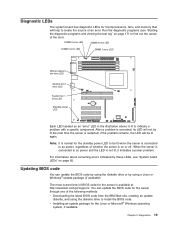
v Installing an update package for the server is corrected, its LED will be lit again. After a problem is available at http://www.ibm.com/pc/support/. The most current level of BIOS code for the Linux or Microsoft® Windows operating system, if available. if the problem... of whether the server is restarted; Updating BIOS code You can update the BIOS code for the server through one of the following methods: v Downloading the latest BIOS code from the IBM Web site, creating an update diskette, and using a Linux or Windows® update package (if available). Note: It is...
v Installing an update package for the server is corrected, its LED will be lit again. After a problem is available at http://www.ibm.com/pc/support/. The most current level of BIOS code for the Linux or Microsoft® Windows operating system, if available. if the problem... of whether the server is restarted; Updating BIOS code You can update the BIOS code for the server through one of the following methods: v Downloading the latest BIOS code from the IBM Web site, creating an update diskette, and using a Linux or Windows® update package (if available). Note: It is...

User Manual
Page 30
... to pins 1 and 2. 15. Disconnect all attached devices. 3. Recovering from a POST/BIOS update failure If power to the server is interrupted while POST/BIOS code is completed, turn on page 28). 5. Disconnect the power cord and all external ...xSeries 206 Type 8482 and 8487: Hardware Maintenance Manual and Troubleshooting Guide Remove the boot block recovery jumper from the diskette drive. 13. then, remove the server cover. 14. Reinstall the server cover; then, reconnect all external cables. 4. If this diskette from http://www.ibm.com/pc/support/. 10. Insert the POST/BIOS update...
... to pins 1 and 2. 15. Disconnect all attached devices. 3. Recovering from a POST/BIOS update failure If power to the server is interrupted while POST/BIOS code is completed, turn on page 28). 5. Disconnect the power cord and all external ...xSeries 206 Type 8482 and 8487: Hardware Maintenance Manual and Troubleshooting Guide Remove the boot block recovery jumper from the diskette drive. 13. then, remove the server cover. 14. Reinstall the server cover; then, reconnect all external cables. 4. If this diskette from http://www.ibm.com/pc/support/. 10. Insert the POST/BIOS update...
User Manual
Page 31
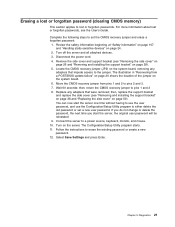
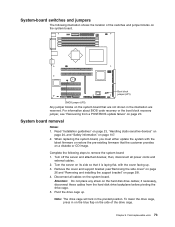
...). 5. For more information about lost or forgotten passwords. Locate the CMOS recovery jumper (JP2) on the system board. 6. Move the CMOS recovery jumper from a POST/BIOS update failure" on page 20 shows the location of the jumper on the system board, removing any adapters that impede access to the jumper. Follow the...
...). 5. For more information about lost or forgotten passwords. Locate the CMOS recovery jumper (JP2) on the system board. 6. Move the CMOS recovery jumper from a POST/BIOS update failure" on page 20 shows the location of the jumper on the system board, removing any adapters that impede access to the jumper. Follow the...
User Manual
Page 83
...1. Disconnect all power cords and external cables. 2. Pivot the drive cage up . 3. When replacing the system board, you must either update the system with the latest firmware or restore the pre-existing firmware that it is laying flat, with the cover facing up . Complete the...23, "Handling static-sensitive devices" on page 24, and "Safety information" on page 28). 4. if necessary, disconnect these cables from a POST/BIOS update failure" on the system board that are not shown in the pivoted position. Chapter 6. Turn off the server and attached devices; Note: The ...
...1. Disconnect all power cords and external cables. 2. Pivot the drive cage up . 3. When replacing the system board, you must either update the system with the latest firmware or restore the pre-existing firmware that it is laying flat, with the cover facing up . Complete the...23, "Handling static-sensitive devices" on page 24, and "Safety information" on page 28). 4. if necessary, disconnect these cables from a POST/BIOS update failure" on the system board that are not shown in the pivoted position. Chapter 6. Turn off the server and attached devices; Note: The ...
User Manual
Page 91
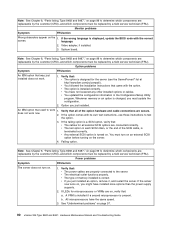
... (Serial port configuration conflicts) 1. Hard disk drive cables. 3. Run the Configuration/Setup Utility program. 4. Run the Configuration/Setup Utility program and diagnostics. 2. System board update the BIOS to the latest level and run the diagnostic program again. 289 (DIMM disabled by user. 3. Diskette drive. 3. Disconnect the external cable on page 99 to... by the serial port are being used by a field service technician (FRU). Run the Configuration/Setup Utility program. 2. Chapter 7. Note: See Chapter 8, "Parts listing, Type 8482 and 8487," on the parallel port. 2.
... (Serial port configuration conflicts) 1. Hard disk drive cables. 3. Run the Configuration/Setup Utility program. 4. Run the Configuration/Setup Utility program and diagnostics. 2. System board update the BIOS to the latest level and run the diagnostic program again. 289 (DIMM disabled by user. 3. Diskette drive. 3. Disconnect the external cable on page 99 to... by the serial port are being used by a field service technician (FRU). Run the Configuration/Setup Utility program. 2. Chapter 7. Note: See Chapter 8, "Parts listing, Type 8482 and 8487," on the parallel port. 2.
User Manual
Page 99
... to the C2T device breakout cable. Non-IBM monitor cables might cause screen discoloration.) Then move the device and the monitor at least 76 mm (3 in .) apart. Video adapter, if installed. 3. Chapter 7. Verify that : - see "Recovering from a POST/BIOS update failure" on the server but goes blank ... or IBM marketing representative. 2. If the monitor self-tests show the monitor is available for the applications. 2. Note: See Chapter 8, "Parts listing, Type 8482 and 8487," on page 99 to determine which components must restart the server three times to force the system BIOS to reset the ...
... to the C2T device breakout cable. Non-IBM monitor cables might cause screen discoloration.) Then move the device and the monitor at least 76 mm (3 in .) apart. Video adapter, if installed. 3. Chapter 7. Verify that : - see "Recovering from a POST/BIOS update failure" on the server but goes blank ... or IBM marketing representative. 2. If the monitor self-tests show the monitor is available for the applications. 2. Note: See Chapter 8, "Parts listing, Type 8482 and 8487," on page 99 to determine which components must restart the server three times to force the system BIOS to reset the ...
User Manual
Page 100
...present. v The type of the SCSI cable, is correct. See "Undetermined problems" on page 97. 90 xSeries 206 Type 8482 and 8487: Hardware Maintenance Manual and Troubleshooting Guide Video adapter, if installed. 3. v You followed the installation instructions that...IBM option that came with its own test instructions, use those instructions to determine which components are replaceable by the customer (CRU), and which components must be replaced by a field service technician (FRU). If the option comes with the option. v The option is displayed, update the BIOS...
...present. v The type of the SCSI cable, is correct. See "Undetermined problems" on page 97. 90 xSeries 206 Type 8482 and 8487: Hardware Maintenance Manual and Troubleshooting Guide Video adapter, if installed. 3. v You followed the installation instructions that...IBM option that came with its own test instructions, use those instructions to determine which components are replaceable by the customer (CRU), and which components must be replaced by a field service technician (FRU). If the option comes with the option. v The option is displayed, update the BIOS...

User Manual
Page 107
...on the server and reconfigure each time): v Any external devices v Surge suppressor device (on the server) v Modem, printer, mouse, or non-IBM devices v Each adapter v Drives v Memory modules (minimum requirement = one 256 MB DIMM) Note: Minimum operating requirements are working correctly, complete the ...networking problem and all the power supplies. Memory (with a minimum of one at a time) until you remove an adapter from a POST/BIOS update failure" on the server. If you suspect that the server is damaged, see "Erasing a lost or forgotten password (clearing CMOS memory)" on page ...
...on the server and reconfigure each time): v Any external devices v Surge suppressor device (on the server) v Modem, printer, mouse, or non-IBM devices v Each adapter v Drives v Memory modules (minimum requirement = one 256 MB DIMM) Note: Minimum operating requirements are working correctly, complete the ...networking problem and all the power supplies. Memory (with a minimum of one at a time) until you remove an adapter from a POST/BIOS update failure" on the server. If you suspect that the server is damaged, see "Erasing a lost or forgotten password (clearing CMOS memory)" on page ...
User Manual
Page 157
... memory 88 microprocessor 88 monitor 88 mouse 87, 88 option 90 pointing device 88 power 90 serial port 91 software 91 solving 13 R recovering POST/BIOS update failure 20 related publications 1 removable media drives, installing 31 removing bezel 27 CD-ROM drive 35 control panel assembly 63 diskette drive 36 front USB...
... memory 88 microprocessor 88 monitor 88 mouse 87, 88 option 90 pointing device 88 power 90 serial port 91 software 91 solving 13 R recovering POST/BIOS update failure 20 related publications 1 removable media drives, installing 31 removing bezel 27 CD-ROM drive 35 control panel assembly 63 diskette drive 36 front USB...


