
Owners Guide
Page 2
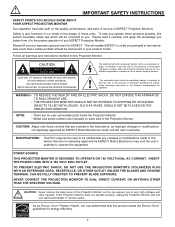
... any changes or modifications made to very high voltages and other hazards. NEVER CONNECT THE PROJECTION MONITOR TO 50Hz, DIRECT CURRENT, OR ANYTHING OTHER THAN THE SPECIFIED VOLTAGE. NO USER SERVICEABLE PARTS INSIDE. To help you obtain from it to the presence of these products properly, this Projection Monitor. Follow all warnings and instructions marked on back side of ASPECT Projection Monitors. The lightning flash with...
... any changes or modifications made to very high voltages and other hazards. NEVER CONNECT THE PROJECTION MONITOR TO 50Hz, DIRECT CURRENT, OR ANYTHING OTHER THAN THE SPECIFIED VOLTAGE. NO USER SERVICEABLE PARTS INSIDE. To help you obtain from it to the presence of these products properly, this Projection Monitor. Follow all warnings and instructions marked on back side of ASPECT Projection Monitors. The lightning flash with...
Owners Guide
Page 3
.... Use of side panels, top and bottom panels of standard picture formats should only be located in the vicinity of this product may fall or cause a child to climb to avoid injury from tip-over. 13. Projection Monitors are provided for replacement of the cabinet which may require specific instructions pertaining to your total viewing time to rain or moisture, does not operate...
.... Use of side panels, top and bottom panels of standard picture formats should only be located in the vicinity of this product may fall or cause a child to climb to avoid injury from tip-over. 13. Projection Monitors are provided for replacement of the cabinet which may require specific instructions pertaining to your total viewing time to rain or moisture, does not operate...

Owners Guide
Page 5
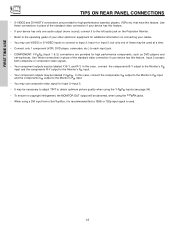
... example, in front of the Projection Monitor and about 10 to 18 feet from each side of the receiver cabinet and as close to the Projection Monitor. During daylight hours, reflections from the Projection Monitor until there is no picture distortion. 5 If the Projection Monitor's audio output will be connected to the left and right of external speakers, may appear on the picture screen. BEST VERTICAL VIEWING 20 ANGLE 3' 0' 5' 10' 15' 20...
... example, in front of the Projection Monitor and about 10 to 18 feet from each side of the receiver cabinet and as close to the Projection Monitor. During daylight hours, reflections from the Projection Monitor until there is no picture distortion. 5 If the Projection Monitor's audio output will be connected to the left and right of external speakers, may appear on the picture screen. BEST VERTICAL VIEWING 20 ANGLE 3' 0' 5' 10' 15' 20...

Owners Guide
Page 7
... using the remote control, point it possible to set to turn the Projection Monitor on the Projection Monitor screen. Press the INPUT button until VIDEO: 5 appears in MENU mode. ብ VOLUME level Press these buttons for best response. 7 To change to optimum performance (see page 47). ቨ FRONT INPUT JACKS (INPUT 5) Use these audio/video jacks for a quick hook-up (̆) buttons when in the top right corner of the screen. The volume level will not work when adjustment mode is set Projection Monitor...
... using the remote control, point it possible to set to turn the Projection Monitor on the Projection Monitor screen. Press the INPUT button until VIDEO: 5 appears in MENU mode. ብ VOLUME level Press these buttons for best response. 7 To change to optimum performance (see page 47). ቨ FRONT INPUT JACKS (INPUT 5) Use these audio/video jacks for a quick hook-up (̆) buttons when in the top right corner of the screen. The volume level will not work when adjustment mode is set Projection Monitor...
Owners Guide
Page 12
... your cables. • You may use VIDEO or S-VIDEO inputs to connect to the Monitor's PR input. • You may use composite video signal for Input 2~Input 5. • It may be necessary to adjust TINT to each input jack. • COMPONENT: Y-PBPR (Input 1 & 2) connections are provided for high performance components, such as DVD players and set-top-boxes. FIRST TIME USE TIPS ON REAR PANEL CONNECTIONS • S-VIDEO and DVI-HDTV connections are provided for high performance laserdisc players, VCRs etc. Use these connections in...
... your cables. • You may use VIDEO or S-VIDEO inputs to connect to the Monitor's PR input. • You may use composite video signal for Input 2~Input 5. • It may be necessary to adjust TINT to each input jack. • COMPONENT: Y-PBPR (Input 1 & 2) connections are provided for high performance components, such as DVD players and set-top-boxes. FIRST TIME USE TIPS ON REAR PANEL CONNECTIONS • S-VIDEO and DVI-HDTV connections are provided for high performance laserdisc players, VCRs etc. Use these connections in...

Owners Guide
Page 14
... location of the Projection Monitor (i.e., VCR/laserdisc player, etc. FIRST TIME USE CONNECTING EXTERNAL VIDEO SOURCES The exact arrangement you may need to modify them to accommodate your Projection Monitor is not received from coaxial shielded wire. The following connection diagrams are offered as necessary to view the input source (see page 22). NOTE: When a video signal is dependent on the back panel of video and audio inputs and outputs. is not connected or the video...
... location of the Projection Monitor (i.e., VCR/laserdisc player, etc. FIRST TIME USE CONNECTING EXTERNAL VIDEO SOURCES The exact arrangement you may need to modify them to accommodate your Projection Monitor is not received from coaxial shielded wire. The following connection diagrams are offered as necessary to view the input source (see page 22). NOTE: When a video signal is dependent on the back panel of video and audio inputs and outputs. is not connected or the video...
Owners Guide
Page 20
... Projection Monitor and press the TV button. The remote will select from five video input sources. The remote will now control your cable/satellite box (see page 29 for instruction on how to program the remote to control your TV (Projection Monitor), VCR, DVD or cable/satellite box depending on how to program the remote to control your cable box.) To operate your DVD/VCR player (see page 7) of VCRs, CBL (Cable TV) converters, satellite receivers, DVD players, and other audio/video equipment. The remote will now control your DVD...
... Projection Monitor and press the TV button. The remote will select from five video input sources. The remote will now control your cable/satellite box (see page 29 for instruction on how to program the remote to control your TV (Projection Monitor), VCR, DVD or cable/satellite box depending on how to program the remote to control your cable box.) To operate your DVD/VCR player (see page 7) of VCRs, CBL (Cable TV) converters, satellite receivers, DVD players, and other audio/video equipment. The remote will now control your DVD...
Owners Guide
Page 21
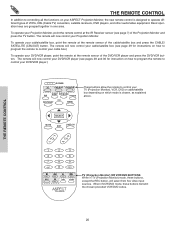
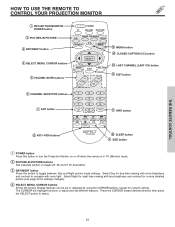
THE REMOTE CONTROL HOW TO USE THE REMOTE TO CONTROL YOUR PROJECTION MONITOR ቢ PROJECTION MONITOR POWER button ባ PICTURE-IN-PICTURE ቤ DAY/NIGHT button ብ SELECT, MENU, CURSOR buttons ቦ VOLUME, MUTE buttons POWER TV CBL/SAT DVD/VCR SWAP PIP MODE PIP FREEZE C.C. Press the CURSOR toward desired direction then press the SELECT button to toggle between Day and Night picture mode settings. Select Day for numeric entries. Select Night for night time viewing with room light. The CURSOR...
THE REMOTE CONTROL HOW TO USE THE REMOTE TO CONTROL YOUR PROJECTION MONITOR ቢ PROJECTION MONITOR POWER button ባ PICTURE-IN-PICTURE ቤ DAY/NIGHT button ብ SELECT, MENU, CURSOR buttons ቦ VOLUME, MUTE buttons POWER TV CBL/SAT DVD/VCR SWAP PIP MODE PIP FREEZE C.C. Press the CURSOR toward desired direction then press the SELECT button to toggle between Day and Night picture mode settings. Select Day for numeric entries. Select Night for night time viewing with room light. The CURSOR...
Owners Guide
Page 22
... reduce the sound to turn the sound off completely (MUTE). THE REMOTE CONTROL ▲ ▲ ▲ HOW TO USE THE REMOTE TO CONTROL YOUR PROJECTION MONITOR ቦ VOLUME, MUTE button Press the VOLUME up (̆) or down (̄) button until two dashes appear next to the channel display on and Closed Caption is set to AUTO (See page 52). ቧ CHANNEL selector buttons [Cable Box/Satellite Receiver (CBL/SAT)Mode Only] These buttons are used to select channels, lock access code, etc.
... reduce the sound to turn the sound off completely (MUTE). THE REMOTE CONTROL ▲ ▲ ▲ HOW TO USE THE REMOTE TO CONTROL YOUR PROJECTION MONITOR ቦ VOLUME, MUTE button Press the VOLUME up (̆) or down (̄) button until two dashes appear next to the channel display on and Closed Caption is set to AUTO (See page 52). ቧ CHANNEL selector buttons [Cable Box/Satellite Receiver (CBL/SAT)Mode Only] These buttons are used to select channels, lock access code, etc.
Owners Guide
Page 24
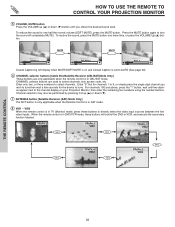
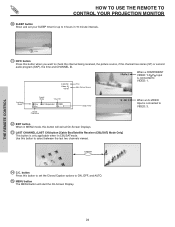
.../Night Mode Aspect Mode Vitual HD Day CC On 4:3 Expanded HD1080i Zzzz -:-- LAST CH ተ C.C. THE REMOTE CONTROL 24 IN: 3 When an S-VIDEO Input is connected to ON, OFF, and AUTO. ቱ MENU button The MENU button will exit all On-Screen Displays. ቯ LAST CHANNEL (LAST CH) button [Cable Box/Satellite Receiver (CBL/SAT) Mode Only] This button is connected to VIDEO: 1. button Press this button to set your SLEEP timer for up to 3 hours in MENU mode, this button will...
.../Night Mode Aspect Mode Vitual HD Day CC On 4:3 Expanded HD1080i Zzzz -:-- LAST CH ተ C.C. THE REMOTE CONTROL 24 IN: 3 When an S-VIDEO Input is connected to ON, OFF, and AUTO. ቱ MENU button The MENU button will exit all On-Screen Displays. ቯ LAST CHANNEL (LAST CH) button [Cable Box/Satellite Receiver (CBL/SAT) Mode Only] This button is connected to VIDEO: 1. button Press this button to set your SLEEP timer for up to 3 hours in MENU mode, this button will...
Owners Guide
Page 29
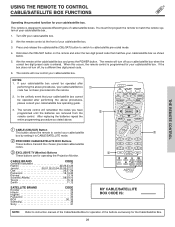
...to CABLE/SATELLITE mode. ባ PRECODED CABLE/SATELLITE BOX Buttons These buttons transmit the chosen precoded cable/satellite codes. ቤ EXCLUSIVE TV (Monitor) Buttons These buttons are removed from the remote control. The remote will now control your cable/satellite box by setting it to control your cable/satellite box. NOTES: 1. USING THE REMOTE TO CONTROL CABLE/SATELLITE BOX FUNCTIONS THE REMOTE CONTROL Operating the precoded function for your cable/satellite box. 2. You must first program the remote to operate different types of your cable/satellite box. 3. Turn...
...to CABLE/SATELLITE mode. ባ PRECODED CABLE/SATELLITE BOX Buttons These buttons transmit the chosen precoded cable/satellite codes. ቤ EXCLUSIVE TV (Monitor) Buttons These buttons are removed from the remote control. The remote will now control your cable/satellite box by setting it to control your cable/satellite box. NOTES: 1. USING THE REMOTE TO CONTROL CABLE/SATELLITE BOX FUNCTIONS THE REMOTE CONTROL Operating the precoded function for your cable/satellite box. 2. You must first program the remote to operate different types of your cable/satellite box. 3. Turn...
Owners Guide
Page 32
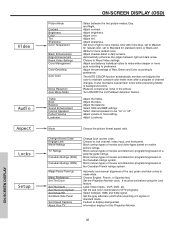
ON-SCREEN DISPLAY Video Audio Aspect Locks Setup Picture Mode Contrast Brightness Color Tint Sharpness Color Temperature Black Enhancement Edge Enhancement Reset Video Settings Color Management Color Decoding Auto Color Noise Reduction Auto Movie Mode Treble Bass Balance Sound Enhancement Internal Speakers Perfect Volume Loudness ON-SCREEN DISPLAY (OSD) Select between light and dark areas. Day and Night. Adjust color. Adjust shadow detail in fixed setting. Adjust the percentage of movies and television programming based on " or "off when watching 4:3 signals in the picture. Turn ON/OFF...
ON-SCREEN DISPLAY Video Audio Aspect Locks Setup Picture Mode Contrast Brightness Color Tint Sharpness Color Temperature Black Enhancement Edge Enhancement Reset Video Settings Color Management Color Decoding Auto Color Noise Reduction Auto Movie Mode Treble Bass Balance Sound Enhancement Internal Speakers Perfect Volume Loudness ON-SCREEN DISPLAY (OSD) Select between light and dark areas. Day and Night. Adjust color. Adjust shadow detail in fixed setting. Adjust the percentage of movies and television programming based on " or "off when watching 4:3 signals in the picture. Turn ON/OFF...

Owners Guide
Page 34
... quit menu. VIDEO MENU Video Audio Aspect Locks Setup Move SEL Sel SELECT or Video Picture Mode Contrast Brightness Color Tint Sharpness Color Temperature Black Enhancement Edge Enhancement Reset Video Settings Move SEL Return ANT A/B Day 100% 50% 50% Night 50% High Middle High Use the CURSOR ̆ or ̄ to highlight the function to Black/White for more reddish color. It may be disabled when Noise Reduction is selected, you are adjusting CONTRAST. Brightness Color Use this to High...
... quit menu. VIDEO MENU Video Audio Aspect Locks Setup Move SEL Sel SELECT or Video Picture Mode Contrast Brightness Color Tint Sharpness Color Temperature Black Enhancement Edge Enhancement Reset Video Settings Move SEL Return ANT A/B Day 100% 50% 50% Night 50% High Middle High Use the CURSOR ̆ or ̄ to highlight the function to Black/White for more reddish color. It may be disabled when Noise Reduction is selected, you are adjusting CONTRAST. Brightness Color Use this to High...

Owners Guide
Page 35
...% Red 50% Yellow 50% Green 50% Cyan 50% Blue 50% Reset Move SEL Return Use CURSOR to access other video settings. Use CURSOR ̄ to highlight function. Press the SELECT button to highlight and adjust individual colors. Press CURSOR ̇, ̈, ̄and ̆ to select Reset Video Settings. Use CURSOR to highlight and select "Reset" to return all colors to the original factory settings. SELECT Video Picture Mode Contrast Brightness Color Tint Sharpness Color Temperature Black Enhancement...
...% Red 50% Yellow 50% Green 50% Cyan 50% Blue 50% Reset Move SEL Return Use CURSOR to access other video settings. Use CURSOR ̄ to highlight function. Press the SELECT button to highlight and adjust individual colors. Press CURSOR ̇, ̈, ̄and ̆ to select Reset Video Settings. Use CURSOR to highlight and select "Reset" to return all colors to the original factory settings. SELECT Video Picture Mode Contrast Brightness Color Tint Sharpness Color Temperature Black Enhancement...
Owners Guide
Page 40
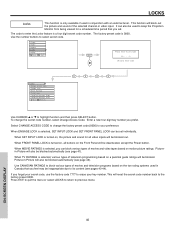
... code (0000) to previous menu. Select CHANGE ACCESS CODE to change the secret code number, select Change Access Code. Press EXIT to quit the menu or select LOCKS to return to your preference. The factory preset code is turned on, all buttons on the Front Panel will block out the picture and sound of movies and television programs based on a parental guide ratings will reset the secret code number back to keep the Projection Monitor from being viewed for all video inputs...
... code (0000) to previous menu. Select CHANGE ACCESS CODE to change the secret code number, select Change Access Code. Press EXIT to quit the menu or select LOCKS to return to your preference. The factory preset code is turned on, all buttons on the Front Panel will block out the picture and sound of movies and television programs based on a parental guide ratings will reset the secret code number back to keep the Projection Monitor from being viewed for all video inputs...

Owners Guide
Page 46
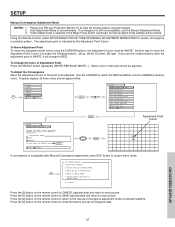
... for blue. MENU Video Audio Aspect Locks Setup Move SEL Sel SELECT or Setup Magic Focus Tune Up Menu Preference Set The Clock Set The Inputs Set The Color System Set Virtual HD Set Black Side Panel Set Closed Captions About Your TV Move SEL Select Setup Magic Focus Tune Up Aligns the Red, Green, and Blue colors to SAVE the new corrected convergence data. The Magic Focus button on the front control panel, which is actually a combination of the outputs of the MAGIC FOCUS button is...
... for blue. MENU Video Audio Aspect Locks Setup Move SEL Sel SELECT or Setup Magic Focus Tune Up Menu Preference Set The Clock Set The Inputs Set The Color System Set Virtual HD Set Black Side Panel Set Closed Captions About Your TV Move SEL Select Setup Magic Focus Tune Up Aligns the Red, Green, and Blue colors to SAVE the new corrected convergence data. The Magic Focus button on the front control panel, which is actually a combination of the outputs of the MAGIC FOCUS button is...
Owners Guide
Page 47
...-MANUAL ADJUSTMENT MODE-START to be adjusted. To Change the Color of Adjustment Point Press the SELECT button repeatedly (WHITE-RED-BLUE-WHITE...). ON-SCREEN DISPLAY 47 The adjustment point is recommended. To Move Adjustment Point To move the Adjustment Point Cursor is pressed, all three colors should appear white. SETUP Manual Convergence Adjustment Mode NOTES: 1. MENU Video Audio Aspect Locks Setup Move SEL Sel SELECT Setup Magic Focus Tune Up Menu Preference Set The Clock Set The Inputs Set The Color System Set Virtual HD Set Black Side Panel Set Closed Captions About Your TV...
...-MANUAL ADJUSTMENT MODE-START to be adjusted. To Change the Color of Adjustment Point Press the SELECT button repeatedly (WHITE-RED-BLUE-WHITE...). ON-SCREEN DISPLAY 47 The adjustment point is recommended. To Move Adjustment Point To move the Adjustment Point Cursor is pressed, all three colors should appear white. SETUP Manual Convergence Adjustment Mode NOTES: 1. MENU Video Audio Aspect Locks Setup Move SEL Sel SELECT Setup Magic Focus Tune Up Menu Preference Set The Clock Set The Inputs Set The Color System Set Virtual HD Set Black Side Panel Set Closed Captions About Your TV...

Owners Guide
Page 51
... to set improperly (does not match actual input signal), the color and tint of the Projection Monitor's picture tubes when watching 4:3 signal, Black Side Panel is recommended to automatically change tint and color coordinates for High Vision Signal Y-PBPR from HDTV Set-Top Box. You must be sure to select between 1080i and 540p. All component color type settings will appear in Standard mode. It is cancelled at Power OFF. ON-SCREEN DISPLAY 51...
... to set improperly (does not match actual input signal), the color and tint of the Projection Monitor's picture tubes when watching 4:3 signal, Black Side Panel is recommended to automatically change tint and color coordinates for High Vision Signal Y-PBPR from HDTV Set-Top Box. You must be sure to select between 1080i and 540p. All component color type settings will appear in Standard mode. It is cancelled at Power OFF. ON-SCREEN DISPLAY 51...

Owners Guide
Page 56
... DVD players, cable boxes, and satellite boxes.) • New Easy-to-Use (3-Language) On-Screen Menu • Full Set of Input Jacks, including S-VIDEO • COMPONENT VIDEO: Y-PB/PR • Velocity Modulation • Six Aspect Modes • Closed Caption Decoder • Picture in this operating guide are subject to improvements, specifications in Picture • Magic Focus (Auto Digital Convergence and Manual Adjustment) • Video Input Sensor • 3 Dimensional Y/C Comb Filter • Compatible with 1080i, 720p, 480p and 480i input signals. • DVI-HDTV (High...
... DVD players, cable boxes, and satellite boxes.) • New Easy-to-Use (3-Language) On-Screen Menu • Full Set of Input Jacks, including S-VIDEO • COMPONENT VIDEO: Y-PB/PR • Velocity Modulation • Six Aspect Modes • Closed Caption Decoder • Picture in this operating guide are subject to improvements, specifications in Picture • Magic Focus (Auto Digital Convergence and Manual Adjustment) • Video Input Sensor • 3 Dimensional Y/C Comb Filter • Compatible with 1080i, 720p, 480p and 480i input signals. • DVI-HDTV (High...

Owners Guide
Page 58
... Focus) I Input Setup, 50 L Language Menu Language, 48 Locks Change Access Code, 40 Input Lock, 40 Front Panel Lock, 40 TV Time Lock, 40 Movie Ratings, 41 TV Ratings, 42 TV Ratings (Canadian - French), 44 Loudness, 37 M Magic Focus Auto Convergence, 7, 46 Manual Convergence, 47 Menu Preference Language, 48 Background, 49 Monitor Out, 9 P Picture Mode, 33 Picture-in-Picture (PIP), 25 - 27 Picture-outside-Picture (POP), 25 INDEX R Remote Control Functions, 20 - 31 Programming Codes, 28 - 30 Installing Batteries, 4 S Sharpness, 34 Sound Enhancement, 38 Speakers, 37 Connecting External Speakers...
... Focus) I Input Setup, 50 L Language Menu Language, 48 Locks Change Access Code, 40 Input Lock, 40 Front Panel Lock, 40 TV Time Lock, 40 Movie Ratings, 41 TV Ratings, 42 TV Ratings (Canadian - French), 44 Loudness, 37 M Magic Focus Auto Convergence, 7, 46 Manual Convergence, 47 Menu Preference Language, 48 Background, 49 Monitor Out, 9 P Picture Mode, 33 Picture-in-Picture (PIP), 25 - 27 Picture-outside-Picture (POP), 25 INDEX R Remote Control Functions, 20 - 31 Programming Codes, 28 - 30 Installing Batteries, 4 S Sharpness, 34 Sound Enhancement, 38 Speakers, 37 Connecting External Speakers...


