

Owners Guide
Page 1
... COLOR TV 50EX12BA 50EX13KA OPERATING GUIDE TABLE OF CONTENTS IMPORTANT ...3 SAFETY TIPS ...4 PICTURE CAUTIONS...9 ACCESSORIES ...9 REMOTE CONTROL BATTERY INSTALLATION AND REPLACEMENT 10 HOW TO SET UP YOUR NEW HITACHI PROJECTION 10 HOOK-UP CABLES AND CONNECTORS 11 ANTENNA CONNECTIONS TO REAR JACK PANEL 12 FRONT PANEL CONTROLS...13 AVX (Audio/Video) selector ...13 VOLUME level ...13 CHANNEL selector ...13 POWER button ...14 POWER light ...14 AI (Artificial Intelligence) sensor 14 REMOTE CONTROL sensor...14 REAR PANEL JACKS ...14 Antenna Input...14 Audio/Video Inputs 1, 2 ...14 Output...
... COLOR TV 50EX12BA 50EX13KA OPERATING GUIDE TABLE OF CONTENTS IMPORTANT ...3 SAFETY TIPS ...4 PICTURE CAUTIONS...9 ACCESSORIES ...9 REMOTE CONTROL BATTERY INSTALLATION AND REPLACEMENT 10 HOW TO SET UP YOUR NEW HITACHI PROJECTION 10 HOOK-UP CABLES AND CONNECTORS 11 ANTENNA CONNECTIONS TO REAR JACK PANEL 12 FRONT PANEL CONTROLS...13 AVX (Audio/Video) selector ...13 VOLUME level ...13 CHANNEL selector ...13 POWER button ...14 POWER light ...14 AI (Artificial Intelligence) sensor 14 REMOTE CONTROL sensor...14 REAR PANEL JACKS ...14 Antenna Input...14 Audio/Video Inputs 1, 2 ...14 Output...
Owners Guide
Page 2
... TV BUTTONS ...25 VCR BRAND AND CODE CONVERSIONS 25 EASY GRAPHIC GUIDE ...27 SET UP ...29 AIR/CABLE AIR...29 AUTO PROGRAM...30 CHANNEL MEMORY...30 CLOSED CAPTION ...30 RESET...31 PROGRAM ...32 CHANNEL CAPTION...32 PROGRAM LIST...33 VOLUME CORRECTION ...34 CLOCK ...35 CLOCK SET ...35 ON/OFF TIMER ...35 AUTOMATIC MESSAGE ...36 VIDEO ...37 PREFERENCE ADJUST...37 PREFERENCE SETTING ...37 CONVERGENCE ADJUST...38 AUDIO ...39 PREFERENCE ADJUSTMENT...40 PREFERENCE SETTING ...40 CARE OF YOUR HITACHI PROJECTION TV AND YOUR REMOTE CONTROL...
... TV BUTTONS ...25 VCR BRAND AND CODE CONVERSIONS 25 EASY GRAPHIC GUIDE ...27 SET UP ...29 AIR/CABLE AIR...29 AUTO PROGRAM...30 CHANNEL MEMORY...30 CLOSED CAPTION ...30 RESET...31 PROGRAM ...32 CHANNEL CAPTION...32 PROGRAM LIST...33 VOLUME CORRECTION ...34 CLOCK ...35 CLOCK SET ...35 ON/OFF TIMER ...35 AUTOMATIC MESSAGE ...36 VIDEO ...37 PREFERENCE ADJUST...37 PREFERENCE SETTING ...37 CONVERGENCE ADJUST...38 AUDIO ...39 PREFERENCE ADJUSTMENT...40 PREFERENCE SETTING ...40 CARE OF YOUR HITACHI PROJECTION TV AND YOUR REMOTE CONTROL...
Owners Guide
Page 3
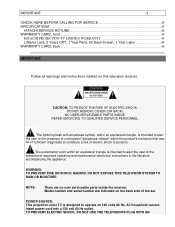
... set. Model number and serial number are no user serviceable parts inside the receiver. NOTE: There are indicated on this television receiver. Insert power cord into a 120 volt 60 Hz outlet. CHECK HERE BEFORE CALLING FOR SERVICE 43 SPECIFICATIONS ...43 HITACHI SERVICE HOTLINE...44 WARRANTY CARD, front ...45 HITACHI PROJECTION TV LIMITED WARRANTY 45 Lifetime Lens, 2 Years CRT, 1 Year Parts, 90 Days Screen, 1 Year Labor 45 WARRANTY CARD, back...46 IMPORTANT Follow all warnings and instructions...
... set. Model number and serial number are no user serviceable parts inside the receiver. NOTE: There are indicated on this television receiver. Insert power cord into a 120 volt 60 Hz outlet. CHECK HERE BEFORE CALLING FOR SERVICE 43 SPECIFICATIONS ...43 HITACHI SERVICE HOTLINE...44 WARRANTY CARD, front ...45 HITACHI PROJECTION TV LIMITED WARRANTY 45 Lifetime Lens, 2 Years CRT, 1 Year Parts, 90 Days Screen, 1 Year Labor 45 WARRANTY CARD, back...46 IMPORTANT Follow all warnings and instructions...
Owners Guide
Page 4
... INSERTED TO PREVENT BLADE EXPOSURE. CAUTION: Never remove the back cover of the set and call your model of these instructions. * Save these units. SAFETY TIPS IMPORTANT SAFEGUARDS SAFETY POINTS YOU SHOULD KNOW ABOUT YOUR HITACHI TELEVISION RECEIVER CAUTION: * Read all warnings and instructions marked on the quality, performance, and ease of service of the FCC rules. This will be...
... INSERTED TO PREVENT BLADE EXPOSURE. CAUTION: Never remove the back cover of the set and call your model of these instructions. * Save these units. SAFETY TIPS IMPORTANT SAFEGUARDS SAFETY POINTS YOU SHOULD KNOW ABOUT YOUR HITACHI TELEVISION RECEIVER CAUTION: * Read all warnings and instructions marked on the quality, performance, and ease of service of the FCC rules. This will be...
Owners Guide
Page 5
... television set is equipped with a polarized alternating-current line plug (a plug having one way. This plug will fit into the outlet, try reversing the plug. This may result in a shock or fire hazard. 5 Do not attempt to service this television set through cabinet slots as opening or removing covers may touch dangerous voltage points or short out parts that...
... television set is equipped with a polarized alternating-current line plug (a plug having one way. This plug will fit into the outlet, try reversing the plug. This may result in a shock or fire hazard. 5 Do not attempt to service this television set through cabinet slots as opening or removing covers may touch dangerous voltage points or short out parts that...

Owners Guide
Page 8
... are unable to restore normal operation by a professional service technician. 24 It is to make occasional snapping or popping sounds, particularly when being turned on the marking label. Adjust only those controls that are covered in the operating instructions as improper adjustment of other controls may result in performance indicates a need for a period of time, turn the television set should be operated only from the wall outlet...
... are unable to restore normal operation by a professional service technician. 24 It is to make occasional snapping or popping sounds, particularly when being turned on the marking label. Adjust only those controls that are covered in the operating instructions as improper adjustment of other controls may result in performance indicates a need for a period of time, turn the television set should be operated only from the wall outlet...
Owners Guide
Page 9
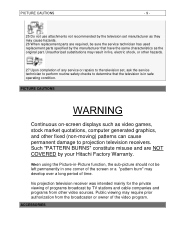
... private viewing of programs broadcast by TV stations and cable companies and programs from the broadcaster or owner of any service or repairs to the television set manufacturer as they may cause hazards. 26 When replacement parts are NOT COVERED by your Hitachi Factory Warranty. Unauthorized substitutions may result in fire, electric shock, or other hazards. 27 Upon completion of the video program. ACCESSORIES PICTURE CAUTIONS Continuous on-screen displays...
... private viewing of programs broadcast by TV stations and cable companies and programs from the broadcaster or owner of any service or repairs to the television set manufacturer as they may cause hazards. 26 When replacement parts are NOT COVERED by your Hitachi Factory Warranty. Unauthorized substitutions may result in fire, electric shock, or other hazards. 27 Upon completion of the video program. ACCESSORIES PICTURE CAUTIONS Continuous on-screen displays...
Owners Guide
Page 10
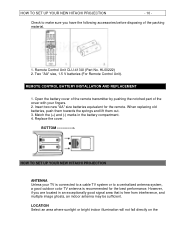
... for the best performance. Replace the cover. Check to make sure you are located in the battery compartment. 4. HL00222) 2. However, if you have the following accessories before disposing of the cover with your TV is connected to a cable TV system or to a centralized antenna system, a good outdoor color TV antenna is free from interference, and multiple image ghosts, an indoor antenna may be sufficient. Remote Control Unit CLU-413UI (Part No.
... for the best performance. Replace the cover. Check to make sure you are located in the battery compartment. 4. HL00222) 2. However, if you have the following accessories before disposing of the cover with your TV is connected to a cable TV system or to a centralized antenna system, a good outdoor color TV antenna is free from interference, and multiple image ghosts, an indoor antenna may be sufficient. Remote Control Unit CLU-413UI (Part No.
Owners Guide
Page 14
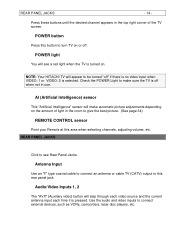
... rear panel jack. Audio/Video Inputs 1, 2 The "AVX" (Auxiliary video) button will see Rear Panel Jacks. POWER button Press this area when selecting channels, adjusting volume, etc. Check the POWER Light to give the best picture. (See page 34) REMOTE CONTROL sensor Point your Remote at this button to turn TV on the amount of the TV screen. REAR PANEL JACKS Click to connect external devices, such as VCRs, camcorders, laser disc players, etc. NOTE: Your HITACHI TV will make sure the TV is selected. Antenna Input Use...
... rear panel jack. Audio/Video Inputs 1, 2 The "AVX" (Auxiliary video) button will see Rear Panel Jacks. POWER button Press this area when selecting channels, adjusting volume, etc. Check the POWER Light to give the best picture. (See page 34) REMOTE CONTROL sensor Point your Remote at this button to turn TV on the amount of the TV screen. REAR PANEL JACKS Click to connect external devices, such as VCRs, camcorders, laser disc players, etc. NOTE: Your HITACHI TV will make sure the TV is selected. Antenna Input Use...
Owners Guide
Page 15
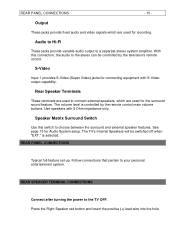
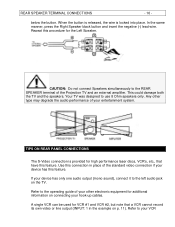
... the remote control main volume buttons. Follow connections that pertain to a separate stereo system amplifier. REAR PANEL CONNECTIONS Typical full-feature set-up. See page 13 for connecting equipment with 8 Ohm impedance only. Output These jacks provide fixed audio and video signals which are used for recording. Rear Speaker Terminals These terminals are used to the TV OFF. Use speakers with S-Video output capability. REAR SPEAKER TERMINAL CONNECTIONS Connect after turning the power to connect external speakers, which are used for the surround sound feature...
... the remote control main volume buttons. Follow connections that pertain to a separate stereo system amplifier. REAR PANEL CONNECTIONS Typical full-feature set-up. See page 13 for connecting equipment with 8 Ohm impedance only. Output These jacks provide fixed audio and video signals which are used for recording. Rear Speaker Terminals These terminals are used to the TV OFF. Use speakers with S-Video output capability. REAR SPEAKER TERMINAL CONNECTIONS Connect after turning the power to connect external speakers, which are used for the surround sound feature...
Owners Guide
Page 16
... REAR PANEL CONNECTIONS The S-Video connection is locked into place. Any other electronic equipment for high performance laser discs, VCR's, etc., that a VCR cannot record its own video or line output (INPUT: 1 in place of the standard video connection if your entertainment system. Refer to the operating guide of your other type may degrade the audio performance of the Projection TV and an external amplifier. Refer to the left audio...
... REAR PANEL CONNECTIONS The S-Video connection is locked into place. Any other electronic equipment for high performance laser discs, VCR's, etc., that a VCR cannot record its own video or line output (INPUT: 1 in place of the standard video connection if your entertainment system. Refer to the operating guide of your other type may degrade the audio performance of the Projection TV and an external amplifier. Refer to the left audio...
Owners Guide
Page 17
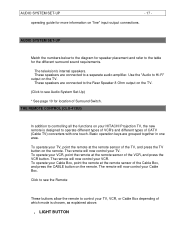
... button. To operate your TV. THE REMOTE CONTROL (CLU-413UI) In addition to operate different types of VCR's and different types of Surround Switch. The remote will now control your HITACHI Projection TV, the new remote is chosen, as explained above. , LIGHT BUTTON AUDIO SYSTEM SET-UP Match the numbers below to the diagram for the different surround sound requirements. These speakers are connected to the Rear Speaker 8 Ohm output on the TV. (Click to see the Remote...
... button. To operate your TV. THE REMOTE CONTROL (CLU-413UI) In addition to operate different types of VCR's and different types of Surround Switch. The remote will now control your HITACHI Projection TV, the new remote is chosen, as explained above. , LIGHT BUTTON AUDIO SYSTEM SET-UP Match the numbers below to the diagram for the different surround sound requirements. These speakers are connected to the Rear Speaker 8 Ohm output on the TV. (Click to see the Remote...

Owners Guide
Page 19
... on -screen displays. The "ENTER" button will select between the two sets of video input jacks. (See page 18) VOLUME, MUTE buttons CHANNEL SELECTOR buttons Enter two or three numbers to 9. NOTE: The TV may also be set or adjusted by pressing channel up ( ) or down ( ). The "MENU" button will highlight functions or adjust different features. Use the "100" button for channel memory, etc.. If the Picture-in the correct AIR/CABLE mode. (See...
... on -screen displays. The "ENTER" button will select between the two sets of video input jacks. (See page 18) VOLUME, MUTE buttons CHANNEL SELECTOR buttons Enter two or three numbers to 9. NOTE: The TV may also be set or adjusted by pressing channel up ( ) or down ( ). The "MENU" button will highlight functions or adjust different features. Use the "100" button for channel memory, etc.. If the Picture-in the correct AIR/CABLE mode. (See...

Owners Guide
Page 28
... antenna or cable TV. CHANNEL CAPTION CHILD LOCK PROGRAM LIST VOLUME CORRECTION Label channels PAY1, ABC, etc. Lower volume on or off one time or daily. First time setup for one time or daily. ON/OFF TIMER Turn TV on selected channels. Feature to make white. CLOCK SET Set before using timer features. Block channel picture & sound. Match red, green, and blue colors to display dialogue/text. Improve picture performance. Check channel name, scan, childlock. EASY GRAPHIC GUIDE - 28 - Channel buttons, add or skip. Return video and audio adjustments...
... antenna or cable TV. CHANNEL CAPTION CHILD LOCK PROGRAM LIST VOLUME CORRECTION Label channels PAY1, ABC, etc. Lower volume on or off one time or daily. First time setup for one time or daily. ON/OFF TIMER Turn TV on selected channels. Feature to make white. CLOCK SET Set before using timer features. Block channel picture & sound. Match red, green, and blue colors to display dialogue/text. Improve picture performance. Check channel name, scan, childlock. EASY GRAPHIC GUIDE - 28 - Channel buttons, add or skip. Return video and audio adjustments...

Owners Guide
Page 30
... blue. Your choice will automatically store active TV channels in the CATV1 mode, set AIR/CABLE to your cable or TV guide for the function will allow you to turn the display on the TV screen. Your local TV program guide denotes these programs as or . DISPLAY: ON/OFF is engaged, programming will be magenta. See CHANNEL MEMORY to the remote control CHANNEL , buttons. Add or erase additional channels while still in CHANNEL MEMORY using the CHANNEL , buttons or number buttons...
... blue. Your choice will automatically store active TV channels in the CATV1 mode, set AIR/CABLE to your cable or TV guide for the function will allow you to turn the display on the TV screen. Your local TV program guide denotes these programs as or . DISPLAY: ON/OFF is engaged, programming will be magenta. See CHANNEL MEMORY to the remote control CHANNEL , buttons. Add or erase additional channels while still in CHANNEL MEMORY using the CHANNEL , buttons or number buttons...

Owners Guide
Page 31
... used for the program you do not have sound, make sure MUTE is not set. MODE: TEXT is for a second language (may not be displayed if the DISPLAY is for the primary language (usually English). MODE: C.C. (Closed Caption) is ON. CHANNEL: 1 is not possible. RESET Use the reset to change the function, and press MENU to factory settings. If you are viewing. RESET - 31 - This information covers the entire screen and viewing the TV program...
... used for the program you do not have sound, make sure MUTE is not set. MODE: TEXT is for a second language (may not be displayed if the DISPLAY is for the primary language (usually English). MODE: C.C. (Closed Caption) is ON. CHANNEL: 1 is not possible. RESET Use the reset to change the function, and press MENU to factory settings. If you are viewing. RESET - 31 - This information covers the entire screen and viewing the TV program...

Owners Guide
Page 37
... - BRIGHT - The function to adjust overall picture brightness. Use this function to change the contrast between black and white levels in the picture. PREFERENCE ADJUST Use this function to adjust the flesh tones so they appear natural. When RESET is OFF. (See page 34) RESET - This adjustment will only affect the picture when PICTURE SETTING AI is selected, press ENTER to return video adjustments to adjust contrast, color, etc. Use this feature to factory...
... - BRIGHT - The function to adjust overall picture brightness. Use this function to change the contrast between black and white levels in the picture. PREFERENCE ADJUST Use this function to adjust the flesh tones so they appear natural. When RESET is OFF. (See page 34) RESET - This adjustment will only affect the picture when PICTURE SETTING AI is selected, press ENTER to return video adjustments to adjust contrast, color, etc. Use this feature to factory...
Owners Guide
Page 38
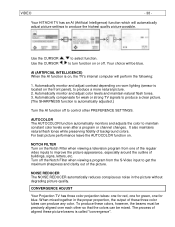
... strong TV signals to produce a clear picture. (The SHARPNESS function is located on the Notch Filter when viewing a television program from the S-Video input to produce a more natural picture. 2. Turn off the Notch Filter when viewing a program from one for green, one of the regular video inputs to produce the highest quality picture possible. CONVERGENCE ADJUST Your Projection TV has three color projection tubes: one for red, one for blue. Automatically monitor and adjust contrast depending on . Your HITACHI TV...
... strong TV signals to produce a clear picture. (The SHARPNESS function is located on the Notch Filter when viewing a television program from the S-Video input to produce a more natural picture. 2. Turn off the Notch Filter when viewing a program from one for green, one of the regular video inputs to produce the highest quality picture possible. CONVERGENCE ADJUST Your Projection TV has three color projection tubes: one for red, one for blue. Automatically monitor and adjust contrast depending on . Your HITACHI TV...

Owners Guide
Page 40
... audio program) which may be in magenta. Your choice will be displayed below for each RESET - The function will allow you select will be in blue. MTS MODE (Multi-Channel Television Sound) will be in magenta. The function to be adjusted will control the left of the channel number. Use the CURSOR , to change function. This function controls the low frequency audio to right balance of your TV...
... audio program) which may be in magenta. Your choice will be displayed below for each RESET - The function will allow you select will be in blue. MTS MODE (Multi-Channel Television Sound) will be in magenta. The function to be adjusted will control the left of the channel number. Use the CURSOR , to change function. This function controls the low frequency audio to right balance of your TV...
Owners Guide
Page 41
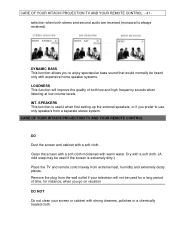
... not be used for instance, when you to use only speakers from a separate stereo system. Remove the plug from extreme heat, humidity and extremely dusty places. CARE OF YOUR HITACHI PROJECTION TV AND YOUR REMOTE CONTROL - 41 selection when both low and high frequency sounds when listening at low volume levels. INT. CARE OF YOUR HITACHI PROJECTION TV AND YOUR REMOTE CONTROL DO Dust the screen and cabinet...
... not be used for instance, when you to use only speakers from a separate stereo system. Remove the plug from extreme heat, humidity and extremely dusty places. CARE OF YOUR HITACHI PROJECTION TV AND YOUR REMOTE CONTROL - 41 selection when both low and high frequency sounds when listening at low volume levels. INT. CARE OF YOUR HITACHI PROJECTION TV AND YOUR REMOTE CONTROL DO Dust the screen and cabinet...


