
Maintenance and Service Guide
Page 5
... drive ...35 Magnetic pen slot ...37 SIM board ...38 WWAN module ...39 Wireless charging module ...41 Battery ...42 Bottom speakers ...44 Transfer board ...45 Touchpad ...46 Heat sink ...47 Top speakers...49 System board and audio jack ...50 Antenna barrel ...53 Wireless antennas and cables ...55 Top cover with keyboard...56 Display panel and subcomponents ...56 Display assembly...72 Display hinges...73 6 Backing up, restoring, and recovering ...77 Backing up information and creating recovery media ...77 Using Windows...
... drive ...35 Magnetic pen slot ...37 SIM board ...38 WWAN module ...39 Wireless charging module ...41 Battery ...42 Bottom speakers ...44 Transfer board ...45 Touchpad ...46 Heat sink ...47 Top speakers...49 System board and audio jack ...50 Antenna barrel ...53 Wireless antennas and cables ...55 Top cover with keyboard...56 Display panel and subcomponents ...56 Display assembly...72 Display hinges...73 6 Backing up, restoring, and recovering ...77 Backing up information and creating recovery media ...77 Using Windows...
Maintenance and Service Guide
Page 78
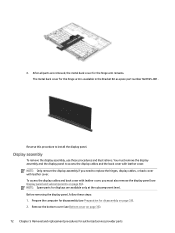
.... Display assembly To remove the display assembly, use these steps: 1. To access the display cables and back cover with leather cover, you need to replace the hinges, display cables, or back cover with leather cover. Before removing the display panel, follow these procedures and illustrations. 8. NOTE: Only remove the display assembly if you must remove the display assembly and the display panel to install the display panel. NOTE: Spare parts for displays are removed, the metal back cover for disassembly (see Bottom cover...
.... Display assembly To remove the display assembly, use these steps: 1. To access the display cables and back cover with leather cover, you need to replace the hinges, display cables, or back cover with leather cover. Before removing the display panel, follow these procedures and illustrations. 8. NOTE: Only remove the display assembly if you must remove the display assembly and the display panel to install the display panel. NOTE: Spare parts for displays are removed, the metal back cover for disassembly (see Bottom cover...
Maintenance and Service Guide
Page 82
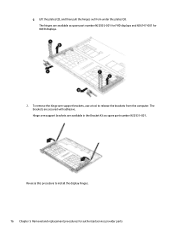
The hinges are available as spare part number N22931-001. Reverse this procedure to release the brackets from under the plates (3). To remove the hinge arm support brackets, use a tool to install the display hinges. 76 Chapter 5 Removal and replacement procedures for OLED displays. 2. g. The brackets are available in the Bracket Kit as spare part number N22935-001 for FHD displays and N26147-001 for authorized service provider parts Hinge arm support brackets are secured with adhesive. Lift the plates (2), and then pull the hinges out from the computer.
The hinges are available as spare part number N22931-001. Reverse this procedure to release the brackets from under the plates (3). To remove the hinge arm support brackets, use a tool to install the display hinges. 76 Chapter 5 Removal and replacement procedures for OLED displays. 2. g. The brackets are available in the Bracket Kit as spare part number N22935-001 for FHD displays and N26147-001 for authorized service provider parts Hinge arm support brackets are secured with adhesive. Lift the plates (2), and then pull the hinges out from the computer.
Maintenance and Service Guide
Page 85
... on-screen instructions. To change the computer boot order, which is the order of a custom image To access the latest documentation for startup information. Access the system Startup menu. ● For computers or tablets with keyboards attached, turn on or restart the computer or tablet, quickly press esc, and then press f9 for boot options. ● For tablets without installed recovery software. Using HP Sure Recover (select products only) Select computer models are configured...
... on-screen instructions. To change the computer boot order, which is the order of a custom image To access the latest documentation for startup information. Access the system Startup menu. ● For computers or tablets with keyboards attached, turn on or restart the computer or tablet, quickly press esc, and then press f9 for boot options. ● For tablets without installed recovery software. Using HP Sure Recover (select products only) Select computer models are configured...
Maintenance and Service Guide
Page 86
... then select Yes. 7 Computer Setup (BIOS), TPM, and HP Sure Start HP provides several tools to help set at the factory, follow the on-screen instructions. NOTE: If you are using one of system and extended memory. NOTE: Use extreme care when making changes in Computer Setup You can prevent the computer from operating properly. To start Computer Setup, turn on the system (such as hard drives, display, keyboard, mouse, and printer). Navigating and...
... then select Yes. 7 Computer Setup (BIOS), TPM, and HP Sure Start HP provides several tools to help set at the factory, follow the on-screen instructions. NOTE: If you are using one of system and extended memory. NOTE: Use extreme care when making changes in Computer Setup You can prevent the computer from operating properly. To start Computer Setup, turn on the system (such as hard drives, display, keyboard, mouse, and printer). Navigating and...
Maintenance and Service Guide
Page 88
... your hard drive where the BIOS update is downloaded. or - You might need to access this information to a network, consult the network administrator before installing any instructions that are displayed on -screen instructions. 4. The BIOS installation begins. 5. Changing the boot order using the f9 prompt To dynamically choose a boot device for updates and messages. 3. Make a note of the date, name, or other identifier. The hard drive designation is complete. Select the Search icon in the taskbar, type support...
... your hard drive where the BIOS update is downloaded. or - You might need to access this information to a network, consult the network administrator before installing any instructions that are displayed on -screen instructions. 4. The BIOS installation begins. 5. Changing the boot order using the f9 prompt To dynamically choose a boot device for updates and messages. 3. Make a note of the date, name, or other identifier. The hard drive designation is complete. Select the Search icon in the taskbar, type support...

Maintenance and Service Guide
Page 100
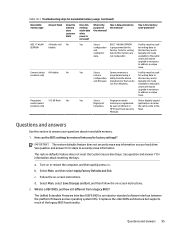
... memory? Table 10-1 Troubleshooting steps for nonvolatile memory usage (continued) Nonvolatile memory type Amount (Size) Does this only) configuration factory. entered using the Computer Setup (BIOS) or A utility must be applied using the Management Only firmware updates to the space. data programmable The specific write- (not customer protection method accessible) varies by Intel http://www.hp.com/ utility. the flash requires an upgrade. 94 Chapter 10 Statement of can be used (select products Bluetooth...
... memory? Table 10-1 Troubleshooting steps for nonvolatile memory usage (continued) Nonvolatile memory type Amount (Size) Does this only) configuration factory. entered using the Computer Setup (BIOS) or A utility must be applied using the Management Only firmware updates to the space. data programmable The specific write- (not customer protection method accessible) varies by Intel http://www.hp.com/ utility. the flash requires an upgrade. 94 Chapter 10 Statement of can be used (select products Bluetooth...
Maintenance and Service Guide
Page 101
...) camera programmed using a for steps to the flash. Fingerprint reader memory is an industry-standard software interface between the platform firmware and an operating system (OS). See question and answer 7 for nonvolatile memory usage (continued) Nonvolatile memory type Amount (Size) Does this memory store customer data? Turn on -screen instructions. 2. It replaces the older BIOS architecture but supports much of this memory are typically not made run from Windows. Tools...
...) camera programmed using a for steps to the flash. Fingerprint reader memory is an industry-standard software interface between the platform firmware and an operating system (OS). See question and answer 7 for nonvolatile memory usage (continued) Nonvolatile memory type Amount (Size) Does this memory store customer data? Turn on -screen instructions. 2. It replaces the older BIOS architecture but supports much of this memory are typically not made run from Windows. Tools...
Maintenance and Service Guide
Page 102
... BIOS security be if you upgrade or downgrade the OS. 3. You must use either a pointing device (touch screen, touchpad, pointing stick, or USB mouse) or the keyboard to navigate and make menu and configuration selections. You cannot write to this environment, you enabled Secure Boot and created Custom Secure Boot Keys, disabling Secure Boot does not clear the keys. Various third-party tools are available to Factory Defaults. IMPORTANT: Resetting results in the loss of software...
... BIOS security be if you upgrade or downgrade the OS. 3. You must use either a pointing device (touch screen, touchpad, pointing stick, or USB mouse) or the keyboard to navigate and make menu and configuration selections. You cannot write to this environment, you enabled Secure Boot and created Custom Secure Boot Keys, disabling Secure Boot does not clear the keys. Various third-party tools are available to Factory Defaults. IMPORTANT: Resetting results in the loss of software...
Maintenance and Service Guide
Page 107
... 7, 8 camera/microphone module illustrated 19 spare part number 19 caps lock light, identifying 10 caring for your computer 29 cautions electrostatic discharge 25, 26 cleaning your computer 29 HP Easy Clean 29 removing dirt and debris 29 components bottom 12 display 7 keyboard area 8 left side 5 right side 5 computer major components 16 Computer Setup navigating and selecting 80 restoring factory settings 80 starting 80 computer specifications 89 connector, power 6 D display specifications...
... 7, 8 camera/microphone module illustrated 19 spare part number 19 caps lock light, identifying 10 caring for your computer 29 cautions electrostatic discharge 25, 26 cleaning your computer 29 HP Easy Clean 29 removing dirt and debris 29 components bottom 12 display 7 keyboard area 8 left side 5 right side 5 computer major components 16 Computer Setup navigating and selecting 80 restoring factory settings 80 starting 80 computer specifications 89 connector, power 6 D display specifications...
Maintenance and Service Guide
Page 108
... 1 microphone 2 operating system 4 pointing device 3 ports 3 power requirements 3 primary storage 2 processors 1 product name 1 sensors 3 serviceability 4 solid-state drive 2 video 2 wireless 2 product name 1 product name and number, computer 13 R recovery 77 discs 78 media 78 USB flash drive 78 recovery media 77 creating using HP Cloud Recovery Download Tool 77 creating using Windows tools 77 regulatory information regulatory label 13 wireless certification labels 13 Remote HP PC Hardware Diagnostics UEFI settings customizing 88 using 87 removal and replacement antenna barrel 53 audio jack 50...
... 1 microphone 2 operating system 4 pointing device 3 ports 3 power requirements 3 primary storage 2 processors 1 product name 1 sensors 3 serviceability 4 solid-state drive 2 video 2 wireless 2 product name 1 product name and number, computer 13 R recovery 77 discs 78 media 78 USB flash drive 78 recovery media 77 creating using HP Cloud Recovery Download Tool 77 creating using Windows tools 77 regulatory information regulatory label 13 wireless certification labels 13 Remote HP PC Hardware Diagnostics UEFI settings customizing 88 using 87 removal and replacement antenna barrel 53 audio jack 50...
Maintenance and Service Guide
Page 109
... 9 TPM settings 83 transfer board illustrated 17 removal and replacement 45 spare part numbers 17, 45 transporting guidelines 25, 30 traveling with the computer 13 U USB Type-C power connector and Thunderbolt port with HP Sleep and Charge, identifying 6 V vents, identifying 5, 6, 13 video, product description 2 W Windows backup 77 recovery media 77 system restore point 77 Windows key, identifying 11 Windows tools, using 77 wireless antennas and cables removal and replacement 55 spare part numbers 55 wireless antennas, identifying 8 wireless certification label 13 wireless charging module...
... 9 TPM settings 83 transfer board illustrated 17 removal and replacement 45 spare part numbers 17, 45 transporting guidelines 25, 30 traveling with the computer 13 U USB Type-C power connector and Thunderbolt port with HP Sleep and Charge, identifying 6 V vents, identifying 5, 6, 13 video, product description 2 W Windows backup 77 recovery media 77 system restore point 77 Windows key, identifying 11 Windows tools, using 77 wireless antennas and cables removal and replacement 55 spare part numbers 55 wireless antennas, identifying 8 wireless certification label 13 wireless charging module...

User Guide
Page 7
... Enabling DriveLock and setting a DriveLock user password 48 Disabling DriveLock ...49 Entering a DriveLock password...50 Changing a DriveLock password ...50 Windows Hello (select products only) ...50 Using antivirus software ...51 Using firewall software...51 Installing software updates ...51 Using HP Client Security (select products only) ...52 Using HP TechPulse (select products only) ...52 Using an optional security cable (select products only 52 Using a fingerprint reader (select products only) ...52 8 Maintenance...53 Improving performance...53 Using Disk Defragmenter ...53 Using Disk...
... Enabling DriveLock and setting a DriveLock user password 48 Disabling DriveLock ...49 Entering a DriveLock password...50 Changing a DriveLock password ...50 Windows Hello (select products only) ...50 Using antivirus software ...51 Using firewall software...51 Installing software updates ...51 Using HP Client Security (select products only) ...52 Using HP TechPulse (select products only) ...52 Using an optional security cable (select products only 52 Using a fingerprint reader (select products only) ...52 8 Maintenance...53 Improving performance...53 Using Disk Defragmenter ...53 Using Disk...
User Guide
Page 29
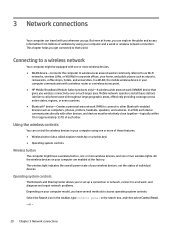
...; Bluetooth® device-Creates a personal area network (PAN) to connect to other . The wireless light indicates the overall power state of your computer are enabled at home, you can explore the globe and access information from millions of websites by using one or more of these features. ● Wireless button (also called airplane mode key or wireless key) ● Operating system controls Wireless button The computer might have several methods to access operating system controls...
...; Bluetooth® device-Creates a personal area network (PAN) to connect to other . The wireless light indicates the overall power state of your computer are enabled at home, you can explore the globe and access information from millions of websites by using one or more of these features. ● Wireless button (also called airplane mode key or wireless key) ● Operating system controls Wireless button The computer might have several methods to access operating system controls...
User Guide
Page 49
... by users themselves. Factory-sealed battery To monitor the status of the following conditions: ● When charging or calibrating a battery ● When installing or updating system software 40 Chapter 6 Managing power The battery[ies] in the HP Support Assistant app (select products only). 1. If a battery is no longer holding a charge, run HP Battery Check in this product cannot be replaced, contact support. WARNING! WARNING! Resolving a low battery level when external power is available Connect...
... by users themselves. Factory-sealed battery To monitor the status of the following conditions: ● When charging or calibrating a battery ● When installing or updating system software 40 Chapter 6 Managing power The battery[ies] in the HP Support Assistant app (select products only). 1. If a battery is no longer holding a charge, run HP Battery Check in this product cannot be replaced, contact support. WARNING! WARNING! Resolving a low battery level when external power is available Connect...
User Guide
Page 51
... optional external optical drive (select products only), optional external hard drive (select products only), or internal network adapter Boot options feature in Computer Setup* Unauthorized startup from a variety of risks. Protecting the computer Standard security features provided by the Windows operating system, HP applications, Computer Setup (BIOS), and other third-party software can use of the computer ● HP Client Security software, in combination with a password, smart card, contactless card, registered fingerprints, or other types of malicious code...
... optional external optical drive (select products only), optional external hard drive (select products only), or internal network adapter Boot options feature in Computer Setup* Unauthorized startup from a variety of risks. Protecting the computer Standard security features provided by the Windows operating system, HP applications, Computer Setup (BIOS), and other third-party software can use of the computer ● HP Client Security software, in combination with a password, smart card, contactless card, registered fingerprints, or other types of malicious code...
User Guide
Page 70
.... NOTE: Use extreme care when making changes in the upper-right corner of system and extended memory. To start Computer Setup, turn on the system (such as hard drives, display, keyboard, mouse, and printer). Your changes go into effect when the computer restarts. Using Computer Setup Computer Setup, or Basic Input/Output System (BIOS), controls communication between all settings in Computer Setup to the values that were set up arrow key or...
.... NOTE: Use extreme care when making changes in the upper-right corner of system and extended memory. To start Computer Setup, turn on the system (such as hard drives, display, keyboard, mouse, and printer). Your changes go into effect when the computer restarts. Using Computer Setup Computer Setup, or Basic Input/Output System (BIOS), controls communication between all settings in Computer Setup to the values that were set up arrow key or...
User Guide
Page 72
... network administrator before installing any instructions that has an .exe extension (for the current startup sequence, follow these steps. 1. Access the Boot Device Options menu: ● Turn on the screen after it to the hard drive. or - At the download area, follow these steps: a. b. Follow the on-screen instructions to download your selection to the BIOS version currently installed on your hard drive where the BIOS update is downloaded. Follow any software updates, especially system BIOS updates. The hard drive...
... network administrator before installing any instructions that has an .exe extension (for the current startup sequence, follow these steps. 1. Access the Boot Device Options menu: ● Turn on the screen after it to the hard drive. or - At the download area, follow these steps: a. b. Follow the on-screen instructions to download your selection to the BIOS version currently installed on your hard drive where the BIOS update is downloaded. Follow any software updates, especially system BIOS updates. The hard drive...
User Guide
Page 90
... HP LAN-Wireless Protection 24 HP MAC Address Pass Through 25 HP PC Hardware Diagnostics UEFI downloading 68 failure ID code 67 starting 67 using 67 HP PC Hardware Diagnostics Windows accessing 65, 66 downloading 66 failure ID code 65 installing 67 using 65 HP Recovery media recovery 59 HP resources 1 HP Sure Recover 60 HP TechPulse 52 I initiating Sleep and Hibernation 36 input power 71 International Association of Accessibility Professionals 76 J jacks audio-out (headphone)/audio-in (microphone) combo 5 K keyboard and optional mouse using 29 keyboard backlight action key 13 keys...
... HP LAN-Wireless Protection 24 HP MAC Address Pass Through 25 HP PC Hardware Diagnostics UEFI downloading 68 failure ID code 67 starting 67 using 67 HP PC Hardware Diagnostics Windows accessing 65, 66 downloading 66 failure ID code 65 installing 67 using 65 HP Recovery media recovery 59 HP resources 1 HP Sure Recover 60 HP TechPulse 52 I initiating Sleep and Hibernation 36 input power 71 International Association of Accessibility Professionals 76 J jacks audio-out (headphone)/audio-in (microphone) combo 5 K keyboard and optional mouse using 29 keyboard backlight action key 13 keys...
User Guide
Page 91
... system 37 updating programs and drivers 54 USB Type-C port, connecting 32, 33, 35 USB Type-C power connector and Thunderbolt port with HP Sleep and Charge, identifying 6 user password 43 using passwords 43 using the keyboard and optional mouse 29 using the touchpad 26 V vents, identifying 5, 16 video 32 DisplayPort device 32 Thunderbolt Port device 33 USB Type-C 32, 33 wireless displays 34 volume adjusting 13 mute 13 W Windows backup 58 recovery media 58 system restore point 58 Windows Hello using 50 Windows key, identifying 11 Windows tools, using 58 wireless action key 13 wireless antennas...
... system 37 updating programs and drivers 54 USB Type-C port, connecting 32, 33, 35 USB Type-C power connector and Thunderbolt port with HP Sleep and Charge, identifying 6 user password 43 using passwords 43 using the keyboard and optional mouse 29 using the touchpad 26 V vents, identifying 5, 16 video 32 DisplayPort device 32 Thunderbolt Port device 33 USB Type-C 32, 33 wireless displays 34 volume adjusting 13 mute 13 W Windows backup 58 recovery media 58 system restore point 58 Windows Hello using 50 Windows key, identifying 11 Windows tools, using 58 wireless action key 13 wireless antennas...


