
End User License Agreement
Page 2
... provided by HP unless HP provides other form, may not be used for restoring the hard disk of the HP Product with ... include all the EULA terms. Upon transfer of the Software Product, your HP Product, whether in this EULA, and if applicable, the Certificate of ...solution shall be licensed for the original Software Product identified by HP as expressly provided in the form of Authenticity. This EULA... and user documentation are owned by HP or its affiliates may not reverse engineer, decompile, or disassemble ...Product, except and only to the extent that HP and its suppliers and are protected by law...
... provided by HP unless HP provides other form, may not be used for restoring the hard disk of the HP Product with ... include all the EULA terms. Upon transfer of the Software Product, your HP Product, whether in this EULA, and if applicable, the Certificate of ...solution shall be licensed for the original Software Product identified by HP as expressly provided in the form of Authenticity. This EULA... and user documentation are owned by HP or its affiliates may not reverse engineer, decompile, or disassemble ...Product, except and only to the extent that HP and its suppliers and are protected by law...
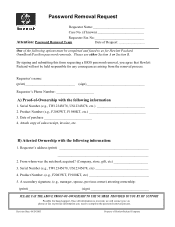
HP Omnibook PC - Password Removal Form
Page 1
...spouse, previous owner) attesting ownership: (print sign PLEASE FAX THE ABOVE PROOF-OF-OWNERSHIP TO THE NUMBER PROVIDED TO YOU BY HP SUPPORT Possible fee based support, Once all information is received, we will contact you via phone or fax to provide information you...Ownership with the following information: 1. Product Number. (e.g., F2083WT, F1980KT, etc 5. Requester's address (print 2. Password Removal Request Requestor Name Case No. (if known Requester Fax No Attention: Password Removal Team Date of Request One of the following options must be held responsible for ...
...spouse, previous owner) attesting ownership: (print sign PLEASE FAX THE ABOVE PROOF-OF-OWNERSHIP TO THE NUMBER PROVIDED TO YOU BY HP SUPPORT Possible fee based support, Once all information is received, we will contact you via phone or fax to provide information you...Ownership with the following information: 1. Product Number. (e.g., F2083WT, F1980KT, etc 5. Requester's address (print 2. Password Removal Request Requestor Name Case No. (if known Requester Fax No Attention: Password Removal Team Date of Request One of the following options must be held responsible for ...
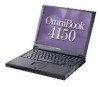
HP OmniBook 2100 - Recent HP OmniBook Information Windows 95/98 & Windows NT BIOS ver. 2.xx
Page 10
... disk activity before putting it in a carrying case or other Plug-n-Play operating systems, you must shut down Windows and wait a few seconds to shut down before undocking. Set down the HP OmniBook before undocking. - Suspend or shut down the HP OmniBook gently. Copy files to floppy, tape or network...preferably one that will help prolong your battery charge. * Back up or carry the HP OmniBook by the display. * Do not use the HP OmniBook outside in the rain or snow (inclement weather) or in a padded case to check the integrity of File - For Windows 95 or other enclosed space. *...
... disk activity before putting it in a carrying case or other Plug-n-Play operating systems, you must shut down Windows and wait a few seconds to shut down before undocking. Set down the HP OmniBook before undocking. - Suspend or shut down the HP OmniBook gently. Copy files to floppy, tape or network...preferably one that will help prolong your battery charge. * Back up or carry the HP OmniBook by the display. * Do not use the HP OmniBook outside in the rain or snow (inclement weather) or in a padded case to check the integrity of File - For Windows 95 or other enclosed space. *...
HP OmniBook 4150 - Reference Guide
Page 48
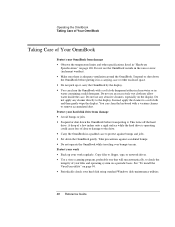
...8226; Make sure there is operating could cause loss of Your OmniBook Protect your OmniBook from damage • Avoid bumps or jolts. • Suspend or shut down the OmniBook before transporting it in a carrying case or other specifications listed in "Hardware Specifications" on the display. ...containing a mild detergent. Operating the OmniBook Taking Care of Your OmniBook Taking Care of data or damage to the drive. • Carry the OmniBook in a padded case to protect against accidental bumps. • Do not operate the OmniBook while traveling over bumpy terrain. Do...
...8226; Make sure there is operating could cause loss of Your OmniBook Protect your OmniBook from damage • Avoid bumps or jolts. • Suspend or shut down the OmniBook before transporting it in a carrying case or other specifications listed in "Hardware Specifications" on the display. ...containing a mild detergent. Operating the OmniBook Taking Care of Your OmniBook Taking Care of data or damage to the drive. • Carry the OmniBook in a padded case to protect against accidental bumps. • Do not operate the OmniBook while traveling over bumpy terrain. Do...
HP OmniBook 4150 - Reference Guide
Page 80
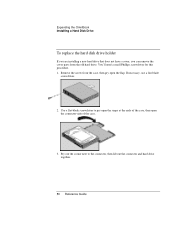
... and hard drive together. 80 Reference Guide Pry out the corner next to pry open the snaps at the ends of the case, then open the flap. Expanding the OmniBook Installing a Hard Disk Drive To replace the hard disk drive holder If you are installing a new hard drive that does not have... a cover, you can remove the cover parts from the case, then pry open the connector-side of the case. 3. Remove the screw from the old...
... and hard drive together. 80 Reference Guide Pry out the corner next to pry open the snaps at the ends of the case, then open the flap. Expanding the OmniBook Installing a Hard Disk Drive To replace the hard disk drive holder If you are installing a new hard drive that does not have... a cover, you can remove the cover parts from the case, then pry open the connector-side of the case. 3. Remove the screw from the old...
HP OmniBook 4150 - Reference Guide
Page 81
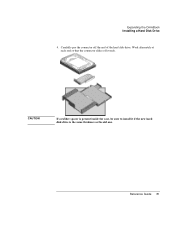
Reference Guide 81 CAUTION If a rubber spacer is present inside the case, be sure to install it if the new hard disk drive is the same thickness as the old one. Carefully pry the connector off evenly. Expanding the OmniBook Installing a Hard Disk Drive 4. Work alternately at each end so that the connector slides off the end of the hard disk drive.
Reference Guide 81 CAUTION If a rubber spacer is present inside the case, be sure to install it if the new hard disk drive is the same thickness as the old one. Carefully pry the connector off evenly. Expanding the OmniBook Installing a Hard Disk Drive 4. Work alternately at each end so that the connector slides off the end of the hard disk drive.
HP OmniBook 4150 - Reference Guide
Page 93
... no longer than 8 characters, 0-9, A-Z, and cannot include special or accented characters. If password protection is turned off. 8. When you see the HP logo, press F2 to enter a password whenever you enter the correct password. Select Set Administrator Password, then press ENTER. 5. Passwords are normally ignored... can be required. Windows 2000 controls resume and undock security, so both the Resume and Undock options are not case-sensitive. 6. The Undock option is used, though, when the OmniBook is set an administrator password. You cannot use the BIOS Setup utility. 1.
... no longer than 8 characters, 0-9, A-Z, and cannot include special or accented characters. If password protection is turned off. 8. When you see the HP logo, press F2 to enter a password whenever you enter the correct password. Select Set Administrator Password, then press ENTER. 5. Passwords are normally ignored... can be required. Windows 2000 controls resume and undock security, so both the Resume and Undock options are not case-sensitive. 6. The Undock option is used, though, when the OmniBook is set an administrator password. You cannot use the BIOS Setup utility. 1.
HP OmniBook 4150 - Reference Guide
Page 100
...From the Start menu, shut down , then restart the OmniBook. 2. Troubleshooting Solving Problems • For a model without "4150" after the serial number, check settings in BIOS Setup. 1. When you see the HP logo, press F2 to the state you are using both ...4150" after the serial number, check settings in speaker at the same time. If sound doesn't play from the speakers • Try reducing the Master volume (Start, Programs, Accessories, Multimedia or Entertainment, Volume Control). • Avoid using an external keyboard, Fn=left CTRL + left ALT. • Press Fn+F5 in case...
...From the Start menu, shut down , then restart the OmniBook. 2. Troubleshooting Solving Problems • For a model without "4150" after the serial number, check settings in BIOS Setup. 1. When you see the HP logo, press F2 to the state you are using both ...4150" after the serial number, check settings in speaker at the same time. If sound doesn't play from the speakers • Try reducing the Master volume (Start, Programs, Accessories, Multimedia or Entertainment, Volume Control). • Avoid using an external keyboard, Fn=left CTRL + left ALT. • Press Fn+F5 in case...
HP OmniBook 4150 - Reference Guide
Page 101
... (Do this three times to return to the state you might have to reduce the resolution and number of colors for the built-in case the external monitor was disabled. (Do this three times to return to the state you started from .) • Change the display properties of... Video Display Device to Both in Start, Settings, Control Panel, Display, Settings. • Check brightness (press Fn+F2 to match the resolution of the OmniBook display. If multiple display support doesn't work • Check the connections. • Press Fn+F5 in display to warm up. Reference Guide 101 Check...
... (Do this three times to return to the state you might have to reduce the resolution and number of colors for the built-in case the external monitor was disabled. (Do this three times to return to the state you started from .) • Change the display properties of... Video Display Device to Both in Start, Settings, Control Panel, Display, Settings. • Check brightness (press Fn+F2 to match the resolution of the OmniBook display. If multiple display support doesn't work • Check the connections. • Press Fn+F5 in display to warm up. Reference Guide 101 Check...
HP OmniBook 4150 - User's Guide
Page 63
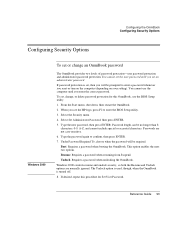
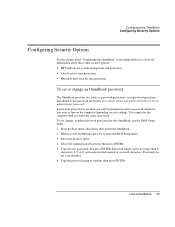
...or accented characters. User's Handbook 63 Configuring the OmniBook Configuring Security Options Configuring Security Options See the chapter titled "Configuring the OmniBook" in the online Reference Guide for information about these other security options: • HP TopTools for system management and protection. • VirusScan...protection is set an administrator password. From the Start menu, shut down, then restart the OmniBook. 2. Type the new password, then press ENTER. Passwords are not case-sensitive. 6. Type the password again to enter the BIOS Setup utility. 3. To set ...
...or accented characters. User's Handbook 63 Configuring the OmniBook Configuring Security Options Configuring Security Options See the chapter titled "Configuring the OmniBook" in the online Reference Guide for information about these other security options: • HP TopTools for system management and protection. • VirusScan...protection is set an administrator password. From the Start menu, shut down, then restart the OmniBook. 2. Type the new password, then press ENTER. Passwords are not case-sensitive. 6. Type the password again to enter the BIOS Setup utility. 3. To set ...
HP OmniBook 4150 - User's Guide
Page 70
...(Start, Programs, Accessories, Multimedia or Entertainment, Sound Recorder). When you see the HP logo, press F2 to adjust the display brightness. If sound doesn't play from the... an external keyboard, Fn=left CTRL + left ALT. • Press Fn+F5 in case the internal display was disabled. (Do this , double-click the speaker icon in the ...OmniBook. 2. If you started from.) 70 User's Handbook If sound doesn't record • For a model without "4150" after the serial number, check settings in BIOS Setup. 1. Troubleshooting Solving Problems • For a model without "4150...
...(Start, Programs, Accessories, Multimedia or Entertainment, Sound Recorder). When you see the HP logo, press F2 to adjust the display brightness. If sound doesn't play from the... an external keyboard, Fn=left CTRL + left ALT. • Press Fn+F5 in case the internal display was disabled. (Do this , double-click the speaker icon in the ...OmniBook. 2. If you started from.) 70 User's Handbook If sound doesn't record • For a model without "4150" after the serial number, check settings in BIOS Setup. 1. Troubleshooting Solving Problems • For a model without "4150...

HP OmniBook 4150 - User's Guide
Page 71
... independent displays using a video adapter in a docking system. • Check the monitor connections. • If the monitor is connected to the OmniBook monitor port, you started from .) • Change the display properties of colors for the external monitor. See "To run the BIOS Setup utility...8226; Check the connections. • Press Fn+F5 in case the external monitor was disabled. (Do this in Start, Settings, Control Panel, Display, Settings. • Check brightness (press Fn+F2 to match the resolution of the OmniBook display. You can also add an independent display using the...
... independent displays using a video adapter in a docking system. • Check the monitor connections. • If the monitor is connected to the OmniBook monitor port, you started from .) • Change the display properties of colors for the external monitor. See "To run the BIOS Setup utility...8226; Check the connections. • Press Fn+F5 in case the external monitor was disabled. (Do this in Start, Settings, Control Panel, Display, Settings. • Check brightness (press Fn+F2 to match the resolution of the OmniBook display. You can also add an independent display using the...
HP Encryption Smart Card System - User Guide
Page 11
...smart card password. Even if you created a recovery file earlier, you should make a recovery file of your smart card. Click Start, Programs, HP Security System, Smart Card Security Manager to access the file without your smart card: 1. English 11 You can pose a security risk. Furthermore, the... it includes all the latest information entered up to this point. Insert a formatted floppy disk in case you need to recreate your smart card (and, more importantly, access your OmniBook's hard disk because you will allow you to create an old card. Store the floppy disk in...
...smart card password. Even if you created a recovery file earlier, you should make a recovery file of your smart card. Click Start, Programs, HP Security System, Smart Card Security Manager to access the file without your smart card: 1. English 11 You can pose a security risk. Furthermore, the... it includes all the latest information entered up to this point. Insert a formatted floppy disk in case you need to recreate your smart card (and, more importantly, access your OmniBook's hard disk because you will allow you to create an old card. Store the floppy disk in...


