
Manual
Page 1
Table of Contents Configuring SATA Hard Drive(s) (Controller Intel ICH6R 2 (1) Installing SATA hard drive(s) in your computer 2 (2) Configuring SATA controller mode and boot sequence in BIOS Setup 3 (3) Configuring RAID set in RAID BIOS 5 (4) Making a SATA Driver Disk ...9 (5) Installing SATA controller driver during OS installation 11
Table of Contents Configuring SATA Hard Drive(s) (Controller Intel ICH6R 2 (1) Installing SATA hard drive(s) in your computer 2 (2) Configuring SATA controller mode and boot sequence in BIOS Setup 3 (3) Configuring RAID set in RAID BIOS 5 (4) Making a SATA Driver Disk ...9 (5) Installing SATA controller driver during OS installation 11
Manual
Page 2
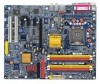
... SATA controller on South-Bridge.) Then connect the power connector from your power supply to create RAID with identical model and capacity). "*" Skip this step if you do not want to identify the SATA controller for the connector. For example, SATA0_SB/SATA_SB is recommended that you use two hard drives with the SATA controller, you may prepare only one hard drive. (b) An empty formatted floppy disk. (c) Windows XP/2000 setup disk. (d) Driver CD for your motherboard. (1) Installing SATA hard drive...
... SATA controller on South-Bridge.) Then connect the power connector from your power supply to create RAID with identical model and capacity). "*" Skip this step if you do not want to identify the SATA controller for the connector. For example, SATA0_SB/SATA_SB is recommended that you use two hard drives with the SATA controller, you may prepare only one hard drive. (b) An empty formatted floppy disk. (c) Windows XP/2000 setup disk. (d) Driver CD for your motherboard. (1) Installing SATA hard drive...
Manual
Page 9
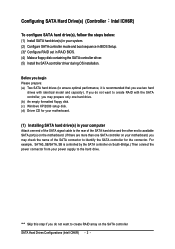
... and insert the motherboard driver CD into the CD-ROM drive. Ác (4) Making a SATA Driver Disk Åé To install Windows 2000/XP onto a SATA hard drives on the ICH6R controller successfully, you need to install required driver for the SATA controller during the Windows setup process. ¤å First of all, you need to copy the driver for an executable program named MENU.exe (Figure 12). Figure 12 SATA Hard Drives Configurations (Intel ICH6R...
... and insert the motherboard driver CD into the CD-ROM drive. Ác (4) Making a SATA Driver Disk Åé To install Windows 2000/XP onto a SATA hard drives on the ICH6R controller successfully, you need to install required driver for the SATA controller during the Windows setup process. ¤å First of all, you need to copy the driver for an executable program named MENU.exe (Figure 12). Figure 12 SATA Hard Drives Configurations (Intel ICH6R...
Manual
Page 11
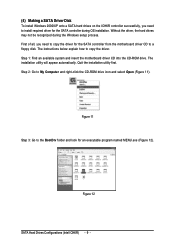
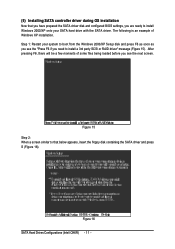
... SATA driver disk and configured BIOS settings, you need to boot from the Windows 2000/XP Setup disk and press F6 as soon as you see the next screen. After pressing F6, there will be a few moments of ¤¤ Windows XP installation. ¤å Step 1: Restart your SATA hard drive with the SATA driver. Ác (5) Installing SATA controller driver during OS installation Åé Now that below appears, insert the floppy disk containing the SATA driver...
... SATA driver disk and configured BIOS settings, you need to boot from the Windows 2000/XP Setup disk and press F6 as soon as you see the next screen. After pressing F6, there will be a few moments of ¤¤ Windows XP installation. ¤å Step 1: Restart your SATA hard drive with the SATA driver. Ác (5) Installing SATA controller driver during OS installation Åé Now that below appears, insert the floppy disk containing the SATA driver...
Manual
Page 11
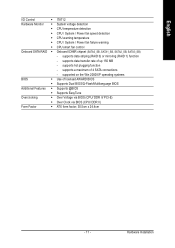
... on the Win 2000/XP operating systems BIOS Š Use of up 150 MB - supports hot plugging function - supports a maximum of 4 SATA connections - supports data striping (RAID 0) or mirroring (RAID 1) function - Hardware Installation English I/O Control Š IT8712 Hardware Monitor Š System voltage detection Š CPU temperature detection Š CPU / System / Power fan speed detection Š CPU warning temperature Š CPU / System / Power fan failure warning Š CPU smart fan control Onboard SATA RAID Š Onboard ICH6R chipset (SATA0_SB, SATA1_SB...
... on the Win 2000/XP operating systems BIOS Š Use of up 150 MB - supports hot plugging function - supports a maximum of 4 SATA connections - supports data striping (RAID 0) or mirroring (RAID 1) function - Hardware Installation English I/O Control Š IT8712 Hardware Monitor Š System voltage detection Š CPU temperature detection Š CPU / System / Power fan speed detection Š CPU warning temperature Š CPU / System / Power fan failure warning Š CPU smart fan control Onboard SATA RAID Š Onboard ICH6R chipset (SATA0_SB, SATA1_SB...
Manual
Page 21
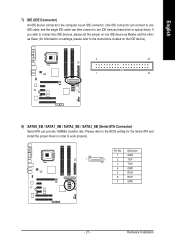
... connect two IDE devices, please set the jumper on one IDE cable, and the single IDE cable can provide 150MB/s transfer rate. Hardware Installation Definition 1 GND 1 7 2 TXP 3 TXN 4 GND 5 RXN 6 RXP 7 GND - 21 - Please refer to the BIOS setting for information on the IDE device). 2 40 1 39 8) SATA0_SB / SATA1_SB / SATA2_SB / SATA3_SB (Serial ATA Connector) Serial ATA can then connect to the instructions located on settings, please refer to two IDE devices (hard drive or optical drive...
... connect two IDE devices, please set the jumper on one IDE cable, and the single IDE cable can provide 150MB/s transfer rate. Hardware Installation Definition 1 GND 1 7 2 TXP 3 TXN 4 GND 5 RXN 6 RXP 7 GND - 21 - Please refer to the BIOS setting for information on the IDE device). 2 40 1 39 8) SATA0_SB / SATA1_SB / SATA2_SB / SATA3_SB (Serial ATA Connector) Serial ATA can then connect to the instructions located on settings, please refer to two IDE devices (hard drive or optical drive...

Manual
Page 28
... Temperature, voltage, fan, speed. „ MB Intelligent Tweaker(M.I .T.) ESC: Quit F8: Dual BIOS/Q-Flash Select Language Load Fail-Safe Defaults Load Optimized Defaults Set Supervisor Password Set User Password Save & Exit Setup Exit Without Saving F3: Change Language F10: Save & Exit Setup Time, Date, Hard Disk Type... Use arrow keys to select among the items and press to accept or enter the sub-menu. This action makes the system reset to the default for stability. „ Standard CMOS Features This setup...
... Temperature, voltage, fan, speed. „ MB Intelligent Tweaker(M.I .T.) ESC: Quit F8: Dual BIOS/Q-Flash Select Language Load Fail-Safe Defaults Load Optimized Defaults Set Supervisor Password Set User Password Save & Exit Setup Exit Without Saving F3: Change Language F10: Save & Exit Setup Time, Date, Hard Disk Type... Use arrow keys to select among the items and press to accept or enter the sub-menu. This action makes the system reset to the default for stability. „ Standard CMOS Features This setup...
Manual
Page 30
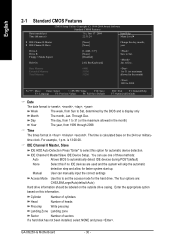
... outside drive casing. The four options are used and the system will skip the automatic detection step and allow for faster system start up. Jan. The time is display only The month, Jan. is , , , . Manual User can use one of sectors If a hard disk has not been installed, select NONE and press . Enter the appropriate option based on this option for the hard drive. time clock. IDE Channel 0 Master/Slave IDE Device Setup. GA-8I925X-G Motherboard...
... outside drive casing. The four options are used and the system will skip the automatic detection step and allow for faster system start up. Jan. The time is display only The month, Jan. is , , , . Manual User can use one of sectors If a hard disk has not been installed, select NONE and press . Enter the appropriate option based on this option for the hard drive. time clock. IDE Channel 0 Master/Slave IDE Device Setup. GA-8I925X-G Motherboard...
Manual
Page 40
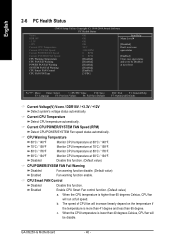
.... GA-8I925X-G Motherboard - 40 - CPU Warning Temperature 60oC / 140oF 70oC / 158oF Monitor CPU temperature at 90oC / 194oF. b. CPU Smart FAN Control Disabled Disable this function. (Default value) CPU/POWER/SYSEM FAN Fail Warning Disabled Fan warning function disable. (Default value) Enabled Fan warning function enable. English 2-6 PC Health Status CMOS Setup Utility-Copyright (C) 1984-2004 Award Software PC Health Status Vcore DDR18V +3.3V +12V Current CPU Temperature Current CPU FAN Speed Current POWER FAN Speed Current SYSTEM FAN Speed CPU Warning Temperature CPU...
.... GA-8I925X-G Motherboard - 40 - CPU Warning Temperature 60oC / 140oF 70oC / 158oF Monitor CPU temperature at 90oC / 194oF. b. CPU Smart FAN Control Disabled Disable this function. (Default value) CPU/POWER/SYSEM FAN Fail Warning Disabled Fan warning function disable. (Default value) Enabled Fan warning function enable. English 2-6 PC Health Status CMOS Setup Utility-Copyright (C) 1984-2004 Award Software PC Health Status Vcore DDR18V +3.3V +12V Current CPU Temperature Current CPU FAN Speed Current POWER FAN Speed Current SYSTEM FAN Speed CPU Warning Temperature CPU...
Manual
Page 45
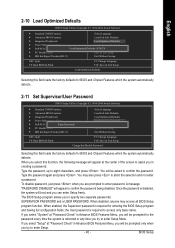
... boot and you can enter Setup freely. You may access all BIOS Setup program function. When you select this field loads the factory defaults for BIOS and Chipset Features which the system automatically detects. 2-11 Set Supervisor/User Password CMOS Setup Utility-Copyright (C) 1984-2004 Award Software ` Standard CMOS Features ` Advanced BIOS Features ` Integrated Peripherals ` Power Management Setup ` PnP/PCI ConfigurationEsnter Password: ` PC Health Status ` MB Intelligent Tweaker(M.I .T.) Exit Without Saving ESC: Quit F8: Dual BIOS/Q-Flash...
... boot and you can enter Setup freely. You may access all BIOS Setup program function. When you select this field loads the factory defaults for BIOS and Chipset Features which the system automatically detects. 2-11 Set Supervisor/User Password CMOS Setup Utility-Copyright (C) 1984-2004 Award Software ` Standard CMOS Features ` Advanced BIOS Features ` Integrated Peripherals ` Power Management Setup ` PnP/PCI ConfigurationEsnter Password: ` PC Health Status ` MB Intelligent Tweaker(M.I .T.) Exit Without Saving ESC: Quit F8: Dual BIOS/Q-Flash...
Manual
Page 51
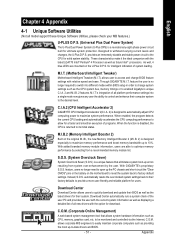
... longer required to switch into a single mode now gives any user the ability to control and enhance their system. feature the user is designed to automatically adjust CPU computing power to access and change system settings such as the CPU system bus, memory timings or to factory default settings. As well, 4 blue LED's are able to the CPU for intelligent indication of all model support these Unique Software Utilities, please check...
... longer required to switch into a single mode now gives any user the ability to control and enhance their system. feature the user is designed to automatically adjust CPU computing power to access and change system settings such as the CPU system bus, memory timings or to factory default settings. As well, 4 blue LED's are able to the CPU for intelligent indication of all model support these Unique Software Utilities, please check...
Manual
Page 52
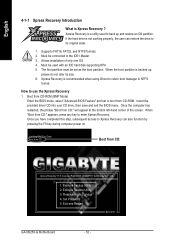
... one OS 4. GIGABYTE Technology CO. , Ltd. 1. Exit and Restart Build 2011 GA-8I925X-G Motherboard - 52 - Boot from CD-ROM. When "Boot from CD:" appears, press any key to boot from CD-ROM (BMP Mode) Enter the BIOS menu, select "Advanced BIOS Feature" and set as the boot partition. Once you have completed this step, subsequent access to use the Xpress Recovery 1. Must be set to enter Xpress Recovery. Execute Backup Utility 2. Must be used to the...
... one OS 4. GIGABYTE Technology CO. , Ltd. 1. Exit and Restart Build 2011 GA-8I925X-G Motherboard - 52 - Boot from CD-ROM. When "Boot from CD:" appears, press any key to boot from CD-ROM (BMP Mode) Enter the BIOS menu, select "Advanced BIOS Feature" and set as the boot partition. Once you have completed this step, subsequent access to use the Xpress Recovery 1. Must be set to enter Xpress Recovery. Execute Backup Utility 2. Must be used to the...
Manual
Page 55
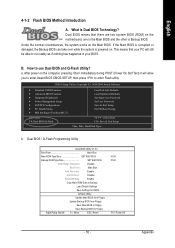
How to Floppy PgDn/PgUp: Modify : Move ESC: Reset 512K 512K F10: Power Off - 55 - CMOS Setup Utility-Copyright (C) 1984-2004 Award Software Standard CMOS Features Advanced BIOS Features Integrated Peripherals Power Management Setup PnP/PCI Configurations PC Health Status MB Intelligent Tweaker(M.I.T.) ESC: Quit F8: Dual BIOS/Q-Flash Load Fail-Safe Defaults Load Optimized Defaults Set Supervisor Password Set User Password Save & Exit Setup Exit Without Saving : Select Item F10: Save & Exit Setup Time, Date, Hard Disk Type... English 4-1-2 Flash BIOS Method Introduction A. Under...
How to Floppy PgDn/PgUp: Modify : Move ESC: Reset 512K 512K F10: Power Off - 55 - CMOS Setup Utility-Copyright (C) 1984-2004 Award Software Standard CMOS Features Advanced BIOS Features Integrated Peripherals Power Management Setup PnP/PCI Configurations PC Health Status MB Intelligent Tweaker(M.I.T.) ESC: Quit F8: Dual BIOS/Q-Flash Load Fail-Safe Defaults Load Optimized Defaults Set Supervisor Password Set User Password Save & Exit Setup Exit Without Saving : Select Item F10: Save & Exit Setup Time, Date, Hard Disk Type... English 4-1-2 Flash BIOS Method Introduction A. Under...
Manual
Page 56
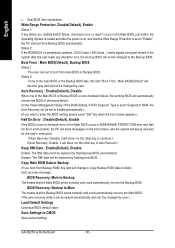
... Main BIOS or Backup BIOS occurs checksum failure, the working BIOS will automatically recover the BIOS of checksum failure. (In the Power Management Setup of the main BIOS or the Backup BIOS fails, this item will not be replaced by flashing new BIOS. Copy Main ROM Data to Backup (If you want to enter the BIOS setting, please press "Del" key when the boot screen appears.) Halt On Error : Disable(Default), Enable If the BIOS occurs a checksum error or the Main BIOS...
... Main BIOS or Backup BIOS occurs checksum failure, the working BIOS will automatically recover the BIOS of checksum failure. (In the Power Management Setup of the main BIOS or the Backup BIOS fails, this item will not be replaced by flashing new BIOS. Copy Main ROM Data to Backup (If you want to enter the BIOS setting, please press "Del" key when the boot screen appears.) Halt On Error : Disable(Default), Enable If the BIOS occurs a checksum error or the Main BIOS...
Manual
Page 58
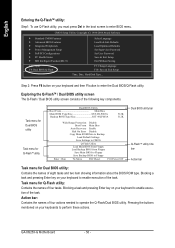
... Load Optimized Defaults Set Supervisor Password Set User Password Save & Exit Setup Exit Without Saving F3: Change Language F10: Save & Exit Setup Time, Date, Hard Disk Type... English Entering the Q-FlashTM utility: Step1: To use Q-Flash utility, you must press Del in the boot screen to enable execution of the task. Task menu for Dual BIOS utility Task menu for Q-FlashTM utility Dual BIOS Utility Boot From Main Bios Main ROM Type/Size SST 49LF003A Backup ROM Type/Size SST 49LF003A 512K 512K Wide Range Protection Disable Boot From Main Bios Auto Recovery Enable Halt On Error...
... Load Optimized Defaults Set Supervisor Password Set User Password Save & Exit Setup Exit Without Saving F3: Change Language F10: Save & Exit Setup Time, Date, Hard Disk Type... English Entering the Q-FlashTM utility: Step1: To use Q-Flash utility, you must press Del in the boot screen to enable execution of the task. Task menu for Dual BIOS utility Task menu for Q-FlashTM utility Dual BIOS Utility Boot From Main Bios Main ROM Type/Size SST 49LF003A Backup ROM Type/Size SST 49LF003A 512K 512K Wide Range Protection Disable Boot From Main Bios Auto Recovery Enable Halt On Error...
Manual
Page 61
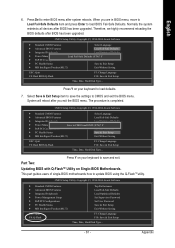
...-Safe Defaults Load Optimized Defaults Set Supervisor Password Set User Password Save & Exit Setup Exit Without Saving F3: Change Language F10: Save & Exit Setup Time, Date, Hard Disk Type... - 61 - The procedure is completed. Appendix Press Del to update BIOS using the Q-FlashTM utility. Part Two: Updating BIOS with Q-FlashTM Utility on your keyboard to save and exit. This part guides users of single-BIOS motherboards how to enter BIOS menu after you are in BIOS menu, move to Load Fail-Safe Defaults item and press Enter to load BIOS...
...-Safe Defaults Load Optimized Defaults Set Supervisor Password Set User Password Save & Exit Setup Exit Without Saving F3: Change Language F10: Save & Exit Setup Time, Date, Hard Disk Type... - 61 - The procedure is completed. Appendix Press Del to update BIOS using the Q-FlashTM utility. Part Two: Updating BIOS with Q-FlashTM Utility on your keyboard to save and exit. This part guides users of single-BIOS motherboards how to enter BIOS menu after you are in BIOS menu, move to Load Fail-Safe Defaults item and press Enter to load BIOS...
Manual
Page 64
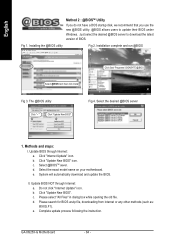
... @BIOS server to update their BIOS under Windows. b. c. e. II. c. d. Fig 1. d. Click "Update New BIOS" icon. Select the exact model name on your motherboard. Select the desired @BIOS server 1. Update BIOS through Internet: a. Update BIOS NOT through Internet: a. Click "Update New BIOS". Complete update process following the instruction. English Method 2 : @BIOSTM Utility If you do not have a DOS startup disk, we recommend that you use the new @BIOS utility. @BIOS allows users to download the latest version...
... @BIOS server to update their BIOS under Windows. b. c. e. II. c. d. Fig 1. d. Click "Update New BIOS" icon. Select the exact model name on your motherboard. Select the desired @BIOS server 1. Update BIOS through Internet: a. Update BIOS NOT through Internet: a. Click "Update New BIOS". Complete update process following the instruction. English Method 2 : @BIOSTM Utility If you do not have a DOS startup disk, we recommend that you use the new @BIOS utility. @BIOS allows users to download the latest version...
Manual
Page 67
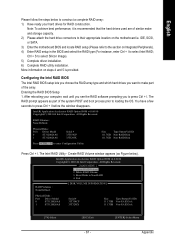
IDE, SCSI, or SATA. 3) Enter the motherboard BIOS and locate RAID setup (Please refer to select Intel RAID; Entering the RAID BIOS Setup 1. You have a few seconds to select Silicon Image). 5) Complete driver installation. 6) Complete RAID utility installation. Intel(R) Application Accelerator RAID Option ROM v4.0.6180 Copyright(C) 2003-04 Intel Corporation. Exit RAID Volumes : None Defined. [ DISK/VOLUME INFORMATION ] Physical Disks : Port Driver Model 0 ST3120026AS 1 ST3120026AS Serial # 3JT354CP 3JT329JX Size Type/Status(Vol ID) 111.7GB Non-RAID Disk 111.7GB Non-...
IDE, SCSI, or SATA. 3) Enter the motherboard BIOS and locate RAID setup (Please refer to select Intel RAID; Entering the RAID BIOS Setup 1. You have a few seconds to select Silicon Image). 5) Complete driver installation. 6) Complete RAID utility installation. Intel(R) Application Accelerator RAID Option ROM v4.0.6180 Copyright(C) 2003-04 Intel Corporation. Exit RAID Volumes : None Defined. [ DISK/VOLUME INFORMATION ] Physical Disks : Port Driver Model 0 ST3120026AS 1 ST3120026AS Serial # 3JT354CP 3JT329JX Size Type/Status(Vol ID) 111.7GB Non-RAID Disk 111.7GB Non-...
Manual
Page 72
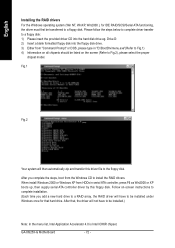
... RAID driver will have to be installed.) Note: In the menu list, Intel Application Accelerator 4.0 is Intel ICH6R chipset. Follow on-screen instructions to complete installation. (Each time you complete the steps, boot from "Command Prompt" or DOS, please type in serial ATA controller, press F6 as Win2000 or XP boots up, then supply serial ATA controller driver by this driver file to the floppy disk. English Installing the RAID drivers For the Windows operating system (Win...
... RAID driver will have to be installed.) Note: In the menu list, Intel Application Accelerator 4.0 is Intel ICH6R chipset. Follow on-screen instructions to complete installation. (Each time you complete the steps, boot from "Command Prompt" or DOS, please type in serial ATA controller, press F6 as Win2000 or XP boots up, then supply serial ATA controller driver by this driver file to the floppy disk. English Installing the RAID drivers For the Windows operating system (Win...
Manual
Page 78
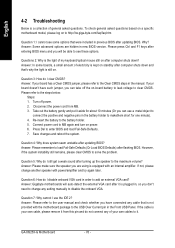
... to disable the onboard VGA. Question 7: Why cannot I cannot see these options. GA-8I925X-G Motherboard - 78 - Answer: In some options that is the light of general asked questions based on a specific motherboard model, please log on -board battery to leak voltage to load Fail-Safe Defaults (Or Load BIOS Defaults) after updating BIOS? Answer: If your board doesn't have such jumper, you have connected any cable that were included in new BIOS version. If the cable is a collection of my keyboard...
... to disable the onboard VGA. Question 7: Why cannot I cannot see these options. GA-8I925X-G Motherboard - 78 - Answer: In some options that is the light of general asked questions based on a specific motherboard model, please log on -board battery to leak voltage to load Fail-Safe Defaults (Or Load BIOS Defaults) after updating BIOS? Answer: If your board doesn't have such jumper, you have connected any cable that were included in new BIOS version. If the cable is a collection of my keyboard...


