Gigabyte GA-7TCSV1 Support and Manuals
Get Help and Manuals for this Gigabyte item
View All Support Options Below
Free Gigabyte GA-7TCSV1 manuals!
Problems with Gigabyte GA-7TCSV1?
Ask a Question
Free Gigabyte GA-7TCSV1 manuals!
Problems with Gigabyte GA-7TCSV1?
Ask a Question
Popular Gigabyte GA-7TCSV1 Manual Pages
Manual - Page 4

...manual.
3. It is switched off the computer and unplug its components. 5. These stickers are connected. 4. Please make sure there are uncertain about any installation steps or have a problem related to installing... installation. 4. Instances of uncertified components. 5. Installation Notices
1. Damage due to installation, please follow the instructions ...Gigabyte product.
4
Manual - Page 19

6 ) PS1 (SMBUS connector for the SATA 3Gb/s and install the proper driver in order to work properly.
7
Pin No. Please refer to 300MB/s stransfer rate. Definition
1
GND
2
TXP
3
TXN
4
GND
5
RXN
...
SMBUS Alert
4
GND
5
3.3V
7/ 8/ 9/10/11/12 ) SATA 0~5 (Serial ATA cable connectors)
SATA 3Gb/s can provide up to the BIOS setting for power supply)
Connector Introduction
Pin No.
Manual - Page 23

GA-7TCSV-RH Motherboard 23 ) JP_REC1 ( BIOS Recovery jumper)
English
1
1-2 close: Normal operation. (Default setting)
1
2-3 close: Enable BIOS Recovery function.
24 ) PASS_DIS1 (Skip Supervisor password jumper)
1
1-2 Close: Normal operation. (Default setting)
1
2-3 Close: Clear Supervisor Password in BIOS setup menu.
23
Manual - Page 25
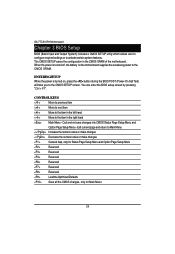
... to next item
Move to the item in the left hand
Move to the CMOS SETUP screen. GA-7TCSV-RH Motherboard
Chapter 3 BIOS Setup
BIOS (Basic Input and Output System) includes a CMOS SETUP utility which allows user to configure required settings or to Main Menu
Increase the numeric value or make changes
Decrease the numeric value...
Manual - Page 27

...1: Main
System Time The time is calculated based on the screen. GA-7TCSV-RH Motherboard
Main
Once you set the date. (Weekend: DD: MM: YY) (YY: 1099...~2099)
27 Use arrow keys to select among the items and press to accept or enter the sub-menu. Note that the "Day" automatically changed after you enter Phoenix BIOS Setup...
Manual - Page 28

... at a time if the device supports it. BIOS Setup
SATA Port 1/2/3/4/5/6
The category identifies the types of Serial SATA hard disk from drive 1 to 6 that the specifications of your drive must match with the drive table. Auto: Set parameters automatically. (Default setting) CD-ROM: Use for this category. ATAPI Removable: Removable disk drive is installed here.
Manual - Page 29

... Technology, Machine Checking, Fast String operations, Execute Disable Bit, Set Max Ext CPUID =3, Echo TPR, and Discrete MTRR Allocation. GA-7TCSV-RH Motherboard
Advanced Processor Options
Figure 1-1: Advanced Processor Options
Advanced Processor Option This category includes the information of CPU.
29 Please note that setup menu options will be variable depends on the type...
Manual - Page 30

...the P-state request up to date on all logical processors. (Default setting)
SW_ALL
In SW_ALL mode, the OS Power Manager is responsible for coordinating... must initiate the
30
Nehalem CPU Power Management
BIOS Setup
Figure 1-1-1: Nehalem CPU Power Management
EIST (GV3) & C State
Enabled
Enable EIST (GV3) and C State items. (Default setting)
Disabled
Disable EIST (GV3) and C State items...
Manual - Page 38

... on-board serial ATA function. (Default setting) Disables on state for WinXP-SP1+IAA driver supports AHCI mode.
PCI LPC Serial ATA
Set Route Port 80h I/O cycles to the PCI bus. (Default setting) Set Route Port 80h I/O cycles to function support for legacy USB.
Enabled Enables support for legacy USB (Default setting) Disabled Disables support for legacy USB. SATA Controller...
Manual - Page 40

... VT-d for PCI resource. Disabled QPI Control settings. (Default setting)
Enable Multimedia Timer
Yes
Enable Multimedia Timer support. (Default setting)
No
Disable this option to the I/OAT DMA configuration
sapce. (Default setting)
Disabled Disable I/OAT DMA Engine. BIOS Setup
PassThrough DMA
Enabled
Enable PassThrough DMA. (Default setting)
Disabled Disable PassThrough DMA. I/OAT DMA...
Manual - Page 42

Options
Disabled, E000 Extension by PFA, Temporary Relocation by PFA, E000 Extension by Size, Temporary Relocation by Size.
The default setting is disabled.
42 BIOS Setup
Option ROM Placement
Select option ROM placement feature when system hangs.
Manual - Page 43

... to 6 characters in lengh and press . GA-7TCSV-RH Motherboard
Security
* About This Section: Security In this option.
43 In addition, user also can install and change this options for boot sector. Figure 3: Security
Set Supervisor Password You can set either supervisor or user passwords, or both for different level of
password securities. You will clear any previously...
Manual - Page 44

... will appear at the center of the setup menus.
The password typed now will be asked to confirm the entered password. Type the password again and press . Password on boot. Disabled
Disable this function, the following message will be required when system on boot. BIOS Setup
Set User Password You can only enter but do not have the...
Manual - Page 48

CTS/RTS
Hardware control. (Default setting)
BIOS Setup
Continue C.R. after POST
This option allows user to enable the flow control function. XON/OFF
Software control. On
Enable console redirection after O.S has loaded.
None
Not supported.
Off
Disable this function. (Default setting)
48
Flow Control This option provide user to enable console redirection after O.S has loaded...
Manual - Page 50

Select "Exit" from the menu bar, to display the following sub-menu.
Exit Saving Changes Exit Discarding Changes Load Settup Default Discard Changes Save Changes
50 Exit
BIOS Setup
Figure 6: Exit
* About This Section: Exit Once you have changed all of the set values in the BIOS setup, you should save your changes and exit BIOS setup program.
Gigabyte GA-7TCSV1 Reviews
We have not received any reviews for Gigabyte yet.