Manual
Page 16
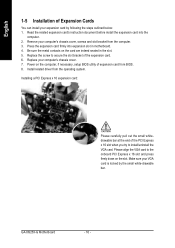
...Please carefully pull out the small whitedrawable bar at the end of expansion card from BIOS. 8. GA-8I925X-G Motherboard - 16 - Replace your VGA card is locked by following the steps outlined below: 1. Install related driver from the computer. 3. Please align the VGA card to the onboard PCI Express x 16 slot... and press firmly down on the card are indeed seated in motherboard. 4. Be sure the metal contacts on the slot. Press ...
...Please carefully pull out the small whitedrawable bar at the end of expansion card from BIOS. 8. GA-8I925X-G Motherboard - 16 - Replace your VGA card is locked by following the steps outlined below: 1. Install related driver from the computer. 3. Please align the VGA card to the onboard PCI Express x 16 slot... and press firmly down on the card are indeed seated in motherboard. 4. Be sure the metal contacts on the slot. Press ...
Manual
Page 48
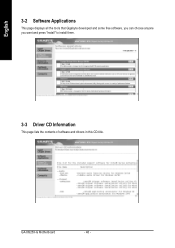
English 3-2 Software Applications This page displays all the tools that Gigabyte developed and some free software, you can choose anyone you want and press "install" to install them. 3-3 Driver CD Information This page lists the contents of software and drivers in this CD-title. GA-8I925X-G Motherboard - 48 -
English 3-2 Software Applications This page displays all the tools that Gigabyte developed and some free software, you can choose anyone you want and press "install" to install them. 3-3 Driver CD Information This page lists the contents of software and drivers in this CD-title. GA-8I925X-G Motherboard - 48 -
Manual
Page 52
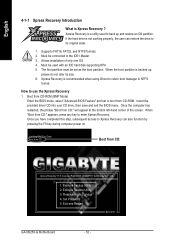
...must be connected to use the Xpress Recovery 1. When "Boot from CD:" will appear at the bottom left-hand corner of only one OS 4. GIGABYTE Technology CO. , Ltd. 1. Remove Backup Image 4. When the boot partition is Xpress Recovery ? English 4-1-1 Xpress Recovery Introduction What is backed up... the provided driver CD into your CD drive, then save and exit the BIOS menu. Verifying DMI Pool Data Boot from CD: Boot from CD-ROM (BMP Mode) Enter the BIOS menu, select "Advanced BIOS Feature" and set as the boot partition. Exit and Restart Build 2011 GA-8I925X-G Motherboard - 52...
...must be connected to use the Xpress Recovery 1. When "Boot from CD:" will appear at the bottom left-hand corner of only one OS 4. GIGABYTE Technology CO. , Ltd. 1. Remove Backup Image 4. When the boot partition is Xpress Recovery ? English 4-1-1 Xpress Recovery Introduction What is backed up... the provided driver CD into your CD drive, then save and exit the BIOS menu. Verifying DMI Pool Data Boot from CD: Boot from CD-ROM (BMP Mode) Enter the BIOS menu, select "Advanced BIOS Feature" and set as the boot partition. Exit and Restart Build 2011 GA-8I925X-G Motherboard - 52...
Manual
Page 72
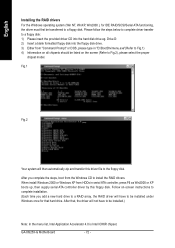
... from HDDs in "D:\BootDrv\menu.exe"(Refer to Fig.1) 4) Information on the screen (Refer to Fig.2), please select the proper chipset model. GA-8I925X-G Motherboard - 72 - After you add a new hard drive to a RAID array, the RAID driver will have to be installed under Windows once for IDE RAID/SCSI/Serial ATA functioning, the...
... from HDDs in "D:\BootDrv\menu.exe"(Refer to Fig.1) 4) Information on the screen (Refer to Fig.2), please select the proper chipset model. GA-8I925X-G Motherboard - 72 - After you add a new hard drive to a RAID array, the RAID driver will have to be installed under Windows once for IDE RAID/SCSI/Serial ATA functioning, the...
Manual
Page 74
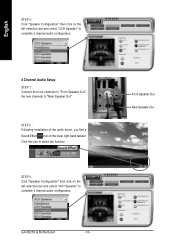
...", the rear channels to complete 4 channel audio configuration. GA-8I925X-G Motherboard - 74 - English STEP 3: Click "Speaker Configuration" then click on the left selection bar and select "4CH Speaker" to "Rear Speaker Out". Click the icon to select the function. STEP 2 : Following installation of the audio driver, you find a Sound Effect icon on the lower...
...", the rear channels to complete 4 channel audio configuration. GA-8I925X-G Motherboard - 74 - English STEP 3: Click "Speaker Configuration" then click on the left selection bar and select "4CH Speaker" to "Rear Speaker Out". Click the icon to select the function. STEP 2 : Following installation of the audio driver, you find a Sound Effect icon on the lower...
Manual
Page 76
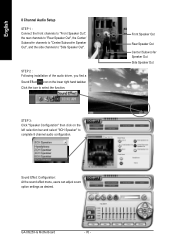
... the sound effect menu, users can adjust sound option settings as desired. Front Speaker Out Rear Speaker Out Center/Subwoofer Speaker Out Side Speaker Out GA-8I925X-G Motherboard - 76 - Click the icon to complete 8 channel audio configuration. English 8 Channel Audio Setup STEP 1 : Connect the front channels to "Front ... Subwoofer channels to "Center/Subwoofer Speaker Out", and the side channels to "Side Speaker Out". STEP 2 : Following installation of the audio driver, you find a Sound Effect icon on the left selection bar and select "8CH Speaker" to select the function.
... the sound effect menu, users can adjust sound option settings as desired. Front Speaker Out Rear Speaker Out Center/Subwoofer Speaker Out Side Speaker Out GA-8I925X-G Motherboard - 76 - Click the icon to complete 8 channel audio configuration. English 8 Channel Audio Setup STEP 1 : Connect the front channels to "Front ... Subwoofer channels to "Center/Subwoofer Speaker Out", and the side channels to "Side Speaker Out". STEP 2 : Following installation of the audio driver, you find a Sound Effect icon on the left selection bar and select "8CH Speaker" to select the function.


