Manual
Page 1
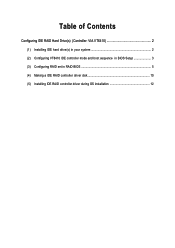
Table of Contents Configuring IDE RAID Hard Drive(s) (Controller: VIA VT6410 2 (1) Installing IDE hard drive(s) in your system 2 (2) Configuring VT6410 IDE controller mode and boot sequence in BIOS Setup 3 (3) Configuring RAID set in RAID BIOS 5 (4) Making a IDE RAID controller driver disk 10 (5) Installing IDE RAID controller driver during OS installation 12
Table of Contents Configuring IDE RAID Hard Drive(s) (Controller: VIA VT6410 2 (1) Installing IDE hard drive(s) in your system 2 (2) Configuring VT6410 IDE controller mode and boot sequence in BIOS Setup 3 (3) Configuring RAID set in RAID BIOS 5 (4) Making a IDE RAID controller driver disk 10 (5) Installing IDE RAID controller driver during OS installation 12
Manual
Page 2
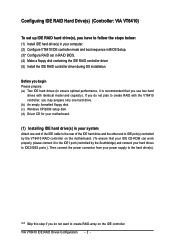
...drives with the VT6410 controller, you may prepare only one hard drive. (b) An empty formatted floppy disk. (c) Windows XP/2000 setup disk. (d) Driver CD for your motherboard. (1) Installing IDE hard drive(s) in your system Attach one end of the IDE cable to the rear of the IDE hard...: VIA VT6410) Åé ¤¤ To set in RAID BIOS. (4) Make a floppy disk containing the IDE RAID controller driver (5) Install the IDE RAID controller driver during OS installation. If you do not want to ensure optimal performance, it to the IDE1 port (controlled by the VT6410 RAID controller...
...drives with the VT6410 controller, you may prepare only one hard drive. (b) An empty formatted floppy disk. (c) Windows XP/2000 setup disk. (d) Driver CD for your motherboard. (1) Installing IDE hard drive(s) in your system Attach one end of the IDE cable to the rear of the IDE hard...: VIA VT6410) Åé ¤¤ To set in RAID BIOS. (4) Make a floppy disk containing the IDE RAID controller driver (5) Install the IDE RAID controller driver during OS installation. If you do not want to ensure optimal performance, it to the IDE1 port (controlled by the VT6410 RAID controller...
Manual
Page 10
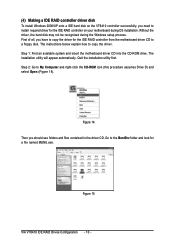
... (Figure 14). The installation utility will appear automatically. Quit the installation utility first. Figure 14 Then you should see folders and files contained in the driver CD. Go to the BootDrv folder and look for the IDE RAID controller from the motherboard... 2000/XP onto a IDE hard disk on the VT6410 controller successfully, you need to install required driver for the IDE RAID controller on your motherboard during the Windows setup process. Without the ¤¤ driver, the hard disk may not be recognized during OS installation. Figure 15 VIA VT6410 IDE RAID Drives...
... (Figure 14). The installation utility will appear automatically. Quit the installation utility first. Figure 14 Then you should see folders and files contained in the driver CD. Go to the BootDrv folder and look for the IDE RAID controller from the motherboard... 2000/XP onto a IDE hard disk on the VT6410 controller successfully, you need to install required driver for the IDE RAID controller on your motherboard during the Windows setup process. Without the ¤¤ driver, the hard disk may not be recognized during OS installation. Figure 15 VIA VT6410 IDE RAID Drives...
Manual
Page 11
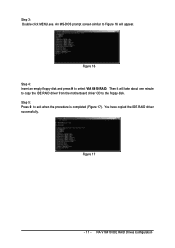
You have copied the IDE RAID driver successfully. Step 3: Double-click MENU.exe. Step 5: Press 0 to select VIA 6410 RAID. VIA VT6410 IDE RAID Drives Configuration Figure 16 Step 4: Insert an empty floppy disk and press H to exit when the procedure is completed (Figure 17). Figure 17 - 11 - An MS-DOS prompt screen similar to the floppy disk. Then it will take about one minute to copy the IDE RAID driver from the motherboard driver CD to Figure 16 will appear.
You have copied the IDE RAID driver successfully. Step 3: Double-click MENU.exe. Step 5: Press 0 to select VIA 6410 RAID. VIA VT6410 IDE RAID Drives Configuration Figure 16 Step 4: Insert an empty floppy disk and press H to exit when the procedure is completed (Figure 17). Figure 17 - 11 - An MS-DOS prompt screen similar to the floppy disk. Then it will take about one minute to copy the IDE RAID driver from the motherboard driver CD to Figure 16 will appear.

Manual
Page 12
... controller on your system to boot from a mass storage device manufacturer, press S. * If you do not have prepared a floppy disk with the IDE RAID driver and adjusted BIOS settings, you can begin to manually specify an adapter. This procedure ¤¤ assumes Windows XP installation. ¤å Step 1: Restart... disk from the Windows 2000/XP Setup disk and press F6 as soon as you see the next screen for use with the IDE RAID driver. Then you will load support for the following mass storage device(s) * To specify additional SCSI adapters, CD-ROM drives, or special disk ...
... controller on your system to boot from a mass storage device manufacturer, press S. * If you do not have prepared a floppy disk with the IDE RAID driver and adjusted BIOS settings, you can begin to manually specify an adapter. This procedure ¤¤ assumes Windows XP installation. ¤å Step 1: Restart... disk from the Windows 2000/XP Setup disk and press F6 as soon as you see the next screen for use with the IDE RAID driver. Then you will load support for the following mass storage device(s) * To specify additional SCSI adapters, CD-ROM drives, or special disk ...
Manual
Page 13
... files cannot be found, please check the floppy disk or copy the correct IDE RAID driver again from the floppy disk. Step 3: Use the arrow keys to the previous screen. "*" Please select the driver according to which you have a device support disk from a mass storage device manufacturer,...below appears, press ENTER to configure a SCSI Adapter for use with IDE RAID controller driver installation from the following operating systems you want to load the IDE RAID driver from the motherboard driver CD. S=Specify Additional Device Enter=Continue F3=Exit Figure 21 If a message appears ...
... files cannot be found, please check the floppy disk or copy the correct IDE RAID driver again from the floppy disk. Step 3: Use the arrow keys to the previous screen. "*" Please select the driver according to which you have a device support disk from a mass storage device manufacturer,...below appears, press ENTER to configure a SCSI Adapter for use with IDE RAID controller driver installation from the following operating systems you want to load the IDE RAID driver from the motherboard driver CD. S=Specify Additional Device Enter=Continue F3=Exit Figure 21 If a message appears ...
Manual
Page 14
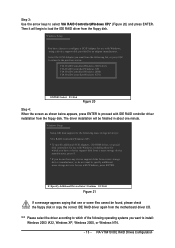
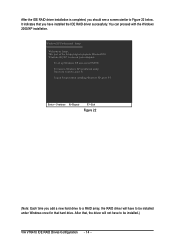
... installing Windows XP, press F3. It indicates that you should see a screen similar to be installed under Windows once for that , the driver will have installed the IDE RAID driver successfully. To repair a Windows XP installation using Recovery Console, press R. After that hard drive. This port of the Setup program prepares Microsoft...(R) Windows (R) XP to Setup. Enter= Continue R=Repair F3=Exit Figure 22 (Note: Each time you add a new hard drive to a RAID array, the RAID driver will not have to Figure 22 below. To set up Windows XP now, press ENTER.
... installing Windows XP, press F3. It indicates that you should see a screen similar to be installed under Windows once for that , the driver will have installed the IDE RAID driver successfully. To repair a Windows XP installation using Recovery Console, press R. After that hard drive. This port of the Setup program prepares Microsoft...(R) Windows (R) XP to Setup. Enter= Continue R=Repair F3=Exit Figure 22 (Note: Each time you add a new hard drive to a RAID array, the RAID driver will not have to Figure 22 below. To set up Windows XP now, press ENTER.
Manual
Page 5
Chapter 3 Install Drivers 49 3-1 Install Chipset Drivers 49 3-2 Software Applications 50 3-3 Driver CD Information 50 3-4 Hardware Information 51 3-5 Contact Us ...51 Chapter 4 Appendix 53 4-1 Unique Software Utilities 53 4-1-1 Xpress Recovery Introduction 54 4-1-2 Flash BIOS Method Introduction 57 4-1-4 2 / 4 / 5.1 / 7.1 Channel Audio Function Introduction 66 4-2 Troubleshooting 72 - 5 -
Chapter 3 Install Drivers 49 3-1 Install Chipset Drivers 49 3-2 Software Applications 50 3-3 Driver CD Information 50 3-4 Hardware Information 51 3-5 Contact Us ...51 Chapter 4 Appendix 53 4-1 Unique Software Utilities 53 4-1-1 Xpress Recovery Introduction 54 4-1-2 Flash BIOS Method Introduction 57 4-1-4 2 / 4 / 5.1 / 7.1 Channel Audio Function Introduction 66 4-2 Troubleshooting 72 - 5 -
Manual
Page 16
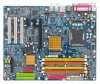
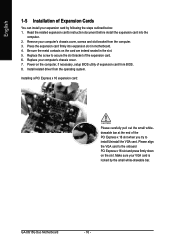
... Expansion Cards You can install your computer's chassis cover. 7. Be sure the metal contacts on the card are indeed seated in motherboard. 4. Install related driver from BIOS. 8. GA-8I915G Duo Motherboard - 16 - Power on the slot .Make sure your computer's chassis cover, screws and slot bracket from the computer. 3. Installing a PCI Express x 16 expansion...
... Expansion Cards You can install your computer's chassis cover. 7. Be sure the metal contacts on the card are indeed seated in motherboard. 4. Install related driver from BIOS. 8. GA-8I915G Duo Motherboard - 16 - Power on the slot .Make sure your computer's chassis cover, screws and slot bracket from the computer. 3. Installing a PCI Express x 16 expansion...
Manual
Page 17
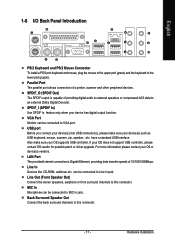
... an external Dolby Digital Decoder. For more information please contact your OS does not support USB controller, please contact OS vendor for possible patch or driver upgrade. Line Out (Front Speaker Out) Connect the stereo speakers, earphone or front surround channels to Line In jack. Back Surround Speaker Out Connect the...
... an external Dolby Digital Decoder. For more information please contact your OS does not support USB controller, please contact OS vendor for possible patch or driver upgrade. Line Out (Front Speaker Out) Connect the stereo speakers, earphone or front surround channels to Line In jack. Back Surround Speaker Out Connect the...

Manual
Page 22
Pin No. Definition 1 1 MPD+ 2 MPD- 3 MPD- It will blink when the system enters suspend mode. Please refer to the BIOS setting for the Serial ATA and install the proper driver in order to indicate whether the system is connect with the system power indicator to work properly. Pin No. English 10) S_ATA0/S_ATA1/S_ATA2/S_ATA3 (Serial ATA Connector) Serial ATA can provide 150MB/s transfer rate. GA-8I915G Duo Motherboard - 22 - Definition 1 GND 7 1 2 TXP 3 TXN 4 GND 5 RXN 6 RXP 7 GND 11) PWR_LED PWR_LED is on/off.
Pin No. Definition 1 1 MPD+ 2 MPD- 3 MPD- It will blink when the system enters suspend mode. Please refer to the BIOS setting for the Serial ATA and install the proper driver in order to indicate whether the system is connect with the system power indicator to work properly. Pin No. English 10) S_ATA0/S_ATA1/S_ATA2/S_ATA3 (Serial ATA Connector) Serial ATA can provide 150MB/s transfer rate. GA-8I915G Duo Motherboard - 22 - Definition 1 GND 7 1 2 TXP 3 TXN 4 GND 5 RXN 6 RXP 7 GND 11) PWR_LED PWR_LED is on/off.
Manual
Page 49
... pick the item that came with your motherboard into your CD-ROM drive, the driver CD-title will continue to install other drivers. or you can install others application. For USB2.0 driver support under "Device Manager". Please remove the question mark and restart the system (System... will reboot automatically after install the drivers, afterward you want and press "install" followed the item; Insert the driver CD-title that you can press "Xpress Install" to install. Some device drivers will restart your system the "Xpress Install" will auto start...
... pick the item that came with your motherboard into your CD-ROM drive, the driver CD-title will continue to install other drivers. or you can install others application. For USB2.0 driver support under "Device Manager". Please remove the question mark and restart the system (System... will reboot automatically after install the drivers, afterward you want and press "install" followed the item; Insert the driver CD-title that you can press "Xpress Install" to install. Some device drivers will restart your system the "Xpress Install" will auto start...
Manual
Page 50
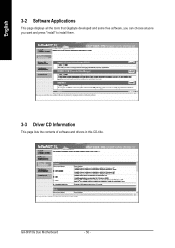
English 3-2 Software Applications This page displays all the tools that Gigabyte developed and some free software, you can choose anyone you want and press "install" to install them. 3-3 Driver CD Information This page lists the contents of software and drivers in this CD-title. GA-8I915G Duo Motherboard - 50 -
English 3-2 Software Applications This page displays all the tools that Gigabyte developed and some free software, you can choose anyone you want and press "install" to install them. 3-3 Driver CD Information This page lists the contents of software and drivers in this CD-title. GA-8I915G Duo Motherboard - 50 -
Manual
Page 51
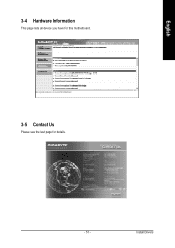
English 3-4 Hardware Information This page lists all device you have for this motherboard. 3-5 Contact Us Please see the last page for details. - 51 - Install Drivers
English 3-4 Hardware Information This page lists all device you have for this motherboard. 3-5 Contact Us Please see the last page for details. - 51 - Install Drivers
Manual
Page 53
... as well as displaying a detailed list of system loading. provides an immensely durable and stable power circuit to -date drivers and BIOS. - 53 - With added branded memory module information, users are mounted on the motherboard to reset the ...such as providing the most up the PC chassis and short-circuit the "Clear CMOS" pins or the battery on the U-Plus D.P.S. With GIGABYTE's proprietary S.O.S. allows corporate MIS engineers to its initial status. Instead, S.O.S. M.I.T. (Motherboard Intelligent Tweaker) Motherboard Intelligent Tweaker (M.I .T. English Chapter...
... as well as displaying a detailed list of system loading. provides an immensely durable and stable power circuit to -date drivers and BIOS. - 53 - With added branded memory module information, users are mounted on the motherboard to reset the ...such as providing the most up the PC chassis and short-circuit the "Clear CMOS" pins or the battery on the U-Plus D.P.S. With GIGABYTE's proprietary S.O.S. allows corporate MIS engineers to its initial status. Instead, S.O.S. M.I.T. (Motherboard Intelligent Tweaker) Motherboard Intelligent Tweaker (M.I .T. English Chapter...
Manual
Page 54
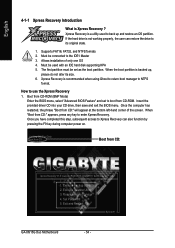
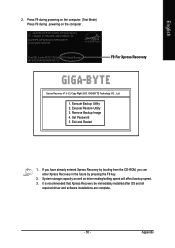
... subsequent access to Xpress Recovery can restore the drive to its size. 6. Execute Backup Utility 2. Set Password 5. When "Boot from CD-ROM. GIGABYTE Technology CO. , Ltd. 1. Must be used to back up , please do not alter its original state. 1. Must be connected to the ...is Xpress Recovery ? How to use the Xpress Recovery 1. Remove Backup Image 4. Exit and Restart Build 2011 GA-8I915G Duo Motherboard - 54 - Execute Restore Utility 3. Insert the provided driver CD into your CD drive, then save and exit the BIOS menu. Once the computer has restarted, the ...
... subsequent access to Xpress Recovery can restore the drive to its size. 6. Execute Backup Utility 2. Set Password 5. When "Boot from CD-ROM. GIGABYTE Technology CO. , Ltd. 1. Must be used to back up , please do not alter its original state. 1. Must be connected to the ...is Xpress Recovery ? How to use the Xpress Recovery 1. Remove Backup Image 4. Exit and Restart Build 2011 GA-8I915G Duo Motherboard - 54 - Execute Restore Utility 3. Insert the provided driver CD into your CD drive, then save and exit the BIOS menu. Once the computer has restarted, the ...
Manual
Page 55
... in the future by pressing the F9 key. 2. Appendix Award Modular BIOS v6.00PG, An Energy Star Al ly Copyright (C) 1984-2004, Award Software, Inc. GIGABYTE Technology CO. , Ltd. 1. Execute Restore Utility 3. Set Password 5. Press F9 during powering on the computer. (Text Mode) Press F9 during powering on the computer . Press... as well as drive reading/writing speed will affect backup speed. 3. It is recommended that Xpress Recovery be immediately installed after OS and all required driver and software installations are complete. - 55 -
... in the future by pressing the F9 key. 2. Appendix Award Modular BIOS v6.00PG, An Energy Star Al ly Copyright (C) 1984-2004, Award Software, Inc. GIGABYTE Technology CO. , Ltd. 1. Execute Restore Utility 3. Set Password 5. Press F9 during powering on the computer. (Text Mode) Press F9 during powering on the computer . Press... as well as drive reading/writing speed will affect backup speed. 3. It is recommended that Xpress Recovery be immediately installed after OS and all required driver and software installations are complete. - 55 -
Manual
Page 66
... be found, go to select the function. Front speakers and surround speakers are 5 kinds of the audio driver, you'll find an icon in 7.1 channel output mode no matter what other output devices are configured.) GA-8I915G Duo Motherboard - 66 - English 4-1-4 2 / 4 / 5.1 / 7.1 Channel Audio Function Introduction After installation of output mode: Earphone Output Mode, 2 / 4 / 5.1 / 7.1 Channel...
... be found, go to select the function. Front speakers and surround speakers are 5 kinds of the audio driver, you'll find an icon in 7.1 channel output mode no matter what other output devices are configured.) GA-8I915G Duo Motherboard - 66 - English 4-1-4 2 / 4 / 5.1 / 7.1 Channel Audio Function Introduction After installation of output mode: Earphone Output Mode, 2 / 4 / 5.1 / 7.1 Channel...
Manual
Page 67
... function. English 2 Channel Audio Setup: We recommend that you 'll find an icon in "Audio System Status". Line Out STEP 2: After installation of the audio driver, you use speakers with amplifier to manually modify the speaker settings. The current audio mode is applied. Appendix The function to "Line Out". STEP 1: Connect...
... function. English 2 Channel Audio Setup: We recommend that you 'll find an icon in "Audio System Status". Line Out STEP 2: After installation of the audio driver, you use speakers with amplifier to manually modify the speaker settings. The current audio mode is applied. Appendix The function to "Line Out". STEP 1: Connect...
Manual
Page 68
STEP 2: After installation of the audio driver, you the functions to adjust speaker volume. Double click the icon to manually modify speaker setting. The function to select the function. The function to manually modify speaker the settings. GA-8I915G Duo Motherboard - 68 - Front Speaker Out Surround speaker out STEP 3: Click "C-Media 3D Audio Configuration" and...
STEP 2: After installation of the audio driver, you the functions to adjust speaker volume. Double click the icon to manually modify speaker setting. The function to select the function. The function to manually modify speaker the settings. GA-8I915G Duo Motherboard - 68 - Front Speaker Out Surround speaker out STEP 3: Click "C-Media 3D Audio Configuration" and...


