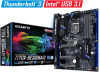
Gigabyte GA-Z170X-Designare Support and Manuals
Get Help and Manuals for this Gigabyte item
View All Support Options Below
Free Gigabyte GA-Z170X-Designare manuals!
Problems with Gigabyte GA-Z170X-Designare?
Ask a Question
Free Gigabyte GA-Z170X-Designare manuals!
Problems with Gigabyte GA-Z170X-Designare?
Ask a Question
Popular Gigabyte GA-Z170X-Designare Manual Pages
User Manual - Page 1
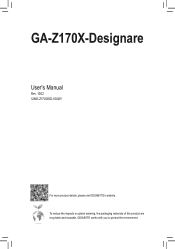
To reduce the impacts on global warming, the packaging materials of this product are recyclable and reusable. GA-Z170X-Designare
User's Manual
Rev. 1002 12ME-Z17XDSG-1002R
For more product details, please visit GIGABYTE's website. GIGABYTE works with you to protect the environment.
User Manual - Page 2
Motherboard GA-Z170X-Designare
May 27, 2016
Motherboard GA-Z170X-Designare
May 27, 2016
User Manual - Page 4

... GA-Z170X-Designare Motherboard Layout 7 Chapter 1 Hardware Installation 9
1-1 Installation Precautions 9 1-2 Product Specifications 10 1-3 Installing the CPU and CPU Cooler 13
1-3-1 Installing the CPU...13 1-3-2 Installing the CPU Cooler 15 1-4 Installing the Memory 16 1-4-1 Dual Channel Memory Configuration 16 1-4-2 Installing a Memory 17 1-5 Installing an Expansion Card 18 1-6 Setting...
User Manual - Page 6
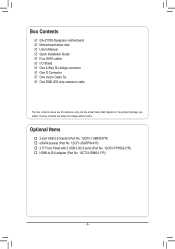
...package you obtain. Box Contents
55 GA-Z170X-Designare motherboard 55 Motherboard driver disk 55 User's Manual 55 Quick Installation Guide 55 Four SATA cables 55 I/O ...Part No. 12CT2-HDMI01-1*R)
- 6 - Optional Items
†† 2-port USB 2.0 bracket (Part No. 12CR1-1UB030-6*R) †† eSATA bracket (Part No. 12CF1-3SATPW-4*R) †† 3.5" Front Panel with 2 USB 3.0/2.0 ports (Part...
User Manual - Page 7
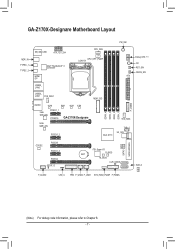
...)
OC RST_SW CMOS_SW ATX
DDR4_4 DDR4_2 DDR4_3 DDR4_1
F_USB30
USB30_ LAN2 USB30_ LAN1 SYS_FAN1
AUDIO
110M
80M 60M 42M
Intel® GbE LAN
PCIEX1_1 PCIEX16
GA-Z170X-Designare
Intel® GbE LAN
PCIEX1_2
M2M_32G
SYS_FAN3
Intel® Z170
THB_C U2_32G
CODEC
PCIEX8 PCIEX1_3
PCIEX4 SPDIF_O
iTE® Super I/O B_BIOS
BAT M_BIOS
CLR_CMOS
F_AUDIO...
User Manual - Page 18
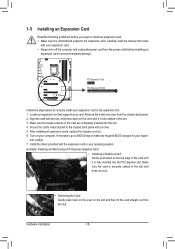
...installing all expansion cards, replace the chassis cover(s). 6. Remove the metal slot cover from the power outlet before you begin to install an expansion card: •• Make sure the motherboard supports...the PCI Express slot. Carefully read the manual that supports your computer. Secure the card's metal bracket to correctly install your expansion card in your expan-
...
User Manual - Page 22
...when the system is on /off your hardware.
Hardware Installation
- 22 -
ing configuration for BIOS configurations). The...BIOS Setup," for your computer and unplug the power cord from their hardware, but also the absolute most optimized GIGABYTE ..., go to BIOS Setup to load factory defaults (select Load Optimized Defaults) or manually configure the BIOS settings (refer to change ...
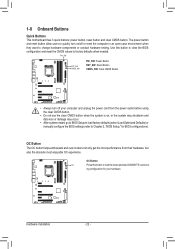
User Manual - Page 26

...
12V of the
other end to turn off the devices and your RGB LED strip. S_
SF _
Hardware Installation
S - 2_6 -
Pin No. Unplug the power cord from the power outlet to prevent damage to
Pin... of the LED strip; B_
S _S
_ S
1 23 1
1 23 1
Before installing the devices, be connected to the devices.
7) SATA EXPRESS (SATA Express Connectors)
S3
B SS S
U
Each SATA Express connector...
User Manual - Page 36
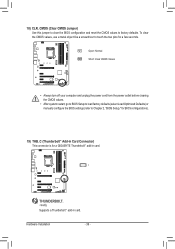
... values to Chapter 2, "BIOS Setup," for BIOS configurations).
19) THB_C (Thunderbolt™ Add-in Card Connector) This connector is for a few seconds.
Hardware Installation
- 36 - To clear the CMOS values, use a metal object like a screwdriver to touch the two pins for a GIGABYTE Thunderbolt™ add-in card.
1
B_
S_
U
Supports a Thunderbolt™ add-in...
User Manual - Page 37

... to modify basic system configuration settings or to keep the configuration values in this occurs, try to clear the CMOS values and reset the board to default values. (Refer to clear the CMOS values.)
- 37 -
For instructions on using the Q-Flash and @BIOS utilities, refer to Chapter 5, "BIOS Update Utilities."
•• Because...
User Manual - Page 43

...of CPU cores to enable in order to reduce the power. BIOS Setup of CPU Cores Enabled (Note) Allows you install a CPU that supports this setting. (Default: Auto)
&& CPU Enhanced Halt (C1E) (Note) ... and voltage will be reduced during system halt state to set the CPU Flex Ratio. Auto sets the power limit according to the CPU specifications. (Default: Auto)
&& Core Current Limit (Amps)...
User Manual - Page 73

...the installation of Windows operating system for a message which says "Press to Legacy Only.
RAID Volumes : None defined. Configuring a RAID Set ...configure a RAID array.
Physical Deivces : ID Device Model 1 Hitachi HDS72105 2 Hitachi HDS72105
[ DISK/VOLUME INFORMATION...Corporation. Step 1: In BIOS Setup, go to BIOS Features and set CSM Support to Enabled and Storage Boot Option...
User Manual - Page 79

... folder under Boot in Figure 1 appears, select Intel Chipset SATA RAID Controller and click Next to load the driver and continue the OS installation. Configuring a RAID Set Step 2: Boot from the motherboard driver disk using "Xpress Install" to ensure system performance and compatibility. Installing Windows
As some operating systems already include Intel® SATA RAID/AHCI...
User Manual - Page 85

... GIGABYTE's website, download the latest compressed BIOS update file that support DualBIOS have two BIOS onboard, a main BIOS and a backup BIOS. Unique Features Additionally, this motherboard features the DualBIOS™ design, providing multiple protection for the safety and stability of system safety, users cannot update the backup BIOS manually. For the sake of your motherboard
model...
User Manual - Page 115

...;• To configure 4/5.1/7.1-channel audio, you want to mute the back panel audio (only supported when using an HD front panel audio module), refer to the following instructions use Windows 8.1 as the example operating system.)
Step 1: After installing the audio driver, restart your computer. High Definition Audio (HD Audio) HD Audio includes multiple high...
Gigabyte GA-Z170X-Designare Reviews
We have not received any reviews for Gigabyte yet.