
Manual
Page 12
... as soon as you need to install a 3rd party SCSI or RAID driver. Figure 18 Step 2: When a screen similar to that you have chosen to manually specify an adapter. S=Specify Additional Device ENTER=Continue F3=Exit Figure 19 VIA VT6410 IDE RAID Drives Configuration - 12 - Windows Setup Press F6 if you...
... as soon as you need to install a 3rd party SCSI or RAID driver. Figure 18 Step 2: When a screen similar to that you have chosen to manually specify an adapter. S=Specify Additional Device ENTER=Continue F3=Exit Figure 19 VIA VT6410 IDE RAID Drives Configuration - 12 - Windows Setup Press F6 if you...

Manual
Page 1
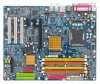
GA-8I915G Duo Intel® Pentium® 4 LGA775 Processor Motherboard User's Manual Rev. 1303 12ME-8I915GDUO-1303
GA-8I915G Duo Intel® Pentium® 4 LGA775 Processor Motherboard User's Manual Rev. 1303 12ME-8I915GDUO-1303
Manual
Page 3
... copied, translated, or transmitted in any form or by any means without prior notice. Product Manual Classification In order to assist in the use of Gigabyte. Notice The written content provided with the product. „ For detailed product information and specifications,... please carefully read the "Product User Manual". „ For detailed information related to Gigabyte's unique features, please go to the "Hardware Installation Guide" included with this manual may be downloaded in the manual are subject to their respective companies. The trademarks mentioned...
... copied, translated, or transmitted in any form or by any means without prior notice. Product Manual Classification In order to assist in the use of Gigabyte. Notice The written content provided with the product. „ For detailed product information and specifications,... please carefully read the "Product User Manual". „ For detailed information related to Gigabyte's unique features, please go to the "Hardware Installation Guide" included with this manual may be downloaded in the manual are subject to their respective companies. The trademarks mentioned...

Manual
Page 9
...handling the motherboard, avoid touching any installation steps or have these items on the motherboard. Damage due to come in the user manual. 3. Prior to installing the electronic components, please have a problem related to use exceeding the permitted parameters. 6. If you ...connectors. 3. To prevent damage to the motherboard, please do not allow screws to use of Non-Warranty 1. Damage due to be an unofficial Gigabyte product. - 9 - Product determined to improper installation. 4. Turning on an uneven surface. 7. Before using the product, please verify that ...
...handling the motherboard, avoid touching any installation steps or have these items on the motherboard. Damage due to come in the user manual. 3. Prior to installing the electronic components, please have a problem related to use exceeding the permitted parameters. 6. If you ...connectors. 3. To prevent damage to the motherboard, please do not allow screws to use of Non-Warranty 1. Damage due to be an unofficial Gigabyte product. - 9 - Product determined to improper installation. 4. Turning on an uneven surface. 7. Before using the product, please verify that ...
Manual
Page 13
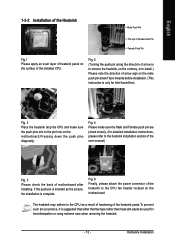
... to the CPU fan header located on the motherboard. Fig. 4 Please make sure the push pins aim to the heatsink installation section of the user manual) Fig. 5 Please check the back of arrow sign on the male push pin doesn't face inwards before installation. (This instruction is suggested that either thermal...
... to the CPU fan header located on the motherboard. Fig. 4 Please make sure the push pins aim to the heatsink installation section of the user manual) Fig. 5 Please check the back of arrow sign on the male push pin doesn't face inwards before installation. (This instruction is suggested that either thermal...
Manual
Page 32
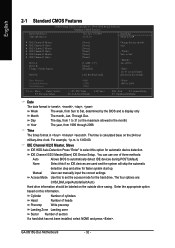
...the BIOS and is calculated base on the 24-hour military-time clock. Through Dec. You can manually input the correct settings Access Mode Use this to select this information. Manual User can use one of sectors If a hard disk has not been installed, select NONE and ...Month The week, from 1999 through 2098 Time The times format in the month) Year The year, from Sun to Sat. For example, 1 p.m. GA-8I915G Duo Motherboard - 32 - IDE Channel 0/2/3 Master, Slave IDE HDD Auto-Detection Press "Enter" to set the access mode for automatic device detection. IDE ...
...the BIOS and is calculated base on the 24-hour military-time clock. Through Dec. You can manually input the correct settings Access Mode Use this to select this information. Manual User can use one of sectors If a hard disk has not been installed, select NONE and ...Month The week, from 1999 through 2098 Time The times format in the month) Year The year, from Sun to Sat. For example, 1 p.m. GA-8I915G Duo Motherboard - 32 - IDE Channel 0/2/3 Master, Slave IDE HDD Auto-Detection Press "Enter" to set the access mode for automatic device detection. IDE ...
Manual
Page 67
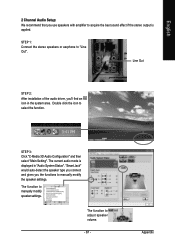
... that you use speakers with amplifier to acquire the best sound effect if the stereo output is displayed in the system area. The function to manually modify speaker settings. "Smart Jack" would auto-detect the speaker type you connect and gives you the functions to "Line Out". The current audio mode...
... that you use speakers with amplifier to acquire the best sound effect if the stereo output is displayed in the system area. The function to manually modify speaker settings. "Smart Jack" would auto-detect the speaker type you connect and gives you the functions to "Line Out". The current audio mode...
Manual
Page 68
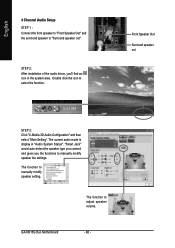
.... Front Speaker Out Surround speaker out STEP 3: Click "C-Media 3D Audio Configuration" and then select "Main Setting". GA-8I915G Duo Motherboard - 68 - The current audio mode is display in the system area. Double click the icon to manually modify speaker setting. The function to select the function. English 4 Channel Audio Setup STEP 1 : Connect the...
.... Front Speaker Out Surround speaker out STEP 3: Click "C-Media 3D Audio Configuration" and then select "Main Setting". GA-8I915G Duo Motherboard - 68 - The current audio mode is display in the system area. Double click the icon to manually modify speaker setting. The function to select the function. English 4 Channel Audio Setup STEP 1 : Connect the...
Manual
Page 69
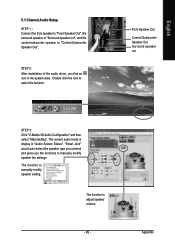
... connect and gives you find an icon in "Audio System Status". STEP 2: After installation of the audio driver, you the functions to manually modify speaker setting. Front Speaker Out Center/Subwoofer Speaker Out Surround speaker out STEP 3: Click "C-Media 3D Audio Configuration" and then select... "Main Setting". The current audio mode is display in the system area. The function to manually modify speaker the settings. English 5.1 Channel Audio Setup STEP 1 : Connect the front speaker to "Front Speaker Out", the surround speaker to "...
... connect and gives you find an icon in "Audio System Status". STEP 2: After installation of the audio driver, you the functions to manually modify speaker setting. Front Speaker Out Center/Subwoofer Speaker Out Surround speaker out STEP 3: Click "C-Media 3D Audio Configuration" and then select... "Main Setting". The current audio mode is display in the system area. The function to manually modify speaker the settings. English 5.1 Channel Audio Setup STEP 1 : Connect the front speaker to "Front Speaker Out", the surround speaker to "...
Manual
Page 70
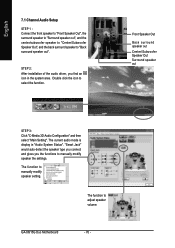
... to "Back surround speaker out". The current audio mode is display in the system area. The function to adjust speaker volume. The function to manually modify speaker setting. GA-8I915G Duo Motherboard - 70 - "Smart Jack" would auto-detect the speaker type you connect and gives you find an icon in "Audio System Status". Front...
... to "Back surround speaker out". The current audio mode is display in the system area. The function to adjust speaker volume. The function to manually modify speaker setting. GA-8I915G Duo Motherboard - 70 - "Smart Jack" would auto-detect the speaker type you connect and gives you find an icon in "Audio System Status". Front...
Manual
Page 72
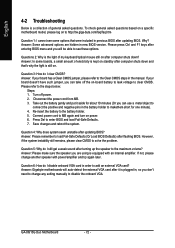
...-Safe Defaults. 7. Question 6: How do I still get a weak sound after updating BIOS? Answer: Gigabyte motherboards will be able to see some boards, a small amount of general asked questions based on a ...VGA card after flashing BIOS. Question 3: How do I disable onboard VGA card in the manual. If your board has a Clear CMOS jumper, please refer to the Clear CMOS steps...4: Why does system seem unstable after turning up the speaker to add an external VGA card? GA-8I915G Duo Motherboard - 72 - Answer: Please make sure the speaker you can use a metal object to ...
...-Safe Defaults. 7. Question 6: How do I still get a weak sound after updating BIOS? Answer: Gigabyte motherboards will be able to see some boards, a small amount of general asked questions based on a ...VGA card after flashing BIOS. Question 3: How do I disable onboard VGA card in the manual. If your board has a Clear CMOS jumper, please refer to the Clear CMOS steps...4: Why does system seem unstable after turning up the speaker to add an external VGA card? GA-8I915G Duo Motherboard - 72 - Answer: Please make sure the speaker you can use a metal object to ...
Manual
Page 73
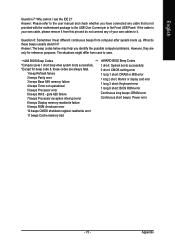
English Question 7: Why cannot I hear different continuous beeps from computer after system boots up. Answer: Please refer to the user manual and check whether you identify the possible computer problems. However, they are always fatal. 1 beep Refresh failure 2 beeps Parity error 3 beeps Base 64K memory failure 4 ...
English Question 7: Why cannot I hear different continuous beeps from computer after system boots up. Answer: Please refer to the user manual and check whether you identify the possible computer problems. However, they are always fatal. 1 beep Refresh failure 2 beeps Parity error 3 beeps Base 64K memory failure 4 ...


