Manual
Page 2
... during OS installation. Before you use two hard drives with the VT6410 controller, you may prepare only one hard drive. (b) An empty formatted floppy disk. (c) Windows XP/2000 setup disk. (d) Driver CD for your hard drives to the hard drive(s).
... during OS installation. Before you use two hard drives with the VT6410 controller, you may prepare only one hard drive. (b) An empty formatted floppy disk. (c) Windows XP/2000 setup disk. (d) Driver CD for your hard drives to the hard drive(s).
Manual
Page 4
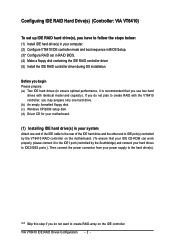
...: Value F10: Save F6: Fail-Safe Defaults Figure 3 ESC: Exit F1: General Help F7: Optimized Defaults VIA VT6410 IDE RAID Drives Configuration - 4 - to install Microsoft Windows 2000/XP (Figure 2). ¤¤ CMOS Setup Utility-Copyright (C) 1984-2004 Award Software Hard Disk Boot Priority ¤å 1. SCSI-1 : Maxtor 6E030L0 3. Ác Step 2: Select...
...: Value F10: Save F6: Fail-Safe Defaults Figure 3 ESC: Exit F1: General Help F7: Optimized Defaults VIA VT6410 IDE RAID Drives Configuration - 4 - to install Microsoft Windows 2000/XP (Figure 2). ¤¤ CMOS Setup Utility-Copyright (C) 1984-2004 Award Software Hard Disk Boot Priority ¤å 1. SCSI-1 : Maxtor 6E030L0 3. Ác Step 2: Select...
Manual
Page 5
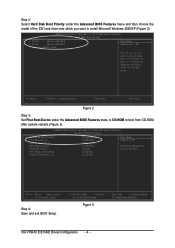
VIA VT6410 RAID BIOS Setting Utility V2.11 Copyright (C) VIA Technologies, Inc. Press key into User Window"(Figure 4). VIA Tech. Hit the TAB key to that below will appear (Figure 5). All Right reserved. Primary Master : Maxtor 6E030L0 Primary Master : No Device Secondary ... the Power-On Self-Test (POST) memory test begins and before the operating system boot begins, look for a message which says "Press key into User Window! You can press the UP and DOWN ARROW keys to enter the RAID setup utility. Skip this step and proceed with the hard disks attached...
VIA VT6410 RAID BIOS Setting Utility V2.11 Copyright (C) VIA Technologies, Inc. Press key into User Window"(Figure 4). VIA Tech. Hit the TAB key to that below will appear (Figure 5). All Right reserved. Primary Master : Maxtor 6E030L0 Primary Master : No Device Secondary ... the Power-On Self-Test (POST) memory test begins and before the operating system boot begins, look for a message which says "Press key into User Window! You can press the UP and DOWN ARROW keys to enter the RAID setup utility. Skip this step and proceed with the hard disks attached...
Manual
Page 10
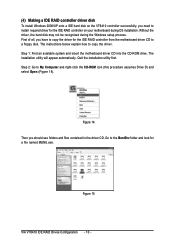
Figure 14 Then you need to install required driver for the IDE RAID controller on your motherboard during the Windows setup process. Figure 15 VIA VT6410 IDE RAID Drives Configuration - 10 - Step 1: Find an available system and insert the motherboard driver CD into ... utility first. The instructions below explain how to ¤å a floppy disk. Ác (4) Making a IDE RAID controller driver disk Åé To install Windows 2000/XP onto a IDE hard disk on the VT6410 controller successfully, you should see folders and files contained in the driver CD.
Figure 14 Then you need to install required driver for the IDE RAID controller on your motherboard during the Windows setup process. Figure 15 VIA VT6410 IDE RAID Drives Configuration - 10 - Step 1: Find an available system and insert the motherboard driver CD into ... utility first. The instructions below explain how to ¤å a floppy disk. Ác (4) Making a IDE RAID controller driver disk Åé To install Windows 2000/XP onto a IDE hard disk on the VT6410 controller successfully, you should see folders and files contained in the driver CD.

Manual
Page 12
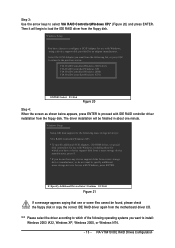
... with the IDE RAID driver. After pressing the F6 key, there will be asked to specify additional mass storage devices for use with Windows, including those for use with Windows, press ENTER. Figure 18 Step 2: When a screen similar to that you have a device support disk from a mass storage device ...disk and press F6 as soon as you see the next screen for you to manually specify an adapter. This procedure ¤¤ assumes Windows XP installation. ¤å Step 1: Restart your system to boot from a mass storage device manufacturer, or do not have chosen to specify...
... with the IDE RAID driver. After pressing the F6 key, there will be asked to specify additional mass storage devices for use with Windows, including those for use with Windows, press ENTER. Figure 18 Step 2: When a screen similar to that you have a device support disk from a mass storage device ...disk and press F6 as soon as you see the next screen for you to manually specify an adapter. This procedure ¤¤ assumes Windows XP installation. ¤å Step 1: Restart your system to boot from a mass storage device manufacturer, or do not have chosen to specify...
Manual
Page 13
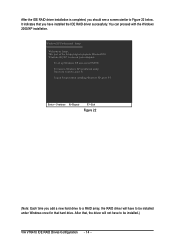
...device support disks from the motherboard driver CD. VIA VT6410 IDE RAID Drives Configuration VIA RAID Controller(Windows 2003 IA32) VIA RAID Controller(Windows XP) VIA RAID Controller(Windows 2000) VIA RAID Controller(Windows NT4) ENTER=Select F3=Exit Figure 20 Step 4: When the screen as shown below appears, ...=Exit Figure 21 If a message appears saying that one minute. The driver installation will begin to configure a SCSI Adapter for use with Windows, press ENTER. Then it will be finished in about one or some files cannot be found, please check the floppy disk or copy ...
...device support disks from the motherboard driver CD. VIA VT6410 IDE RAID Drives Configuration VIA RAID Controller(Windows 2003 IA32) VIA RAID Controller(Windows XP) VIA RAID Controller(Windows 2000) VIA RAID Controller(Windows NT4) ENTER=Select F3=Exit Figure 20 Step 4: When the screen as shown below appears, ...=Exit Figure 21 If a message appears saying that one minute. The driver installation will begin to configure a SCSI Adapter for use with Windows, press ENTER. Then it will be finished in about one or some files cannot be found, please check the floppy disk or copy ...
Manual
Page 14
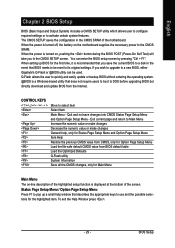
... time you have to Setup. This port of the Setup program prepares Microsoft(R) Windows (R) XP to Figure 22 below. To set up Windows XP now, press ENTER. To quit Setup without installing Windows XP, press F3. To repair a Windows XP installation using Recovery Console, press R. After that hard drive. It indicates ... a RAID array, the RAID driver will have to be installed.) VIA VT6410 IDE RAID Drives Configuration - 14 - You can proceed with the Windows Åé 2000/XP installation. ¤¤ ¤å WindowsXP Professional Setup Welcome to be installed under...
... time you have to Setup. This port of the Setup program prepares Microsoft(R) Windows (R) XP to Figure 22 below. To set up Windows XP now, press ENTER. To quit Setup without installing Windows XP, press F3. To repair a Windows XP installation using Recovery Console, press R. After that hard drive. It indicates ... a RAID array, the RAID driver will have to be installed.) VIA VT6410 IDE RAID Drives Configuration - 14 - You can proceed with the Windows Åé 2000/XP installation. ¤¤ ¤å WindowsXP Professional Setup Welcome to be installed under...
Manual
Page 29
... Setup Menu - BIOS Setup Q-Flash allows the user to be used. Exit current page and return to the CMOS SETUP screen. To exit the Help Window press . - 29 - English Chapter 2 BIOS Setup BIOS (Basic Input and Output System) includes a CMOS SETUP utility which allows user to configure required settings or ... power is turned on, pushing the button during the BIOS POST (Power-On Self Test) will take you wish to upgrade to a new BIOS, either Gigabyte's Q-Flash or @BIOS utility can enter the BIOS setup screen by pressing "Ctrl + F1". When the power is turned off, the battery on -line ...
... Setup Menu - BIOS Setup Q-Flash allows the user to be used. Exit current page and return to the CMOS SETUP screen. To exit the Help Window press . - 29 - English Chapter 2 BIOS Setup BIOS (Basic Input and Output System) includes a CMOS SETUP utility which allows user to configure required settings or ... power is turned on, pushing the button during the BIOS POST (Power-On Self Test) will take you wish to upgrade to a new BIOS, either Gigabyte's Q-Flash or @BIOS utility can enter the BIOS setup screen by pressing "Ctrl + F1". When the power is turned off, the battery on -line ...

Manual
Page 35
... On-chip frame buffer size to 32MB. (Note) This item will not access to Setup page if the correct password is only working Disabled for windows XP. (Default value) No-Execute Memory Protect (Note) Enabled Disabled Enables No-Execute Memory Protect function. Please note that this function. - 35 - CPU Hyper-Threading...
... On-chip frame buffer size to 32MB. (Note) This item will not access to Setup page if the correct password is only working Disabled for windows XP. (Default value) No-Execute Memory Protect (Note) Enabled Disabled Enables No-Execute Memory Protect function. Please note that this function. - 35 - CPU Hyper-Threading...
Manual
Page 49
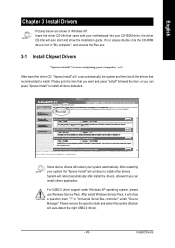
... item that recommended to install all the drivers that you can install others application. or you want and press "install" followed the item; After install Windows Service Pack, it will scan automatically the system and then list all items defaulted. If not, please double click the CD-ROM device icon in...
... item that recommended to install all the drivers that you can install others application. or you want and press "install" followed the item; After install Windows Service Pack, it will scan automatically the system and then list all items defaulted. If not, please double click the CD-ROM device icon in...
Manual
Page 57
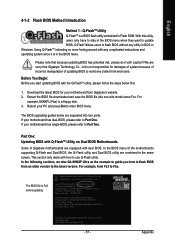
Extract the BIOS file downloaded and save the BIOS file (the one with dual BIOS. Some of Gigabyte motherboards are separated into two parts. In the following sections, we take GA-8KNXP Ultra as the example to guide you start updating BIOS with how to a floppy disk. 3. For ...BIOS file is in Flash ROM. Part One: Updating BIOS with caution!! With this utility, users only have to stay in DOS or Windows. Appendix Using Q-FlashTM indicating no more fooling around with any complicated instructions and operating system since it with Q-FlashTM Utility on Dual BIOS...
Extract the BIOS file downloaded and save the BIOS file (the one with dual BIOS. Some of Gigabyte motherboards are separated into two parts. In the following sections, we take GA-8KNXP Ultra as the example to guide you start updating BIOS with how to a floppy disk. 3. For ...BIOS file is in Flash ROM. Part One: Updating BIOS with caution!! With this utility, users only have to stay in DOS or Windows. Appendix Using Q-FlashTM indicating no more fooling around with any complicated instructions and operating system since it with Q-FlashTM Utility on Dual BIOS...
Manual
Page 64
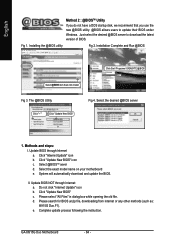
Installation Complete and Run @BIOS Click Sart/ Programs/ GIGABYTE/@BIOS Select @BIOS item than click Install Fig 3. Select the desired @BIOS server 1. Update BIOS NOT through Internet a. Do not click "Internet Update" icon b. d. ...BIOS. Select @BIOSTM sever d. Please select "All Files" in dialog box while opening the old file. e. GA-8I915G Duo Motherboard - 64 - II. Click "Update New BIOS" icon c. Just select the desired @BIOS server to update their BIOS under Windows. Please search for BIOS unzip file, downloading from internet or any other methods (such as...
Installation Complete and Run @BIOS Click Sart/ Programs/ GIGABYTE/@BIOS Select @BIOS item than click Install Fig 3. Select the desired @BIOS server 1. Update BIOS NOT through Internet a. Do not click "Internet Update" icon b. d. ...BIOS. Select @BIOSTM sever d. Please select "All Files" in dialog box while opening the old file. e. GA-8I915G Duo Motherboard - 64 - II. Click "Update New BIOS" icon c. Just select the desired @BIOS server to update their BIOS under Windows. Please search for BIOS unzip file, downloading from internet or any other methods (such as...


