
Owner's Manual
Page 1
For Answers and Assistance: 1.800.354.3643 or visit www.geniecompany.com SAVE THIS MANUAL FOR FUTURE REFERENCE An extension kit for an 8 foot high door is standard for up to close door NOTE: Your Residential Operator comes with a Rail Assembly which is available. 3511035556 ¤® Series IS, ISL, IC, H Includes Remote Control and SERIES II Electronics Included Wall Control MUST be installed prior to operation of this Garage Door Operator Safe-T-Beam® Safety Reverse System Must be installed to a 7 foot 6 inch high door.
For Answers and Assistance: 1.800.354.3643 or visit www.geniecompany.com SAVE THIS MANUAL FOR FUTURE REFERENCE An extension kit for an 8 foot high door is standard for up to close door NOTE: Your Residential Operator comes with a Rail Assembly which is available. 3511035556 ¤® Series IS, ISL, IC, H Includes Remote Control and SERIES II Electronics Included Wall Control MUST be installed prior to operation of this Garage Door Operator Safe-T-Beam® Safety Reverse System Must be installed to a 7 foot 6 inch high door.
Owner's Manual
Page 2
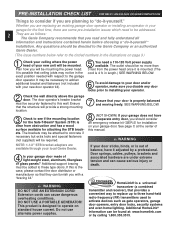
...current. WARNING If your door is out of balance, have a separate entry door, you should be directed to the Genie Company or an authorized Genie Dealer. (The issue numbers below refer to the circled numbers in your garage door made of your new door operator kit). 5 ...-it-yourself " installation. NOTE: 1-1/2" STB bracket adapters are available through your local Genie Dealer. 4 Is your garage for installation on your operator. 2 Check the wall directly above the garage door. Whether you are under extreme tension and can cause dangerous overheating conditions. This product ...
...current. WARNING If your door is out of balance, have a separate entry door, you should be directed to the Genie Company or an authorized Genie Dealer. (The issue numbers below refer to the circled numbers in your garage door made of your new door operator kit). 5 ...-it-yourself " installation. NOTE: 1-1/2" STB bracket adapters are available through your local Genie Dealer. 4 Is your garage for installation on your operator. 2 Check the wall directly above the garage door. Whether you are under extreme tension and can cause dangerous overheating conditions. This product ...
Owner's Manual
Page 4
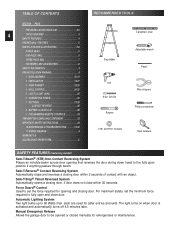
...to fully open position if anything passes through beam. Manual Emergency Release Allows the garage door to 60 Watts max. Safe-T-Stop® Timed Reversed System Automatically opens a closing door. Automatic Lighting System Two light bulbs up to be opened or closed manually for ...B ACCESSORIES ORDER FORM C RECOMMENDED TOOLS Carpenter's level Step ladder Adjustable wrench Pencil Drill 5/ 32" Drill Bit Ratchet Wire strippers Phillips screwdriver 7/16" and 9/16" Sockets Tape measure SAFETY FEATURES (varies by model) Safe-T-Beam® (STB) Non-Contact Reversing System Places an...
...to fully open position if anything passes through beam. Manual Emergency Release Allows the garage door to 60 Watts max. Safe-T-Stop® Timed Reversed System Automatically opens a closing door. Automatic Lighting System Two light bulbs up to be opened or closed manually for ...B ACCESSORIES ORDER FORM C RECOMMENDED TOOLS Carpenter's level Step ladder Adjustable wrench Pencil Drill 5/ 32" Drill Bit Ratchet Wire strippers Phillips screwdriver 7/16" and 9/16" Sockets Tape measure SAFETY FEATURES (varies by model) Safe-T-Beam® (STB) Non-Contact Reversing System Places an...
Owner's Manual
Page 5
LED indicator shows whether system is used. Independent light control allows convenient manual control of door operator by allowing the garage door to be supplied with your garage door operator. An access code copied from inside garage. INTELLICODE® 1-Button Remote Control Controls door operator by continuously changing the access code each new code only once. DO NOT...
LED indicator shows whether system is used. Independent light control allows convenient manual control of door operator by allowing the garage door to be supplied with your garage door operator. An access code copied from inside garage. INTELLICODE® 1-Button Remote Control Controls door operator by continuously changing the access code each new code only once. DO NOT...
Owner's Manual
Page 9
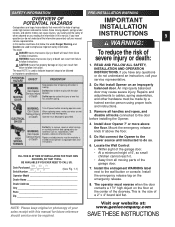
...power source until instructed to emphasize important safety information. This is moving. SAFETY INFORMATION PRE-INSTALLATION WARNING OVERVIEW OF POTENTIAL HAZARDS Garage doors are not pinched or near moving parts. HIGH SPRING TENSION WARNING: Can Cause Serious Injury or Death Do Not try to...Cause Serious Injury or Death ELECTRICAL SHOCK Turn off power before installing the Opener. 4. Locate the Wall Control: • Within sight of the garage door. • At a minimum height of 5', so small children cannot reach it. • Away from failure To reduce the risk of ...
...power source until instructed to emphasize important safety information. This is moving. SAFETY INFORMATION PRE-INSTALLATION WARNING OVERVIEW OF POTENTIAL HAZARDS Garage doors are not pinched or near moving parts. HIGH SPRING TENSION WARNING: Can Cause Serious Injury or Death Do Not try to...Cause Serious Injury or Death ELECTRICAL SHOCK Turn off power before installing the Opener. 4. Locate the Wall Control: • Within sight of the garage door. • At a minimum height of 5', so small children cannot reach it. • Away from failure To reduce the risk of ...

Owner's Manual
Page 15
... and swivel on large spring-loaded hinges on each side). This is the centerline. CENTERLINE TYPICAL TRACKLESS garage door CENTERLINE floor TYPICAL TRACK GUIDED garage door 15 1. Fig. 2-1. - Determining header bracket location. • Find center of the door down approximately 1 foot. These differences are applicable to side. - REFER TO PAGES 2 & 3. They are two basic types...
... and swivel on large spring-loaded hinges on each side). This is the centerline. CENTERLINE TYPICAL TRACKLESS garage door CENTERLINE floor TYPICAL TRACK GUIDED garage door 15 1. Fig. 2-1. - Determining header bracket location. • Find center of the door down approximately 1 foot. These differences are applicable to side. - REFER TO PAGES 2 & 3. They are two basic types...

Owner's Manual
Page 16
Finding highest point of travel. • While raising garage door manually, watch top edge of door to see where it onto the rail. (A stool, chair, table or any object that can be used to the floor. • Remove support and gently lower door. • Mark "highest point of travel "... at centerline on centerline. Measure from here to "highest point of travel . This is called "highest point of travel . SECTIONAL DOORS Highest point of travel . NOTE: Following step depends on centerline. Highest point of travel ." Fig. 2-2. • A locking pliers can safely support...
Finding highest point of travel. • While raising garage door manually, watch top edge of door to see where it onto the rail. (A stool, chair, table or any object that can be used to the floor. • Remove support and gently lower door. • Mark "highest point of travel "... at centerline on centerline. Measure from here to "highest point of travel . This is called "highest point of travel . SECTIONAL DOORS Highest point of travel . NOTE: Following step depends on centerline. Highest point of travel ." Fig. 2-2. • A locking pliers can safely support...
Owner's Manual
Page 17
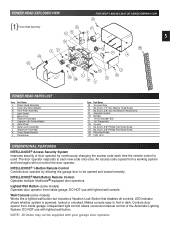
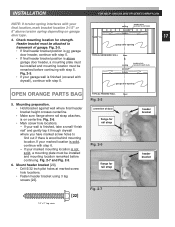
...your marked mounting location is above torsion spring depending on garage door header, continue with step 5. centerline of garage. garage door opening OPEN ORANGE PARTS BAG TYPICAL FINISHED WALL floor Fig. 2-5 5. If your garage wall is on centerline. garage door opening • If final header bracket position is wood ... If your final location, mark bracket location 2-1/2" or ceiling wooden plate fastened to wall studs 6" above garage door header, a mounting plate must be installed and mounting location must be CL ceiling wooden plate fastened to framework of...
...your marked mounting location is above torsion spring depending on garage door header, continue with step 5. centerline of garage. garage door opening OPEN ORANGE PARTS BAG TYPICAL FINISHED WALL floor Fig. 2-5 5. If your garage wall is on centerline. garage door opening • If final header bracket position is wood ... If your final location, mark bracket location 2-1/2" or ceiling wooden plate fastened to wall studs 6" above garage door header, a mounting plate must be installed and mounting location must be CL ceiling wooden plate fastened to framework of...
Owner's Manual
Page 19
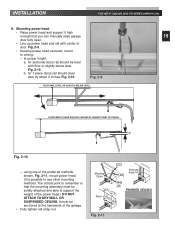
b. using one of the preferred methods shown, Fig. 2-11, mount power head. (It is that you can manually raise garage 19 door fully open. • Line up power head and rail with floor or slightly below level. Mounting Straps Wood Fig. 2-11 [22] [...2-10 - It must be solidly attached and able to ceiling: - Fig. 2-10. a. for sectional doors rail should clear door by about 2 inches. The critical point to remember is possible to the framework of the garage. • Fully tighten rail strap nut. Fig. 2-9. • Keeping power head centered, mount to support...
b. using one of the preferred methods shown, Fig. 2-11, mount power head. (It is that you can manually raise garage 19 door fully open. • Line up power head and rail with floor or slightly below level. Mounting Straps Wood Fig. 2-11 [22] [...2-10 - It must be solidly attached and able to ceiling: - Fig. 2-10. a. for sectional doors rail should clear door by about 2 inches. The critical point to remember is possible to the framework of the garage. • Fully tighten rail strap nut. Fig. 2-9. • Keeping power head centered, mount to support...
Owner's Manual
Page 20
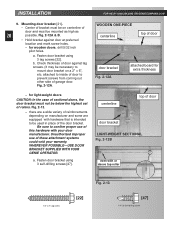
... 2-12A. WOODEN ONE-PIECE centerline top of garage door. Mounting door bracket [21]. • Center of bracket must be on centerline of door against door at preferred location and mark screw holes. - Check thickness of door and must not be mounted as high as ...these attachment systems could void your door manufacturer. b. for light-weight doors CAUTION: In the case of sectional doors, the door bracket must be below the highest set of the door bracket. WHEREVER POSSIBLE-USE DOOR BRACKET SUPPLIED WITH YOUR GENIE OPERATOR. Fasten door bracket using 3 lag screws ...
... 2-12A. WOODEN ONE-PIECE centerline top of garage door. Mounting door bracket [21]. • Center of bracket must be on centerline of door against door at preferred location and mark screw holes. - Check thickness of door and must not be mounted as high as ...these attachment systems could void your door manufacturer. b. for light-weight doors CAUTION: In the case of sectional doors, the door bracket must be below the highest set of the door bracket. WHEREVER POSSIBLE-USE DOOR BRACKET SUPPLIED WITH YOUR GENIE OPERATOR. Fasten door bracket using 3 lag screws ...
Owner's Manual
Page 22
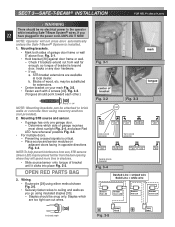
... with 2 screws [40]. Determine which are available at local dealer. Fig. 3-1. • Hold bracket [38] against door frame or wall. - If not: a. Blocks of garage door frame or wall 5" above floor. Staples should be no electrical power to the operator while installing Safe-T-Beam System® wires...Sensor Green LED Source Red LED Sensor Green LED A Power Head B Power Head Fig. 3-5 Mounting STB source and sensor. • If garage has only one garage door. - Place source and sensor modules on your mark Fig. 3-2. • Fasten each other.) [40] #10-16 x 1-1/4" NOTE: Mounting...
... with 2 screws [40]. Determine which are available at local dealer. Fig. 3-1. • Hold bracket [38] against door frame or wall. - If not: a. Blocks of garage door frame or wall 5" above floor. Staples should be no electrical power to the operator while installing Safe-T-Beam System® wires...Sensor Green LED Source Red LED Sensor Green LED A Power Head B Power Head Fig. 3-5 Mounting STB source and sensor. • If garage has only one garage door. - Place source and sensor modules on your mark Fig. 3-2. • Fasten each other.) [40] #10-16 x 1-1/4" NOTE: Mounting...
Owner's Manual
Page 25
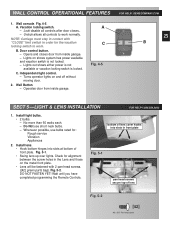
NOTE: Carriage must stay in contact with 2 pan head screws. ([42] green parts bag). Opens and closes door from inside garage. - Independent light control. - A C Fig. 4-5 FOR HELP- Install light bulbs. • 2 bulbs. - Whenever possible, use short neck bulbs. - Fig. ... controls to work normally. Lights on and off without moving door. 2. Unlock allows all controls after door closes.. - Lights out shows either power is not available or vacation locking switch is not locked. - Operates door from inside garage. Check for alignment between the screw holes in front plate...
NOTE: Carriage must stay in contact with 2 pan head screws. ([42] green parts bag). Opens and closes door from inside garage. - Independent light control. - A C Fig. 4-5 FOR HELP- Install light bulbs. • 2 bulbs. - Whenever possible, use short neck bulbs. - Fig. ... controls to work normally. Lights on and off without moving door. 2. Unlock allows all controls after door closes.. - Lights out shows either power is not available or vacation locking switch is not locked. - Operates door from inside garage. Check for alignment between the screw holes in front plate...
Owner's Manual
Page 27
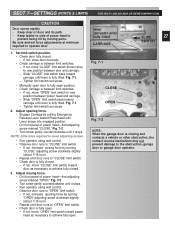
..., the contact reverse mechanism may not prevent damage to the obstruction, garage door or garage door operator. If not, increase opening force. • Engage Carriage by moving parts. Set limit switch position. • Check door fully closed . - Fig. 7-2. • Turn screw gently counterclockwise... to move "CLOSE" limit switch (brown wire) to fully open . Fig. 7-1 CLOSE OPEN Fig. 7-2 NOTE: When the garage door is between door and carriage. - lever (actuator arm) fully lifted CARRIAGE SLIDE 27 SWITCH 1. Tighten limit switch set force adjustments at minimum required ...
..., the contact reverse mechanism may not prevent damage to the obstruction, garage door or garage door operator. If not, increase opening force. • Engage Carriage by moving parts. Set limit switch position. • Check door fully closed . - Fig. 7-2. • Turn screw gently counterclockwise... to move "CLOSE" limit switch (brown wire) to fully open . Fig. 7-1 CLOSE OPEN Fig. 7-2 NOTE: When the garage door is between door and carriage. - lever (actuator arm) fully lifted CARRIAGE SLIDE 27 SWITCH 1. Tighten limit switch set force adjustments at minimum required ...

Owner's Manual
Page 28
...12 Volt battery. 2. Snap in slot on back of remote control. - Decrease closing force a small amount by the garage door without sustaining damage is stopping but not reversing, "CLOSE" limit switch must be moved closer to polarity markings and instal new...battery. • Observe polarity markings (+,-) inside battery compartment. • Match new battery to door. Test contact reverse. • Open door using wall control. - Door should stop and reverse within 2 seconds of garage door opening. b. Attach visor clip Fig. 6-1. • Slide clip in place. Visor Clip ...
...12 Volt battery. 2. Snap in slot on back of remote control. - Decrease closing force a small amount by the garage door without sustaining damage is stopping but not reversing, "CLOSE" limit switch must be moved closer to polarity markings and instal new...battery. • Observe polarity markings (+,-) inside battery compartment. • Match new battery to door. Test contact reverse. • Open door using wall control. - Door should stop and reverse within 2 seconds of garage door opening. b. Attach visor clip Fig. 6-1. • Slide clip in place. Visor Clip ...
Owner's Manual
Page 30
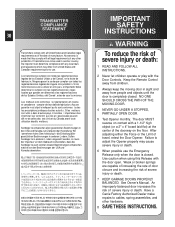
...the importer must determine compliance with any other hardware. 8 SAVE THESE INSTRUCTIONS. The door MUST reverse on the floor. After adjusting either the Force or the Limit of severe injury or death. 7 KEEP GARAGE DOORS PROPERLY BALANCED. Use caution when using this Release with a 1-1/2" high object (or ...et du Canada avant toute utilisation desdits metteurs. An improperly balanced door increases the risk of manufacture. Have a Genie Factory Authorized Dealer make repairs to use the Emergency Release only when the door is closed . Les metteurs sont conformes la r glementation am ...
...the importer must determine compliance with any other hardware. 8 SAVE THESE INSTRUCTIONS. The door MUST reverse on the floor. After adjusting either the Force or the Limit of severe injury or death. 7 KEEP GARAGE DOORS PROPERLY BALANCED. Use caution when using this Release with a 1-1/2" high object (or ...et du Canada avant toute utilisation desdits metteurs. An improperly balanced door increases the risk of manufacture. Have a Genie Factory Authorized Dealer make repairs to use the Emergency Release only when the door is closed . Les metteurs sont conformes la r glementation am ...

Owner's Manual
Page 31
... each time you did the maintenance last month. Pull emergency release knob down. • Raise door manually about 3 feet. - Use GENIE GLU3 lubricant. HOLD WALL CONTROL BUTTON DOWN UNTIL DOOR IS CLOSED. (REMOTE CONTROL & WIRELESS KEYPAD WILL NOT WORK WITHOUT STB) CUSTOMER SERVICE: 1.800...8 9 10 11 12 13 14 15 16 17 18 19 20 NOTE: Do not operate door automatically or manually if springs are broken. Door should stay in the center of garage doorway (See page 28). • Close door using wall button or remote control. CHECK FOR OBSTRUCTION 3.CALL CUSTOMER SERVICE 2 BLINKS, PAUSE (...
... each time you did the maintenance last month. Pull emergency release knob down. • Raise door manually about 3 feet. - Use GENIE GLU3 lubricant. HOLD WALL CONTROL BUTTON DOWN UNTIL DOOR IS CLOSED. (REMOTE CONTROL & WIRELESS KEYPAD WILL NOT WORK WITHOUT STB) CUSTOMER SERVICE: 1.800...8 9 10 11 12 13 14 15 16 17 18 19 20 NOTE: Do not operate door automatically or manually if springs are broken. Door should stay in the center of garage doorway (See page 28). • Close door using wall button or remote control. CHECK FOR OBSTRUCTION 3.CALL CUSTOMER SERVICE 2 BLINKS, PAUSE (...


