

Owner's Manual
Page 10
Fig. 1-1. 3. Fig. 1-1. 4. CAUTION Drive screws can slide out of screw against coupler. Attach 1-piece rail or "first" rail section[3A] of 3-piece rail to power head. • (3-piece only)Select "first" rail section. (It has ... doors is available. 1. Set power head so that front panel (with shaft. (It will drop down over end of screw out about 5 inches. Install coupler [39]. • Place coupler over end of screw.) Fig. 1-2. • (3-piece only) Remove cardboard sleeve. • Slide end of shaft and will no . 2. Keep rail sections level...
Fig. 1-1. 3. Fig. 1-1. 4. CAUTION Drive screws can slide out of screw against coupler. Attach 1-piece rail or "first" rail section[3A] of 3-piece rail to power head. • (3-piece only)Select "first" rail section. (It has ... doors is available. 1. Set power head so that front panel (with shaft. (It will drop down over end of screw out about 5 inches. Install coupler [39]. • Place coupler over end of screw.) Fig. 1-2. • (3-piece only) Remove cardboard sleeve. • Slide end of shaft and will no . 2. Keep rail sections level...

Owner's Manual
Page 24
... next to wall control • Find location for wall control: - If you have a lighted wall control, all your dealer. Drive staples just tight enough to wall control - In sight of each other or other wall control can cause the door to operate unexpectedly... ONE OF YOUR WALL CONTROLS MAY BE THE LIGHTED TYPE. Striped wire to 1-1/2" Fig. 4-2 button Fig. 4-3 console Fig. 4-4 [34] #6 x 1-1/4" Pan head screw Tighten screws 4. Fig. 4-1 1/2" 1-1/4" to terminal #2 - Fig. 4-4. • For Wall Console or Wall Button. - SECT 4-WALL CONTROL INSTALLATION FOR HELP- 1.800.354....
... next to wall control • Find location for wall control: - If you have a lighted wall control, all your dealer. Drive staples just tight enough to wall control - In sight of each other or other wall control can cause the door to operate unexpectedly... ONE OF YOUR WALL CONTROLS MAY BE THE LIGHTED TYPE. Striped wire to 1-1/2" Fig. 4-2 button Fig. 4-3 console Fig. 4-4 [34] #6 x 1-1/4" Pan head screw Tighten screws 4. Fig. 4-1 1/2" 1-1/4" to terminal #2 - Fig. 4-4. • For Wall Console or Wall Button. - SECT 4-WALL CONTROL INSTALLATION FOR HELP- 1.800.354....
Owner's Manual
Page 31
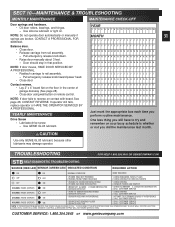
...A AAAAA AAAA Contact reverse. • Lay 2" x 4" board flat on the floor in that position. See page 28, CONTACT REVERSE. Drive Screw • Lubricate drive screw. - One less thing you will have to reverse on your busy schedule is whether or not you perform routine maintenance. BEAM OBSTRUCTED 3.SENSOR ... BUTTON DOWN UNTIL DOOR IS CLOSED. (REMOTE CONTROL & WIRELESS KEYPAD WILL NOT WORK WITHOUT STB) CUSTOMER SERVICE: 1.800.354.3643 or www.geniecompany.com Use GENIE GLU3 lubricant. F F FFF FFFFF F FFFFF FFFF M M MMM MMMMM M MMMMM MMMM A A AAA AAAAA A AAAAA AAAA M M MMM MMMMM M ...
...A AAAAA AAAA Contact reverse. • Lay 2" x 4" board flat on the floor in that position. See page 28, CONTACT REVERSE. Drive Screw • Lubricate drive screw. - One less thing you will have to reverse on your busy schedule is whether or not you perform routine maintenance. BEAM OBSTRUCTED 3.SENSOR ... BUTTON DOWN UNTIL DOOR IS CLOSED. (REMOTE CONTROL & WIRELESS KEYPAD WILL NOT WORK WITHOUT STB) CUSTOMER SERVICE: 1.800.354.3643 or www.geniecompany.com Use GENIE GLU3 lubricant. F F FFF FFFFF F FFFFF FFFF M M MMM MMMMM M MMMMM MMMM A A AAA AAAAA A AAAAA AAAA M M MMM MMMMM M ...


