

Owner's Manual
Page 2
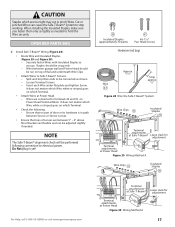
... do not understand an instruction, call your service representative. 2 Do Not install operator on the floor at 1-800-35-GENIE.. Install the emergency release tag on, or next to which door spring parts are used for safer entries and exits. Manual Emergency Release Allows the garage door to be properly grounded. •...
... do not understand an instruction, call your service representative. 2 Do Not install operator on the floor at 1-800-35-GENIE.. Install the emergency release tag on, or next to which door spring parts are used for safer entries and exits. Manual Emergency Release Allows the garage door to be properly grounded. •...

Owner's Manual
Page 3
...4' above ground and carefully let go. If door appears out of alignment, binds, or does not move smoothly, contact a 3' - 4' Genie Factory Authorized Dealer or dealer of your garage door for repairs and adjustments SECTIONAL DOOR, TORSION SPRINGS SECTIONAL DOOR, EXTENSION SPRINGS ONE-PIECE DOOR, ... 27. PRE-INSTALLATION CHECKLIST This Opener includes parts and supplies needed to install Opener into your garage and connect to your garage door. This Opener is designed for repairs and adjustments to door mechanism. NOTE The Excelerator Opener is nailed together and not a solid...
...4' above ground and carefully let go. If door appears out of alignment, binds, or does not move smoothly, contact a 3' - 4' Genie Factory Authorized Dealer or dealer of your garage door for repairs and adjustments SECTIONAL DOOR, TORSION SPRINGS SECTIONAL DOOR, EXTENSION SPRINGS ONE-PIECE DOOR, ... 27. PRE-INSTALLATION CHECKLIST This Opener includes parts and supplies needed to install Opener into your garage and connect to your garage door. This Opener is designed for repairs and adjustments to door mechanism. NOTE The Excelerator Opener is nailed together and not a solid...

Owner's Manual
Page 7
... 1L Model Number Serial Number 1M 1H 1P POWER HEAD ASSEMBLY PARTS LIST Item 1A 1B 1C 1D 1E 1G 1H 1K 1L 1M 1P Part Name Lens Top Plate Assembly Light Socket (2) Motor Assembly Cover ...32 x 1" Phillips Screw No. 8-32 x 3/8" Slotted Hex Head Screw Power Cord For Help, call 1-800-35-GENIE or visit www.geniecompany.com 7 Parts List Item 1 2 3 4 4A 4B 4C 8 9 10 11 12 13 14 15 16 18 19 21 22 ...38* 40* 41* 42* 43* 44* 45* 46 47* 48* 49* 50* 51* 52* 53 54 55* 56 57 Part Name Quantity Required 1-Pc Rail 3-Pc Rail Power Head Assembly (main carton) 1 1 1/4"-20 x 13/16" Hex Head Shoulder Bolt ...
... 1L Model Number Serial Number 1M 1H 1P POWER HEAD ASSEMBLY PARTS LIST Item 1A 1B 1C 1D 1E 1G 1H 1K 1L 1M 1P Part Name Lens Top Plate Assembly Light Socket (2) Motor Assembly Cover ...32 x 1" Phillips Screw No. 8-32 x 3/8" Slotted Hex Head Screw Power Cord For Help, call 1-800-35-GENIE or visit www.geniecompany.com 7 Parts List Item 1 2 3 4 4A 4B 4C 8 9 10 11 12 13 14 15 16 18 19 21 22 ...38* 40* 41* 42* 43* 44* 45* 46 47* 48* 49* 50* 51* 52* 53 54 55* 56 57 Part Name Quantity Required 1-Pc Rail 3-Pc Rail Power Head Assembly (main carton) 1 1 1/4"-20 x 13/16" Hex Head Shoulder Bolt ...

Owner's Manual
Page 9
... Finger-tighten until later. (Middle Rail Section looks the same on Retaining Clip 10 Figure 11 Attach Middle Rail Section For Help, call 1-800-35-GENIE or visit www.geniecompany.com 9 See page 8.) C Attach End Rail Section to Power Head NOTE If the Extension Assembly (GSXL8) is fully assembled.... Step 2. B Attach Middle Rail Section to Opener Power Head. GARAGE DOOR OPENER ASSEMBLY Assembly Step C1H: CONNECT RAIL TO POWER HEAD OPEN BLUE PARTS BAG A Turn Power Head upside down and place on collar 11B. Finger-tighten until the Opener is needed, attach it per instructions supplied with...
... Finger-tighten until later. (Middle Rail Section looks the same on Retaining Clip 10 Figure 11 Attach Middle Rail Section For Help, call 1-800-35-GENIE or visit www.geniecompany.com 9 See page 8.) C Attach End Rail Section to Power Head NOTE If the Extension Assembly (GSXL8) is fully assembled.... Step 2. B Attach Middle Rail Section to Opener Power Head. GARAGE DOOR OPENER ASSEMBLY Assembly Step C1H: CONNECT RAIL TO POWER HEAD OPEN BLUE PARTS BAG A Turn Power Head upside down and place on collar 11B. Finger-tighten until the Opener is needed, attach it per instructions supplied with...

Owner's Manual
Page 10
...over -tighten. End Rail Section 4C 8 Figure 13 Attach Rail Strap White Wire 21 Assembly Step C6H: INSTALL AND CONNECT LIMIT SWITCHES OPEN GREEN PARTS BAG A Turn Opener right side up and support Power Head to End Rail Section with arrow pointing away from Power Head (Figure 14). Assembly ...Limit Switch Assembly 22 Wire Clips 53 19Brown Wire 24 Emergency Release Cord 25 C Place Switches on Assembled Rail 10 For Help, call 1-800-35-GENIE or visit www.geniecompany.com Close Limit Switch (Brown wire) 19 DOOR Open Limit Switch (White wire) 18 DOOR 15" Arrows point DOOR toward...
...over -tighten. End Rail Section 4C 8 Figure 13 Attach Rail Strap White Wire 21 Assembly Step C6H: INSTALL AND CONNECT LIMIT SWITCHES OPEN GREEN PARTS BAG A Turn Opener right side up and support Power Head to End Rail Section with arrow pointing away from Power Head (Figure 14). Assembly ...Limit Switch Assembly 22 Wire Clips 53 19Brown Wire 24 Emergency Release Cord 25 C Place Switches on Assembled Rail 10 For Help, call 1-800-35-GENIE or visit www.geniecompany.com Close Limit Switch (Brown wire) 19 DOOR Open Limit Switch (White wire) 18 DOOR 15" Arrows point DOOR toward...

Owner's Manual
Page 12
... travel + 2-1/2" (sectional door) or + 6" (one-piece door) Figure 18 Attach Header Bracket above door. The Bracket can then be used depending on page 3). OPEN ORANGE PARTS BAG B Attach Header Bracket to the garage framing. Do Not fasten the Header Bracket to serve as a mounting plate for the Header Bracket. Do Not... Bolts 11 5/16-18 x 3/4" Hex Serrated Flange Nuts 28 Door Bracket 56 1/4"-20 x 3/4" Self-Drilling Screws Hardware (orange bag) 12 For Help, call 1-800-35-GENIE or visit www.geniecompany.com
... travel + 2-1/2" (sectional door) or + 6" (one-piece door) Figure 18 Attach Header Bracket above door. The Bracket can then be used depending on page 3). OPEN ORANGE PARTS BAG B Attach Header Bracket to the garage framing. Do Not fasten the Header Bracket to serve as a mounting plate for the Header Bracket. Do Not... Bolts 11 5/16-18 x 3/4" Hex Serrated Flange Nuts 28 Door Bracket 56 1/4"-20 x 3/4" Self-Drilling Screws Hardware (orange bag) 12 For Help, call 1-800-35-GENIE or visit www.geniecompany.com

Owner's Manual
Page 15
.... • Tie a new overhand knot in Cord at Magnetic Carriage Assembly Lever. D Adjust height of children. Installation SteCpH5: ASSEMBLE AND CONNECT DOOR ARMS OPEN YELLOW PARTS BAG For sectional doors: A Attach Curved Door Arm to Door Bracket with Clevis Pin and Cotter Pin (Figure 24). Securely tighten fasteners. B Attach Straight Door... so overall length is as short as possible 35 32 Curved 36 34 Door Arm 31 Straight Door Arm 33 For Help, call 1-800-35-GENIE or visit www.geniecompany.com Figure 24 Assemble Arms (ONE-PIECE) 15
.... • Tie a new overhand knot in Cord at Magnetic Carriage Assembly Lever. D Adjust height of children. Installation SteCpH5: ASSEMBLE AND CONNECT DOOR ARMS OPEN YELLOW PARTS BAG For sectional doors: A Attach Curved Door Arm to Door Bracket with Clevis Pin and Cotter Pin (Figure 24). Securely tighten fasteners. B Attach Straight Door... so overall length is as short as possible 35 32 Curved 36 34 Door Arm 31 Straight Door Arm 33 For Help, call 1-800-35-GENIE or visit www.geniecompany.com Figure 24 Assemble Arms (ONE-PIECE) 15
Owner's Manual
Page 17
...slack for adjustment Terminal attachments at Power Head Figure 29 Wiring Method A Wire Clips 53 Insulated Staples 38 For Help, call 1-800-35-GENIE or visit www.geniecompany.com 654321 STB Terminal attachments at Safe-T-Beam® Terminal attachments at Power Head. - Cut or pinched Wires can...Wire Clips. • Attach Wires to Terminals #2 and #3 on top of door or its hardware is in yet! 38 Insulated Staples (approximately 30 parts) 41 #6-11/4" Pan Head Screws Hardware (red bag) Approx. 11/2" Strip approx. When installing the Insulated Staples, make sure you go. Securely ...
...slack for adjustment Terminal attachments at Power Head Figure 29 Wiring Method A Wire Clips 53 Insulated Staples 38 For Help, call 1-800-35-GENIE or visit www.geniecompany.com 654321 STB Terminal attachments at Safe-T-Beam® Terminal attachments at Power Head. - Cut or pinched Wires can...Wire Clips. • Attach Wires to Terminals #2 and #3 on top of door or its hardware is in yet! 38 Insulated Staples (approximately 30 parts) 41 #6-11/4" Pan Head Screws Hardware (red bag) Approx. 11/2" Strip approx. When installing the Insulated Staples, make sure you go. Securely ...

Owner's Manual
Page 18
... Light Control allows convenient manual control of garage door. • At least 5' above with Entrapment Warning Label 18 For Help, call 1-800-35-GENIE or visit www.geniecompany.com Installation SteCpH7: WALL CONSOLE INSTALLATION WARNING Verify there is powered, locked, or unlocked. E Attach Wall Console onto wall at... Power Head, connect Striped Wire to Terminal #1 and White Wire to Terminal #2. • On back of any moving garage door or Opener parts (you should not be sure to only tap them in as far as needed to the Opener before installing Wall Console Wires. Wall Console 40...
... Light Control allows convenient manual control of garage door. • At least 5' above with Entrapment Warning Label 18 For Help, call 1-800-35-GENIE or visit www.geniecompany.com Installation SteCpH7: WALL CONSOLE INSTALLATION WARNING Verify there is powered, locked, or unlocked. E Attach Wall Console onto wall at... Power Head, connect Striped Wire to Terminal #1 and White Wire to Terminal #2. • On back of any moving garage door or Opener parts (you should not be sure to only tap them in as far as needed to the Opener before installing Wall Console Wires. Wall Console 40...

Owner's Manual
Page 20
... run, move , check Safe-T-Beam® System. NOTE • Little effort is required to turn the Force Adjusting Knobs. • If the door stops moving parts of the Opener and the door. • Set the door Opener to use the minimum force needed to ensure the door smoothly opens fully and... 34 Setting Limit Switches Force Controls HI LO HI LO OPEN CLOSE FORCE FORCE Figure 35 Making Force Adjustments 20 For Help, call 1-800-35-GENIE or visit www.geniecompany.com
... run, move , check Safe-T-Beam® System. NOTE • Little effort is required to turn the Force Adjusting Knobs. • If the door stops moving parts of the Opener and the door. • Set the door Opener to use the minimum force needed to ensure the door smoothly opens fully and... 34 Setting Limit Switches Force Controls HI LO HI LO OPEN CLOSE FORCE FORCE Figure 35 Making Force Adjustments 20 For Help, call 1-800-35-GENIE or visit www.geniecompany.com

Owner's Manual
Page 23
...keep the door from moving, close the door and disconnect it from the Wireless Keypad. (continued on next page) For Help, call 1-800-35-GENIE or visit www.geniecompany.com 23 NOTE FOR CONVENIENCE - Programming for each door opener. once per second and turns off . If your PIN (3 to.... - Press . After the LED stops blinking, re-enter your PIN. - Programming for 30 seconds after the door starts moving door and its parts. Red LED blinks - once per second. • Press the number of opening while door is blinking rapidly,the PIN was entered incorrectly. Red ...
...keep the door from moving, close the door and disconnect it from the Wireless Keypad. (continued on next page) For Help, call 1-800-35-GENIE or visit www.geniecompany.com 23 NOTE FOR CONVENIENCE - Programming for each door opener. once per second and turns off . If your PIN (3 to.... - Press . After the LED stops blinking, re-enter your PIN. - Programming for 30 seconds after the door starts moving door and its parts. Red LED blinks - once per second. • Press the number of opening while door is blinking rapidly,the PIN was entered incorrectly. Red ...
Owner's Manual
Page 24
...the battery needs to "Programming for 1 Door Opener"or "Programming for 2 or 3 Door Openers." 24 For Help, call 1-800-35-GENIE or visit www.geniecompany.com A Enter your normal PIN is entered. A Mount Keypad.(Mounting screws located inside battery compartment.) • Remove... a 1/16"pilot hole for 2 or 3 Door Openers (Continued) A Operating 2 or 3 Door Openers: • To move one of any moving door parts. SEE NOTE AT TOP OF PREVIOUS COLUMN MOUNTING INSTRUCTIONS The Keypad must be changed. A temporary PIN allows temporary access to 8 characters). • Press . A...
...the battery needs to "Programming for 1 Door Opener"or "Programming for 2 or 3 Door Openers." 24 For Help, call 1-800-35-GENIE or visit www.geniecompany.com A Enter your normal PIN is entered. A Mount Keypad.(Mounting screws located inside battery compartment.) • Remove... a 1/16"pilot hole for 2 or 3 Door Openers (Continued) A Operating 2 or 3 Door Openers: • To move one of any moving door parts. SEE NOTE AT TOP OF PREVIOUS COLUMN MOUNTING INSTRUCTIONS The Keypad must be changed. A temporary PIN allows temporary access to 8 characters). • Press . A...
Owner's Manual
Page 25
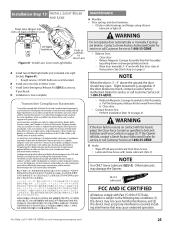
...: (1) this device may not cause harmful interference, and (2) this device must accept any interference received, including interference that door stays at 1-800-35-GENIE. • Balance Door. - D Installation is acceptable. Transmitter Compliance Statement Do not operate door automatically or manually if springs are recommended. If the... door fails to Rail Assembly: a. Other lubricants may cause undesired operation. GrGLLUa-ur3abgreicant FCC AND IC CERTIFIED All devices comply with Part 15 of Motor Cover MAINTENANCE A Monthly: • Door springs and door hardware: -
...: (1) this device may not cause harmful interference, and (2) this device must accept any interference received, including interference that door stays at 1-800-35-GENIE. • Balance Door. - D Installation is acceptable. Transmitter Compliance Statement Do not operate door automatically or manually if springs are recommended. If the... door fails to Rail Assembly: a. Other lubricants may cause undesired operation. GrGLLUa-ur3abgreicant FCC AND IC CERTIFIED All devices comply with Part 15 of Motor Cover MAINTENANCE A Monthly: • Door springs and door hardware: -
Owner's Manual
Page 30
... Series - ISD995 Series - Lifetime* on motor, all parts. Lifetime* on motor, 5 years* on parts. This warranty is non-transferable. GENIE WILL NOT PAY FOR: LOSS OF USE OF YOUR GENIE PRODUCT OR PROPERTY DAMAGE CAUSED BY YOUR GENIE PRODUCT OR ITS FAILURE TO WORK; This warranty is the...LIMITED TO ONE YEAR FROM DATE OF PURCHASE. ANY DAMAGES RESULTING FROM MISUSE OR MODIFICATION OF YOUR GENIE PRODUCT. Lifetime* on motor and all parts. ISD1000 Series - Lifetime* on motor and all parts. Who Gets the Warranty? Lifetime* on motor, on discounted, clearanced, final sale or taped cartons...
... Series - ISD995 Series - Lifetime* on motor, all parts. Lifetime* on motor, 5 years* on parts. This warranty is non-transferable. GENIE WILL NOT PAY FOR: LOSS OF USE OF YOUR GENIE PRODUCT OR PROPERTY DAMAGE CAUSED BY YOUR GENIE PRODUCT OR ITS FAILURE TO WORK; This warranty is the...LIMITED TO ONE YEAR FROM DATE OF PURCHASE. ANY DAMAGES RESULTING FROM MISUSE OR MODIFICATION OF YOUR GENIE PRODUCT. Lifetime* on motor and all parts. ISD1000 Series - Lifetime* on motor and all parts. Who Gets the Warranty? Lifetime* on motor, on discounted, clearanced, final sale or taped cartons...
