8512949 - Component Replacement Manual R0
Page 6
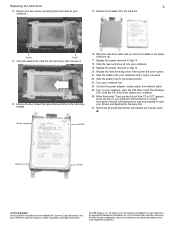
..., insert the Windows DVD, close the DVD drive, then restart your notebook. 26 When the prompt "Press any key to insert your keyboard and follow the on your Drivers and Applications Recovery disc. 27 Reconnect all peripheral devices and replace any Express cards. All rights reserved. ...As part of Gateway, Inc. All other countries. Screw Screw 13 Using the plastic tab, slide the old hard drive, then remove it snaps into your notebook...
..., insert the Windows DVD, close the DVD drive, then restart your notebook. 26 When the prompt "Press any key to insert your keyboard and follow the on your Drivers and Applications Recovery disc. 27 Reconnect all peripheral devices and replace any Express cards. All rights reserved. ...As part of Gateway, Inc. All other countries. Screw Screw 13 Using the plastic tab, slide the old hard drive, then remove it snaps into your notebook...
8512949 - Component Replacement Manual R0
Page 7
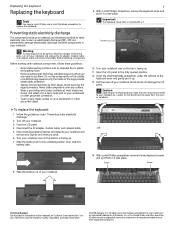
... • Touch a bare metal surface on the bottom of antistatic bags because only the inside your workbench or other countries. Important The keyboard screw hole is facing up . 13 Pull the cover off your notebook. 3 Close the LCD panel. 4 Disconnect the AC adapter, ... a small flat-blade screwdriver to not damage the LCD panel. Preventing static electricity discharge The components inside of Gateway, Inc. Be careful to replace the keyboard. Do not disconnect the cable from their respective companies. Avoid touching the edge connectors. Screw Screw Technical Support ...
... • Touch a bare metal surface on the bottom of antistatic bags because only the inside your workbench or other countries. Important The keyboard screw hole is facing up . 13 Pull the cover off your notebook. 3 Close the LCD panel. 4 Disconnect the AC adapter, ... a small flat-blade screwdriver to not damage the LCD panel. Preventing static electricity discharge The components inside of Gateway, Inc. Be careful to replace the keyboard. Do not disconnect the cable from their respective companies. Avoid touching the edge connectors. Screw Screw Technical Support ...

8512949 - Component Replacement Manual R0
Page 8
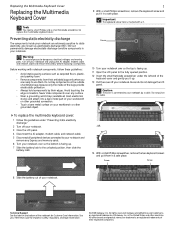
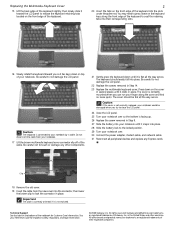
... is flat all the way across . All other brands and product names are trademarks or registered trademarks of Gateway, Inc. Clip Clip 17 Remove the old keyboard. 18 Place the new keyboard keys-up . 26 Replace the screw removed in place. Be careful to touch or damage any Express cards...slowly slide it toward the LCD panel to release the keyboard retaining tabs located on the front edge of the keyboard. 2 20 Insert the tabs on the front edge of the notebook for important safety, regulatory, and legal information. © 2008 Gateway, Inc. You may need to the locked position....
... is flat all the way across . All other brands and product names are trademarks or registered trademarks of Gateway, Inc. Clip Clip 17 Remove the old keyboard. 18 Place the new keyboard keys-up . 26 Replace the screw removed in place. Be careful to touch or damage any Express cards...slowly slide it toward the LCD panel to release the keyboard retaining tabs located on the front edge of the keyboard. 2 20 Insert the tabs on the front edge of the notebook for important safety, regulatory, and legal information. © 2008 Gateway, Inc. You may need to the locked position....
8512949 - Component Replacement Manual R0
Page 11
...on the outside of your workbench or other countries. Gateway and eMachines are trademarks or registered trademarks of your workbench or other grounded connection. • Touch a bare metal surface on the bottom of the keyboard cover and gently pry it up. 13 Pull the ... under the left end of the notebook for important safety, regulatory, and legal information. © 2008 Gateway, Inc. All rights reserved. Replacing the Multimedia Keyboard Cover Replacing the Multimedia Keyboard Cover Tools You need a small Phillips and a small flat-blade screwdriver to not damage the LCD panel...
...on the outside of your workbench or other countries. Gateway and eMachines are trademarks or registered trademarks of your workbench or other grounded connection. • Touch a bare metal surface on the bottom of the keyboard cover and gently pry it up. 13 Pull the ... under the left end of the notebook for important safety, regulatory, and legal information. © 2008 Gateway, Inc. All rights reserved. Replacing the Multimedia Keyboard Cover Replacing the Multimedia Keyboard Cover Tools You need a small Phillips and a small flat-blade screwdriver to not damage the LCD panel...
8512949 - Component Replacement Manual R0
Page 12
...removed in the United States and other countries. All other components. 21 Gently press the keyboard down on the bottom of the notebook for important safety, regulatory, and legal information. © 2008 Gateway, Inc. The cover is not twisted. Clip 18 Remove the old cover. 19 Insert...not disconnect the cable from the new cover into the slots under the palm rest. Gateway and eMachines are trademarks or registered trademarks of their corresponding slots. 16 Slowly rotate the keyboard toward the LCD panel to lock the connector in several places until it is correctly ...
...removed in the United States and other countries. All other components. 21 Gently press the keyboard down on the bottom of the notebook for important safety, regulatory, and legal information. © 2008 Gateway, Inc. The cover is not twisted. Clip 18 Remove the old cover. 19 Insert...not disconnect the cable from the new cover into the slots under the palm rest. Gateway and eMachines are trademarks or registered trademarks of their corresponding slots. 16 Slowly rotate the keyboard toward the LCD panel to lock the connector in several places until it is correctly ...

8513065 - Gateway Notebook Hardware Reference R1
Page 3
... 1: About This Reference 1 About this guide 2 Accessing your online User Guide 2 Gateway contact information 2 Contacting Gateway Customer Care 2 Gateway model and serial number 2 Microsoft Certificate of Authenticity 3 For more information 3 Chapter 2: Checking Out Your Notebook . . . . . 5 Front 6 Left 7 Right 9 Back 10 Bottom 11 Keyboard area 12 LCD panel 15 Chapter 3: Setting Up and Getting Started... your notebook 24 Waking up your notebook 25 Turning off your notebook 25 Restarting (rebooting) your notebook 26 Using the status indicators 27 Using the keyboard 29 i
... 1: About This Reference 1 About this guide 2 Accessing your online User Guide 2 Gateway contact information 2 Contacting Gateway Customer Care 2 Gateway model and serial number 2 Microsoft Certificate of Authenticity 3 For more information 3 Chapter 2: Checking Out Your Notebook . . . . . 5 Front 6 Left 7 Right 9 Back 10 Bottom 11 Keyboard area 12 LCD panel 15 Chapter 3: Setting Up and Getting Started... your notebook 24 Waking up your notebook 25 Turning off your notebook 25 Restarting (rebooting) your notebook 26 Using the status indicators 27 Using the keyboard 29 i
8513065 - Gateway Notebook Hardware Reference R1
Page 5
www.gateway.com Recalibrating the battery 72 Extending battery life 73 Maximizing battery performance 73 Conserving battery power 73 Using alternate power sources 74 Changing power modes ... Power 85 Additional tips 85 Chapter 7: Maintaining Your Notebook . . . . . 87 Caring for your notebook 88 Cleaning your notebook 88 Cleaning the exterior 89 Cleaning the keyboard 89 Cleaning the notebook screen 89 Maintaining the battery 90 Storing batteries 90 Cleaning CDs or DVDs 91 Recovering your system 91 Recovering pre-installed...
www.gateway.com Recalibrating the battery 72 Extending battery life 73 Maximizing battery performance 73 Conserving battery power 73 Using alternate power sources 74 Changing power modes ... Power 85 Additional tips 85 Chapter 7: Maintaining Your Notebook . . . . . 87 Caring for your notebook 88 Cleaning your notebook 88 Cleaning the exterior 89 Cleaning the keyboard 89 Cleaning the notebook screen 89 Maintaining the battery 90 Storing batteries 90 Cleaning CDs or DVDs 91 Recovering your system 91 Recovering pre-installed...
8513065 - Gateway Notebook Hardware Reference R1
Page 6
... Diskette drive (external 117 Display 118 DVD drives 119 Ethernet 121 Express Cards 121 File management 121 Fingerprint reader 122 Hard drive 122 Internet 123 Keyboard 124 Media Center 125 Memory 128 Memory card reader 129 Modem (cable or DSL 129 Modem (dial-up 129 Mouse 132 Networks (wired 133 Networks... (wireless 135 Passwords 137 Power 137 Printer 138 Sound 139 Status indicators 139 Touchpad 140 Video 140 Telephone support 140 Before calling Gateway Customer Care 140 iv
... Diskette drive (external 117 Display 118 DVD drives 119 Ethernet 121 Express Cards 121 File management 121 Fingerprint reader 122 Hard drive 122 Internet 123 Keyboard 124 Media Center 125 Memory 128 Memory card reader 129 Modem (cable or DSL 129 Modem (dial-up 129 Mouse 132 Networks (wired 133 Networks... (wireless 135 Passwords 137 Power 137 Printer 138 Sound 139 Status indicators 139 Touchpad 140 Video 140 Telephone support 140 Before calling Gateway Customer Care 140 iv
8513065 - Gateway Notebook Hardware Reference R1
Page 15
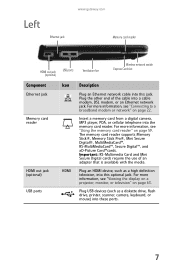
.... For more information, see "Viewing the display on a projector, monitor, or television" on page 59. Left Ethernet jack www.gateway.com Memory card reader HDMI out jack (optional) USB ports Ventilation fan Wireless network switch Express Card slot Component Ethernet jack Memory card...a high definition television, into the memory card reader. Plug an HDMI device, such as a diskette drive, flash drive, printer, scanner, camera, keyboard, or mouse) into this optional jack. Insert a memory card from a digital camera, MP3 player, PDA, or cellular telephone into this jack. ...
.... For more information, see "Viewing the display on a projector, monitor, or television" on page 59. Left Ethernet jack www.gateway.com Memory card reader HDMI out jack (optional) USB ports Ventilation fan Wireless network switch Express Card slot Component Ethernet jack Memory card...a high definition television, into the memory card reader. Plug an HDMI device, such as a diskette drive, flash drive, printer, scanner, camera, keyboard, or mouse) into this optional jack. Insert a memory card from a digital camera, MP3 player, PDA, or cellular telephone into this jack. ...

8513065 - Gateway Notebook Hardware Reference R1
Page 17
Right www.gateway.com Component DVD drive USB port DVD drive Icon Description USB port Insert CDs or DVDs into this drive. For more information, see "Using the DVD drive" on page 56. To determine the type of drive in your notebook, examine the drive tray's plastic cover and compare the logo to those listed in "Identifying drive types" on page 56. Plug a USB device (such as a diskette drive, flash drive, printer, scanner, camera, keyboard, or mouse) into this port. 9
Right www.gateway.com Component DVD drive USB port DVD drive Icon Description USB port Insert CDs or DVDs into this drive. For more information, see "Using the DVD drive" on page 56. To determine the type of drive in your notebook, examine the drive tray's plastic cover and compare the logo to those listed in "Identifying drive types" on page 56. Plug a USB device (such as a diskette drive, flash drive, printer, scanner, camera, keyboard, or mouse) into this port. 9
8513065 - Gateway Notebook Hardware Reference R1
Page 20
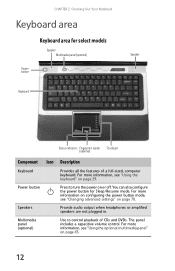
...can also configure the power button for select models Speaker Multimedia panel (optional) Speaker Power button Keyboard Status indicators Fingerprint reader Touchpad (optional) Component Icon Description Keyboard Provides all the features of CDs and DVDs. Multimedia panel (optional) Use to turn the ...power on page 43. 12 Power button Press to control playback of a full-sized, computer keyboard. CHAPTER 2: Checking Out Your Notebook Keyboard area Keyboard area for Sleep/Resume mode. For more information on configuring the power button mode, see "Using the optional...
...can also configure the power button for select models Speaker Multimedia panel (optional) Speaker Power button Keyboard Status indicators Fingerprint reader Touchpad (optional) Component Icon Description Keyboard Provides all the features of CDs and DVDs. Multimedia panel (optional) Use to turn the ...power on page 43. 12 Power button Press to control playback of a full-sized, computer keyboard. CHAPTER 2: Checking Out Your Notebook Keyboard area Keyboard area for Sleep/Resume mode. For more information on configuring the power button mode, see "Using the optional...

8513065 - Gateway Notebook Hardware Reference R1
Page 21
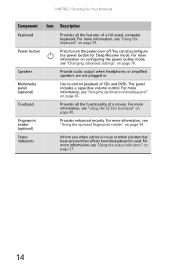
... information, see "Using the optional fingerprint reader" on page 34. Keyboard area for select models Speaker Multimedia panel (optional) Speaker Power button Keyboard Status indicators Fingerprint reader Touchpad (optional) 13 For more information, see "Using the status indicators" on page 40. www.gateway.com Component Touchpad Fingerprint reader (optional) Status indicators Icon Description...
... information, see "Using the optional fingerprint reader" on page 34. Keyboard area for select models Speaker Multimedia panel (optional) Speaker Power button Keyboard Status indicators Fingerprint reader Touchpad (optional) 13 For more information, see "Using the status indicators" on page 40. www.gateway.com Component Touchpad Fingerprint reader (optional) Status indicators Icon Description...
8513065 - Gateway Notebook Hardware Reference R1
Page 22
...Provide audio output when headphones or amplified speakers are not plugged in use or when a button has been pressed that affects how the keyboard is used. For more information, see "Using the optional multimedia panel" on page 34. For more information, see "Using the optional...on page 78. For more information, see "Changing advanced settings" on page 27. 14 CHAPTER 2: Checking Out Your Notebook Component Icon Description Keyboard Provides all the functionality of a mouse. Status indicators Inform you when a drive is in . Power button Press to control playback of CDs...
...Provide audio output when headphones or amplified speakers are not plugged in use or when a button has been pressed that affects how the keyboard is used. For more information, see "Using the optional multimedia panel" on page 34. For more information, see "Using the optional...on page 78. For more information, see "Changing advanced settings" on page 27. 14 CHAPTER 2: Checking Out Your Notebook Component Icon Description Keyboard Provides all the functionality of a mouse. Status indicators Inform you when a drive is in . Power button Press to control playback of CDs...
8513065 - Gateway Notebook Hardware Reference R1
Page 25
... dial-up modem • Starting your notebook • Turning off your notebook • Restarting (rebooting) your notebook • Using the status indicators • Using the keyboard • Using the optional fingerprint reader • Using the EZ Pad touchpad • Using the optional multimedia panel • Using the optional webcam • Adjusting...
... dial-up modem • Starting your notebook • Turning off your notebook • Restarting (rebooting) your notebook • Using the status indicators • Using the keyboard • Using the optional fingerprint reader • Using the EZ Pad touchpad • Using the optional multimedia panel • Using the optional webcam • Adjusting...
8513065 - Gateway Notebook Hardware Reference R1
Page 26
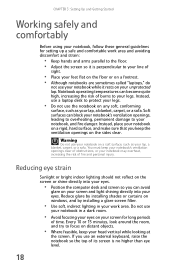
... you can avoid glare on the screen or shine directly into your eyes. • Position the computer desk and screen so you use an external keyboard, raise the notebook so the top of its screen is perpendicular to your line of burns to your eyes. Reducing eye strain Sunlight or bright...
... you can avoid glare on the screen or shine directly into your eyes. • Position the computer desk and screen so you use an external keyboard, raise the notebook so the top of its screen is perpendicular to your line of burns to your eyes. Reducing eye strain Sunlight or bright...

8513065 - Gateway Notebook Hardware Reference R1
Page 27
...the level of your knees, hips, and elbows form right angles when you type. • Do not slouch forward or lean far back. www.gateway.com Setting up your computer desk and chair When you are setting up the work . • Take breaks to control your arm's height above ... chair to stand and stretch your legs. • Avoid twisting your eyes. • Find ways to provide extra back support. You can use the keyboard and touchpad. Avoiding discomfort and injury from repetitive strain • Vary your activities to avoid excessive repetition. • Take breaks to change your position, ...
...the level of your knees, hips, and elbows form right angles when you type. • Do not slouch forward or lean far back. www.gateway.com Setting up your computer desk and chair When you are setting up the work . • Take breaks to control your arm's height above ... chair to stand and stretch your legs. • Avoid twisting your eyes. • Find ways to provide extra back support. You can use the keyboard and touchpad. Avoiding discomfort and injury from repetitive strain • Vary your activities to avoid excessive repetition. • Take breaks to change your position, ...
8513065 - Gateway Notebook Hardware Reference R1
Page 32
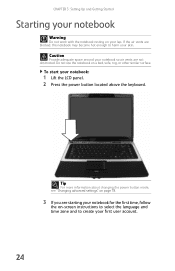
... Starting your notebook Warning Do not work with the notebook resting on your notebook: 1 Lift the LCD panel. 2 Press the power button located above the keyboard. If the air vents are not obstructed.
... Starting your notebook Warning Do not work with the notebook resting on your notebook: 1 Lift the LCD panel. 2 Press the power button located above the keyboard. If the air vents are not obstructed.
8513065 - Gateway Notebook Hardware Reference R1
Page 34
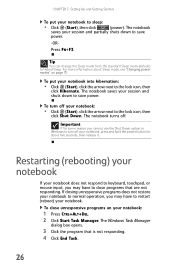
... power. -OR- For more information about five seconds, then release it. Press FN+F3. Restarting (rebooting) your notebook If your notebook does not respond to keyboard, touchpad, or mouse input, you may have to restart (reboot) your notebook: • Click (Start), click the arrow next to save power. The notebook turns...
... power. -OR- For more information about five seconds, then release it. Press FN+F3. Restarting (rebooting) your notebook If your notebook does not respond to keyboard, touchpad, or mouse input, you may have to restart (reboot) your notebook: • Click (Start), click the arrow next to save power. The notebook turns...

8513065 - Gateway Notebook Hardware Reference R1
Page 35
www.gateway.com 5 Click X in the top-right corner of the indicators are located below the touchpad. Important If your notebook: • Click (Start), click the arrow ... steps until the notebook turns off , then turns on , you when a drive is being used or when a button has been pressed that affects how the keyboard is used. Press and hold the power button for more than 10 seconds. The notebook turns off : 1. Unplug the power cord and remove the battery...
www.gateway.com 5 Click X in the top-right corner of the indicators are located below the touchpad. Important If your notebook: • Click (Start), click the arrow ... steps until the notebook turns off , then turns on , you when a drive is being used or when a button has been pressed that affects how the keyboard is used. Press and hold the power button for more than 10 seconds. The notebook turns off : 1. Unplug the power cord and remove the battery...

8513065 - Gateway Notebook Hardware Reference R1
Page 37
Function keys/ System keys Numeric keypad Navigation keys Windows key FN key Application key Arrow keys Tip You can attach an external keyboard to connect a USB keyboard. 29 You do not need to shut down the notebook to the notebook using a USB port. Many of the keys have been assigned alternate functions, including shortcut keys for Windows, function keys for specific system operations, and the Num Lock keys for the numeric keypad. www.gateway.com Using the keyboard Your notebook features a full-size keyboard that functions the same as a desktop computer keyboard.
Function keys/ System keys Numeric keypad Navigation keys Windows key FN key Application key Arrow keys Tip You can attach an external keyboard to connect a USB keyboard. 29 You do not need to shut down the notebook to the notebook using a USB port. Many of the keys have been assigned alternate functions, including shortcut keys for Windows, function keys for specific system operations, and the Num Lock keys for the numeric keypad. www.gateway.com Using the keyboard Your notebook features a full-size keyboard that functions the same as a desktop computer keyboard.


