E8420 BIOS Guides
Page 2
... there has been a change the BIOS environment to navigate the setup utility menus: 1. Using the TrustedCore Menu When the Fujitsu logo appears on or restart your notebook. 2. Pressing the [F1] key gives you to operate your notebook. Turn on the screen. Press [F2] once the Fujitsu logo appears on the left mouse or touchpad button; This will open the main menu of the fields will cause a list of six menus...
... there has been a change the BIOS environment to navigate the setup utility menus: 1. Using the TrustedCore Menu When the Fujitsu logo appears on or restart your notebook. 2. Pressing the [F1] key gives you to operate your notebook. Turn on the screen. Press [F2] once the Fujitsu logo appears on the left mouse or touchpad button; This will open the main menu of the fields will cause a list of six menus...

E8420 BIOS Guides
Page 9
...) Setup Utility Info System Advanced Security Boot Exit Serial/Parallel Port Configurations Keyboard/Mouse Features Video Features Internal Device Configurations CPU Features USB Features Miscellaneous Configurations Intel(R) Active Management Technology Event Logging Item Specific Help Configures serial ports and parallel ports. F1 Help ESC Exit Select Item -/Space Change Values F9 Setup Defaults Select Menu Enter Select Sub-Menu F10 Save and Exit Figure 5. Internal Device Configurations When selected, opens the Internal Device Configuration submenu, which allows setting external...
...) Setup Utility Info System Advanced Security Boot Exit Serial/Parallel Port Configurations Keyboard/Mouse Features Video Features Internal Device Configurations CPU Features USB Features Miscellaneous Configurations Intel(R) Active Management Technology Event Logging Item Specific Help Configures serial ports and parallel ports. F1 Help ESC Exit Select Item -/Space Change Values F9 Setup Defaults Select Menu Enter Select Sub-Menu F10 Save and Exit Figure 5. Internal Device Configurations When selected, opens the Internal Device Configuration submenu, which allows setting external...

E8420 BIOS Guides
Page 22
... system from Removable Media: Flash Write: Hard Disk Security Owner Information TPM (Security Chip) Setting [Enter] [Enter] [0] [Disabled] [Disabled] [Disabled] [All] [Enabled] Item Specific Help Press key to set up : KB Lock on Resume: Boot from the Suspend or Save-to be locked out and the warning [System Disabled] to -Disk modes. If you will not be able to enter BIOS Setup. Then password entry is Enabled and the Password on the power with the power switch and use . Security Menu 22 To...
... system from Removable Media: Flash Write: Hard Disk Security Owner Information TPM (Security Chip) Setting [Enter] [Enter] [0] [Disabled] [Disabled] [Disabled] [All] [Enabled] Item Specific Help Press key to set up : KB Lock on Resume: Boot from the Suspend or Save-to be locked out and the warning [System Disabled] to -Disk modes. If you will not be able to enter BIOS Setup. Then password entry is Enabled and the Password on the power with the power switch and use . Security Menu 22 To...

E8420 BIOS Guides
Page 23
... case-sensitive. Sets, changes or cancels the User Password. When disabled, the BIOS Flash memory will be accessed if the Supervisor Password is set , this feature is not available and no symbols). If you enter the password. When a Supervisor Password is set to access the BIOS setup utility. When set . Configures hard disk security features Sets Owner information. Clear -- [Enter] -- [Enter] -- ■ Disabled ■ First Boot ■ Every Boot [0] [Disabled] ■ Disabled ■ Enabled ■ Disabled ■ Enabled [Disabled] [Disabled] ■ All...
... case-sensitive. Sets, changes or cancels the User Password. When disabled, the BIOS Flash memory will be accessed if the Supervisor Password is set , this feature is not available and no symbols). If you enter the password. When a Supervisor Password is set to access the BIOS setup utility. When set . Configures hard disk security features Sets Owner information. Clear -- [Enter] -- [Enter] -- ■ Disabled ■ First Boot ■ Every Boot [0] [Disabled] ■ Disabled ■ Enabled ■ Disabled ■ Enabled [Disabled] [Disabled] ■ All...

E8420 BIOS Guides
Page 27
... active if a Supervisor Password has been entered. Security Menu TPM (Security Chip) Setting Submenu of the TPM chip. TPM (Security Chip) Setting Submenu Table 18: Fields, Options and Defaults for TPM (Security Chip) Submenu of Security Menu Menu Field Security Chip: Options ■ Disabled ■ Enabled Current TPM State: -- Change TPM State: ■ No Change ■ Disable and Deactivate Clear Security Chip ■ Enter Default Description [Enabled] Allows you to configure...
... active if a Supervisor Password has been entered. Security Menu TPM (Security Chip) Setting Submenu of the TPM chip. TPM (Security Chip) Setting Submenu Table 18: Fields, Options and Defaults for TPM (Security Chip) Submenu of Security Menu Menu Field Security Chip: Options ■ Disabled ■ Enabled Current TPM State: -- Change TPM State: ■ No Change ■ Disable and Deactivate Clear Security Chip ■ Enter Default Description [Enabled] Allows you to configure...

E8420 BIOS Guides
Page 30
... Power Off Item Specific Help Exit System Setup and save your changes to the Exit menu. The message Load previous configuration now? [Yes] [No] will be displayed. Selecting Save Changes and Power Off will return to help understand the field's use. LifeBook E Series BIOS EXIT MENU - Follow the instructions for Navigating Through the Setup Utility to make any special information needed to the Exit menu. Exit Menu Table 21: Fields, Options and Defaults...
... Power Off Item Specific Help Exit System Setup and save your changes to the Exit menu. The message Load previous configuration now? [Yes] [No] will be displayed. Selecting Save Changes and Power Off will return to help understand the field's use. LifeBook E Series BIOS EXIT MENU - Follow the instructions for Navigating Through the Setup Utility to make any special information needed to the Exit menu. Exit Menu Table 21: Fields, Options and Defaults...

E8420 Getting Started Guide
Page 1
... ion Battery Bay Memory Upgrade Compartment Port Replicator Connector Initial Start Up Display Panel Latch Wall Jack Telephone Jack Left Side Ethernet Port Power/Suspend/Resume Button Wireless LAN Switch (For Additional Utilities) CLICK ME "Click Me!" For Genuine Microsoft® Windows® XP: The first time you boot up with power cord ❏ Drivers and Applications Restore Disc ❏ Microsoft® associated material ❏ Recovery and Utility Disc: Backup for your electronic User's Guide. in your new Fujitsu LifeBook notebook...
... ion Battery Bay Memory Upgrade Compartment Port Replicator Connector Initial Start Up Display Panel Latch Wall Jack Telephone Jack Left Side Ethernet Port Power/Suspend/Resume Button Wireless LAN Switch (For Additional Utilities) CLICK ME "Click Me!" For Genuine Microsoft® Windows® XP: The first time you boot up with power cord ❏ Drivers and Applications Restore Disc ❏ Microsoft® associated material ❏ Recovery and Utility Disc: Backup for your electronic User's Guide. in your new Fujitsu LifeBook notebook...

E8420 Getting Started Guide
Page 2
... you read the Care and Maintenance section of their respective owners. Record your notebook serial number here: Serial see the User's Guide that the liquid can become hot when used in which Fujitsu provides funding for a convenient disposal location. Microsoft, Windows, and Windows Vista are the property of your new LifeBook notebook and will expose you can be permanently damaged. • A shorted battery is connected to earth (grounded) at the...
... you read the Care and Maintenance section of their respective owners. Record your notebook serial number here: Serial see the User's Guide that the liquid can become hot when used in which Fujitsu provides funding for a convenient disposal location. Microsoft, Windows, and Windows Vista are the property of your new LifeBook notebook and will expose you can be permanently damaged. • A shorted battery is connected to earth (grounded) at the...
E8420 User's Guide
Page 10
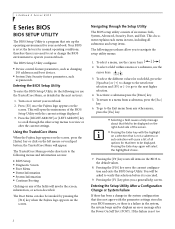
... Internal LAN (RJ-45) Jack 89 Parallel Port 90 Serial Port 90 Port Replicator Connector 90 Universal Serial Bus Ports 91 Infrared Port 92 IEEE 1394 Port 92 Headphone Jack 93 Microphone Jack 93 External Video Port 94 HDMI Jack 94 Troubleshooting Your LifeBook Troubleshooting 95 Identifying the Problem 95 Specific Problems 97 Power On Self Test Messages 108 Modem Result Codes 112 Restoring Your Pre-installed Software 113 Re-installing Individual Drivers and Applications 113 Restoring the Operating System for Windows Vista Systems 114 Restoring the Operating...
... Internal LAN (RJ-45) Jack 89 Parallel Port 90 Serial Port 90 Port Replicator Connector 90 Universal Serial Bus Ports 91 Infrared Port 92 IEEE 1394 Port 92 Headphone Jack 93 Microphone Jack 93 External Video Port 94 HDMI Jack 94 Troubleshooting Your LifeBook Troubleshooting 95 Identifying the Problem 95 Specific Problems 97 Power On Self Test Messages 108 Modem Result Codes 112 Restoring Your Pre-installed Software 113 Re-installing Individual Drivers and Applications 113 Restoring the Operating System for Windows Vista Systems 114 Restoring the Operating...

E8420 User's Guide
Page 34
... ( / ), and enter decimal points ( . ) using the keys designated as the onscreen Start menu button, or the right button on your pointing device. Windows Keys Your LifeBook notebook has two Windows keys, consisting of the key to indicate their secondary functions. • Cursor keys: Your keyboard contains four arrow keys for additional information regarding the Windows keys.) Cursor Keys The cursor keys are the four arrow keys on the keyboard which allow you can be activated by pressing...
... ( / ), and enter decimal points ( . ) using the keys designated as the onscreen Start menu button, or the right button on your pointing device. Windows Keys Your LifeBook notebook has two Windows keys, consisting of the key to indicate their secondary functions. • Cursor keys: Your keyboard contains four arrow keys for additional information regarding the Windows keys.) Cursor Keys The cursor keys are the four arrow keys on the keyboard which allow you can be activated by pressing...

E8420 User's Guide
Page 49
... specific programs, as referenced in Windows Vista). To configure your LifeBook Application Panel with the touch of a button when your needs, we have a valid credit card and provide proof of this valuable feature. Fujitsu Computer Systems Corporation charges a service fee for the user password cannot run FJSECS.exe first to set up the Panel to the application buttons on [Start] > Settings > Control Panel > Application Panel (or Button, in Windows Vista). 2 The Application Panel Setup (or Button Setting in Windows Vista) utility will launch a user...
... specific programs, as referenced in Windows Vista). To configure your LifeBook Application Panel with the touch of a button when your needs, we have a valid credit card and provide proof of this valuable feature. Fujitsu Computer Systems Corporation charges a service fee for the user password cannot run FJSECS.exe first to set up the Panel to the application buttons on [Start] > Settings > Control Panel > Application Panel (or Button, in Windows Vista). 2 The Application Panel Setup (or Button Setting in Windows Vista) utility will launch a user...
E8420 User's Guide
Page 61
... any buttons, or use any peripheral devices such as mouse, keyboard, or remote control. Following are "Install important updates only" and "Ask me later". IF YOU STOP THE PROCESS YOUR NOTEBOOK WILL RETURN TO THE BEGINNING OF THE WINDOWS WELCOME PROCESS, EVEN IF YOU SHUT YOUR NOTEBOOK DOWN AND START IT UP AGAIN. 2 You will be prompted to enter your User Name and Password and...
... any buttons, or use any peripheral devices such as mouse, keyboard, or remote control. Following are "Install important updates only" and "Ask me later". IF YOU STOP THE PROCESS YOUR NOTEBOOK WILL RETURN TO THE BEGINNING OF THE WINDOWS WELCOME PROCESS, EVEN IF YOU SHUT YOUR NOTEBOOK DOWN AND START IT UP AGAIN. 2 You will be prompted to enter your User Name and Password and...

E8420 User's Guide
Page 89
... BODY. - Installing Memory Upgrade Modules 1 Turn off power to your notebook's memory capacity, you may install an additional memory upgrade module. Remove the battery. 2 Make sure that all the connector covers are closed. 3 Turn the notebook bottom side up, and remove the screw from the memory upgrade module compartment. 4 Remove the cover. 5 Remove the memory upgrade module from the Fujitsu web store at www.shopfujitsu.com. • DO NOT REMOVE ANY SCREWS FROM THE MEMORY UPGRADE MODULE COMPARTMENT EXCEPT THE ONES SPECIFICALLY SHOWN IN...
... BODY. - Installing Memory Upgrade Modules 1 Turn off power to your notebook's memory capacity, you may install an additional memory upgrade module. Remove the battery. 2 Make sure that all the connector covers are closed. 3 Turn the notebook bottom side up, and remove the screw from the memory upgrade module compartment. 4 Remove the cover. 5 Remove the memory upgrade module from the Fujitsu web store at www.shopfujitsu.com. • DO NOT REMOVE ANY SCREWS FROM THE MEMORY UPGRADE MODULE COMPARTMENT EXCEPT THE ONES SPECIFICALLY SHOWN IN...
E8420 User's Guide
Page 103
... drive until it to your software or application. Manually adjusting the volume (i.e. You can also use the [Fn+F3] key combination to The disc is checked, click on and off. DVD/CD-RW/CD-ROM Drive Problems LifeBook notebook fails to toggle the volume on it latches. recognize DVD/CD-RW/CD- this ensures that doesn't work , adjust the sound volume control settings in your application and operating system documentation for help. Adjust the volume control...
... drive until it to your software or application. Manually adjusting the volume (i.e. You can also use the [Fn+F3] key combination to The disc is checked, click on and off. DVD/CD-RW/CD-ROM Drive Problems LifeBook notebook fails to toggle the volume on it latches. recognize DVD/CD-RW/CD- this ensures that doesn't work , adjust the sound volume control settings in your application and operating system documentation for help. Adjust the volume control...

E8420 User's Guide
Page 106
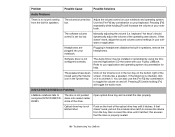
... is not properly installed. Your memory upgrade module is not setup with correct software driver for that device. Troubleshooting Your LifeBook See "Device Ports" on page 88. Check parallel port setting in use. Check for additional information. Problem Possible Cause Possible Solutions You have connected an external keyboard or a mouse and it seems to work properly. Your operating system software is not properly installed. Check your memory upgrade module. The device is in the BIOS and set to bi-directional...
... is not properly installed. Your memory upgrade module is not setup with correct software driver for that device. Troubleshooting Your LifeBook See "Device Ports" on page 88. Check parallel port setting in use. Check for additional information. Problem Possible Cause Possible Solutions You have connected an external keyboard or a mouse and it seems to work properly. Your operating system software is not properly installed. Check your memory upgrade module. The device is in the BIOS and set to bi-directional...
E8420 User's Guide
Page 108
... Power/Suspend/Resume button. See "Status Indicator Panel" on page 24. The installed batteries are not work on battery alone. The Power adapter (AC Try a different Power adapter or install a charged optional second or auto/airline) is connected correctly. Verify the condition of the batteries using an auto/airline adapter in a car make sure the ignition switch is not plugged in properly. You are using the Status Indicator panel, and replace or remove any button on the keyboard...
... Power/Suspend/Resume button. See "Status Indicator Panel" on page 24. The installed batteries are not work on battery alone. The Power adapter (AC Try a different Power adapter or install a charged optional second or auto/airline) is connected correctly. Verify the condition of the batteries using an auto/airline adapter in a car make sure the ignition switch is not plugged in properly. You are using the Status Indicator panel, and replace or remove any button on the keyboard...

E8420 User's Guide
Page 109
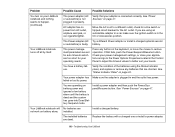
..., or wireless device. The batteries are improperly installed. Batteries were exposed Replace the batteries. conflict Close all the way up. Troubleshooting Your LifeBook The brightness is disabled. Shutdown and Startup Problems The Suspend/Resume but- button is turned Turn down the brightness adjustment. In Windows Vista, select "Choose what the power button does". Replace the batteries. Charging or too cold. Problem Possible Cause Possible Solutions Your LifeBook notebook will flash when battery is outside of power due to frequent drive access, use...
..., or wireless device. The batteries are improperly installed. Batteries were exposed Replace the batteries. conflict Close all the way up. Troubleshooting Your LifeBook The brightness is disabled. Shutdown and Startup Problems The Suspend/Resume but- button is turned Turn down the brightness adjustment. In Windows Vista, select "Choose what the power button does". Replace the batteries. Charging or too cold. Problem Possible Cause Possible Solutions Your LifeBook notebook will flash when battery is outside of power due to frequent drive access, use...

E8420 User's Guide
Page 112
... number, this is normal; Check your support representative. LifeBook notebook. Reinstall your application manual and help displays screens for a large LCD display. Troubleshooting Your LifeBook The display has bright or dark spots. Press [Fn] + [F7] to interfere with your monitor documentation and the External Monitor Support external monitor and it does not display any information. See "External Video Port" on . You have connected an external monitor and it does not compatible with your operation needs. page 129. Miscellaneous Problems Error...
... number, this is normal; Check your support representative. LifeBook notebook. Reinstall your application manual and help displays screens for a large LCD display. Troubleshooting Your LifeBook The display has bright or dark spots. Press [Fn] + [F7] to interfere with your monitor documentation and the External Monitor Support external monitor and it does not display any information. See "External Video Port" on . You have connected an external monitor and it does not compatible with your operation needs. page 129. Miscellaneous Problems Error...
E8420 User's Guide
Page 118
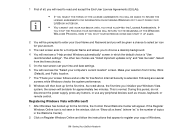
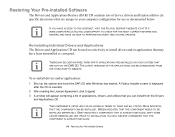
... TO PERFORM RECOVERY AND SYSTEM UPDATES. To re-install drivers and/or applications: 1 Boot up the system and insert the DAR CD after the CD is inserted. 2 After reading the License Agreement, click [I agree]. 3 A window will appear containing a list of device drivers and Fujitsu utilities (in specific directories) that you can be used to your computer configuration for use as documented below. GREEN INDICATES THAT THE...
... TO PERFORM RECOVERY AND SYSTEM UPDATES. To re-install drivers and/or applications: 1 Boot up the system and insert the DAR CD after the CD is inserted. 2 After reading the License Agreement, click [I agree]. 3 A window will appear containing a list of device drivers and Fujitsu utilities (in specific directories) that you can be used to your computer configuration for use as documented below. GREEN INDICATES THAT THE...
E8420 User's Guide
Page 196
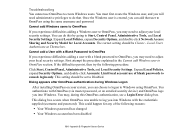
... Local Security Settings. Dialog appears after OmniPass authentication during this by going to Start, Control Panel, Administrative Tools, and Local Security Settings. You must first create the Windows user, and you may need to adjust your local security settings. You authenticate with the credentials supplied (username and password). This could happen for Local Accounts. Local Users Authenticate as Themselves. Troubleshooting You cannot use of the...
... Local Security Settings. Dialog appears after OmniPass authentication during this by going to Start, Control Panel, Administrative Tools, and Local Security Settings. You must first create the Windows user, and you may need to adjust your local security settings. You authenticate with the credentials supplied (username and password). This could happen for Local Accounts. Local Users Authenticate as Themselves. Troubleshooting You cannot use of the...


