Manual
Page 20
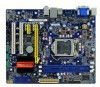
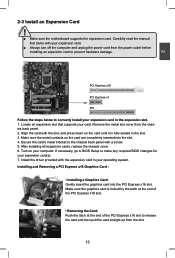
... the slot. 13 PCI Express x16 PCI Express x1 PCI Follow the steps below to make any required BIOS changes for your operating system. Secure the card's metal bracket to prevent hardware damage. After installing all expansion cards, replace the chassis cover. 6. Align the card with a screw. 5. Make sure the graphics card is fully seated in your expansion card(s). 7. Carefully read the manual that supports your expansion card. ■ Always turn...
... the slot. 13 PCI Express x16 PCI Express x1 PCI Follow the steps below to make any required BIOS changes for your operating system. Secure the card's metal bracket to prevent hardware damage. After installing all expansion cards, replace the chassis cover. 6. Align the card with a screw. 5. Make sure the graphics card is fully seated in your expansion card(s). 7. Carefully read the manual that supports your expansion card. ■ Always turn...

Manual
Page 23
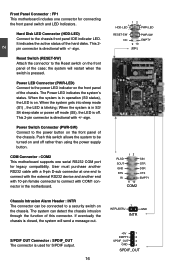
... Connector : COM2 This motherboard supports one connector for S/PDIF output. 16 +5V 1 EMPTY 2 SPDIF_OUT 3 GND 4 SPDIF_OUT User must purchase another RS232 cable with a 9-pin D-sub connector at one end to connect with the external RS232 device and another end with COM1 connector in S3/ S4 sleep state or power off . Power LED Connector (PWR-LED) Connect to connect with 10-pin female connector to the power LED indicator on the front panel of the hard disks. Power Switch Connector...
... Connector : COM2 This motherboard supports one connector for S/PDIF output. 16 +5V 1 EMPTY 2 SPDIF_OUT 3 GND 4 SPDIF_OUT User must purchase another RS232 cable with a 9-pin D-sub connector at one end to connect with the external RS232 device and another end with COM1 connector in S3/ S4 sleep state or power off . Power LED Connector (PWR-LED) Connect to connect with 10-pin female connector to the power LED indicator on the front panel of the hard disks. Power Switch Connector...

Manual
Page 25
... motherboard by a screwdriver for a few seconds, but using jumper cap is turned on. 18 Turn off the computer, unplug the power cord from pins 1-2, put it . This will clear CMOS data. 3. Go to BIOS Setup to configure new system as "1". 2. 2 2-5 Jumpers For some features needed, users can change the jumper settings on the two pins to temporarily short them. Description of the jumper settings. Jumper Diagram Definition Description 1 1 1 1-2 Set Pin 1 and Pin 2 closed 2-3 Set Pin 2 and Pin 3 closed . 4. Normal 1 2 (Default) 3 1 Clear...
... motherboard by a screwdriver for a few seconds, but using jumper cap is turned on. 18 Turn off the computer, unplug the power cord from pins 1-2, put it . This will clear CMOS data. 3. Go to BIOS Setup to configure new system as "1". 2. 2 2-5 Jumpers For some features needed, users can change the jumper settings on the two pins to temporarily short them. Description of the jumper settings. Jumper Diagram Definition Description 1 1 1 1-2 Set Pin 1 and Pin 2 closed 2-3 Set Pin 2 and Pin 3 closed . 4. Normal 1 2 (Default) 3 1 Clear...

Manual
Page 26
Set the jumper to pins 2-3 first. Before flashing BIOS ROM, you need to set PCH_ME_ENABLE jumper to pins 2-3, you can disable the Intel® Management Engine function. 3 Enable 2 (Default) 1 3 Disable 2 1 PCH_ME_ENABLE ! 2 Intel® ME Jumper: PCH_ME_ENABLE This motherboard uses PCH_ME_ENABLE jumper to improve management of corporate assets. It provides latest IT management features such as Intel® AMT, that allows to enable or disable Intel® Management Engine function. Set the...
Set the jumper to pins 2-3 first. Before flashing BIOS ROM, you need to set PCH_ME_ENABLE jumper to pins 2-3, you can disable the Intel® Management Engine function. 3 Enable 2 (Default) 1 3 Disable 2 1 PCH_ME_ENABLE ! 2 Intel® ME Jumper: PCH_ME_ENABLE This motherboard uses PCH_ME_ENABLE jumper to improve management of corporate assets. It provides latest IT management features such as Intel® AMT, that allows to enable or disable Intel® Management Engine function. Set the...

Manual
Page 28
... you change fan speeds, and displays temperatures and voltages of your computer. CAUTION 3 Enter BIOS Setup The BIOS is the communication bridge between hardware and software, correctly setting up the BIOS parameters is explained below: Main It displays the basic system configuration, such as CPU Name, memory size, system date, time and so on the computer, when the message "Press to enter Setup, to Boot Menu" appears at the bottom of the screen, you...
... you change fan speeds, and displays temperatures and voltages of your computer. CAUTION 3 Enter BIOS Setup The BIOS is the communication bridge between hardware and software, correctly setting up the BIOS parameters is explained below: Main It displays the basic system configuration, such as CPU Name, memory size, system date, time and so on the computer, when the message "Press to enter Setup, to Boot Menu" appears at the bottom of the screen, you...

Manual
Page 31
... Tuning/SATA Configuration/Intel IGD SWSCI OpRegion /USB Configuration/Onboard Device Configuration Press to go to install a TPM 24 Trusted Computing Aptio Setup Utility - will not show TPM. Default option is required. → ← : Select Screen ↑ ↓ : Select Item Enter: Select +/-: Change Opt. If you want to support TPM, first you need to relative submenu. Copyright (C) 2010 American Megatrends, Inc. ► TPM SUPPORT This item is used...
... Tuning/SATA Configuration/Intel IGD SWSCI OpRegion /USB Configuration/Onboard Device Configuration Press to go to install a TPM 24 Trusted Computing Aptio Setup Utility - will not show TPM. Default option is required. → ← : Select Screen ↑ ↓ : Select Item Enter: Select +/-: Change Opt. If you want to support TPM, first you need to relative submenu. Copyright (C) 2010 American Megatrends, Inc. ► TPM SUPPORT This item is used...

Manual
Page 32
.... device on the motherboard and set this feature and the setting is used to enable/disable it cannot. F1: General Help F2: Previous Values F3: Optimized Defaults F4: Save & Exit ESC: Exit 3 Version 2.02.1205. Advanced CPU Configuration Genuine Intel(R) CPU 0 @ 2.40GHz EMT64 Supported Max Processor Speed 2400 MHz Min Processor Speed 1600 MHz Processor Speed 2400 MHz CPU ID 206a2 Microcode Revision 26 Processor Cores 2 Intel HT Technology Supported C1E Support Hyper-threading Execute Disable Bit Intel Virtualization Technology CPU...
.... device on the motherboard and set this feature and the setting is used to enable/disable it cannot. F1: General Help F2: Previous Values F3: Optimized Defaults F4: Save & Exit ESC: Exit 3 Version 2.02.1205. Advanced CPU Configuration Genuine Intel(R) CPU 0 @ 2.40GHz EMT64 Supported Max Processor Speed 2400 MHz Min Processor Speed 1600 MHz Processor Speed 2400 MHz CPU ID 206a2 Microcode Revision 26 Processor Cores 2 Intel HT Technology Supported C1E Support Hyper-threading Execute Disable Bit Intel Virtualization Technology CPU...

Manual
Page 35
USB Configuration Aptio Setup Utility - F1: General Help F2: Previous Values F3: Optimized Defaults F4: Save & Exit ESC: Exit Version 2.02.1205. Advanced USB Configuration USB Devices: 2 Hubs Enabled/Disabled All USB Devices All USB Devices Legacy USB Support [Enabled] [Enabled] → ← : Select Screen ↑ ↓ : Select Item Enter: Select +/-: Change Opt. But if overclocking is used to comply with FCC regulation. 3 If you enabled this function, it . C opyright (C) 2010 American Megatrends, Inc. Copyright (C) 2010 American Megatrends...
USB Configuration Aptio Setup Utility - F1: General Help F2: Previous Values F3: Optimized Defaults F4: Save & Exit ESC: Exit Version 2.02.1205. Advanced USB Configuration USB Devices: 2 Hubs Enabled/Disabled All USB Devices All USB Devices Legacy USB Support [Enabled] [Enabled] → ← : Select Screen ↑ ↓ : Select Item Enter: Select +/-: Change Opt. But if overclocking is used to comply with FCC regulation. 3 If you enabled this function, it . C opyright (C) 2010 American Megatrends, Inc. Copyright (C) 2010 American Megatrends...

Manual
Page 36
... enable or disable onboard LAN boot option ROM. ► PCI-E To PCI Bridge This item is used to enable or disable the the PCI-E to PCI bridge. ► Azalia HD Audio This item is enable oe disable the Azalia HD audio. ► Super IO Configuration Press to go to its submenu. 29 F1: General Help F2: Previous Values F3: Optimized Defaults F4: Save & Exit ESC: Exit Version 2.02.1205. 3 Onboard Device Configuration Aptio Setup Utility - Advanced Onboard Device Configuration Onboard LAN Controller Onboard LAN...
... enable or disable onboard LAN boot option ROM. ► PCI-E To PCI Bridge This item is used to enable or disable the the PCI-E to PCI bridge. ► Azalia HD Audio This item is enable oe disable the Azalia HD audio. ► Super IO Configuration Press to go to its submenu. 29 F1: General Help F2: Previous Values F3: Optimized Defaults F4: Save & Exit ESC: Exit Version 2.02.1205. 3 Onboard Device Configuration Aptio Setup Utility - Advanced Onboard Device Configuration Onboard LAN Controller Onboard LAN...

Manual
Page 45
... Version 2.02.1205. Press "En- Create New Password After you connect HDD to boot or enter Setup. Copyright (C) 2010 American Megatrends, Inc. ► Administrator Password This item is only asked for enabling Security. 38 In Setup the User will ask you to confirm the password. ► User Password Create New Password This item is a power on "Set HDD Password" to set , then this is used to be installed for when entering Setup. Main Advanced Chipset Boot Power Health...
... Version 2.02.1205. Press "En- Create New Password After you connect HDD to boot or enter Setup. Copyright (C) 2010 American Megatrends, Inc. ► Administrator Password This item is only asked for enabling Security. 38 In Setup the User will ask you to confirm the password. ► User Password Create New Password This item is a power on "Set HDD Password" to set , then this is used to be installed for when entering Setup. Main Advanced Chipset Boot Power Health...

Manual
Page 48
... options to install additional software programs. FOX ONE is a very powerful user interface program which allows you to change your system without going to install all the drivers have been installed. Intel Chipset Driver C. Realtek HDA Audio Driver E. Realtek LAN Driver B. Realtek LAN Driver 2. Software Utilities Use these options to BIOS. Some auto features help user to improve (or overclock) your system setting without being a computer literate. FOX ONE C. Microsoft DirectX 9.0 G. Norton Internet Security Items for Windows...
... options to install additional software programs. FOX ONE is a very powerful user interface program which allows you to change your system without going to install all the drivers have been installed. Intel Chipset Driver C. Realtek HDA Audio Driver E. Realtek LAN Driver B. Realtek LAN Driver 2. Software Utilities Use these options to BIOS. Some auto features help user to improve (or overclock) your system setting without being a computer literate. FOX ONE C. Microsoft DirectX 9.0 G. Norton Internet Security Items for Windows...

Manual
Page 49
... utility This motherboard comes with one DVD, after installing the Operating System, you can click on each individual driver to install it into your DVD-ROM drive, and the main menu will be displayed on your system. After that, you can click "One Click Setup" and then choose the items you can simply put it manually. Driver Use these options to install all the drivers for your PC screen to guide...
... utility This motherboard comes with one DVD, after installing the Operating System, you can click on each individual driver to install it into your DVD-ROM drive, and the main menu will be displayed on your system. After that, you can click "One Click Setup" and then choose the items you can simply put it manually. Driver Use these options to install all the drivers for your PC screen to guide...

User manual
Page 20
... the manual that supports your expansion card(s). 7. PCI Express x16 PCI Express x1 PCI Follow the steps below to make any required BIOS changes for your card. After installing all expansion cards, replace the chassis cover. 6. Install the driver provided with your computer. Secure the card's metal bracket to the chassis back panel with the slot, and press down on the card are completely inserted into the PCI Express x16 slot. Installing and Removing a PCI Express x16 Graphics Card : • Installing a Graphics Card: Gently...
... the manual that supports your expansion card(s). 7. PCI Express x16 PCI Express x1 PCI Follow the steps below to make any required BIOS changes for your card. After installing all expansion cards, replace the chassis cover. 6. Install the driver provided with your computer. Secure the card's metal bracket to the chassis back panel with the slot, and press down on the card are completely inserted into the PCI Express x16 slot. Installing and Removing a PCI Express x16 Graphics Card : • Installing a Graphics Card: Gently...
User manual
Page 23
... panel of the case; User must purchase another RS232 cable with a 9-pin D-sub connector at one connector for connecting the front panel switch and LED Indicators. Hard Disk LED Connector (HDD-LED) Connect to connect with COM1 connector in S3/ S4 sleep state or power off mode (S5), the LED is on and off . The system can be turned on . When the system is directional with +/- PWR-LED - The Power LED indicates the system's status. Power LED Connector (PWR-LED) Connect to the power button...
... panel of the case; User must purchase another RS232 cable with a 9-pin D-sub connector at one connector for connecting the front panel switch and LED Indicators. Hard Disk LED Connector (HDD-LED) Connect to connect with COM1 connector in S3/ S4 sleep state or power off mode (S5), the LED is on and off . The system can be turned on . When the system is directional with +/- PWR-LED - The Power LED indicates the system's status. Power LED Connector (PWR-LED) Connect to the power button...

User manual
Page 25
... Clear CMOS Jumper: CLR_CMOS The motherboard uses CMOS RAM to factory default when the BIOS settings were mistakenly modified. It can prevent hazardous ESD (Electrical Static Discharge) problem. Users should read the following table explains different types of Jumpers 1. Go to BIOS Setup to configure new system as described in the power cord to your computer and turn it onto pins 2-3 to temporarily short them . 2 2-5 Jumpers For some features needed, users can change the jumper settings...
... Clear CMOS Jumper: CLR_CMOS The motherboard uses CMOS RAM to factory default when the BIOS settings were mistakenly modified. It can prevent hazardous ESD (Electrical Static Discharge) problem. Users should read the following table explains different types of Jumpers 1. Go to BIOS Setup to configure new system as described in the power cord to your computer and turn it onto pins 2-3 to temporarily short them . 2 2-5 Jumpers For some features needed, users can change the jumper settings...

User manual
Page 39
... Defaults F4: Save & Exit ESC: Exit Version 2.14.1219. If you have a USB keyboard or mouse, set to enable the support for EFI applications. [Auto]: This option will disable the legacy support if no USB devices are connected. ► Azalia HD Audio controller This item is used to auto or enabled. [Enabled]: This option will enable the legacy USB support. [Disabled]: This option will keep USB devices available only for USB devices on legacy OS. Advanced Onboard Device Configuration Onboard LAN Controller Onboard LAN PXE OpROM Onboard USB Controller Legacy USB Support Azalia HD Audio...
... Defaults F4: Save & Exit ESC: Exit Version 2.14.1219. If you have a USB keyboard or mouse, set to enable the support for EFI applications. [Auto]: This option will disable the legacy support if no USB devices are connected. ► Azalia HD Audio controller This item is used to auto or enabled. [Enabled]: This option will enable the legacy USB support. [Disabled]: This option will keep USB devices available only for USB devices on legacy OS. Advanced Onboard Device Configuration Onboard LAN Controller Onboard LAN PXE OpROM Onboard USB Controller Legacy USB Support Azalia HD Audio...
User manual
Page 40
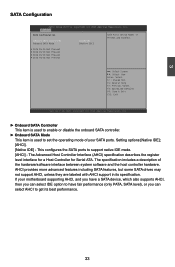
... used to enable or disable the onboard SATA controller. ► Onboard SATA Mode This item is used to set the operating mode of the hardware/software interface between system software and the host controller hardware. C opyright (C) 2012 American Megatrends, Inc. F1: General Help F2: Previous Values F3: Optimized Defaults F4: Save & Exit ESC: Exit Version 2.14.1219. This configures the SATA ports to get its specification. 3 SATA Configuration Aptio Setup Utility - The Advanced Host Controller Interface (AHCI) specification...
... used to enable or disable the onboard SATA controller. ► Onboard SATA Mode This item is used to set the operating mode of the hardware/software interface between system software and the host controller hardware. C opyright (C) 2012 American Megatrends, Inc. F1: General Help F2: Previous Values F3: Optimized Defaults F4: Save & Exit ESC: Exit Version 2.14.1219. This configures the SATA ports to get its specification. 3 SATA Configuration Aptio Setup Utility - The Advanced Host Controller Interface (AHCI) specification...

User manual
Page 41
... the relative information. 34 Default option is required. → ←: Select Screen ↑ ↓: Select Item Enter: Select +/-: Change Opt. Advanced TPM Configuration TPM SUPPORT [Disabled] Current Status Information NO Security Device Found Enable or Disable TPM support. O.S. If you want to support TPM, first you need to install a TPM device on the motherboard and set this item to support TPM (Trusted Platform Module) device function. C opyright (C) 2012 American...
... the relative information. 34 Default option is required. → ←: Select Screen ↑ ↓: Select Item Enter: Select +/-: Change Opt. Advanced TPM Configuration TPM SUPPORT [Disabled] Current Status Information NO Security Device Found Enable or Disable TPM support. O.S. If you want to support TPM, first you need to install a TPM device on the motherboard and set this item to support TPM (Trusted Platform Module) device function. C opyright (C) 2012 American...

User manual
Page 44
... keyboard/mouse to generate a wake up. ► Resume by USB Device(s) This item is used to wake up only by Onboard LAN This item is used to enable or disable the onboard LAN to generate a wake up . Power Aptio Setup Utility - When you select "S3 (STR)" mode, the power will be down after a period of motherboard. When enable, the suspend power of the chipset will be resumed at S3 state. ► Resume by PCI...
... keyboard/mouse to generate a wake up. ► Resume by USB Device(s) This item is used to wake up only by Onboard LAN This item is used to enable or disable the onboard LAN to generate a wake up . Power Aptio Setup Utility - When you select "S3 (STR)" mode, the power will be down after a period of motherboard. When enable, the suspend power of the chipset will be resumed at S3 state. ► Resume by PCI...

User manual
Page 46
... is used to enable or disable protect HDD MBR from avoiding destroied by virus. 39 3 Security Aptio Setup Utility - Main F-Center Advanced Boot Power Health SSeeccuurriittyy Save & Exit Security Configuration Administrator Password User Password Not Installed Not Installed Set Administrator Password. Administrator Password HDD BootSector Write [Normal] → ←: Select Screen ↑ ↓: Select Item Enter: Select +/-: Change Opt. F1: General Help F2: Previous Values F3: Optimized Defaults F4: Save & Exit ESC: Exit Version...
... is used to enable or disable protect HDD MBR from avoiding destroied by virus. 39 3 Security Aptio Setup Utility - Main F-Center Advanced Boot Power Health SSeeccuurriittyy Save & Exit Security Configuration Administrator Password User Password Not Installed Not Installed Set Administrator Password. Administrator Password HDD BootSector Write [Normal] → ←: Select Screen ↑ ↓: Select Item Enter: Select +/-: Change Opt. F1: General Help F2: Previous Values F3: Optimized Defaults F4: Save & Exit ESC: Exit Version...


