
English Manual.
Page 11
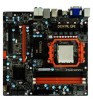
... Note : The above motherboard layout is for reference only, please refer to the physical motherboard for Cinema Deluxe) 23. 1 1-2 Layout 4 3 2 1 5 6 7 8 25 9 10 24 11 23 12 22 13 14 21 15 16 17 18 19 20 1. 8-pin ATX 12V Power Connector 14. Front Panel Connector 2. SATA Connectors 5.CD_IN Connector 18. HDA_DH Connector (Option) 21.
... Note : The above motherboard layout is for reference only, please refer to the physical motherboard for Cinema Deluxe) 23. 1 1-2 Layout 4 3 2 1 5 6 7 8 25 9 10 24 11 23 12 22 13 14 21 15 16 17 18 19 20 1. 8-pin ATX 12V Power Connector 14. Front Panel Connector 2. SATA Connectors 5.CD_IN Connector 18. HDA_DH Connector (Option) 21.
English Manual.
Page 20
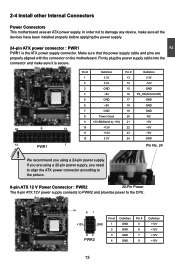
...-Pin Power The 8-pin ATX 12V power supply connects to PWR2 and provides power to the picture. Pin # Definition Pin # Definition 1 3.3V 13 3.3V 2 3.3V 14 -12V 3 GND 15 GND 4 +5V 16 PS_ON(Soft On/Off) 5 GND 17 GND 6 +5V 18 GND 7 GND 19 GND 8 Power Good 20 NC 9 +5V SB...
...-Pin Power The 8-pin ATX 12V power supply connects to PWR2 and provides power to the picture. Pin # Definition Pin # Definition 1 3.3V 13 3.3V 2 3.3V 14 -12V 3 GND 15 GND 4 +5V 16 PS_ON(Soft On/Off) 5 GND 17 GND 6 +5V 18 GND 7 GND 19 GND 8 Power Good 20 NC 9 +5V SB...
English Manual.
Page 21
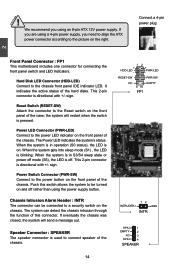
... power supply. If eventually the chassis was closed, the system will restart when the switch is pressed. It indicates the active status of the chassis. 14 1 + HDD-LED - 2 + PWR-LED - When the system is in S3/S4 sleep state or power off . Chassis Intrusion Alarm Header : INTR The connector can detect...
... power supply. If eventually the chassis was closed, the system will restart when the switch is pressed. It indicates the active status of the chassis. 14 1 + HDD-LED - 2 + PWR-LED - When the system is in S3/S4 sleep state or power off . Chassis Intrusion Alarm Header : INTR The connector can detect...
English Manual.
Page 110
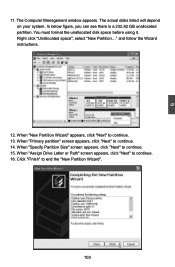
... it. and follow the Wizard instructions. 12. When "Primary partition" screen appears, click "Next" to end the "New Partition Wizard". 103 Click "Finish" to continue. 14. Right click "Unallocated space", select "New Partition..." The actual disks listed will depend on your system. When "New Partition Wizard" appears, click "Next" to continue...
... it. and follow the Wizard instructions. 12. When "Primary partition" screen appears, click "Next" to end the "New Partition Wizard". 103 Click "Finish" to continue. 14. Right click "Unallocated space", select "New Partition..." The actual disks listed will depend on your system. When "New Partition Wizard" appears, click "Next" to continue...