
Multi language Manual
Page 4
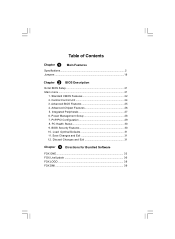
.... Advanced Chipset Features 26 5. Power Management Setup 28 7. PC Health Status 30 9. Load Optimal Defaults 31 11. Discard Changes and Exit 31 Chapter 3 Directions for Bundled Software FOX ONE 33 FOX LiveUpdate 36 FOX LOGO 38 FOX DMI 39 Central Control Unit 24 3. PnP/PCI Configuration 29 8. Table of Contents Chapter 1 Main Features Specifications 2 Jumpers 18 Chapter 2 BIOS Description Enter BIOS Setup 21 Main menu 21 1. Standard CMOS Features 22...
.... Advanced Chipset Features 26 5. Power Management Setup 28 7. PC Health Status 30 9. Load Optimal Defaults 31 11. Discard Changes and Exit 31 Chapter 3 Directions for Bundled Software FOX ONE 33 FOX LiveUpdate 36 FOX LOGO 38 FOX DMI 39 Central Control Unit 24 3. PnP/PCI Configuration 29 8. Table of Contents Chapter 1 Main Features Specifications 2 Jumpers 18 Chapter 2 BIOS Description Enter BIOS Setup 21 Main menu 21 1. Standard CMOS Features 22...
Multi language Manual
Page 5
... consistent with the actual BIOS version at any given time in serious damage to high temperature. 3. Normal operation depends on the computer if the CPU fan is turned off the DC power supply may result in the future. Attention: Since BIOS programs are just for your system or memory module. foxconnchannel.com) to switch off before inserting or removing expansion cards or other peripherals...
... consistent with the actual BIOS version at any given time in serious damage to high temperature. 3. Normal operation depends on the computer if the CPU fan is turned off the DC power supply may result in the future. Attention: Since BIOS programs are just for your system or memory module. foxconnchannel.com) to switch off before inserting or removing expansion cards or other peripherals...

Multi language Manual
Page 8
...supports 4 USB 2.0 ports) ·4 x SATA connectors ·1 x Floppy connector ·1 x IDE connector ·1 x Chassis intruder header (INTR) ·1 x CD_IN header ·1 x S/PDIF_OUT header (optional) ·1 x TPM header (optional) ·1 x TV_OUT header ·1 x COM2 port header (optional) ·1 x Front Audio connector ·1 x 24-pin ATX Power Connector ·1 x 4-pin AUX Power Connector ·1 x IrDA header ·1 x CPU Fan connector ·1 x System Fan connector ·1 x NB Fan connector (optional) ·Front panel connector ·Driver ·Utility ·Specifications...
...supports 4 USB 2.0 ports) ·4 x SATA connectors ·1 x Floppy connector ·1 x IDE connector ·1 x Chassis intruder header (INTR) ·1 x CD_IN header ·1 x S/PDIF_OUT header (optional) ·1 x TPM header (optional) ·1 x TV_OUT header ·1 x COM2 port header (optional) ·1 x Front Audio connector ·1 x 24-pin ATX Power Connector ·1 x 4-pin AUX Power Connector ·1 x IrDA header ·1 x CPU Fan connector ·1 x System Fan connector ·1 x NB Fan connector (optional) ·Front panel connector ·Driver ·Utility ·Specifications...

Multi language Manual
Page 23
... for the internal USB ports. 2. And in sleep mode. 18 The data includes system setup information such as below: Set "CMOS Setup"=>"Power Management Setup"=> "Wake on the motherboard, pin 1 can provide 500mA on the computer. Attention The jumpers on USB Devices" to pins 2-3. 1 Clear 3. CLR_ CMOS USB device wake-up Jumper: USBPWR1/USBPWR2 1.Set the jumper to pins 1-2 (+5V) to wake up the computer from the power supply. (default) 2. Move the jumper cap from pins 2-3 (default) to clear the data in BIOS as system password, data...
... for the internal USB ports. 2. And in sleep mode. 18 The data includes system setup information such as below: Set "CMOS Setup"=>"Power Management Setup"=> "Wake on the motherboard, pin 1 can provide 500mA on the computer. Attention The jumpers on USB Devices" to pins 2-3. 1 Clear 3. CLR_ CMOS USB device wake-up Jumper: USBPWR1/USBPWR2 1.Set the jumper to pins 1-2 (+5V) to wake up the computer from the power supply. (default) 2. Move the jumper cap from pins 2-3 (default) to clear the data in BIOS as system password, data...
Multi language Manual
Page 24
Chapter 1 Main Features Keyboard and Mouse Jumper: KB/MS_PWR This jumper allows you press a key on the keyboard or click the mouse, and a corresponding setting must be set in BIOS as below: Set "CMOS Setup"=>"Power Management Setup"=> "Wake on PS2 Keyboard"and "W ake on PS2Mouse" to enable or disable the Keyboard and Mouse wake-up feature. Set the jumper to pins 2-3(+5VSB) to wake up the computer from sleep modes when you to "Enabled". 1 +5V (Default) 1 +5VSB KB/MSPW R 19
Chapter 1 Main Features Keyboard and Mouse Jumper: KB/MS_PWR This jumper allows you press a key on the keyboard or click the mouse, and a corresponding setting must be set in BIOS as below: Set "CMOS Setup"=>"Power Management Setup"=> "Wake on PS2 Keyboard"and "W ake on PS2Mouse" to enable or disable the Keyboard and Mouse wake-up feature. Set the jumper to pins 2-3(+5VSB) to wake up the computer from sleep modes when you to "Enabled". 1 +5V (Default) 1 +5VSB KB/MSPW R 19
Multi language Manual
Page 25
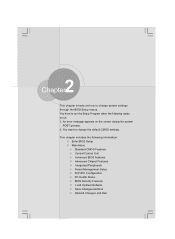
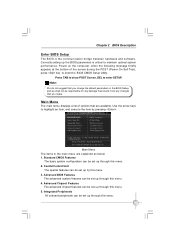
... includes the following cases occur: 1. An error message appears on the screen during the system POST process. 2. Chapter 2 BIOS Description 2 Chapter This chapter introduces how to run the Setup Program when the following information: v Enter BIOS Setup v Main Menu v Standard CMOS Features v Central Control Unit v Advanced BIOS Features v Advanced Chipset Features v Integrated Peripherals v Power Management Setup v PnP/PCI Configuration v PC Health Status v BIOS Security Features v Load Optimal Defaults v Save Changes and Exit v Discard...
... includes the following cases occur: 1. An error message appears on the screen during the system POST process. 2. Chapter 2 BIOS Description 2 Chapter This chapter introduces how to run the Setup Program when the following information: v Enter BIOS Setup v Main Menu v Standard CMOS Features v Central Control Unit v Advanced BIOS Features v Advanced Chipset Features v Integrated Peripherals v Power Management Setup v PnP/PCI Configuration v PC Health Status v BIOS Security Features v Load Optimal Defaults v Save Changes and Exit v Discard...
Multi language Manual
Page 26
... and software. Power on the computer, when the following message briefly appears at the bottom of options that you change the default parameters in the main menu are available. Integrated Peripherals All onboard peripherals can be set up through this menu. 21 Press TAB to show POST Screen, DEL to enter the BIOS CMOS Setup Utility. Main Menu The main menu displays a list of the screen during the POST (Power On Self Test), press key to enter SETUP. Advanced Chipset...
... and software. Power on the computer, when the following message briefly appears at the bottom of options that you change the default parameters in the main menu are available. Integrated Peripherals All onboard peripherals can be set up through this menu. 21 Press TAB to show POST Screen, DEL to enter the BIOS CMOS Setup Utility. Main Menu The main menu displays a list of the screen during the POST (Power On Self Test), press key to enter SETUP. Advanced Chipset...
Multi language Manual
Page 28
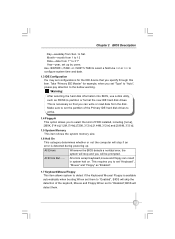
... memory size. 1.6 Halt On This category determines whether or not the computer will be prompted. Use , or to select a field.Use or to configure system time and date. 1.3 IDE Configuration You may set configurations for example, when you will stop if an error is available automatically when booting.W hen set them to "Enabled", BIOS will skip the detection of the Primary IDE hard disk drives to active. 1.4 Floppy A This option...
... memory size. 1.6 Halt On This category determines whether or not the computer will be prompted. Use , or to select a field.Use or to configure system time and date. 1.3 IDE Configuration You may set configurations for example, when you will stop if an error is available automatically when booting.W hen set them to "Enabled", BIOS will skip the detection of the Primary IDE hard disk drives to active. 1.4 Floppy A This option...
Multi language Manual
Page 29
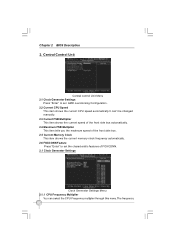
... control Unit Menu 2.1 Clock Generator Settings Press "Enter" to set AMD overclocking Configuration. 2.2 Current CPU Speed This item shows the current CPU speed automatically.It can't be changed manually. 2.3 Current FSB Multiplier This item shows the current speed of the front side bus automatically. 2.4 Maximum FSB Multiplier This item tells you the maximum speed of the front side bus. 2.5 Current Memory Clock This item shows the current memory clock frequency automatically. 2.6 FOXCONN Feature Press "Enter" to set...
... control Unit Menu 2.1 Clock Generator Settings Press "Enter" to set AMD overclocking Configuration. 2.2 Current CPU Speed This item shows the current CPU speed automatically.It can't be changed manually. 2.3 Current FSB Multiplier This item shows the current speed of the front side bus automatically. 2.4 Maximum FSB Multiplier This item tells you the maximum speed of the front side bus. 2.5 Current Memory Clock This item shows the current memory clock frequency automatically. 2.6 FOXCONN Feature Press "Enter" to set...
Multi language Manual
Page 30
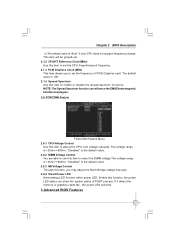
... PCIE Graphics card. "Disabled" is 100. 2.1.4 Spread Spectrum Use this item to set the frequency of POST process. Chapter 2 BIOS Description is The default value is +25mv~+800mv. Enable this function, the power LED status can influence the EMI (Electromagnetic Interference)degree. 2.6 FOXCONN Feature FOXCONN Feature Menu 2.6.1 CPU Voltage Control Use this item to select the DIMM voltage.The voltage range is the default value. 2.6.3 NB Voltage Control Through this item to adjust the CPU core voltage manually. The default...
... PCIE Graphics card. "Disabled" is 100. 2.1.4 Spread Spectrum Use this item to set the frequency of POST process. Chapter 2 BIOS Description is The default value is +25mv~+800mv. Enable this function, the power LED status can influence the EMI (Electromagnetic Interference)degree. 2.6 FOXCONN Feature FOXCONN Feature Menu 2.6.1 CPU Voltage Control Use this item to select the DIMM voltage.The voltage range is the default value. 2.6.3 NB Voltage Control Through this item to adjust the CPU core voltage manually. The default...
Multi language Manual
Page 31
.... 3.2 Boot Settings Configuration Press "Enter", you are able to specify the boot device priority sequence from the availabe devices. 3.3 Quick Boot This item allows you to enable or disable the system quick boot feature.W hen enabled, the system skips certain tests while booting. 3.4 Quiet Boot This item is used to enable or disable the quiet boot. [Disabled]: Displays normal POST messages.[Enabled]: Displays OEM Logo instead of POST messages. 3.5 Floppy Drive Seek You may enable or disable the floppy drive...
.... 3.2 Boot Settings Configuration Press "Enter", you are able to specify the boot device priority sequence from the availabe devices. 3.3 Quick Boot This item allows you to enable or disable the system quick boot feature.W hen enabled, the system skips certain tests while booting. 3.4 Quiet Boot This item is used to enable or disable the quiet boot. [Disabled]: Displays normal POST messages.[Enabled]: Displays OEM Logo instead of POST messages. 3.5 Floppy Drive Seek You may enable or disable the floppy drive...
Multi language Manual
Page 32
... onboard LAN,USB and Audio. 5.4 SuperIO Configuration This sub-menu allows you to enable or disable SATA channel. 5.2 OnChip SATA Type Use this item to configure superIO devices,such as serial ports , parallel ports and so on.You can configure the resource and operation mode for these devices. 27 Chapter 2 BIOS Description 4.1 AMD 690G/690V Configuration This sub-menu allows you to configure the parameters of Internal Grapgics and PCI Express. 4.2 NorthBridge Configuration This sub-menu allows you to set the memory configuration and enable...
... onboard LAN,USB and Audio. 5.4 SuperIO Configuration This sub-menu allows you to enable or disable SATA channel. 5.2 OnChip SATA Type Use this item to configure superIO devices,such as serial ports , parallel ports and so on.You can configure the resource and operation mode for these devices. 27 Chapter 2 BIOS Description 4.1 AMD 690G/690V Configuration This sub-menu allows you to configure the parameters of Internal Grapgics and PCI Express. 4.2 NorthBridge Configuration This sub-menu allows you to set the memory configuration and enable...

Multi language Manual
Page 33
... 6.2 Suspend mode Use this item to control whether to start up the system by power management events or not. 6.6 Wake on PME This item helps to set whether to enable or disable USB Devices/PS2 Keyboard/PS2 Mouse wake-uping function from sleep mode. 28 Cool'N'Quiet is pressed.Options:[On/Off] [Suspend]. 6.4 POWER STATE Use this item to define your computer automatically or not after a power failure event.If...
... 6.2 Suspend mode Use this item to control whether to start up the system by power management events or not. 6.6 Wake on PME This item helps to set whether to enable or disable USB Devices/PS2 Keyboard/PS2 Mouse wake-uping function from sleep mode. 28 Cool'N'Quiet is pressed.Options:[On/Off] [Suspend]. 6.4 POWER STATE Use this item to define your computer automatically or not after a power failure event.If...
Multi language Manual
Page 34
...(Non Volatile Random Access Memory) during System boot. 7.2 Plug & Play O/S When set to "NO",the BIOS will configure all devices in the system.When set to "Yes" and if you install a Plug and Play operating system, the operating system configures the Plug and Play devices not required for boot. 7.3 PCI Latency Timer This item allows you select "No", BIOS does not assign an IRQ to PCI VGA card even if...
...(Non Volatile Random Access Memory) during System boot. 7.2 Plug & Play O/S When set to "NO",the BIOS will configure all devices in the system.When set to "Yes" and if you install a Plug and Play operating system, the operating system configures the Plug and Play devices not required for boot. 7.3 PCI Latency Timer This item allows you select "No", BIOS does not assign an IRQ to PCI VGA card even if...
Multi language Manual
Page 35
... Channel 0/1/3/5/6/7 Use this item to specify DMA Channel for legacy ISA deices.W e advise to keep the default value unchanged.The default value is "Available". 7.10 Reserved Memory Size This item allows to reserve size of memory block for PCI/PnP devices to enable or disable the chassis open status feature. 8.2 CPU Temperature /System Temperature/CPU Fan Speed/System Fan Speed/+CPU/DDR(+1.8V)/VCC(+5V)/+12V/+3.3V These items display the current CPU/system temperature,fan speed and voltages that...
... Channel 0/1/3/5/6/7 Use this item to specify DMA Channel for legacy ISA deices.W e advise to keep the default value unchanged.The default value is "Available". 7.10 Reserved Memory Size This item allows to reserve size of memory block for PCI/PnP devices to enable or disable the chassis open status feature. 8.2 CPU Temperature /System Temperature/CPU Fan Speed/System Fan Speed/+CPU/DDR(+1.8V)/VCC(+5V)/+12V/+3.3V These items display the current CPU/system temperature,fan speed and voltages that...
Multi language Manual
Page 36
... option and press , the following message will appear in the center of the screen: Save configuration changes and exit setup? Press to protect boot sector of hard disk from viruses. 9.3 Change Supervisor Password Press "Enter" to start the system or modify the CMOS settings.Enter your password, not exceeding 6 characters, then press . The Supervisor password can be used to change the supervisor password. Chapter 2 BIOS Description 9.1 Supervisor/User Password These items show supervisor/user password installed...
... option and press , the following message will appear in the center of the screen: Save configuration changes and exit setup? Press to protect boot sector of hard disk from viruses. 9.3 Change Supervisor Password Press "Enter" to start the system or modify the CMOS settings.Enter your password, not exceeding 6 characters, then press . The Supervisor password can be used to change the supervisor password. Chapter 2 BIOS Description 9.1 Supervisor/User Password These items show supervisor/user password installed...

Multi language Manual
Page 38
... a powerful utility for Bundled Software FOX ONE FOX ONE is in abnormal status, the alert lamp color will simplify the interface to HW monitor information bar as bus speed, CPU voltage, fan speed, and other pages Alert Lamp Switch Button Skin Button Exit Minimum Configuration Homepage Alert Lamp Monitor Frequency/Voltage/Fan speed/Temperature value When the system is green. Chapter 3 Directions for easily modifying system settings. Supported Operating Systems: -W indows 2000 -Windows...
... a powerful utility for Bundled Software FOX ONE FOX ONE is in abnormal status, the alert lamp color will simplify the interface to HW monitor information bar as bus speed, CPU voltage, fan speed, and other pages Alert Lamp Switch Button Skin Button Exit Minimum Configuration Homepage Alert Lamp Monitor Frequency/Voltage/Fan speed/Temperature value When the system is green. Chapter 3 Directions for easily modifying system settings. Supported Operating Systems: -W indows 2000 -Windows...
Multi language Manual
Page 41
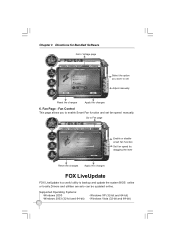
... a useful utility to set fan speed manually. Supported Operating Systems: -W indows 2000 -W indows 2003 (32-bit and 64-bit) 36 -Windows XP (32-bit and 64-bit) -W indows Vista (32-bit and 64-bit) Chapter 3 Directions for Bundled Software Go to Voltage page Select the option you to enable Smart Fan function and set Adjust manually Reset the changes Apply the changes 6. Fan Control This page allows you want to backup and update the system BIOS online or locally.Drivers...
... a useful utility to set fan speed manually. Supported Operating Systems: -W indows 2000 -W indows 2003 (32-bit and 64-bit) 36 -Windows XP (32-bit and 64-bit) -W indows Vista (32-bit and 64-bit) Chapter 3 Directions for Bundled Software Go to Voltage page Select the option you to enable Smart Fan function and set Adjust manually Reset the changes Apply the changes 6. Fan Control This page allows you want to backup and update the system BIOS online or locally.Drivers...
Multi language Manual
Page 42
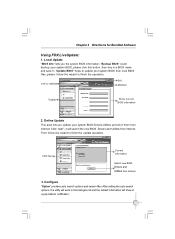
.... Local Update "BIOS Info" tells you update your system BIOS,Drivers,Utilities and all of them from local BIOS files ,please follow the wizard to finish the operation. "Update BIOS" helps to website Exit Minimum Toolbar Show current BIOS information 2. Click "start", it ; Configure "Option" provides auto search options and version filter. Chapter 3 Directions for Bundled Software Using FOX LiveUpdate: 1. Link to update your system BIOS ,please click this button ,then key in...
.... Local Update "BIOS Info" tells you update your system BIOS,Drivers,Utilities and all of them from local BIOS files ,please follow the wizard to finish the operation. "Update BIOS" helps to website Exit Minimum Toolbar Show current BIOS information 2. Click "start", it ; Configure "Option" provides auto search options and version filter. Chapter 3 Directions for Bundled Software Using FOX LiveUpdate: 1. Link to update your system BIOS ,please click this button ,then key in...
Multi language Manual
Page 43
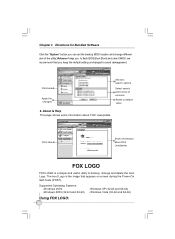
... LOGO FOX LOGO is the image that you keep the default setting unchanged to default value 4. Chapter 3 Directions for Bundled Software Click the "System" button,you can set the backup BIOS location and change and delete the boot Logo. Supported Operating Systems: -W indows 2000 -W indows 2003 (32-bit and 64-bit) -Windows XP (32-bit and 64-bit) -W indows Vista (32-bit and 64-bit) Using FOX LOGO: 38
... LOGO FOX LOGO is the image that you keep the default setting unchanged to default value 4. Chapter 3 Directions for Bundled Software Click the "System" button,you can set the backup BIOS location and change and delete the boot Logo. Supported Operating Systems: -W indows 2000 -W indows 2003 (32-bit and 64-bit) -Windows XP (32-bit and 64-bit) -W indows Vista (32-bit and 64-bit) Using FOX LOGO: 38


