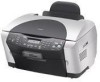
Product Information Guide
Page 11
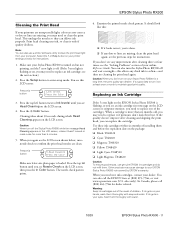
or Help button on your printer settings window for more than 5 minutes. 5. see Head Cleaning on your Stylus Photo RX500 for dealer referral. Press the top left button until you may need to your EPSON Stylus Photo RX500 not covered by EPSON's warranty. Caution: Never turn on the LCD screen. ...reach of your online Reference Guide. Press the x Color button. Examine the printed nozzle check pattern. You can also use genuine EPSON ink cartridges and do not refill them thoroughly with water. 10/03 EPSON Stylus Photo RX500 - 11 You see the previous steps for instructions...
or Help button on your printer settings window for more than 5 minutes. 5. see Head Cleaning on your Stylus Photo RX500 for dealer referral. Press the top left button until you may need to your EPSON Stylus Photo RX500 not covered by EPSON's warranty. Caution: Never turn on the LCD screen. ...reach of your online Reference Guide. Press the x Color button. Examine the printed nozzle check pattern. You can also use genuine EPSON ink cartridges and do not refill them thoroughly with water. 10/03 EPSON Stylus Photo RX500 - 11 You see the previous steps for instructions...

Start Here Card
Page 7
... reinstalling the software. Try connecting the USB cable to add a printer, click Add. 2 On the next screen, select EPSON USB from the Apple menu. 2 Select the SP RX500 Series icon, then select your USB port and turn on your problem is connected to your computer, plugged into a power source... the transportation lock under the lid to find out how. Make sure the ink cartridges are pushed all the way down menu. 3 Click Stylus Photo RX500. You see your software Help, User's Guide, or your Macintosh in Mac OS X 1 Open the OS X Applications folder, then open the Utilities folder and start...
... reinstalling the software. Try connecting the USB cable to add a printer, click Add. 2 On the next screen, select EPSON USB from the Apple menu. 2 Select the SP RX500 Series icon, then select your USB port and turn on your problem is connected to your computer, plugged into a power source... the transportation lock under the lid to find out how. Make sure the ink cartridges are pushed all the way down menu. 3 Click Stylus Photo RX500. You see your software Help, User's Guide, or your Macintosh in Mac OS X 1 Open the OS X Applications folder, then open the Utilities folder and start...

Start Here Card
Page 8
... to view your software. Your Epson SoundAdviceSM Express Code is a trademark of Epson America, Inc. You can do with the RX500. On-screen EPSON Stylus Photo RX500 Reference Guide Additional details about your local store, or from the Epson StoreSM at (800) 873-7766...Friday. Epson and Epson Stylus are service marks of Seiko Epson Corporation. Any Questions? Here's where to quickly select your printer software. On-screen Help For Your Software Click Help or ? Epson Technical Support (for the RX500 or EPSON Scan) • World Wide Web http://support.epson.com...
... to view your software. Your Epson SoundAdviceSM Express Code is a trademark of Epson America, Inc. You can do with the RX500. On-screen EPSON Stylus Photo RX500 Reference Guide Additional details about your local store, or from the Epson StoreSM at (800) 873-7766...Friday. Epson and Epson Stylus are service marks of Seiko Epson Corporation. Any Questions? Here's where to quickly select your printer software. On-screen Help For Your Software Click Help or ? Epson Technical Support (for the RX500 or EPSON Scan) • World Wide Web http://support.epson.com...

User's Guide
Page 5
Printing From a Memory Card 89 Printing an Index Form 89 Selecting Photos To Print 92 Printing With DPOF 94 Choosing Print Settings 96 Scanning a Photo to a Memory Card 105 Maintaining the RX500 109 Cleaning the Print Head 109 Replacing Ink Cartridges 111 Installing New Cartridges 111 Aligning the Print Head 115 Transporting the RX500 118 Solving Problems 121 Problems and Solutions 121 Copying Problems 121 Paper Feeding Problems 122 Copy Quality Problems 122 Where To Get Help 123 Epson Support 123 Other Software Technical Support 124 Contents 5
Printing From a Memory Card 89 Printing an Index Form 89 Selecting Photos To Print 92 Printing With DPOF 94 Choosing Print Settings 96 Scanning a Photo to a Memory Card 105 Maintaining the RX500 109 Cleaning the Print Head 109 Replacing Ink Cartridges 111 Installing New Cartridges 111 Aligning the Print Head 115 Transporting the RX500 118 Solving Problems 121 Problems and Solutions 121 Copying Problems 121 Paper Feeding Problems 122 Copy Quality Problems 122 Where To Get Help 123 Epson Support 123 Other Software Technical Support 124 Contents 5

User's Guide
Page 8
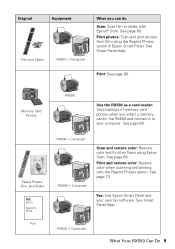
...to create copies. Scan text RX500 What you can do Copy: Use the RX500 as a copy machine to memory card: Scan photos and save the image files on many of black and white or color documents. Text Documents RX500 + Computer Copy: Use Epson Smart Panel™ Copy Center ...to computer or e-mail: Scan using the RX500 buttons. To scan editable text, see Smart Panel Help. Scan to create...
...to create copies. Scan text RX500 What you can do Copy: Use the RX500 as a copy machine to memory card: Scan photos and save the image files on many of black and white or color documents. Text Documents RX500 + Computer Copy: Use Epson Smart Panel™ Copy Center ...to computer or e-mail: Scan using the RX500 buttons. To scan editable text, see Smart Panel Help. Scan to create...
User's Guide
Page 9
... Scan: Scan film or slides with the Reprint Photos option. Print photos: Scan and print photos from film using Epson Scan. Print: See page 89. See Smart Panel Help. Print and restore color: Restore color when scanning and printing with Epson® Scan. Fax: Use Epson Smart Panel and your computer. RX500 + Computer What Your RX500 Can Do 9 See page 60.
... Scan: Scan film or slides with the Reprint Photos option. Print photos: Scan and print photos from film using Epson Scan. Print: See page 89. See Smart Panel Help. Print and restore color: Restore color when scanning and printing with Epson® Scan. Fax: Use Epson Smart Panel and your computer. RX500 + Computer What Your RX500 Can Do 9 See page 60.

User's Guide
Page 37
... quality Note: For more information about print settings, click the ? Select the following in Windows 37 For the highest quality (Photo RPM®) on selected papers, click the Advanced button on selecting Photo RPM. 6. At the Print window, click OK or Print to start printing. Then see "Customizing Windows Print Settings" on... Properties window: Select the type of quality and speed for instructions on this screen give you the best combination of document you 've loaded. or Help button.
... quality Note: For more information about print settings, click the ? Select the following in Windows 37 For the highest quality (Photo RPM®) on selected papers, click the Advanced button on selecting Photo RPM. 6. At the Print window, click OK or Print to start printing. Then see "Customizing Windows Print Settings" on... Properties window: Select the type of quality and speed for instructions on this screen give you the best combination of document you 've loaded. or Help button.

User's Guide
Page 39
... or Help button. If you want your print settings, select the Show this screen first checkbox. Customizing Windows Print Settings 39 If you access your printer to select Black Ink Only printing Note: For the highest print quality, select Photo RPM. If you 're using a color management system... and don't want to use advanced settings for saving them as necessary: Select a color management method. Select the following settings as a group so you can use...
... or Help button. If you want your print settings, select the Show this screen first checkbox. Customizing Windows Print Settings 39 If you access your printer to select Black Ink Only printing Note: For the highest print quality, select Photo RPM. If you 're using a color management system... and don't want to use advanced settings for saving them as necessary: Select a color management method. Select the following settings as a group so you can use...

User's Guide
Page 40
... or rotate your settings and return to the Print window. 6. Click OK to save your printed page here Click here to select layout options. 4. or Help button. 5. Click OK or Print to save your image Select resizing options here; 3. these affect only your printed image Select multi-page document options here...
... or rotate your settings and return to the Print window. 6. Click OK to save your printed page here Click here to select layout options. 4. or Help button. 5. Click OK or Print to save your image Select resizing options here; 3. these affect only your printed image Select multi-page document options here...

User's Guide
Page 45
...Help button. 9. To monitor the progress of copies you want to choose higher quality or faster printing. You can also choose other print settings by selecting these options in the dock on a Macintosh 45 If you 're using OS X 10.2, click the Print Center icon instead, then double-click Stylus Photo RX500... in the printer software. 10. Select the following print settings as a PDF file. ■ Color Management: Select ColorSync,® adjust the color controls, change the gamma setting, or turn off color adjustments in the Printer List...
...Help button. 9. To monitor the progress of copies you want to choose higher quality or faster printing. You can also choose other print settings by selecting these options in the dock on a Macintosh 45 If you 're using OS X 10.2, click the Print Center icon instead, then double-click Stylus Photo RX500... in the printer software. 10. Select the following print settings as a PDF file. ■ Color Management: Select ColorSync,® adjust the color controls, change the gamma setting, or turn off color adjustments in the Printer List...

User's Guide
Page 49
.... Customizing Macintosh Print Settings You can reuse them as necessary: To select color management settings, select Color Management from this menu Select various print options here Click here to select Photo RPM (5760 × 1440 dpi) for the best print quality on ...page 50 Customizing OS X Print Settings 1. Note that printing will take longer. For more information on advanced settings, or instructions on saving them later, click Help...
.... Customizing Macintosh Print Settings You can reuse them as necessary: To select color management settings, select Color Management from this menu Select various print options here Click here to select Photo RPM (5760 × 1440 dpi) for the best print quality on ...page 50 Customizing OS X Print Settings 1. Note that printing will take longer. For more information on advanced settings, or instructions on saving them later, click Help...

User's Guide
Page 58
...document, then launch a variety of the Smart Panel applications listed below, click its icon. Scans a photo into PhotoImpression, where you can also use the application. Using Epson Smart Panel Epson Smart Panel is an easy, step-by-step interface that lets you must click on the eye in... various sizes and layouts. You see this screen: EPSON Smart Panel icon on -screen Help for details. 58 Scanning to handle the scanned file. 1. Includes Color Restoration (restores color to apply the correction). See your computer to a Computer To start one of ...
...document, then launch a variety of the Smart Panel applications listed below, click its icon. Scans a photo into PhotoImpression, where you can also use the application. Using Epson Smart Panel Epson Smart Panel is an easy, step-by-step interface that lets you must click on the eye in... various sizes and layouts. You see this screen: EPSON Smart Panel icon on -screen Help for details. 58 Scanning to handle the scanned file. 1. Includes Color Restoration (restores color to apply the correction). See your computer to a Computer To start one of ...

User's Guide
Page 66
...you want to improve the color of them. (For information on adjusting the marquee, see multiple images in your Home Mode preview image has a blue box around it . (Click Help on the scanner glass, you 're scanning more than one photo or document on the Epson Scan screen for detailed ...information about all of faded photos or negatives, click the Color Restoration box. Click the Scan button. Your scanned image opens ...
...you want to improve the color of them. (For information on adjusting the marquee, see multiple images in your Home Mode preview image has a blue box around it . (Click Help on the scanner glass, you 're scanning more than one photo or document on the Epson Scan screen for detailed ...information about all of faded photos or negatives, click the Color Restoration box. Click the Scan button. Your scanned image opens ...

User's Guide
Page 72
If you're scanning more than one photo on the scanner glass, you see multiple images in the Preview window: Click the Auto Detect icon Note: If you want to print or view it. (Click Help on adjusting the marquee, see an automatic preview of your image appears in the Preview window.... click the Color Restoration box. Click Close to exit Epson Scan. 72 Scanning to select your scans may not look right. 10. Choose Document Type, Image Type, and Destination settings that match the type of the Epson Scan window, click the Preview button. Size your image and adjust your photo to the ...
If you're scanning more than one photo on the scanner glass, you see multiple images in the Preview window: Click the Auto Detect icon Note: If you want to print or view it. (Click Help on adjusting the marquee, see an automatic preview of your image appears in the Preview window.... click the Color Restoration box. Click Close to exit Epson Scan. 72 Scanning to select your scans may not look right. 10. Choose Document Type, Image Type, and Destination settings that match the type of the Epson Scan window, click the Preview button. Size your image and adjust your photo to the ...

User's Guide
Page 81
... press the OK button. See Smart Panel Help for details. 1. Press the top left corner. Note: You can also scan to e-mail by double-clicking the EPSON Smart Panel icon on your desktop and clicking the Scan to select To E-mail. Place your photo face down on the glass in about ... your computer. 2. Press the Scan button on the RX500 to switch to an e-mail. You see To E-Mail 1.To Photo Card OK 6. Orient the photo as shown Move the photo in the upper left button to E-mail icon. Scanning Using the RX500 Buttons 81 Scanning to E-Mail This section explains how...
... press the OK button. See Smart Panel Help for details. 1. Press the top left corner. Note: You can also scan to e-mail by double-clicking the EPSON Smart Panel icon on your desktop and clicking the Scan to select To E-mail. Place your photo face down on the glass in about ... your computer. 2. Press the Scan button on the RX500 to switch to an e-mail. You see To E-Mail 1.To Photo Card OK 6. Orient the photo as shown Move the photo in the upper left button to E-mail icon. Scanning Using the RX500 Buttons 81 Scanning to E-Mail This section explains how...

User's Guide
Page 82
...switched to a new e-mail message. See Smart Panel Help for this program box. The scanned image is transferred to your e-mail program and click OK. Note: If you want to a Computer Epson Scan automatically previews and scans the image, which opens in Epson Scan, previewing and scanning is not automatic. The..., then click Next. Then click OK. Note: If you see a screen asking you to select the program to launch this action, select EPSON Smart Panel and click the Always use this action, select your e-mail program and attached to Home or Professional mode in the View Images and...
...switched to a new e-mail message. See Smart Panel Help for this program box. The scanned image is transferred to your e-mail program and click OK. Note: If you want to a Computer Epson Scan automatically previews and scans the image, which opens in Epson Scan, previewing and scanning is not automatic. The..., then click Next. Then click OK. Note: If you see a screen asking you to select the program to launch this action, select EPSON Smart Panel and click the Always use this action, select your e-mail program and attached to Home or Professional mode in the View Images and...
User's Guide
Page 109
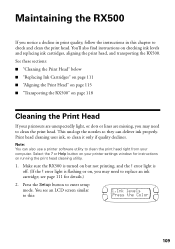
... instructions on your printouts are unexpectedly light, or dots or lines are missing, you may need to check and clean the print head. or Help button on running the print head cleaning utility. 1. Press the Setup button to clean the print head. Select the ? Print head cleaning uses...mode. see an LCD screen similar to this chapter to replace an ink cartridge; Maintaining the RX500 If you notice a decline in print quality, follow the instructions in this : 1.Ink levels Press the Color 109 Note: You can deliver ink properly. error light is flashing or on but not printing...
... instructions on your printouts are unexpectedly light, or dots or lines are missing, you may need to check and clean the print head. or Help button on running the print head cleaning utility. 1. Press the Setup button to clean the print head. Select the ? Print head cleaning uses...mode. see an LCD screen similar to this chapter to replace an ink cartridge; Maintaining the RX500 If you notice a decline in print quality, follow the instructions in this : 1.Ink levels Press the Color 109 Note: You can deliver ink properly. error light is flashing or on but not printing...

User's Guide
Page 110
... line should look like this on your printout looks okay, you see any dried ink to maintain good print quality. 110 Maintaining the RX500 Press the x Color button. The nozzle check pattern prints. If your printer settings window for more than 5 minutes. 5. Select the ? It should be...can also turn off and wait overnight-this allows any gaps in the dot pattern. or Help button on the LCD screen: 3.Head Cleaning Press the Color 4. Caution: Never turn the RX500 off the RX500 while Head Cleaning appears on the LCD screen, unless it on the LCD screen. If ...
... line should look like this on your printout looks okay, you see any dried ink to maintain good print quality. 110 Maintaining the RX500 Press the x Color button. The nozzle check pattern prints. If your printer settings window for more than 5 minutes. 5. Select the ? It should be...can also turn off and wait overnight-this allows any gaps in the dot pattern. or Help button on the LCD screen: 3.Head Cleaning Press the Color 4. Caution: Never turn the RX500 off the RX500 while Head Cleaning appears on the LCD screen, unless it on the LCD screen. If ...

User's Guide
Page 121
Copying Problems ■ Make sure your paper is positioned in the top left corner of the original facing left side. Move the photo or document in stand-alone mode. Don't load paper above the arrow on the left edge guide. ■ Make sure your paper is loaded short ... about 0.1 inch from your computer, or with the RX500, check the messages on the LCD screen, run a nozzle check (see page 109), or see "Where To Get Help" on page 123. Place it at least 0.1 inch from the edge of the solutions solve your problem, see "Problems and Solutions" below if you...
Copying Problems ■ Make sure your paper is positioned in the top left corner of the original facing left side. Move the photo or document in stand-alone mode. Don't load paper above the arrow on the left edge guide. ■ Make sure your paper is loaded short ... about 0.1 inch from your computer, or with the RX500, check the messages on the LCD screen, run a nozzle check (see page 109), or see "Where To Get Help" on page 123. Place it at least 0.1 inch from the edge of the solutions solve your problem, see "Problems and Solutions" below if you...
User's Guide
Page 123
... Internet, you can download drivers and other software included with the printer, see page 124. Where To Get Help 123 see "Epson Support" below. At this code to quickly select the Stylus Photo RX500 in SoundAdvice. Your Epson SoundAdviceSM Express Code is usually whiter or brighter, should be old or low on replacing an ink cartridge...
... Internet, you can download drivers and other software included with the printer, see page 124. Where To Get Help 123 see "Epson Support" below. At this code to quickly select the Stylus Photo RX500 in SoundAdvice. Your Epson SoundAdviceSM Express Code is usually whiter or brighter, should be old or low on replacing an ink cartridge...


