
User Manual
Page 3
Contents Introduction 1 Apex80 Features 1 About This Manual 2 Where to Get Help 2 Chapter 1 Setting Up Identifying Printer Parts 1-1 Selecting a Place for the Printer 1-2 Installing the Paper Feed Knob 1-3 Installing the Ribbon 1-3 Replacing the Ribbon 1-6 Plugging in the Printer 1-7 Using Continuous-feed Paper 1-7 Using Single-sheet Paper 1-15 Operating the Control Panel 1-19 Connecting the Apex80 to Your...
Contents Introduction 1 Apex80 Features 1 About This Manual 2 Where to Get Help 2 Chapter 1 Setting Up Identifying Printer Parts 1-1 Selecting a Place for the Printer 1-2 Installing the Paper Feed Knob 1-3 Installing the Ribbon 1-3 Replacing the Ribbon 1-6 Plugging in the Printer 1-7 Using Continuous-feed Paper 1-7 Using Single-sheet Paper 1-15 Operating the Control Panel 1-19 Connecting the Apex80 to Your...

User Manual
Page 6
... have perfected a document, you can create and print your own symbols or characters. l A ribbon cassette for top quality printing. Introduction 1 Introduction The Epson Apex80 printer combines low price with the control panel. l Near Letter Quality (NLQ) mode for quick and clean ribbon changing. l A variety of typestyles with high quality printing and advanced features. l Selection...
... have perfected a document, you can create and print your own symbols or characters. l A ribbon cassette for top quality printing. Introduction 1 Introduction The Epson Apex80 printer combines low price with the control panel. l Near Letter Quality (NLQ) mode for quick and clean ribbon changing. l A variety of typestyles with high quality printing and advanced features. l Selection...

User Manual
Page 7
To purchase accessories such as ribbons and option cards, check with your Apex80 printer, just call the 800 number for the location of the manual is a pull-out Quick Reference card containing the information you need most. You can also call the toll-free Epson number: 1-800-421-5426. The ...appendixes contain reference information, including all the details you need to Get Help If you need assistance with your dealer. 2 Introduction Where to use any of the printer's commands, and some advice on setting up...
To purchase accessories such as ribbons and option cards, check with your Apex80 printer, just call the 800 number for the location of the manual is a pull-out Quick Reference card containing the information you need most. You can also call the toll-free Epson number: 1-800-421-5426. The ...appendixes contain reference information, including all the details you need to Get Help If you need assistance with your dealer. 2 Introduction Where to use any of the printer's commands, and some advice on setting up...

User Manual
Page 10
... the knob into an indentation in setting it up is enclosed in Figure 1-2. Installing the Ribbon The Apex80 printer uses a continuous-loop, inked fabric ribbon. Installing the Paper Feed Knob Now that makes ribbon installation and replacement a clean and easy job. Locate the paper feed knob, which is ...flush with the printer case. Paper feed knob installation 3. Setting Up 1-3 Gently rotate the knob until it fits over the shaft. Push the...
... the knob into an indentation in setting it up is enclosed in Figure 1-2. Installing the Ribbon The Apex80 printer uses a continuous-loop, inked fabric ribbon. Installing the Paper Feed Knob Now that makes ribbon installation and replacement a clean and easy job. Locate the paper feed knob, which is ...flush with the printer case. Paper feed knob installation 3. Setting Up 1-3 Gently rotate the knob until it fits over the shaft. Push the...

User Manual
Page 11
... Figure 1-3. Let it becomes hot during use. Move the print head by hand to the center of the printer so that the exposed strip of the printer will not get in Figure 1-3. Grasp the ribbon cartridge by lifting the handles. Removing the lid enables you move the print head because moving the print... is on may damage your way. 3. Remove the lid at the front of the printer by its handle and hold the cartridge so that the other parts of ribbon is facing away from you 've been using your printer, be off when you to touch the print head because it cool for a few...
... Figure 1-3. Let it becomes hot during use. Move the print head by hand to the center of the printer so that the exposed strip of the printer will not get in Figure 1-3. Grasp the ribbon cartridge by lifting the handles. Removing the lid enables you move the print head because moving the print... is on may damage your way. 3. Remove the lid at the front of the printer by its handle and hold the cartridge so that the other parts of ribbon is facing away from you 've been using your printer, be off when you to touch the print head because it cool for a few...

User Manual
Page 12
...cartridge in the direction of the cartridge into the slots located inside the printer in Figure 1-5. Push down into place. (See Figure 1-4.) Figure 1-4. Ribbon cartridge installation 5. As you turn the knob, see that the ribbon slips down until the cartridge snaps into its proper place between the print... head and the ribbon guide. (See the figure on each side of the arrow to direct the ribbon, as shown in the right and left front corners....
...cartridge in the direction of the cartridge into the slots located inside the printer in Figure 1-5. Push down into place. (See Figure 1-4.) Figure 1-4. Ribbon cartridge installation 5. As you turn the knob, see that the ribbon slips down until the cartridge snaps into its proper place between the print... head and the ribbon guide. (See the figure on each side of the arrow to direct the ribbon, as shown in the right and left front corners....
User Manual
Page 13
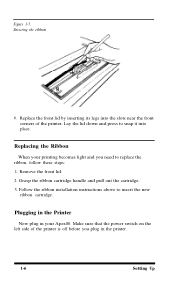
... plug in your printing becomes light and you plug in the printer. 1-6 Setting Up Lay the lid down and press to replace the ribbon, follow these steps: 1. Follow the ribbon installation instructions above to insert the new ribbon cartridge. Directing the ribbon 6. Remove the front lid. 2. Replace the front lid by inserting its legs into...
... plug in your printing becomes light and you plug in the printer. 1-6 Setting Up Lay the lid down and press to replace the ribbon, follow these steps: 1. Follow the ribbon installation instructions above to insert the new ribbon cartridge. Directing the ribbon 6. Remove the front lid. 2. Replace the front lid by inserting its legs into...

User Manual
Page 21
The printer with continuous-feed paper When you turn on the perforations, check to advance the paper until a ...the top of form position. Setting top of form Now you later find that your Apex80, it remembers this top of the ribbon, 2. If you are in Figure 1-15. Figure 1-15. Now replace the front lid. Turn the paper feed knob to... of form setting and uses it when any program tells it from paper exiting the printer. Follow these steps: 1. Your printer should rest atop the paper entering the printer, separating it to move to set up as shown in the slots, lean the ...
The printer with continuous-feed paper When you turn on the perforations, check to advance the paper until a ...the top of form position. Setting top of form Now you later find that your Apex80, it remembers this top of the ribbon, 2. If you are in Figure 1-15. Figure 1-15. Now replace the front lid. Turn the paper feed knob to... of form setting and uses it when any program tells it from paper exiting the printer. Follow these steps: 1. Your printer should rest atop the paper entering the printer, separating it to move to set up as shown in the slots, lean the ...

User Manual
Page 113
... Problem Solving and Maintenance Cancel NLQ mode: it has priority over condensed. Printing is patchy, faint, uneven, or intermittent Solution Check that the ribbon is seated correctly If you have correctly set according to current print when changing pitch pitch. If they are set DIP switch 1-3. Horizontal tabs ... This can usually be replaced. It is also possible for the print head to wear out if the printer is correctly installed and that does not solve the problem, you have been using the ribbon for a long time or for long periods at the end of this appendix.
... Problem Solving and Maintenance Cancel NLQ mode: it has priority over condensed. Printing is patchy, faint, uneven, or intermittent Solution Check that the ribbon is seated correctly If you have correctly set according to current print when changing pitch pitch. If they are set DIP switch 1-3. Horizontal tabs ... This can usually be replaced. It is also possible for the print head to wear out if the printer is correctly installed and that does not solve the problem, you have been using the ribbon for a long time or for long periods at the end of this appendix.
User Manual
Page 121
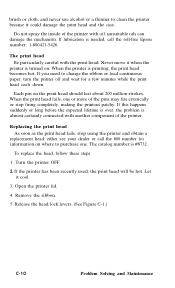
... firing completely, making the printout patchy. either see your dealer or call the toll-free Epson number: 1-800421-5426. Never move it cool. 3. To replace the head, follow these steps: 1. Turn the printer OFF 2. If the printer has been recently used, the print head will be hot. Let it when the... spray the inside of the pins may fire erratically or stop using the printer and obtain a replacement head; If you need to purchase one or more of the printer with oil: unsuitable oils can damage the mechanism. Remove the ribbon. 5. brush or cloth, and never use alcohol or a thinner to...
... firing completely, making the printout patchy. either see your dealer or call the toll-free Epson number: 1-800421-5426. Never move it cool. 3. To replace the head, follow these steps: 1. Turn the printer OFF 2. If the printer has been recently used, the print head will be hot. Let it when the... spray the inside of the pins may fire erratically or stop using the printer and obtain a replacement head; If you need to purchase one or more of the printer with oil: unsuitable oils can damage the mechanism. Remove the ribbon. 5. brush or cloth, and never use alcohol or a thinner to...

User Manual
Page 130
... upper case of the printer, insert a blade screwdriver...board of the printer because many of the printer, as shown in Figure E-1. Remove the printer lid, tractor ...unit (if installed), paper rest (if installed), and paper guide. 3. Installing an Interface Before installing an interface, you must remove the printer's cover. Remove the cut sheet feeder if one is loosened from the printer.... 2. WARNING Do not remove the cover unless the printer...
... upper case of the printer, insert a blade screwdriver...board of the printer because many of the printer, as shown in Figure E-1. Remove the printer lid, tractor ...unit (if installed), paper rest (if installed), and paper guide. 3. Installing an Interface Before installing an interface, you must remove the printer's cover. Remove the cut sheet feeder if one is loosened from the printer.... 2. WARNING Do not remove the cover unless the printer...

User Manual
Page 138
... 1 kV rms applied between AC line and chassis for 1 minute, or 1.20 kV rms for 1 second F-2 Technical Specifications Mechanical Ribbon Cartridge, black #8750 (uses the same ribbon as the Epson LX-800 and FX printers) Life expectancy (in characters, at 14 dots/character): 3 million MCBF 3 million lines (excluding the print head) MTBF 4,000 hours...
... 1 kV rms applied between AC line and chassis for 1 minute, or 1.20 kV rms for 1 second F-2 Technical Specifications Mechanical Ribbon Cartridge, black #8750 (uses the same ribbon as the Epson LX-800 and FX printers) Life expectancy (in characters, at 14 dots/character): 3 million MCBF 3 million lines (excluding the print head) MTBF 4,000 hours...

User Manual
Page 144
See also Character tables L Lights, indicator. See also Commands Printer selection menu, 2-1-2 Print head, 1-4,6-2-3, C-10-13 Problem-solving, C-1-9 Programming languages, 2-6-7 R READY light, 1-20 Ribbon, 1-3-6 Ribbon guide, 1-5 Roman 1-21, 4-1 Index- 2 Index See International character sets FORM... character sets, 4-4, B-8, D-3-4 Italics, 4-4. See Interface, parallel Pica, 4-2 Pin feed holders, 1-11-12 Pitch, 4-2 POWER light, 1-20 Printer commands, 2-2-7. F Foreign language characters. See Continuous-feed paper or Single-sheet paper Paper feed knob, 1-1, 1-3 Paper guide, 1-7, 1-12-14,...
See also Character tables L Lights, indicator. See also Commands Printer selection menu, 2-1-2 Print head, 1-4,6-2-3, C-10-13 Problem-solving, C-1-9 Programming languages, 2-6-7 R READY light, 1-20 Ribbon, 1-3-6 Ribbon guide, 1-5 Roman 1-21, 4-1 Index- 2 Index See International character sets FORM... character sets, 4-4, B-8, D-3-4 Italics, 4-4. See Interface, parallel Pica, 4-2 Pin feed holders, 1-11-12 Pitch, 4-2 POWER light, 1-20 Printer commands, 2-2-7. F Foreign language characters. See Continuous-feed paper or Single-sheet paper Paper feed knob, 1-1, 1-3 Paper guide, 1-7, 1-12-14,...


