
User Manual
Page 28
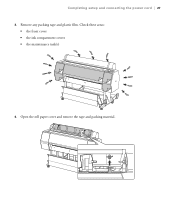
Open the roll paper cover and remove the tape and packing material. Check these areas: • the front cover • the ink compartment covers • the maintenance tank(s) 4. Completing setup and connecting the power cord | 27 3. Remove any packing tape and plastic film.
Open the roll paper cover and remove the tape and packing material. Check these areas: • the front cover • the ink compartment covers • the maintenance tank(s) 4. Completing setup and connecting the power cord | 27 3. Remove any packing tape and plastic film.

User Manual
Page 13
Back 1 Maintenance tank 2 USB port 3 Interface for optional equipment 4 LAN port 5 LAN data light 6 LAN status light 7 AC inlet 8 Slot for optional internal print server 13 9 Roll paper cover 10 Roll paper holder Parent topic: Printer Part Locations Product Parts -
Back 1 Maintenance tank 2 USB port 3 Interface for optional equipment 4 LAN port 5 LAN data light 6 LAN status light 7 AC inlet 8 Slot for optional internal print server 13 9 Roll paper cover 10 Roll paper holder Parent topic: Printer Part Locations Product Parts -

Quick Reference
Page 3
2 | Printer parts Printer parts Note: Unless otherwise indicated, the illustrations in this guide show the SureColor® P8000/P9000, but the instructions apply to all models. Front Roll paper holder Front cover Roll paper cover Roll paper holder Control panel Left ink bay Back Paper basket Interface for optional equipment USB interface for computer Maintenance tank Right ink bay Casters Network interface Maintenance tank (SC-P8000/SC-P9000 only) Slot for optional internal print server AC inlet
2 | Printer parts Printer parts Note: Unless otherwise indicated, the illustrations in this guide show the SureColor® P8000/P9000, but the instructions apply to all models. Front Roll paper holder Front cover Roll paper cover Roll paper holder Control panel Left ink bay Back Paper basket Interface for optional equipment USB interface for computer Maintenance tank Right ink bay Casters Network interface Maintenance tank (SC-P8000/SC-P9000 only) Slot for optional internal print server AC inlet

Quick Reference
Page 35
... press the r button. 4. Printing status information The status check sheet shows some of the current default settings, the page count, and the status of the maintenance tank. 1. Close the ink cover. Press the r Menu button. 3. Press the d button to start printing. Press the OK button to select Print Status Sheet, then press...
... press the r button. 4. Printing status information The status check sheet shows some of the current default settings, the page count, and the status of the maintenance tank. 1. Close the ink cover. Press the r Menu button. 3. Press the d button to start printing. Press the OK button to select Print Status Sheet, then press...

Quick Reference
Page 36
... the amount of ink in the printer and maintenance tank(s) and displays one of these windows: Checking and cleaning the print head If your printed image shows a color shift or horizontal lines, you can also turn on Auto Nozzle Check from the printer driver The Epson Status Monitor utility installed with your printer...
... the amount of ink in the printer and maintenance tank(s) and displays one of these windows: Checking and cleaning the print head If your printed image shows a color shift or horizontal lines, you can also turn on Auto Nozzle Check from the printer driver The Epson Status Monitor utility installed with your printer...

