Quick Guide
Page 21
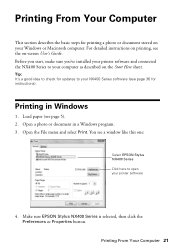
...installed your printer software and connected the NX400 Series to your computer as described on -screen User's Guide. For detailed instructions on printing, see page 36 for instructions). Printing in a Windows program. 3. Open a photo or document in Windows 1. Load paper (see a window like this one: Select EPSON Stylus NX400... Series Click here to your NX400 Series software (see the on the Start Here sheet. You see page 5). 2. Open the File menu and select...
...installed your printer software and connected the NX400 Series to your computer as described on -screen User's Guide. For detailed instructions on printing, see page 36 for instructions). Printing in a Windows program. 3. Open a photo or document in Windows 1. Load paper (see a window like this one: Select EPSON Stylus NX400... Series Click here to your NX400 Series software (see the on the Start Here sheet. You see page 5). 2. Open the File menu and select...
Start Here
Page 1
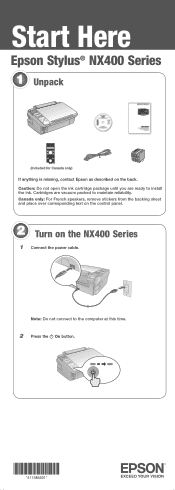
Cartridges are ready to install the ink. Note: Do not connect to maintain reliability. Caution: Do not open the ink cartridge package until you are vacuum packed to the computer at this time. 2 Press the On button. Start Here Epson Stylus® NX400 Series 1 Unpack (Included for Canada only) If anything is missing, contact Epson as described on the NX400 Series 1 Connect the power cable. Canada only: For French speakers, remove stickers from the backing sheet and place over corresponding text on the control panel. 2 Turn on the back.
Cartridges are ready to install the ink. Note: Do not connect to maintain reliability. Caution: Do not open the ink cartridge package until you are vacuum packed to the computer at this time. 2 Press the On button. Start Here Epson Stylus® NX400 Series 1 Unpack (Included for Canada only) If anything is missing, contact Epson as described on the NX400 Series 1 Connect the power cable. Canada only: For French speakers, remove stickers from the backing sheet and place over corresponding text on the control panel. 2 Turn on the back.


