
Epson Scan ICM Updater v1.20 (PSB.2008.07.001)
Page 1
... message occurs when attempting to select ICM Adobe RGB, Apple RGB or ColorMatch RGB color profiles from the Epson website (www.epson.com). • Double-click on the computer. Note: Installation completes in -One's using Epson Scan 3.5xA or later already include the latest ICM module and are not affected.... the onscreen prompts to and including 3.4xA Note: Scanners/All-in a few seconds. • Open Epson Scan. Description of 1 PSB.2008.07.001 Page 1 of Change: ICM module updater for Windows XP/XP x64 / Vista (32bit & 64bit) This bulletin was created to inform you can now choose...
... message occurs when attempting to select ICM Adobe RGB, Apple RGB or ColorMatch RGB color profiles from the Epson website (www.epson.com). • Double-click on the computer. Note: Installation completes in -One's using Epson Scan 3.5xA or later already include the latest ICM module and are not affected.... the onscreen prompts to and including 3.4xA Note: Scanners/All-in a few seconds. • Open Epson Scan. Description of 1 PSB.2008.07.001 Page 1 of Change: ICM module updater for Windows XP/XP x64 / Vista (32bit & 64bit) This bulletin was created to inform you can now choose...
Quick Guide
Page 2
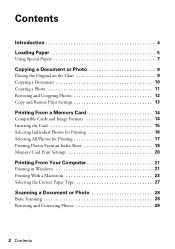
... Selecting All Photos for Printing 17 Printing Photos From an Index Sheet 18 Memory Card Print Settings 20 Printing From Your Computer 21 Printing in Windows 21 Printing With a Macintosh 23 Selecting the Correct Paper Type 27 Scanning a Document or Photo 28 Basic Scanning 28 Restoring and Correcting Photos 29 2 Contents
... Selecting All Photos for Printing 17 Printing Photos From an Index Sheet 18 Memory Card Print Settings 20 Printing From Your Computer 21 Printing in Windows 21 Printing With a Macintosh 23 Selecting the Correct Paper Type 27 Scanning a Document or Photo 28 Basic Scanning 28 Restoring and Correcting Photos 29 2 Contents
Quick Guide
Page 4
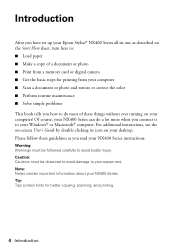
... or photo and restore or correct the color ■ Perform routine maintenance ■ Solve simple problems This book tells you how to do a lot more when you read your NX400 Series instructions: Warning: Warnings must be ...followed carefully to avoid bodily injury. Note: Notes contain important information about your Windows® or Macintosh® computer. Caution: ... your desktop. Introduction After you have set up your Epson Stylus® NX400 Series all-in-one as you connect it to your...
... or photo and restore or correct the color ■ Perform routine maintenance ■ Solve simple problems This book tells you how to do a lot more when you read your NX400 Series instructions: Warning: Warnings must be ...followed carefully to avoid bodily injury. Note: Notes contain important information about your Windows® or Macintosh® computer. Caution: ... your desktop. Introduction After you have set up your Epson Stylus® NX400 Series all-in-one as you connect it to your...
Quick Guide
Page 21
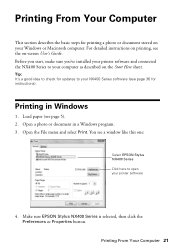
... instructions). Before you start, make sure you've installed your printer software and connected the NX400 Series to your NX400 Series software (see a window like this one: Select EPSON Stylus NX400 Series Click here to open your Windows or Macintosh computer. Printing in a Windows program. 3. You see page 36 for printing a photo or document stored on -screen User...
... instructions). Before you start, make sure you've installed your printer software and connected the NX400 Series to your NX400 Series software (see a window like this one: Select EPSON Stylus NX400 Series Click here to open your Windows or Macintosh computer. Printing in a Windows program. 3. You see page 36 for printing a photo or document stored on -screen User...
Quick Guide
Page 23
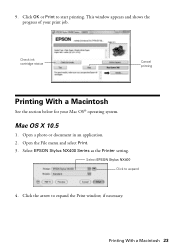
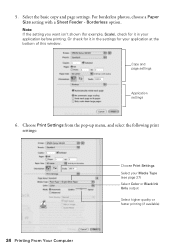
Click the arrow to start printing. Select EPSON Stylus NX400 Series as the Printer setting. 9. Click OK or Print to expand the Print window, if necessary. Open a photo or document in an application. 2. Select EPSON Stylus NX400 Click to expand 4. Open the File menu and select Print. 3. This window appears and shows the progress of your Mac OS® operating system. Check ink cartridge status Cancel printing Printing With a Macintosh See the section below for your print job. Mac OS X 10.5 1. Printing With a Macintosh 23
Click the arrow to start printing. Select EPSON Stylus NX400 Series as the Printer setting. 9. Click OK or Print to expand the Print window, if necessary. Open a photo or document in an application. 2. Select EPSON Stylus NX400 Click to expand 4. Open the File menu and select Print. 3. This window appears and shows the progress of your Mac OS® operating system. Check ink cartridge status Cancel printing Printing With a Macintosh See the section below for your print job. Mac OS X 10.5 1. Printing With a Macintosh 23
Quick Guide
Page 24
... before printing. Copy and page settings Application settings 6. Or check for it in the settings for it in your application at the bottom of this window. Select the basic copy and page settings. Choose Print Settings from the pop-up menu, and select the following print settings: Choose Print Settings Select...
... before printing. Copy and page settings Application settings 6. Or check for it in the settings for it in your application at the bottom of this window. Select the basic copy and page settings. Choose Print Settings from the pop-up menu, and select the following print settings: Choose Print Settings Select...
Quick Guide
Page 25
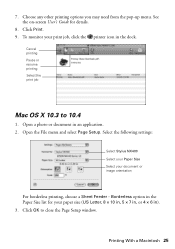
... printing Pause or resume printing Select the print job Mac OS X 10.3 to close the Page Setup window. Choose any other printing options you may need from the pop-up menu. Select the following settings: Select Stylus NX400 Select your Paper Size Select your print job, click the printer icon in an application. 2.
... printing Pause or resume printing Select the print job Mac OS X 10.3 to close the Page Setup window. Choose any other printing options you may need from the pop-up menu. Select the following settings: Select Stylus NX400 Select your Paper Size Select your print job, click the printer icon in an application. 2.
Quick Guide
Page 28
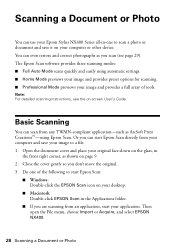
...User's Guide. Do one to scan a photo or document and save your image to start Epson Scan: ■ Windows: Double-click the EPSON Scan icon on your desktop. ■ Macintosh: Double-click EPSON Scan in the front right corner, as shown on page 9. 2. Open the document cover ... from an application, start your application. Then open the File menu, choose Import or Acquire, and select EPSON NX400. 28 Scanning a Document or Photo Scanning a Document or Photo You can use your Epson Stylus NX400 Series all-in-one of tools. Note: For detailed scanning instructions, see page 29). The...
...User's Guide. Do one to scan a photo or document and save your image to start Epson Scan: ■ Windows: Double-click the EPSON Scan icon on your desktop. ■ Macintosh: Double-click EPSON Scan in the front right corner, as shown on page 9. 2. Open the document cover ... from an application, start your application. Then open the File menu, choose Import or Acquire, and select EPSON NX400. 28 Scanning a Document or Photo Scanning a Document or Photo You can use your Epson Stylus NX400 Series all-in-one of tools. Note: For detailed scanning instructions, see page 29). The...
Quick Guide
Page 29
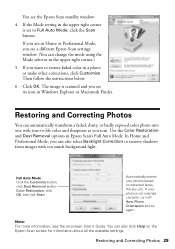
...5. If the Mode setting in the upper right corner is set to restore faded color in Home or Professional Mode, you see a different Epson Scan settings window. (You can also click Help on the Epson Scan screen for information about all the available settings. The image is not oriented ...orients your photo is scanned and you see its icon in Epson Scan's Full Auto Mode. Note: For more information, see the Epson Scan standby window: 4. Click OK. If you can automatically transform a faded, dusty, or badly exposed color photo into one with too much background light. In Home ...
...5. If the Mode setting in the upper right corner is set to restore faded color in Home or Professional Mode, you see a different Epson Scan settings window. (You can also click Help on the Epson Scan screen for information about all the available settings. The image is not oriented ...orients your photo is scanned and you see its icon in Epson Scan's Full Auto Mode. Note: For more information, see the Epson Scan standby window: 4. Click OK. If you can automatically transform a faded, dusty, or badly exposed color photo into one with too much background light. In Home ...

Quick Guide
Page 32
... the first time you order or purchase new ink cartridges: Ink color Black Cyan Magenta Yellow High Capacity 68 - - - See page 33 to select Ink Levels and press OK. This window can purchase genuine Epson ink and paper from an Epson website. On a Windows computer that is expended even if the other updates retrieved from...
... the first time you order or purchase new ink cartridges: Ink color Black Cyan Magenta Yellow High Capacity 68 - - - See page 33 to select Ink Levels and press OK. This window can purchase genuine Epson ink and paper from an Epson website. On a Windows computer that is expended even if the other updates retrieved from...
Quick Guide
Page 36
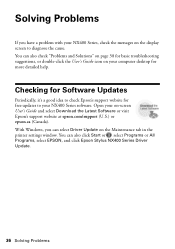
...tab in the printer settings window. Checking for Software Updates Periodically, it's a good idea to diagnose the cause. With Windows, you have a problem with your on the display screen to check Epson's support website for more detailed help. Open your NX400 Series, check the messages... on -screen User's Guide and select Download the Latest Software or visit Epson's support website at epson.com/support (U.S.) or epson.ca (Canada). You can also click Start or , select Programs or All Programs, select EPSON, and click Epson Stylus NX400 Series ...
...tab in the printer settings window. Checking for Software Updates Periodically, it's a good idea to diagnose the cause. With Windows, you have a problem with your on the display screen to check Epson's support website for more detailed help. Open your NX400 Series, check the messages... on -screen User's Guide and select Download the Latest Software or visit Epson's support website at epson.com/support (U.S.) or epson.ca (Canada). You can also click Start or , select Programs or All Programs, select EPSON, and click Epson Stylus NX400 Series ...
Start Here
Page 5
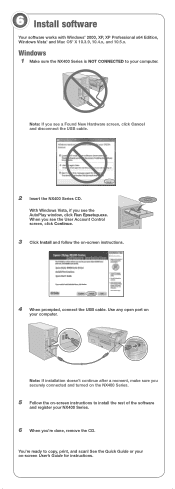
... 3 Click Install and follow the on -screen instructions to copy, print, and scan! With Windows Vista, if you 're done, remove the CD. Note: If you securely connected and turned on the NX400 Series. 5 Follow the on -screen instructions. 4 When prompted, connect the USB cable. Use ..., click Cancel and disconnect the USB cable. 2 Insert the NX400 Series CD. 6 Install software Your software works with Windows® 2000, XP, XP Professional x64 Edition, Windows Vista® and Mac OS® X 10.3.9, 10.4.x, and 10.5.x. Windows 1 Make sure the NX400 Series is NOT CONNECTED to your computer.
... 3 Click Install and follow the on -screen instructions to copy, print, and scan! With Windows Vista, if you 're done, remove the CD. Note: If you securely connected and turned on the NX400 Series. 5 Follow the on -screen instructions. 4 When prompted, connect the USB cable. Use ..., click Cancel and disconnect the USB cable. 2 Insert the NX400 Series CD. 6 Install software Your software works with Windows® 2000, XP, XP Professional x64 Edition, Windows Vista® and Mac OS® X 10.3.9, 10.4.x, and 10.5.x. Windows 1 Make sure the NX400 Series is NOT CONNECTED to your computer.


