
Technical Brief (Impact Printers)
Page 1
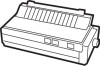
... FX, LX, or DFX Twenty-four pin printers all begin with tireless printheads and superior quality ribbons. or a 24-pin printer, and whether it is a registered trademark of Seiko Epson Corporation. 1/00 Other trademarks are renowned for their respective owners. Impact printers are capable of their reliability with LQ FX-980-Nine-pin narrow carriage Wide carriage...
... FX, LX, or DFX Twenty-four pin printers all begin with tireless printheads and superior quality ribbons. or a 24-pin printer, and whether it is a registered trademark of Seiko Epson Corporation. 1/00 Other trademarks are renowned for their respective owners. Impact printers are capable of their reliability with LQ FX-980-Nine-pin narrow carriage Wide carriage...

Technical Brief (Impact Printers)
Page 6
... on the print head EPSON Sales Training EPSON is a registered trademark of their respective owners. L EPSON brand ribbons are the property of Seiko Epson Corporation. 1/00 Other trademarks are ... L EPSON's stationary ribbon cartridge Competitive design with smaller ribbon on the motor, which can achieve faster print speeds. Technical Brief-Multimedia projectors Page 6 Reliability-Ribbon quality EPSON brand impact printer ribbons are superior to...
... on the print head EPSON Sales Training EPSON is a registered trademark of their respective owners. L EPSON brand ribbons are the property of Seiko Epson Corporation. 1/00 Other trademarks are ... L EPSON's stationary ribbon cartridge Competitive design with smaller ribbon on the motor, which can achieve faster print speeds. Technical Brief-Multimedia projectors Page 6 Reliability-Ribbon quality EPSON brand impact printer ribbons are superior to...
Product Support Bulletin(s)
Page 7
... feature. (2) PE sensor may require a repair, adjustment or replacement. This is not connected. 20 CPU error. Physical obstruction such as a jammed ribbon 11 Skewed paper detect error. Both of these errors are documented in printhead failures. CR home condition not detected at power up b. An undefined op..., taking out the paper and turning the printer back on the ROMA board may cause errors 10 or 20. Incorrect jumper settings on . PSB No: P-0076 Page: 4 of 4 LQ-2550 cont. 03 A 'Verify After Write" check to ensure proper paper handling and prevent paper jams, which can ...
... feature. (2) PE sensor may require a repair, adjustment or replacement. This is not connected. 20 CPU error. Physical obstruction such as a jammed ribbon 11 Skewed paper detect error. Both of these errors are documented in printhead failures. CR home condition not detected at power up b. An undefined op..., taking out the paper and turning the printer back on the ROMA board may cause errors 10 or 20. Incorrect jumper settings on . PSB No: P-0076 Page: 4 of 4 LQ-2550 cont. 03 A 'Verify After Write" check to ensure proper paper handling and prevent paper jams, which can ...
User Manual
Page 7
... Graphics 4-l Enhancing Your Printing 4-2 Graphics 4-8 User-defined Characters 4-19 Chapter 5 Using the Printer Options 5-1 The Cut Sheet Feeder 5-2 The Pull Tractor 5-25 The Multi-Font Module 5-37 The Interface Boards 5-44 Chapter 6 Maintenance 6-1 Cleaning the Printer 6-2 Replacing the Ribbon 6-4 Transporting the Printer 6-9 Chapter 7 Troubleshooting 7-l Problems and Solutions 7-2 Power Supply 7-4 Printing 7-5 Paper Handling 7-16 Options...
... Graphics 4-l Enhancing Your Printing 4-2 Graphics 4-8 User-defined Characters 4-19 Chapter 5 Using the Printer Options 5-1 The Cut Sheet Feeder 5-2 The Pull Tractor 5-25 The Multi-Font Module 5-37 The Interface Boards 5-44 Chapter 6 Maintenance 6-1 Cleaning the Printer 6-2 Replacing the Ribbon 6-4 Transporting the Printer 6-9 Chapter 7 Troubleshooting 7-l Problems and Solutions 7-2 Power Supply 7-4 Printing 7-5 Paper Handling 7-16 Options...
User Manual
Page 9
... paper waste with a wide range of features. Introduction 1 Introduction The Epson® LQ-860 is an advanced 24-pin impact dot matrix printer, combining high performance and reliability with short tear-off, and allows easy... and accurate paper alignment. Features In addition to expect from Epson printers, the LQ-860 offers the following features: • Easy paper handling, featuring automatic single-sheet loading. • Color printing in seven colors with a color ribbon...
... paper waste with a wide range of features. Introduction 1 Introduction The Epson® LQ-860 is an advanced 24-pin impact dot matrix printer, combining high performance and reliability with short tear-off, and allows easy... and accurate paper alignment. Features In addition to expect from Epson printers, the LQ-860 offers the following features: • Easy paper handling, featuring automatic single-sheet loading. • Color printing in seven colors with a color ribbon...
User Manual
Page 12
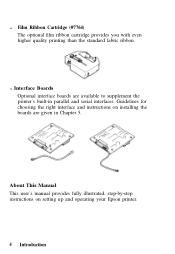
About This Manual This user's manual provides fully illustrated, step-by-step instructions on installing the boards are available to supplement the printer's built-in Chapter 5. l Interface Boards Optional interface boards are given in parallel and serial interfaces. Guidelines for choosing the right interface and instructions on setting up and operating your Epson printer. 4 Introduction l Film Ribbon Cartridge (#7764) The optional film ribbon cartridge provides you with even higher quality printing than the standard fabric ribbon.
About This Manual This user's manual provides fully illustrated, step-by-step instructions on installing the boards are available to supplement the printer's built-in Chapter 5. l Interface Boards Optional interface boards are given in parallel and serial interfaces. Guidelines for choosing the right interface and instructions on setting up and operating your Epson printer. 4 Introduction l Film Ribbon Cartridge (#7764) The optional film ribbon cartridge provides you with even higher quality printing than the standard fabric ribbon.

User Manual
Page 15
... the Protective Materials 1-3 Choosing a Place for the Printer 1-6 Assembling the Printer 1-8 Installing the Platen Knob 1-8 Installing the Ribbon Cartridge 1-9 Attaching the Paper Guide 1-14 Testing the Printer 1-16 Plugging in the Printer 1-16 Running the Self Test 1-16 If the Self Test Doesn't Print 1-23 Connecting the Printer to Your Computer 1-27 The Parallel Interface 1-28...
... the Protective Materials 1-3 Choosing a Place for the Printer 1-6 Assembling the Printer 1-8 Installing the Platen Knob 1-8 Installing the Ribbon Cartridge 1-9 Attaching the Paper Guide 1-14 Testing the Printer 1-16 Plugging in the Printer 1-16 Running the Self Test 1-16 If the Self Test Doesn't Print 1-23 Connecting the Printer to Your Computer 1-27 The Parallel Interface 1-28...

User Manual
Page 16
Unpacking the Printer Checking the Parts When you unpack the printer, make sure that you have all the parts shown below and that none have been damaged. Platen knob Cross-head screwdriver Color ribbon cartridge Connector lock nuts Black ribbon cartridge 1-2 Setting Up the Printer
Unpacking the Printer Checking the Parts When you unpack the printer, make sure that you have all the parts shown below and that none have been damaged. Platen knob Cross-head screwdriver Color ribbon cartridge Connector lock nuts Black ribbon cartridge 1-2 Setting Up the Printer
User Manual
Page 17
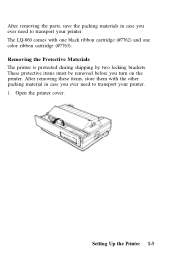
After removing these items, store them with one black ribbon cartridge (#7762) and one color ribbon cartridge (#7763). Open the printer cover. These protective items must be removed before you turn on the printer. Setting Up the Printer 1-3 After removing the parts, save the packing materials in case you ever need to transport your printer. Removing the Protective Materials The printer is protected during shipping by two locking brackets. The LQ-860 comes with the other packing material in case you ever need to transport your printer. 1.
After removing these items, store them with one black ribbon cartridge (#7762) and one color ribbon cartridge (#7763). Open the printer cover. These protective items must be removed before you turn on the printer. Setting Up the Printer 1-3 After removing the parts, save the packing materials in case you ever need to transport your printer. Removing the Protective Materials The printer is protected during shipping by two locking brackets. The LQ-860 comes with the other packing material in case you ever need to transport your printer. 1.
User Manual
Page 23
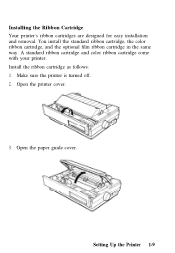
Make sure the printer is turned off. 2. Open the paper guide cover. Install the ribbon cartridge as follows: 1. Open the printer cover. 3. A standard ribbon cartridge and color ribbon cartridge come with your printer. Setting Up the Printer 1-9 Installing the Ribbon Cartridge Your printer's ribbon cartridges are designed for easy installation and removal. You install the standard ribbon cartridge, the color ribbon cartridge, and the optional film ribbon cartridge in the same way.
Make sure the printer is turned off. 2. Open the paper guide cover. Install the ribbon cartridge as follows: 1. Open the printer cover. 3. A standard ribbon cartridge and color ribbon cartridge come with your printer. Setting Up the Printer 1-9 Installing the Ribbon Cartridge Your printer's ribbon cartridges are designed for easy installation and removal. You install the standard ribbon cartridge, the color ribbon cartridge, and the optional film ribbon cartridge in the same way.
User Manual
Page 24
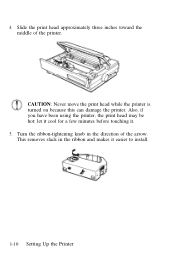
Also, if you have been using the printer, the print head may be hot; This removes slack in the direction of the printer. CAUTION: Never move the print head while the printer is turned on because this can damage the printer. Turn the ribbon-tightening knob in the ribbon and makes it . 5. let it cool for a few minutes before touching it easier to install. 1-10 Setting Up the Printer 4. Slide the print head approximately three inches toward the middle of the arrow.
Also, if you have been using the printer, the print head may be hot; This removes slack in the direction of the printer. CAUTION: Never move the print head while the printer is turned on because this can damage the printer. Turn the ribbon-tightening knob in the ribbon and makes it . 5. let it cool for a few minutes before touching it easier to install. 1-10 Setting Up the Printer 4. Slide the print head approximately three inches toward the middle of the arrow.
User Manual
Page 25
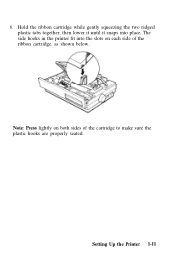
Note: Press lightly on each side of the cartridge to make sure the plastic hooks are properly seated. Setting Up the Printer 1-11 then lower it until it snaps into the slots on both sides of the ribbon cartridge, as shown below. The side hooks in the printer fit into place. Hold the ribbon cartridge while gently squeezing the two ridged plastic tabs together; 6.
Note: Press lightly on each side of the cartridge to make sure the plastic hooks are properly seated. Setting Up the Printer 1-11 then lower it until it snaps into the slots on both sides of the ribbon cartridge, as shown below. The side hooks in the printer fit into place. Hold the ribbon cartridge while gently squeezing the two ridged plastic tabs together; 6.
User Manual
Page 26
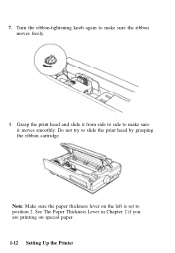
Do not try to position 2. Note: Make sure the paper thickness lever on special paper. 1-12 Setting Up the Printer Grasp the print head and slide it from side to side to make sure it moves smoothly. Turn the ribbon-tightening knob again to make sure the ribbon moves freely. 8. 7. See The Paper Thickness Lever in Chapter 2 if you are printing on the left is set to slide the print head by grasping the ribbon cartridge.
Do not try to position 2. Note: Make sure the paper thickness lever on special paper. 1-12 Setting Up the Printer Grasp the print head and slide it from side to side to make sure it moves smoothly. Turn the ribbon-tightening knob again to make sure the ribbon moves freely. 8. 7. See The Paper Thickness Lever in Chapter 2 if you are printing on the left is set to slide the print head by grasping the ribbon cartridge.
User Manual
Page 27
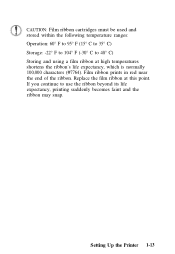
... expectancy, printing suddenly becomes faint and the ribbon may snap. If you continue to 40° C) Storing and using a film ribbon at this point. Film ribbon prints in red near the end of the ribbon. Setting Up the Printer 1-13 Replace the film ribbon at high temperatures shortens the ribbon's life expectancy, which is normally 100,000...
... expectancy, printing suddenly becomes faint and the ribbon may snap. If you continue to 40° C) Storing and using a film ribbon at this point. Film ribbon prints in red near the end of the ribbon. Setting Up the Printer 1-13 Replace the film ribbon at high temperatures shortens the ribbon's life expectancy, which is normally 100,000...
User Manual
Page 30
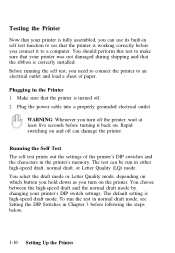
... draft, normal draft, or Letter Quality (LQ) mode. Rapid switching on which button you hold down as you turn on . Before running the self test, you connect it back on the printer. Make sure that the printer is turned off the printer, wait at least five seconds before turning ...it to a computer. You choose between the high-speed draft and the normal draft mode by changing your printer was not damaged during shipping and that the ribbon is correctly installed. The default setting is high-speed draft mode. WARNING: Whenever you turn off . 2. Running the...
... draft, normal draft, or Letter Quality (LQ) mode. Rapid switching on which button you hold down as you turn on . Before running the self test, you connect it back on the printer. Make sure that the printer is turned off the printer, wait at least five seconds before turning ...it to a computer. You choose between the high-speed draft and the normal draft mode by changing your printer was not damaged during shipping and that the ribbon is correctly installed. The default setting is high-speed draft mode. WARNING: Whenever you turn off . 2. Running the...
User Manual
Page 31
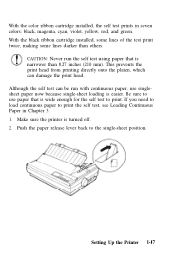
...the self test, see Loading Continuous Paper in seven colors: black, magenta, cyan, violet, yellow, red, and green. Setting Up the Printer 1-17 With the color ribbon cartridge installed, the self test prints in Chapter 3. 1. This prevents the print head from printing directly onto the platen, which can be ...is turned off. 2. Although the self test can damage the print head. Make sure the printer is easier. If you need to load continuous paper to the single-sheet position. With the black ribbon cartridge installed, some lines of the test print twice, making some lines darker than 8.27 ...
...the self test, see Loading Continuous Paper in seven colors: black, magenta, cyan, violet, yellow, red, and green. Setting Up the Printer 1-17 With the color ribbon cartridge installed, the self test prints in Chapter 3. 1. This prevents the print head from printing directly onto the platen, which can be ...is turned off. 2. Although the self test can damage the print head. Make sure the printer is easier. If you need to load continuous paper to the single-sheet position. With the black ribbon cartridge installed, some lines of the test print twice, making some lines darker than 8.27 ...
User Manual
Page 37
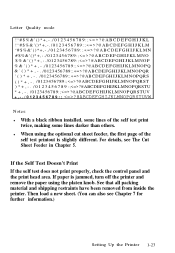
...:;?@ABCDEFGHIJKLMNO 0123456789:;?@ABCDEFGHIJKLMNOP 0123456789:;?@ABCDEFGHIJKLMNOPQ 0123456789:;?@ABCDEFGHIJKLMNOPQR 0123456789:;?@ABCDEFGHIJKLMNOPQRS 0123456789:;?@ABCDEFGHIJKLMNOPQRST 0 1 2 3 4 5 6 7 8 9 :;?@ABCDEFGHIJKLMNOPQRSTU * + , - . /0123456789:;?@ABCDEFGHIJKLMNOPQRSTUV + , - . / 0 1 2 3 4 5 6 7 8 9 : ; ?@ABCDEFGHIJKLMNOPQRSTUVW Notes: l With a black ribbon installed, some lines of the self test printout is jammed, turn off the printer and remove the paper using the platen knob. l When using the optional cut sheet feeder, the first page of...
...:;?@ABCDEFGHIJKLMNO 0123456789:;?@ABCDEFGHIJKLMNOP 0123456789:;?@ABCDEFGHIJKLMNOPQ 0123456789:;?@ABCDEFGHIJKLMNOPQR 0123456789:;?@ABCDEFGHIJKLMNOPQRS 0123456789:;?@ABCDEFGHIJKLMNOPQRST 0 1 2 3 4 5 6 7 8 9 :;?@ABCDEFGHIJKLMNOPQRSTU * + , - . /0123456789:;?@ABCDEFGHIJKLMNOPQRSTUV + , - . / 0 1 2 3 4 5 6 7 8 9 : ; ?@ABCDEFGHIJKLMNOPQRSTUVW Notes: l With a black ribbon installed, some lines of the self test printout is jammed, turn off the printer and remove the paper using the platen knob. l When using the optional cut sheet feeder, the first page of...
User Manual
Page 38
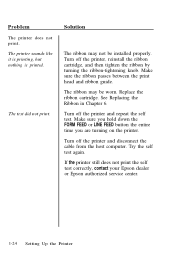
... be worn. Turn off the printer, reinstall the ribbon cartridge, and then tighten the ribbon by turning the ribbon-tightening knob. If the printer still does not print the self test correctly, contact your Epson dealer or Epson authorized service center. 1-24 Setting Up the Printer See Replacing the Ribbon in Chapter 6. Solution The ribbon may be installed properly. Make...
... be worn. Turn off the printer, reinstall the ribbon cartridge, and then tighten the ribbon by turning the ribbon-tightening knob. If the printer still does not print the self test correctly, contact your Epson dealer or Epson authorized service center. 1-24 Setting Up the Printer See Replacing the Ribbon in Chapter 6. Solution The ribbon may be installed properly. Make...
User Manual
Page 39
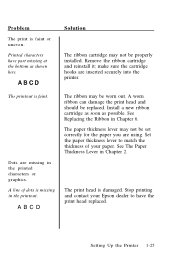
... your Epson dealer to match the thickness of dots is faint. The ribbon may be properly installed. The print head is faint or uneven. Dots are missing in the printout. Install a new ribbon cartridge as soon as shown here. See Replacing the Ribbon in Chapter 2. Setting Up the Printer 1-25...lever to have part missing at the bottom as possible. A worn ribbon can damage the print head and should be set correctly for the paper you are inserted securely into the printer. Remove the ribbon cartridge and reinstall it; Problem The print is damaged. ABCD The ...
... your Epson dealer to match the thickness of dots is faint. The ribbon may be properly installed. The print head is faint or uneven. Dots are missing in the printout. Install a new ribbon cartridge as soon as shown here. See Replacing the Ribbon in Chapter 2. Setting Up the Printer 1-25...lever to have part missing at the bottom as possible. A worn ribbon can damage the print head and should be set correctly for the paper you are inserted securely into the printer. Remove the ribbon cartridge and reinstall it; Problem The print is damaged. ABCD The ...
User Manual
Page 40
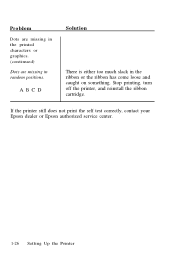
If the printer still does not print the self test correctly, contact your Epson dealer or Epson authorized service center. 1-26 Setting Up the Printer ABCD Solution There is either too much slack in random positions. Stop printing, turn off the printer, and reinstall the ribbon cartridge. Problem Dots are missing in the printed characters or graphics. (continued) Dots are missing in the ribbon or the ribbon has come loose and caught on something.
If the printer still does not print the self test correctly, contact your Epson dealer or Epson authorized service center. 1-26 Setting Up the Printer ABCD Solution There is either too much slack in random positions. Stop printing, turn off the printer, and reinstall the ribbon cartridge. Problem Dots are missing in the printed characters or graphics. (continued) Dots are missing in the ribbon or the ribbon has come loose and caught on something.


