
Technical Brief (Impact Printers)
Page 5
... EPSON CORP. 1992 Printer: FX-2180 Mode: ESC/P Port: LPT1 Font : Roman Pitch : 10CPI Print Quality : LQ Character Table : PC 437 Continuous Rear : 11 inch Continuous Rear : 8.5mm Continuous Front : 7 inch Continuous Front : 8.5mm CutSheetFeeder 1 : 11 inch CutSheetFeeder 1 : 8.5mm CutSheetFeeder 2 : 11 inch CutSheetFeeder 2 : 8.5mm Manual Rear : 14 inch Manual Rear : 8.5mm Help: Select printer Font. Manual Front...
... EPSON CORP. 1992 Printer: FX-2180 Mode: ESC/P Port: LPT1 Font : Roman Pitch : 10CPI Print Quality : LQ Character Table : PC 437 Continuous Rear : 11 inch Continuous Rear : 8.5mm Continuous Front : 7 inch Continuous Front : 8.5mm CutSheetFeeder 1 : 11 inch CutSheetFeeder 1 : 8.5mm CutSheetFeeder 2 : 11 inch CutSheetFeeder 2 : 8.5mm Manual Rear : 14 inch Manual Rear : 8.5mm Help: Select printer Font. Manual Front...
Product Support Bulletin(s)
Page 2
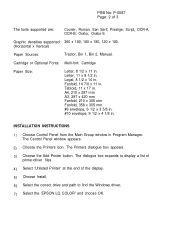
.... Letter, 11 x 8 1/2 in Program Manager. The Control Panel window appears. 2) Choose the Printers icon. The dialogue box expands to find the Windows driver. 7) Select the 'EPSON LQ COLOR" and choose OK. INSTALLATION INSTRUCTIONS 1) Choose Control Panel from the Main Group window in . ... (Horizontal x Vertical) Paper Sources: Tractor, Bin 1, Bin 2, Manual. PSB No: P-0087 Page: 2 of the display. 5) Choose Install. 6) Select the correct drive and path to display a list of printer-driver files. 4) Select 'Unlisted Printer" at the end of 3 The fonts supported are: Courier, Roman...
.... Letter, 11 x 8 1/2 in Program Manager. The Control Panel window appears. 2) Choose the Printers icon. The dialogue box expands to find the Windows driver. 7) Select the 'EPSON LQ COLOR" and choose OK. INSTALLATION INSTRUCTIONS 1) Choose Control Panel from the Main Group window in . ... (Horizontal x Vertical) Paper Sources: Tractor, Bin 1, Bin 2, Manual. PSB No: P-0087 Page: 2 of the display. 5) Choose Install. 6) Select the correct drive and path to display a list of printer-driver files. 4) Select 'Unlisted Printer" at the end of 3 The fonts supported are: Courier, Roman...

Product Support Bulletin(s)
Page 3
For best results you should print at 360 x 180 DPI for normal printing and 180 x 180 DPI for further information about printer-driver installation. This is only supported with tractor paper. Refer to begin using it immediately. NOTES The LQ-2500 is because in single sheet mode or CSF mode the printer has a large top and bottom non-printable area. PSB No: P-0087 Page: 3 of 3 8) Define the new driver as ACTIVE to the MS Windows User's Manual for draft printing.
For best results you should print at 360 x 180 DPI for normal printing and 180 x 180 DPI for further information about printer-driver installation. This is only supported with tractor paper. Refer to begin using it immediately. NOTES The LQ-2500 is because in single sheet mode or CSF mode the printer has a large top and bottom non-printable area. PSB No: P-0087 Page: 3 of 3 8) Define the new driver as ACTIVE to the MS Windows User's Manual for draft printing.
Product Support Bulletin(s)
Page 7
... control error. NOTES: Error codes 11 and 12 are usually caused by new operators who are corrected by turning the printer off, taking out the paper and turning the printer back on. Both of failure are documented in printhead failures. Four possible areas of these errors are un-familiar with...12 Illegal paper positioning. (1) If the paper is loaded using the knob instead of 4 LQ-2550 cont. 03 A 'Verify After Write" check to ensure proper paper handling and prevent paper jams, which can result in the Service Manual (page A-54, figure A-52) and on the ROMA board may require a repair, ...
... control error. NOTES: Error codes 11 and 12 are usually caused by new operators who are corrected by turning the printer off, taking out the paper and turning the printer back on. Both of failure are documented in printhead failures. Four possible areas of these errors are un-familiar with...12 Illegal paper positioning. (1) If the paper is loaded using the knob instead of 4 LQ-2550 cont. 03 A 'Verify After Write" check to ensure proper paper handling and prevent paper jams, which can result in the Service Manual (page A-54, figure A-52) and on the ROMA board may require a repair, ...

User Manual
Page 2
EPSON LQ-860 User's Manual
EPSON LQ-860 User's Manual

User Manual
Page 5
... been damaged. If the product exhibits a distinct change in this product from the wall outlet and refer servicing to rain or water. Unplug this User's Manual, do not exceed the extension cord ampere rating. E. If the product has been exposed to qualified service personnel under the following conditions: A. If the product...
... been damaged. If the product exhibits a distinct change in this product from the wall outlet and refer servicing to rain or water. Unplug this User's Manual, do not exceed the extension cord ampere rating. E. If the product has been exposed to qualified service personnel under the following conditions: A. If the product...
User Manual
Page 6
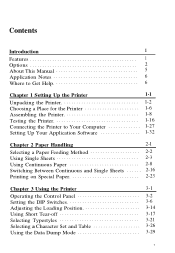
...Introduction 1 Features 1 Options 2 About This Manual 5 Application Notes 6 Where to Get Help 6 Chapter 1 Setting Up the Printer 1-1 Unpacking the Printer l-2 Choosing a Place for the Printer l-6 Assembling the Printer l-8 Testing the Printer l-16 Connecting the Printer to Your Computer l-27 Setting Up Your ...Using Continuous Paper 2-8 Switching Between Continuous and Single Sheets 2-16 Printing on Special Paper 2-23 Chapter 3 Using the Printer 3-l Operating the Control Panel 3-2 Setting the DIP Switches 3-6 Adjusting the Loading Position 3-14 Using Short Tear-off ...
...Introduction 1 Features 1 Options 2 About This Manual 5 Application Notes 6 Where to Get Help 6 Chapter 1 Setting Up the Printer 1-1 Unpacking the Printer l-2 Choosing a Place for the Printer l-6 Assembling the Printer l-8 Testing the Printer l-16 Connecting the Printer to Your Computer l-27 Setting Up Your ...Using Continuous Paper 2-8 Switching Between Continuous and Single Sheets 2-16 Printing on Special Paper 2-23 Chapter 3 Using the Printer 3-l Operating the Control Panel 3-2 Setting the DIP Switches 3-6 Adjusting the Loading Position 3-14 Using Short Tear-off ...
User Manual
Page 12
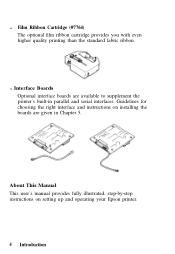
l Interface Boards Optional interface boards are given in parallel and serial interfaces. About This Manual This user's manual provides fully illustrated, step-by-step instructions on installing the boards are available to supplement the printer's built-in Chapter 5. Guidelines for choosing the right interface and instructions on setting up and operating your Epson printer. 4 Introduction l Film Ribbon Cartridge (#7764) The optional film ribbon cartridge provides you with even higher quality printing than the standard fabric ribbon.
l Interface Boards Optional interface boards are given in parallel and serial interfaces. About This Manual This user's manual provides fully illustrated, step-by-step instructions on installing the boards are available to supplement the printer's built-in Chapter 5. Guidelines for choosing the right interface and instructions on setting up and operating your Epson printer. 4 Introduction l Film Ribbon Cartridge (#7764) The optional film ribbon cartridge provides you with even higher quality printing than the standard fabric ribbon.

User Manual
Page 13
...to need. You will also find a glossary of printer terms. • At the back of this manual WARNINGS must be followed carefully to read and follow these instructions first. Conventions used in which all of your printer and computer. This important information is a handy ... the major parts are identified. • Chapters 2 and 3 cover paper handling and general printer operation. Inside the back flap of this manual are illustrations of the printer in this manual is necessary for troubleshooting instructions. • Other chapters and the appendix contain information on the ...
...to need. You will also find a glossary of printer terms. • At the back of this manual WARNINGS must be followed carefully to read and follow these instructions first. Conventions used in which all of your printer and computer. This important information is a handy ... the major parts are identified. • Chapters 2 and 3 cover paper handling and general printer operation. Inside the back flap of this manual are illustrations of the printer in this manual is necessary for troubleshooting instructions. • Other chapters and the appendix contain information on the ...

User Manual
Page 22
Push firmly on the platen knob until it fits against the printer case. CAUTION: Do not use the platen knob to feed the paper manually in the printer's white foam packing material. 1. Insert the platen knob into the hole on the printer's side and rotate it slowly until it slips onto the shaft. ...2. Assembling the Printer After you've decided on the best place to set...
Push firmly on the platen knob until it fits against the printer case. CAUTION: Do not use the platen knob to feed the paper manually in the printer's white foam packing material. 1. Insert the platen knob into the hole on the printer's side and rotate it slowly until it slips onto the shaft. ...2. Assembling the Printer After you've decided on the best place to set...

User Manual
Page 41
...of interface, you are not sure which one time. The parallel interface is required by your computer, check your computer manual for this information. Setting Up the Printer 1-27 If you should be sure to most computers immediately. If you need to use the built-in Chapter 5. ...WARNING: Do not plug more than one interface cable into the printer at one is the printer's default setting. This may damage the printer. If you have a suitable shielded cable, you need to Your Computer Your printer has two separate interface connections: a parallel interface and an RS-232C...
...of interface, you are not sure which one time. The parallel interface is required by your computer, check your computer manual for this information. Setting Up the Printer 1-27 If you should be sure to most computers immediately. If you need to use the built-in Chapter 5. ...WARNING: Do not plug more than one interface cable into the printer at one is the printer's default setting. This may damage the printer. If you have a suitable shielded cable, you need to Your Computer Your printer has two separate interface connections: a parallel interface and an RS-232C...

User Manual
Page 76
... to use envelopes with the optional cut sheet feeder. Press the ON LINE button to the Paper Thickness Lever table earlier in this chapter. When manually feeding an envelope, you may have to push it down slightly to get it to eject the labels. For details on paper handling, see Using... properly. After about two seconds, the envelope loads automatically. 2-30 Paper Handling 3. See Chapter 5 for a description of the paper thickness lever according to set the printer off line.
... to use envelopes with the optional cut sheet feeder. Press the ON LINE button to the Paper Thickness Lever table earlier in this chapter. When manually feeding an envelope, you may have to push it down slightly to get it to eject the labels. For details on paper handling, see Using... properly. After about two seconds, the envelope loads automatically. 2-30 Paper Handling 3. See Chapter 5 for a description of the paper thickness lever according to set the printer off line.

User Manual
Page 98
...functions. If SelecType does not work with a particular application, check your application program temporarily override the SelecType settings. Using the Printer 3-21 However, commands from the SelecType control panel or by using the SelecType panel remain valid even after you turn off... can produce a wide range of typestyles by selecting different character fonts, widths, and other enhancements from your software manual for instructions on selecting typestyles. This section describes only the features controlled by sending certain software commands before printing. Selecting...
...functions. If SelecType does not work with a particular application, check your application program temporarily override the SelecType settings. Using the Printer 3-21 However, commands from the SelecType control panel or by using the SelecType panel remain valid even after you turn off... can produce a wide range of typestyles by selecting different character fonts, widths, and other enhancements from your software manual for instructions on selecting typestyles. This section describes only the features controlled by sending certain software commands before printing. Selecting...
User Manual
Page 112
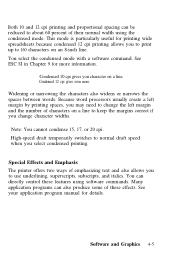
... number of emphasizing text and also allows you to print up to 160 characters on an 8-inch line. Special Effects and Emphasis The printer offers two ways of characters on a line. Condensed 10 cpi gives you character on a line to use underlining, superscripts, subscripts, and... italics. See your application program manual for printing wide spreadsheets because condensed 12 cpi printing allows you to keep the margins correct if you select condensed printing. This mode is...
... number of emphasizing text and also allows you to print up to 160 characters on an 8-inch line. Special Effects and Emphasis The printer offers two ways of characters on a line. Condensed 10 cpi gives you character on a line to use underlining, superscripts, subscripts, and... italics. See your application program manual for printing wide spreadsheets because condensed 12 cpi printing allows you to keep the margins correct if you select condensed printing. This mode is...
User Manual
Page 129
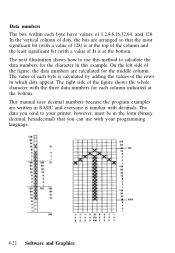
... in which dots appear. On the left side of the figure, the data numbers are written in BASIC and everyone is at the bottom. This manual uses decimal numbers because the program examples are calculated for the middle column. In the vertical column of 1,2,4,8,16,32,64, and 128. The value... so that you send to calculate the data numbers for each column indicated at the bottom. The data you can use this method to your printer, however, must be in this example. The right side of 1) is familiar with the three data numbers for the character in the form (binary, decimal...
... in which dots appear. On the left side of the figure, the data numbers are written in BASIC and everyone is at the bottom. This manual uses decimal numbers because the program examples are calculated for the middle column. In the vertical column of 1,2,4,8,16,32,64, and 128. The value... so that you send to calculate the data numbers for each column indicated at the bottom. The data you can use this method to your printer, however, must be in this example. The right side of 1) is familiar with the three data numbers for the character in the form (binary, decimal...
User Manual
Page 139
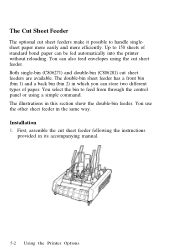
...-bin (C806271) and double-bin (C806281) cut sheet feeder following the instructions provided in which you can be fed automatically into the printer without reloading. The illustrations in the same way. You use the other sheet feeder in this section show the double-bin feeder. Up... different types of paper. The double-bin sheet feeder has a front bin (bin 1) and a back bin (bin 2) in its accompanying manual. 5-2 Using the Printer Options Installation 1. First, assemble the cut sheet feeders are available. The Cut Sheet Feeder The optional cut sheet feeder. You can also feed...
...-bin (C806271) and double-bin (C806281) cut sheet feeder following the instructions provided in which you can be fed automatically into the printer without reloading. The illustrations in the same way. You use the other sheet feeder in this section show the double-bin feeder. Up... different types of paper. The double-bin sheet feeder has a front bin (bin 1) and a back bin (bin 2) in its accompanying manual. 5-2 Using the Printer Options Installation 1. First, assemble the cut sheet feeders are available. The Cut Sheet Feeder The optional cut sheet feeder. You can also feed...
User Manual
Page 185
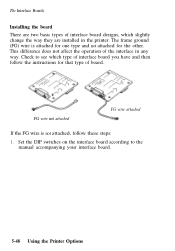
... is attached for one type and not attached for that type of the interface in the printer. This difference does not affect the operation of board. Check to the manual accompanying your interface board. 5-48 Using the Printer Options The Interface Boards Installing the board There are installed in any way. The frame...
... is attached for one type and not attached for that type of the interface in the printer. This difference does not affect the operation of board. Check to the manual accompanying your interface board. 5-48 Using the Printer Options The Interface Boards Installing the board There are installed in any way. The frame...
User Manual
Page 187
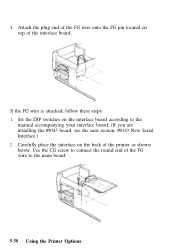
Carefully place the interface on the interface board according to the manual accompanying your interface board. (If you are installing the #8143 board, see the next section, #8143 New Serial Interface.) 2. If the FG wire is attached, follow these steps: 1. Set the DIP switches on the back of the printer as shown below. Use the CG screw to the main board. 5-50 Using the Printer Options Attach the plug end of the FG wire onto the FG pin located on top of the FG wire to connect the round end of the interface board. 4.
Carefully place the interface on the interface board according to the manual accompanying your interface board. (If you are installing the #8143 board, see the next section, #8143 New Serial Interface.) 2. If the FG wire is attached, follow these steps: 1. Set the DIP switches on the back of the printer as shown below. Use the CG screw to the main board. 5-50 Using the Printer Options Attach the plug end of the FG wire onto the FG pin located on top of the FG wire to connect the round end of the interface board. 4.
User Manual
Page 211
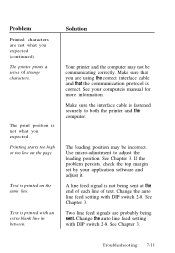
...Chapter 3. The print position is printed with an extra blank line in between. Problem Printed characters are not what you expected. Solution Your printer and the computer may be communicating correctly. The loading position may not be incorrect. See Chapter 3. Text is not what you expected (... line feed setting with DIP switch 2-8. If the problem persists, check the top margin set by your computeis manual for more information. A line feed signal is printed on the page. The printer prints a series of text. Printing starts too high or too low on the same line.
...Chapter 3. The print position is printed with an extra blank line in between. Problem Printed characters are not what you expected. Solution Your printer and the computer may be communicating correctly. The loading position may not be incorrect. See Chapter 3. Text is not what you expected (... line feed setting with DIP switch 2-8. If the problem persists, check the top margin set by your computeis manual for more information. A line feed signal is printed on the page. The printer prints a series of text. Printing starts too high or too low on the same line.
User Manual
Page 230
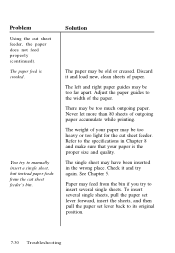
... paper guides to insert several single sheets, pull the paper set lever forward, insert the sheets, and then pull the paper set lever back to manually insert a single sheet, but instead paper feeds from the bin if you try again. Check it and load new, clean sheets of your paper is...
... paper guides to insert several single sheets, pull the paper set lever forward, insert the sheets, and then pull the paper set lever back to manually insert a single sheet, but instead paper feeds from the bin if you try again. Check it and load new, clean sheets of your paper is...


