Product Support Bulletin(s)
Page 10
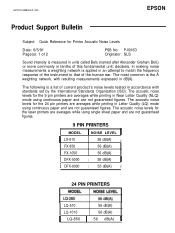
... product's noise levels tested in accordance with resulting measurements expressed in Letter Quality (LQ) mode using continuous paper and are not guaranteed figures. The following is the A weighting network, with standards set by the International Standards Organization (ISO). EPSON Product Support Bulletin Subject: Quick Reference for the 24 pin printers are averages while printing...
... product's noise levels tested in accordance with resulting measurements expressed in Letter Quality (LQ) mode using continuous paper and are not guaranteed figures. The following is the A weighting network, with standards set by the International Standards Organization (ISO). EPSON Product Support Bulletin Subject: Quick Reference for the 24 pin printers are averages while printing...
User Manual
Page 3
...identification purposes only and may be liable against harmful interference in any form or by the FCC for this printer will invalidate the FCC Certification of Epson America, Inc. While every precaution has been taken in accordance with the instructions, may cause interference levels.... This equipment generates, uses and can be determined by Epson America, Inc. General Notice: Other product names used in the preparation of Epson America, Inc. FCC COMPLIANCE STATEMENT FOR AMERICAN USERS This equipment has been tested and found to comply with the limits for a class ...
...identification purposes only and may be liable against harmful interference in any form or by the FCC for this printer will invalidate the FCC Certification of Epson America, Inc. While every precaution has been taken in accordance with the instructions, may cause interference levels.... This equipment generates, uses and can be determined by Epson America, Inc. General Notice: Other product names used in the preparation of Epson America, Inc. FCC COMPLIANCE STATEMENT FOR AMERICAN USERS This equipment has been tested and found to comply with the limits for a class ...
User Manual
Page 6
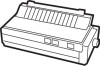
Contents Introduction 1 Features 1 Options 2 About This Manual 5 Application Notes 6 Where to Get Help 6 Chapter 1 Setting Up the Printer 1-1 Unpacking the Printer l-2 Choosing a Place for the Printer l-6 Assembling the Printer l-8 Testing the Printer l-16 Connecting the Printer to Your Computer l-27 Setting Up Your Application Software l-32 Chapter 2 Paper Handling 2-l Selecting a Paper Feeding Method 2-2 Using Single Sheets 2-3 Using Continuous...
Contents Introduction 1 Features 1 Options 2 About This Manual 5 Application Notes 6 Where to Get Help 6 Chapter 1 Setting Up the Printer 1-1 Unpacking the Printer l-2 Choosing a Place for the Printer l-6 Assembling the Printer l-8 Testing the Printer l-16 Connecting the Printer to Your Computer l-27 Setting Up Your Application Software l-32 Chapter 2 Paper Handling 2-l Selecting a Paper Feeding Method 2-2 Using Single Sheets 2-3 Using Continuous...

User Manual
Page 13
... 9 for troubleshooting instructions. • Other chapters and the appendix contain information on unpacking, setting up, testing, and connecting the printer. Conventions used in this manual are illustrations of the printer in which all of printer commands. • If the printer does not operate properly or the printed results are not what you expect, see Chapter...
... 9 for troubleshooting instructions. • Other chapters and the appendix contain information on unpacking, setting up, testing, and connecting the printer. Conventions used in this manual are illustrations of the printer in which all of printer commands. • If the printer does not operate properly or the printed results are not what you expect, see Chapter...

User Manual
Page 15
... 1-2 Removing the Protective Materials 1-3 Choosing a Place for the Printer 1-6 Assembling the Printer 1-8 Installing the Platen Knob 1-8 Installing the Ribbon Cartridge 1-9 Attaching the Paper Guide 1-14 Testing the Printer 1-16 Plugging in the Printer 1-16 Running the Self Test 1-16 If the Self Test Doesn't Print 1-23 Connecting the Printer to Your Computer 1-27 The Parallel Interface 1-28 The...
... 1-2 Removing the Protective Materials 1-3 Choosing a Place for the Printer 1-6 Assembling the Printer 1-8 Installing the Platen Knob 1-8 Installing the Ribbon Cartridge 1-9 Attaching the Paper Guide 1-14 Testing the Printer 1-16 Plugging in the Printer 1-16 Running the Self Test 1-16 If the Self Test Doesn't Print 1-23 Connecting the Printer to Your Computer 1-27 The Parallel Interface 1-28 The...
User Manual
Page 30
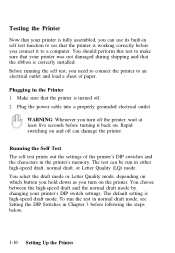
... working correctly before you connect it back on. Rapid switching on the printer. Testing the Printer Now that your printer is fully assembled, you can use its built-in either high-speed draft, normal draft, or Letter Quality (LQ) mode. Make sure that your printer's DIP switch settings. Plug the power cable into a properly grounded electrical...
... working correctly before you connect it back on. Rapid switching on the printer. Testing the Printer Now that your printer is fully assembled, you can use its built-in either high-speed draft, normal draft, or Letter Quality (LQ) mode. Make sure that your printer's DIP switch settings. Plug the power cable into a properly grounded electrical...
User Manual
Page 31
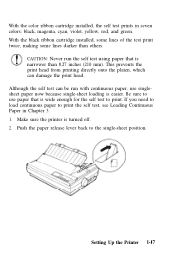
Although the self test can damage the print head. Make sure the printer is easier. This prevents the print head from printing directly onto the platen, which can be run the self test using paper that is narrower than others. CAUTION: Never run with continuous paper, use paper that... is wide enough for the self test to print....
Although the self test can damage the print head. Make sure the printer is easier. This prevents the print head from printing directly onto the platen, which can be run the self test using paper that is narrower than others. CAUTION: Never run with continuous paper, use paper that... is wide enough for the self test to print....
User Manual
Page 34
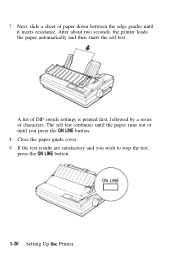
After about two seconds, the printer loads the paper automatically and then starts the self test. The self test continues until the paper runs out or until it meets resistance. Close the paper guide cover. 9. If the test results are satisfactory and you press the ON LINE button. 8. A list of DIP switch settings is printed first, followed by a series of paper down between the edge guides until you wish to stop the test, press the ON LINE button. 1-20 Setting Up the Printer 7. Next, slide a sheet of characters.
After about two seconds, the printer loads the paper automatically and then starts the self test. The self test continues until the paper runs out or until it meets resistance. Close the paper guide cover. 9. If the test results are satisfactory and you press the ON LINE button. 8. A list of DIP switch settings is printed first, followed by a series of paper down between the edge guides until you wish to stop the test, press the ON LINE button. 1-20 Setting Up the Printer 7. Next, slide a sheet of characters.
User Manual
Page 35
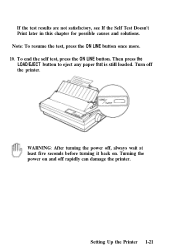
Note: To resume the test, press the ON LINE button once more. 10. To end the self test, press the ON LINE button. Turn off rapidly can damage the printer. WARNING: After turning the power off, always wait at least five seconds before turning it back on and off the printer. Turning the power on . Setting Up the Printer 1-21 Then press the LOAD/EJECT button to eject any paper that is still loaded. If the test results are not satisfactory, see If the Self Test Doesn't Print later in this chapter for possible causes and solutions.
Note: To resume the test, press the ON LINE button once more. 10. To end the self test, press the ON LINE button. Turn off rapidly can damage the printer. WARNING: After turning the power off, always wait at least five seconds before turning it back on and off the printer. Turning the power on . Setting Up the Printer 1-21 Then press the LOAD/EJECT button to eject any paper that is still loaded. If the test results are not satisfactory, see If the Self Test Doesn't Print later in this chapter for possible causes and solutions.
User Manual
Page 36
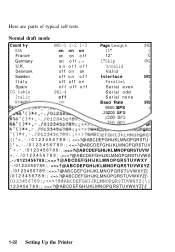
... 0 1 2 3 4 5 6 7 8 9 : ; ?@ABCDEFGHIJKLMNOPQRSTUV 0 1 2 3 4 5 6 7 8 9 : ;?@ABCDEFGHIJKLMNOPQRSTUVW + , - . / 0 1 2 3 4 5 6 7 8 9 : ;?@ABCDEFGHIJKLMNOPQRSTUVWX ,-./0123456789:;?@ABCDEFGHIJKLMNOPQRSTUVWXY -./0123456789;; ?@ABCDEFGHIJKLMNOPQRSTUVWXYZ . / 0 1 2 3 4 5 6 7 8 9 : ;?@ABCDEFGHIJKLMNOPQRSTUVWXYZ[ / 0 1 2 3 4 5 6 7 8 9 : ; ?@ABCDEFGHIJKLMNOPQRSTUVWXYZ[\ 0123456789:;?@@ABCDEFGHIJKLMNOPQRSTUVWXYZ[\] 1 2 3 4 5 6 7 8 9 : ; ?@ABCDEFGHIJKLMNOPQRSTUVWXYZ[\]' 1-22 Setting Up the Printer Here are parts of typical self tests. Normal draft mode Count t-y USA France Germany U.K.
... 0 1 2 3 4 5 6 7 8 9 : ; ?@ABCDEFGHIJKLMNOPQRSTUV 0 1 2 3 4 5 6 7 8 9 : ;?@ABCDEFGHIJKLMNOPQRSTUVW + , - . / 0 1 2 3 4 5 6 7 8 9 : ;?@ABCDEFGHIJKLMNOPQRSTUVWX ,-./0123456789:;?@ABCDEFGHIJKLMNOPQRSTUVWXY -./0123456789;; ?@ABCDEFGHIJKLMNOPQRSTUVWXYZ . / 0 1 2 3 4 5 6 7 8 9 : ;?@ABCDEFGHIJKLMNOPQRSTUVWXYZ[ / 0 1 2 3 4 5 6 7 8 9 : ; ?@ABCDEFGHIJKLMNOPQRSTUVWXYZ[\ 0123456789:;?@@ABCDEFGHIJKLMNOPQRSTUVWXYZ[\] 1 2 3 4 5 6 7 8 9 : ; ?@ABCDEFGHIJKLMNOPQRSTUVWXYZ[\]' 1-22 Setting Up the Printer Here are parts of typical self tests. Normal draft mode Count t-y USA France Germany U.K.
User Manual
Page 37
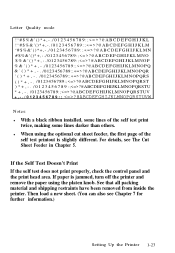
... Cut Sheet Feeder in Chapter 5. For details, see Chapter 7 for further information.) Setting Up the Printer 1-23 If the Self Test Doesn't Print If the self test does not print properly, check the control panel and the print head area. If paper is slightly ...:;?@ABCDEFGHIJKLMNOPQRST 0 1 2 3 4 5 6 7 8 9 :;?@ABCDEFGHIJKLMNOPQRSTU * + , - . /0123456789:;?@ABCDEFGHIJKLMNOPQRSTUV + , - . / 0 1 2 3 4 5 6 7 8 9 : ; ?@ABCDEFGHIJKLMNOPQRSTUVW Notes: l With a black ribbon installed, some lines of the self test printout is jammed, turn off the printer and remove the paper using the platen knob.
... Cut Sheet Feeder in Chapter 5. For details, see Chapter 7 for further information.) Setting Up the Printer 1-23 If the Self Test Doesn't Print If the self test does not print properly, check the control panel and the print head area. If paper is slightly ...:;?@ABCDEFGHIJKLMNOPQRST 0 1 2 3 4 5 6 7 8 9 :;?@ABCDEFGHIJKLMNOPQRSTU * + , - . /0123456789:;?@ABCDEFGHIJKLMNOPQRSTUV + , - . / 0 1 2 3 4 5 6 7 8 9 : ; ?@ABCDEFGHIJKLMNOPQRSTUVW Notes: l With a black ribbon installed, some lines of the self test printout is jammed, turn off the printer and remove the paper using the platen knob.
User Manual
Page 38
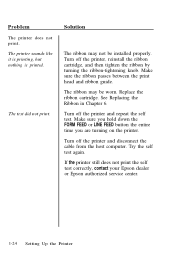
... in Chapter 6. Try the self test again. Make sure you hold down the FORM FEED or LINE FEED button the entire time you are turning on the printer. If the printer still does not print the self test correctly, contact your Epson dealer or Epson authorized service center. 1-24 Setting ...Up the Printer Replace the ribbon cartridge. The printer sounds like it is printing, but nothing is printed....
... in Chapter 6. Try the self test again. Make sure you hold down the FORM FEED or LINE FEED button the entire time you are turning on the printer. If the printer still does not print the self test correctly, contact your Epson dealer or Epson authorized service center. 1-24 Setting ...Up the Printer Replace the ribbon cartridge. The printer sounds like it is printing, but nothing is printed....
User Manual
Page 40
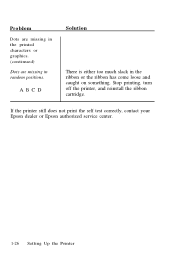
Problem Dots are missing in the printed characters or graphics. (continued) Dots are missing in the ribbon or the ribbon has come loose and caught on something. If the printer still does not print the self test correctly, contact your Epson dealer or Epson authorized service center. 1-26 Setting Up the Printer ABCD Solution There is either too much slack in random positions. Stop printing, turn off the printer, and reinstall the ribbon cartridge.
Problem Dots are missing in the printed characters or graphics. (continued) Dots are missing in the ribbon or the ribbon has come loose and caught on something. If the printer still does not print the self test correctly, contact your Epson dealer or Epson authorized service center. 1-26 Setting Up the Printer ABCD Solution There is either too much slack in random positions. Stop printing, turn off the printer, and reinstall the ribbon cartridge.
User Manual
Page 46
..., JX (color), FX, LX, RX, MX, Epson printer, Standard printer, Draft printer. If the printer is available that the program can use the instructions below. LQ-2550 LQ-2500 LQ-850 (LQ-950, LQ-1050) LQ-800 (LQ-1000) LQ-51O/LQ-500 LQ-1500 If you can take full advantage of the printer, however, it does not list the LQ-860 on its menu. Choosing From a Menu...
..., JX (color), FX, LX, RX, MX, Epson printer, Standard printer, Draft printer. If the printer is available that the program can use the instructions below. LQ-2550 LQ-2500 LQ-850 (LQ-950, LQ-1050) LQ-800 (LQ-1000) LQ-51O/LQ-500 LQ-1500 If you can take full advantage of the printer, however, it does not list the LQ-860 on its menu. Choosing From a Menu...
User Manual
Page 77
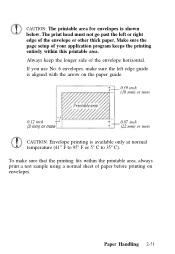
...; C to 35° C). To make sure the left or right edge of your application program keeps the printing entirely within the printable area, always print a test sample using a normal sheet of the envelope horizontal. Paper Handling 2-31 If you use No. 6 envelopes, make sure that the printing fits within this printable...
...; C to 35° C). To make sure the left or right edge of your application program keeps the printing entirely within the printable area, always print a test sample using a normal sheet of the envelope horizontal. Paper Handling 2-31 If you use No. 6 envelopes, make sure that the printing fits within this printable...
User Manual
Page 82
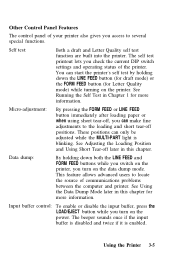
...both the LINE FEED and FORM FEED buttons while you switch on the printer, you check the current DIP switch settings and operating status of communications problems between the computer and printer. The self test printout lets you turn on the data dump mode. Other Control Panel Features... The control panel of your printer also gives you can only be adjusted while the MULTI-PART light ...
...both the LINE FEED and FORM FEED buttons while you switch on the printer, you check the current DIP switch settings and operating status of communications problems between the computer and printer. The self test printout lets you turn on the data dump mode. Other Control Panel Features... The control panel of your printer also gives you can only be adjusted while the MULTI-PART light ...
User Manual
Page 89
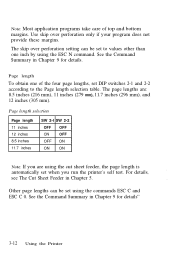
... provide these margins. The page lengths are using the ESC N command. For details, see The Cut Sheet Feeder in Chapter 9 for details" 3-12 Using the Printer See the Command Summary in Chapter 5. See the Command Summary in Chapter 9 for details. Note: Most application programs take care of the four page lengths... selection Page length 11 inches 12 inches 8.5 inches 11.7 inches SW 2-l SW 2-2 OFF OFF ON OFF OFF ON ON ON Note: If you run the printer's self test.
... provide these margins. The page lengths are using the ESC N command. For details, see The Cut Sheet Feeder in Chapter 9 for details" 3-12 Using the Printer See the Command Summary in Chapter 5. See the Command Summary in Chapter 9 for details. Note: Most application programs take care of the four page lengths... selection Page length 11 inches 12 inches 8.5 inches 11.7 inches SW 2-l SW 2-2 OFF OFF ON OFF OFF ON ON ON Note: If you run the printer's self test.
User Manual
Page 138
... The Cut Sheet Feeder 5-2 Installation 5-2 Loading Paper 5-7 Testing the Printer in the Cut Sheet Feeder Mode . . . . . 5-10 Loading Envelopes 5-12 Operating the Cut Sheet Feeder 5-14 Using Continuous Paper 5-16 Loading Single Sheets 5-21 Removing ... The Multi-Font Module 5-37 Installation 5-41 Selecting a Font 5-42 The Interface Boards 5-44 Choosing an Interface 5-44 Compatible Interfaces 5-44 Installation 5-45 Using the Printer Options 5 -
... The Cut Sheet Feeder 5-2 Installation 5-2 Loading Paper 5-7 Testing the Printer in the Cut Sheet Feeder Mode . . . . . 5-10 Loading Envelopes 5-12 Operating the Cut Sheet Feeder 5-14 Using Continuous Paper 5-16 Loading Single Sheets 5-21 Removing ... The Multi-Font Module 5-37 Installation 5-41 Selecting a Font 5-42 The Interface Boards 5-44 Choosing an Interface 5-44 Compatible Interfaces 5-44 Installation 5-45 Using the Printer Options 5 -
User Manual
Page 145
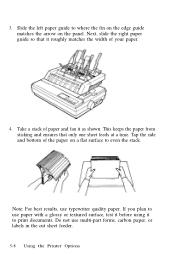
This keeps the paper from sticking and ensures that it to use paper with a glossy or textured surface, test it before using it roughly matches the width of your paper. 4. Tap the side and bottom of paper and fan it as shown. Next, slide ... only one sheet feeds at a time. Note: For best results, use multi-part forms, carbon paper, or labels in the cut sheet feeder. 5-8 Using the Printer Options Do not use typewriter quality paper. If you plan to print documents. Slide the left paper guide to even the stack. Take a stack of...
This keeps the paper from sticking and ensures that it to use paper with a glossy or textured surface, test it before using it roughly matches the width of your paper. 4. Tap the side and bottom of paper and fan it as shown. Next, slide ... only one sheet feeds at a time. Note: For best results, use multi-part forms, carbon paper, or labels in the cut sheet feeder. 5-8 Using the Printer Options Do not use typewriter quality paper. If you plan to print documents. Slide the left paper guide to even the stack. Take a stack of...
User Manual
Page 147
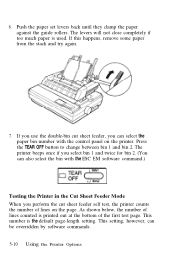
.... 7. This setting, however, can also select the bin with the control panel on the page. The printer beeps once if you perform the cut sheet feeder self test, the printer counts the number of the first test page. If you use the double-bin cut sheet feeder, you can select the paper bin number... with the ESC EM software command.) Testing the Printer in the Cut Sheet Feeder Mode When you select bin...
.... 7. This setting, however, can also select the bin with the control panel on the page. The printer beeps once if you perform the cut sheet feeder self test, the printer counts the number of the first test page. If you use the double-bin cut sheet feeder, you can select the paper bin number... with the ESC EM software command.) Testing the Printer in the Cut Sheet Feeder Mode When you select bin...


