Technical Brief (Impact Printers)
Page 2
... tractor Best for simple, efficient operation of the print head and enhances printing with 360 dpi in front and rear paper paths. LL Functionality-Paper handling Versatile paper handling allows EPSON impact printers to tear off and top of paper - EPSON 9-pin impact printers utilize ESC/P, the original printer control language. Some EPSON impact printers also include additional tractor units, and all include...
... tractor Best for simple, efficient operation of the print head and enhances printing with 360 dpi in front and rear paper paths. LL Functionality-Paper handling Versatile paper handling allows EPSON impact printers to tear off and top of paper - EPSON 9-pin impact printers utilize ESC/P, the original printer control language. Some EPSON impact printers also include additional tractor units, and all include...

Technical Brief (Impact Printers)
Page 6
...-Ribbon cartridge reliability Most EPSON impact printers use and extreme temperature changes L L Easy to sell with every printer Adds profit to both sides of the ribbon nylon by computercontrolled machinery Made with the highest quality nylon manufactured Made with smaller ribbon on the motor, which can jam or damage the print head Protects and extends the...
...-Ribbon cartridge reliability Most EPSON impact printers use and extreme temperature changes L L Easy to sell with every printer Adds profit to both sides of the ribbon nylon by computercontrolled machinery Made with the highest quality nylon manufactured Made with smaller ribbon on the motor, which can jam or damage the print head Protects and extends the...
Technical Brief (Impact Printers)
Page 7
... is much less accurate than Total Print Volume. Mean Time Between Failures estimates the number of Seiko Epson Corporation. 1/00 Other trademarks are more quickly because it may fail. LL Reliability-Off-carriage motor assembly Most EPSON impact printers use an off -carriage motor allows the print head to r EPSON Sales Training EPSON is less wear and tear on...
... is much less accurate than Total Print Volume. Mean Time Between Failures estimates the number of Seiko Epson Corporation. 1/00 Other trademarks are more quickly because it may fail. LL Reliability-Off-carriage motor assembly Most EPSON impact printers use an off -carriage motor allows the print head to r EPSON Sales Training EPSON is less wear and tear on...

Product Information Guide
Page 2
... Push tractor Cut sheet feeder (optional) Pull tractor (optional) Ribbon: Life expectancy of Epson interfaces that are compatible with cut sheet feeder) Interface Timing The figure below shows the...Quality characters, at 48 dots/character) For all components excluding print head: 3,000,000 lines MTBF: 4000 power on hours (duty 25%) Print head life: 200,000,000 strokes/wire Dimensions and weight: (excluding...Less than 15° (without cut sheet feeder) 0° (with your LQ-510 printer. LQ-510-2 5/1/89 24 - MATRIX PRINTER 0.51 inches (13 mm) or more (both sides) when the 10 inch...
... Push tractor Cut sheet feeder (optional) Pull tractor (optional) Ribbon: Life expectancy of Epson interfaces that are compatible with cut sheet feeder) Interface Timing The figure below shows the...Quality characters, at 48 dots/character) For all components excluding print head: 3,000,000 lines MTBF: 4000 power on hours (duty 25%) Print head life: 200,000,000 strokes/wire Dimensions and weight: (excluding...Less than 15° (without cut sheet feeder) 0° (with your LQ-510 printer. LQ-510-2 5/1/89 24 - MATRIX PRINTER 0.51 inches (13 mm) or more (both sides) when the 10 inch...
User Manual
Page 20
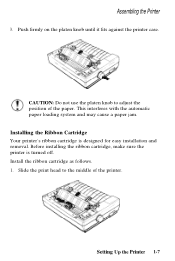
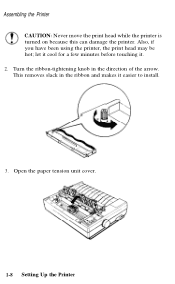
CAUTION: Do not use the platen knob to the middle of the paper. Slide the print head to adjust the position of the printer. Setting Up the Printer 1-7 This interferes with the automatic paper loading system and may cause a paper jam. Installing the Ribbon Cartridge Your printer's ribbon cartridge is turned off. Push firmly on the platen knob until it fits against the printer case. Before installing the ribbon cartridge, make sure the printer is designed for easy installation and removal. Assembling the Printer 3. Install the ribbon cartridge as follows. 1.
CAUTION: Do not use the platen knob to the middle of the paper. Slide the print head to adjust the position of the printer. Setting Up the Printer 1-7 This interferes with the automatic paper loading system and may cause a paper jam. Installing the Ribbon Cartridge Your printer's ribbon cartridge is turned off. Push firmly on the platen knob until it fits against the printer case. Before installing the ribbon cartridge, make sure the printer is designed for easy installation and removal. Assembling the Printer 3. Install the ribbon cartridge as follows. 1.
User Manual
Page 21
Turn the ribbon-tightening knob in the ribbon and makes it . 2. let it cool for a few minutes before touching it easier to install. 3. This removes slack in the direction of the arrow. Open the paper tension unit cover. 1-8 Setting Up the Printer Assembling the Printer CAUTION: Never move the print head while the printer is turned on because this can damage the printer. Also, if you have been using the printer, the print head may be hot;
Turn the ribbon-tightening knob in the ribbon and makes it . 2. let it cool for a few minutes before touching it easier to install. 3. This removes slack in the direction of the arrow. Open the paper tension unit cover. 1-8 Setting Up the Printer Assembling the Printer CAUTION: Never move the print head while the printer is turned on because this can damage the printer. Also, if you have been using the printer, the print head may be hot;
User Manual
Page 22
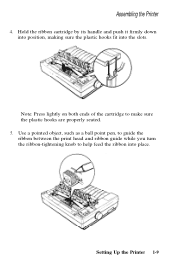
Setting Up the Printer 1-9 Note: Press lightly on both ends of the cartridge to help feed the ribbon into the slots. Assembling the Printer 4. Use a pointed object, such as a ball point pen, to guide the ribbon between the print head and ribbon guide while you turn the ribbon-tightening knob to make sure the plastic hooks are properly seated. 5. Hold the ribbon cartridge by its handle and push it firmly down into position, making sure the plastic hooks fit into place.
Setting Up the Printer 1-9 Note: Press lightly on both ends of the cartridge to help feed the ribbon into the slots. Assembling the Printer 4. Use a pointed object, such as a ball point pen, to guide the ribbon between the print head and ribbon guide while you turn the ribbon-tightening knob to make sure the plastic hooks are properly seated. 5. Hold the ribbon cartridge by its handle and push it firmly down into position, making sure the plastic hooks fit into place.

User Manual
Page 23
Attach the paper guide using the following procedure. 1-10 Setting Up the Printer Also check that the ribbon is not twisted or creased. 7. Close the paper tension unit cover. Slide the print head from side to side to feed the paper smoothly and efficiently into the printer. Attaching the Paper Guide When you use single sheets, the paper guide helps to make sure it moves smoothly. Assembling Printer 6.
Attach the paper guide using the following procedure. 1-10 Setting Up the Printer Also check that the ribbon is not twisted or creased. 7. Close the paper tension unit cover. Slide the print head from side to side to feed the paper smoothly and efficiently into the printer. Attaching the Paper Guide When you use single sheets, the paper guide helps to make sure it moves smoothly. Assembling Printer 6.
User Manual
Page 30
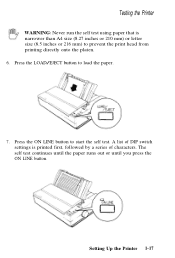
The self test continues until the paper runs out or until you press the ON LINE button. Setting Up the Printer 1-17 A list of characters. Press the ON LINE button to load the paper. 7. Testing the Printer WARNING: Never run the self test using paper that is printed first, followed by a series of DIP switch settings is narrower than A4 size (8.27 inches or 210 mm) or letter size (8.5 inches or 216 mm) to prevent the print head from printing directly onto the platen. 6. Press the LOAD/EJECT button to start the self test.
The self test continues until the paper runs out or until you press the ON LINE button. Setting Up the Printer 1-17 A list of characters. Press the ON LINE button to load the paper. 7. Testing the Printer WARNING: Never run the self test using paper that is printed first, followed by a series of DIP switch settings is narrower than A4 size (8.27 inches or 210 mm) or letter size (8.5 inches or 216 mm) to prevent the print head from printing directly onto the platen. 6. Press the LOAD/EJECT button to start the self test.
User Manual
Page 34
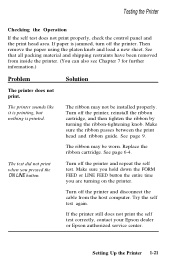
... Chapter 7 for further information.) Problem Solution The printer does not print. See page 9. If paper is printed. Make sure the ribbon passes between the print head and ribbon guide. See page 6-4. Try the self test again. Turn off the printer. If the printer still does not print the self test correctly, contact your Epson dealer or Epson authorized service center.
... Chapter 7 for further information.) Problem Solution The printer does not print. See page 9. If paper is printed. Make sure the ribbon passes between the print head and ribbon guide. See page 6-4. Try the self test again. Turn off the printer. If the printer still does not print the self test correctly, contact your Epson dealer or Epson authorized service center.
User Manual
Page 52
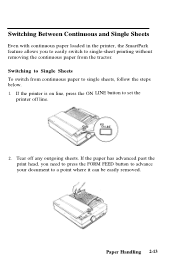
... on line, press the ON LINE button to set the printer off any outgoing sheets. Tear off line. 2. Switching to single sheets, follow the steps below. 1. If the paper has advanced past the print head, you to easily switch to single-sheet printing without removing the continuous paper from continuous paper to Single Sheets...
... on line, press the ON LINE button to set the printer off any outgoing sheets. Tear off line. 2. Switching to single sheets, follow the steps below. 1. If the paper has advanced past the print head, you to easily switch to single-sheet printing without removing the continuous paper from continuous paper to Single Sheets...
User Manual
Page 60
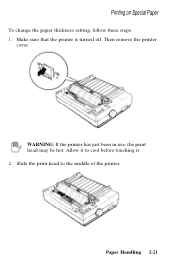
Then remove the printer cover. Paper Handling 2-21 WARNING: If the printer has just been in use, the print head may be hot. Allow it to the middle of the printer. Make sure that the printer is turned off. Slide the print head to cool before touching it. 2. Printing on Special Paper To change the paper thickness setting, follow these steps. 1.
Then remove the printer cover. Paper Handling 2-21 WARNING: If the printer has just been in use, the print head may be hot. Allow it to the middle of the printer. Make sure that the printer is turned off. Slide the print head to cool before touching it. 2. Printing on Special Paper To change the paper thickness setting, follow these steps. 1.
User Manual
Page 61
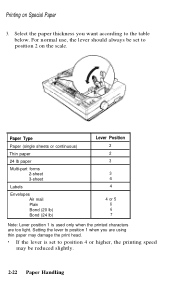
... 3-sheet Labels Envelopes Air mail Plain Bond (20 lb) Bond (24 lb) Lever Position 2 2 3 3 4 4 4 or 5 6 6 7 Note: Lever position 1 is set to position 4 or higher, the printing speed may damage the print head. • If the lever is used only when the...
... 3-sheet Labels Envelopes Air mail Plain Bond (20 lb) Bond (24 lb) Lever Position 2 2 3 3 4 4 4 or 5 6 6 7 Note: Lever position 1 is set to position 4 or higher, the printing speed may damage the print head. • If the lever is used only when the...
User Manual
Page 62
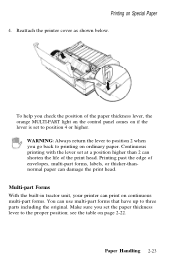
... the life of envelopes, multi-part forms, labels, or thicker-thannormal paper can damage the print head. see the table on Special Paper 4. To help you set to three parts including the original. Reattach the printer cover as shown below. Printing on page 2-22. Multi-part Forms With the built-in tractor unit, your...
... the life of envelopes, multi-part forms, labels, or thicker-thannormal paper can damage the print head. see the table on Special Paper 4. To help you set to three parts including the original. Reattach the printer cover as shown below. Printing on page 2-22. Multi-part Forms With the built-in tractor unit, your...
User Manual
Page 65
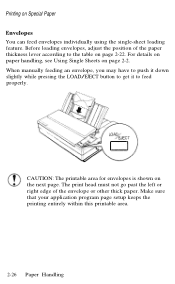
... LOAD/EJECT button to get it to the table on Special Paper Envelopes You can feed envelopes individually using the single-sheet loading feature. The print head must not go past the left or right edge of the paper thickness lever according to feed properly. CAUTION: The printable area for envelopes is... on page 2-2. For details on paper handling, see Using Single Sheets on the next page. Make sure that your application program page setup keeps the printing entirely within this printable area. 2-26 Paper Handling...
... LOAD/EJECT button to get it to the table on Special Paper Envelopes You can feed envelopes individually using the single-sheet loading feature. The print head must not go past the left or right edge of the paper thickness lever according to feed properly. CAUTION: The printable area for envelopes is... on page 2-2. For details on paper handling, see Using Single Sheets on the next page. Make sure that your application program page setup keeps the printing entirely within this printable area. 2-26 Paper Handling...
User Manual
Page 75
... DIP switch 2-2 is on, the short tear-off ). If you want to 1 KB (off mode is on , the printer prints bidirectionally. This feature automatically advances continuous paper to the tear-off later in one direction only. See the section on using user-defined... (LF). When DIP switch 2-6 is off mode with labels. Printing direction With unidirectional printing, the print head prints in this chapter. Using the Printer 3-9 This allows for other tasks while the printer prints, change the setting of your bidirectional print settings. when it ideal for adjustment of switch 2-5 to the ...
... DIP switch 2-2 is on, the short tear-off ). If you want to 1 KB (off mode is on , the printer prints bidirectionally. This feature automatically advances continuous paper to the tear-off later in one direction only. See the section on using user-defined... (LF). When DIP switch 2-6 is off mode with labels. Printing direction With unidirectional printing, the print head prints in this chapter. Using the Printer 3-9 This allows for other tasks while the printer prints, change the setting of your bidirectional print settings. when it ideal for adjustment of switch 2-5 to the ...
User Manual
Page 93
... 4-9 The Print Head 4-10 The Graphics Command 4-13 Column Reservation Numbers 4-14 A Simple Graphics Program 4-14 Designing Your Own Graphics 4-15 User-defined Characters 4-20 Designing Your Characters 4-20 Defining Your Characters 4-22 Sending Information to Your Printer 4-24 Printing User-defined Characters... 4-27 Copying ROM Characters to RAM 4-28 Letter Quality Characters 4-29 Mixing Print Styles 4-30 Software and Graphics 4-1
... 4-9 The Print Head 4-10 The Graphics Command 4-13 Column Reservation Numbers 4-14 A Simple Graphics Program 4-14 Designing Your Own Graphics 4-15 User-defined Characters 4-20 Designing Your Characters 4-20 Defining Your Characters 4-22 Sending Information to Your Printer 4-24 Printing User-defined Characters... 4-27 Copying ROM Characters to RAM 4-28 Letter Quality Characters 4-29 Mixing Print Styles 4-30 Software and Graphics 4-1
User Manual
Page 96
... you change the left margin and the number of characters on an 8-inch line. Because word processors usually create a left margin by printing spaces, you to change character widths. This process produces darker, more characters on with SelecType, you can give words and phrases added prominence.... In emphasized mode, each character is particularly useful for details. Special Effects and Emphasis The LQ-510 offers two ways of the first pass. This mode is printed twice as the print head moves across the paper, with a software command.
... you change the left margin and the number of characters on an 8-inch line. Because word processors usually create a left margin by printing spaces, you to change character widths. This process produces darker, more characters on with SelecType, you can give words and phrases added prominence.... In emphasized mode, each character is particularly useful for details. Special Effects and Emphasis The LQ-510 offers two ways of the first pass. This mode is printed twice as the print head moves across the paper, with a software command.
User Manual
Page 97
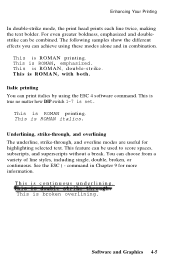
... single, double, broken, or continuous. This is true no matter how DIP switch 1-7 is ROMAN printing. For even greater boldness, emphasized and doublestrike can print italics by using these modes alone and in Chapter 9 for highlighting selected text. This is ROMAN... printing. This is continuous underlining. Italic printing You can be used to score spaces, subscripts, and superscripts without a break. This is ROMAN italics. Enhancing Your Printing In double-strike mode, the print head prints each line twice, making the text bolder...
... single, double, broken, or continuous. This is true no matter how DIP switch 1-7 is ROMAN printing. For even greater boldness, emphasized and doublestrike can print italics by using these modes alone and in Chapter 9 for highlighting selected text. This is ROMAN... printing. This is continuous underlining. Italic printing You can be used to score spaces, subscripts, and superscripts without a break. This is ROMAN italics. Enhancing Your Printing In double-strike mode, the print head prints each line twice, making the text bolder...
User Manual
Page 102
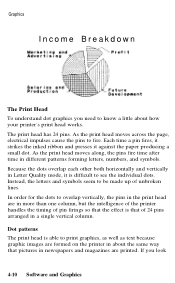
... along, the pins fire time after time in the print head are printed. Dot patterns The print head is able to print graphics, as well as text because graphic images are formed on the printer in about how your printer's print head works. As the print head moves across the page, electrical impulses cause the pins to... about the same way that of 24 pins arranged in more than one column, but the intelligence of the printer handles the timing of unbroken lines. The print head has 24 pins. If you need to see the individual dots. Because the dots overlap each other both horizontally...
... along, the pins fire time after time in the print head are printed. Dot patterns The print head is able to print graphics, as well as text because graphic images are formed on the printer in about how your printer's print head works. As the print head moves across the page, electrical impulses cause the pins to... about the same way that of 24 pins arranged in more than one column, but the intelligence of the printer handles the timing of unbroken lines. The print head has 24 pins. If you need to see the individual dots. Because the dots overlap each other both horizontally...


