
Product Information Guide
Page 1
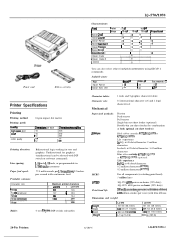
... cartridge Printer Specifications Printing Printing method: Printing speed: Quellly Mgh-speed draft DraR I Letter quality 24-pin impact dot matrix Chemcten per second with continuous feed 1 Maximum prlnted characters I La570 I LO-1070 &I 136 137 j/ 233 96 I 164 Buffer: 0 or 8 Kbytes (DIP-switch selectable) LQ-570/1070 Characterfonts: ! Fort1 I I 1 Epson Drafi Epson Cower Epson Roman 1 Epson San6 Sent Epson Presllge ~Epson Scnpt I Epson Sormt C Epson Orator 1 Epson...
... cartridge Printer Specifications Printing Printing method: Printing speed: Quellly Mgh-speed draft DraR I Letter quality 24-pin impact dot matrix Chemcten per second with continuous feed 1 Maximum prlnted characters I La570 I LO-1070 &I 136 137 j/ 233 96 I 164 Buffer: 0 or 8 Kbytes (DIP-switch selectable) LQ-570/1070 Characterfonts: ! Fort1 I I 1 Epson Drafi Epson Cower Epson Roman 1 Epson San6 Sent Epson Presllge ~Epson Scnpt I Epson Sormt C Epson Orator 1 Epson...
Product Information Guide
Page 3
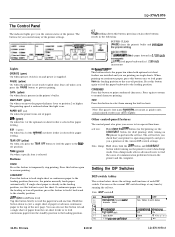
...the next page. LOAD/EJECT Press this button again to resume printing. If single-sheet paper is already in the printer's buffer. When printing on 24-Pin Printers 8/20/91 LQ-570/1070-3 Press again to return to temporarily stop printing. Other control-panel features The control panel also gives you press ... feeders are installed and you control many of each DIP switch. LQ-570/1070 The Control Panel The indicator lights give you press the TEAR OFF button to feed the paper to the tearoff position Fonts(gretm) On when a specific font is selected. DATA (yellow) On when data is not ...
...the next page. LOAD/EJECT Press this button again to resume printing. If single-sheet paper is already in the printer's buffer. When printing on 24-Pin Printers 8/20/91 LQ-570/1070-3 Press again to return to temporarily stop printing. Other control-panel features The control panel also gives you press ... feeders are installed and you control many of each DIP switch. LQ-570/1070 The Control Panel The indicator lights give you press the TEAR OFF button to feed the paper to the tearoff position Fonts(gretm) On when a specific font is selected. DATA (yellow) On when data is not ...
Product Information Guide
Page 5
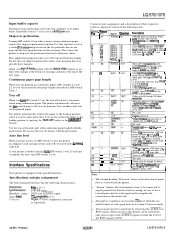
...a l l e l STROBE pulse BUSY and ACKNLG signal ITL compati%le level 36pin 57-30360 (Amphenol) connector or equivalent LQ-570/1070 Connector pin assignments and a description of paper. The printer automatically advances the last printed page to the tear-off to ON.) t Not used . 35 - - You can be ...fixed to this by pressing the TEAR OFF button or the LOAD/EJECT button Use the tear-off feature is LOW.) 24-Pin Printers LQ-570/1070-5 Specifications and pin assignments The built-in parallel interface has the following table. I CATA 7 I IN DATA8 / IN ACKNLG / OUT I BUSY ...
...a l l e l STROBE pulse BUSY and ACKNLG signal ITL compati%le level 36pin 57-30360 (Amphenol) connector or equivalent LQ-570/1070 Connector pin assignments and a description of paper. The printer automatically advances the last printed page to the tear-off to ON.) t Not used . 35 - - You can be ...fixed to this by pressing the TEAR OFF button or the LOAD/EJECT button Use the tear-off feature is LOW.) 24-Pin Printers LQ-570/1070-5 Specifications and pin assignments The built-in parallel interface has the following table. I CATA 7 I IN DATA8 / IN ACKNLG / OUT I BUSY ...
Product Information Guide
Page 6
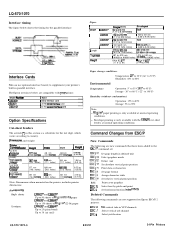
...Numkr ' C823051 c823071 I C823lOl / Name 1 1Serial Interface card 1 32 KB senel mlerfaca card II 32 KB rwallei Intetface card Option Specifications Cut-sheet feeders The asterisk (') in parallel interface. Escx Escc Set page length in defined unit Select graphics mode Define unit Set absolute...Inches) (3.42 lb) 444mm 0.75 kg (17.5 Inches) (1.85 lb) 434 mm 2.15 kg (17.1 Inches) (4.74 lb) Note: Dimensions when mounted on Epson ESC/P 2 printers: ESCb ESC/ FXa set : cc (G (U (V t* =(c =(t EsC(v ESC. LQ-570/1070 Interface timing The figure below are not supported on the...
...Numkr ' C823051 c823071 I C823lOl / Name 1 1Serial Interface card 1 32 KB senel mlerfaca card II 32 KB rwallei Intetface card Option Specifications Cut-sheet feeders The asterisk (') in parallel interface. Escx Escc Set page length in defined unit Select graphics mode Define unit Set absolute...Inches) (3.42 lb) 444mm 0.75 kg (17.5 Inches) (1.85 lb) 434 mm 2.15 kg (17.1 Inches) (4.74 lb) Note: Dimensions when mounted on Epson ESC/P 2 printers: ESCb ESC/ FXa set : cc (G (U (V t* =(c =(t EsC(v ESC. LQ-570/1070 Interface timing The figure below are not supported on the...

User Manual
Page 9
...-Sheet Feeders 4-2 Pull Tractor 4-12 Interface Cards 4-14 Chapter 5 Maintenance and Transportation 5-1 Cleaning the Printer 5-2 Replacing the Ribbon Cartridge 5-3 Transporting the Printer 5-4 Chapter 6 Troubleshooting 6-1 Problems and Solutions 6-2 Power Supply 6-3 Printing 6-4 Paper Handling 6-8 Options 6-10 Chapter 7 Technical Specifications 7-1 Printer Specifications 7-2 Interface Specifications 7-10 Option Specifications 7-14 Initialization 7-16 Chapter 8 Command Summary 8-1 Using the Command Summary 8-2 Commands Arranged by...
...-Sheet Feeders 4-2 Pull Tractor 4-12 Interface Cards 4-14 Chapter 5 Maintenance and Transportation 5-1 Cleaning the Printer 5-2 Replacing the Ribbon Cartridge 5-3 Transporting the Printer 5-4 Chapter 6 Troubleshooting 6-1 Problems and Solutions 6-2 Power Supply 6-3 Printing 6-4 Paper Handling 6-8 Options 6-10 Chapter 7 Technical Specifications 7-1 Printer Specifications 7-2 Interface Specifications 7-10 Option Specifications 7-14 Initialization 7-16 Chapter 8 Command Summary 8-1 Using the Command Summary 8-2 Commands Arranged by...
User Manual
Page 12
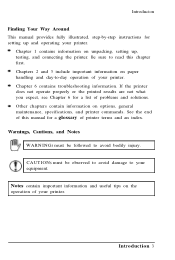
... Introduction 3 Notes contain important information and useful tips on unpacking, setting up and operating your printer. Introducion Finding Your Way Around This manual provides fully illustrated, step-by-step instructions for setting up , testing, and ... bodily injury. Chapter 6 contains troubleshooting information. If the printer does not operate properly or the printed results are not what you expect, see Chapter 6 for a list of your printer. Chapters 2 and 3 include important information on options, general maintenance, specifications, and printer commands.
... Introduction 3 Notes contain important information and useful tips on unpacking, setting up and operating your printer. Introducion Finding Your Way Around This manual provides fully illustrated, step-by-step instructions for setting up , testing, and ... bodily injury. Chapter 6 contains troubleshooting information. If the printer does not operate properly or the printed results are not what you expect, see Chapter 6 for a list of your printer. Chapters 2 and 3 include important information on options, general maintenance, specifications, and printer commands.
User Manual
Page 29
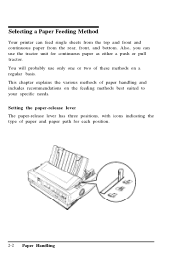
... paper-release lever has three positions, with icons indicating the type of these methods on the feeding methods best suited to your specific needs. Selecting a Paper Feeding Method Your printer can use only one or two of paper and paper path for continuous paper as either a push or pull tractor. You will...
... paper-release lever has three positions, with icons indicating the type of these methods on the feeding methods best suited to your specific needs. Selecting a Paper Feeding Method Your printer can use only one or two of paper and paper path for continuous paper as either a push or pull tractor. You will...

User Manual
Page 56
... printing. Control Panel BIN 2 (green) On when bin 2 of paper from the cut -sheet feeder is selected for paper feeding. Font (green) On when a specific font is already in the loading or tear-off position. Press this button to load a single sheet of the optional cut -sheet feeder or to... PAUSE Press this button down to eject a single sheet of paper or advance continuous paper to feed the paper forward one line. However, the printer normally loads paper automatically. Hold this button to the loading position. LF/FF (line feed/form feed) Tap this button to feed it backward to...
... printing. Control Panel BIN 2 (green) On when bin 2 of paper from the cut -sheet feeder is selected for paper feeding. Font (green) On when a specific font is already in the loading or tear-off position. Press this button to load a single sheet of the optional cut -sheet feeder or to... PAUSE Press this button down to eject a single sheet of paper or advance continuous paper to feed the paper forward one line. However, the printer normally loads paper automatically. Hold this button to the loading position. LF/FF (line feed/form feed) Tap this button to feed it backward to...
User Manual
Page 101
...meets both ends of the interface cable between the printer and the computer. Check both the printer and computer specifications. See the section on . Turn off but nothing is a shielded twisted-pair parallel cable. Wait a few minutes; Check the software's printer settings. If you are using the built-in parallel... head is on. Check that the software is installed properly for a paper jam, a ribbon jam, or other problems. If the printer still does not print correctly, contact your cable is printed. Load paper in Chapter 5. The ribbon may be installed properly. l The...
...meets both ends of the interface cable between the printer and the computer. Check both the printer and computer specifications. See the section on . Turn off but nothing is a shielded twisted-pair parallel cable. Wait a few minutes; Check the software's printer settings. If you are using the built-in parallel... head is on. Check that the software is installed properly for a paper jam, a ribbon jam, or other problems. If the printer still does not print correctly, contact your cable is printed. Load paper in Chapter 5. The ribbon may be installed properly. l The...
User Manual
Page 108
... not operate properly. Make sure the sprocket units on the computer and printer match. Remove slack lengthwise by pulling out and rotating the gear on the right of the paper. Check the specifications to take up any slack across the width of the optional pull tractor. Troubleshooting 6-11 Options l Paper feeding is...
... not operate properly. Make sure the sprocket units on the computer and printer match. Remove slack lengthwise by pulling out and rotating the gear on the right of the paper. Check the specifications to take up any slack across the width of the optional pull tractor. Troubleshooting 6-11 Options l Paper feeding is...
User Manual
Page 110
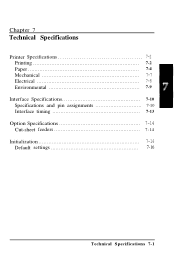
Chapter 7 Technical Specifications Printer Specifications 7-2 Printing 7-2 Paper 7-4 Mechanical 7-7 Electrical 7-8 Environmental 7-9 Interface Specifications 7-10 Specifications and pin assignments 7-10 Interface timing 7-13 Option Specifications 7-14 Cut-sheet feeders 7-14 Initialization 7-16 Default settings 7-16 Technical Specifications 7-1
Chapter 7 Technical Specifications Printer Specifications 7-2 Printing 7-2 Paper 7-4 Mechanical 7-7 Electrical 7-8 Environmental 7-9 Interface Specifications 7-10 Specifications and pin assignments 7-10 Interface timing 7-13 Option Specifications 7-14 Cut-sheet feeders 7-14 Initialization 7-16 Default settings 7-16 Technical Specifications 7-1
User Manual
Page 111
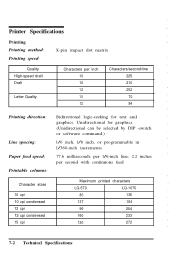
Printer Specifications Printing Printing method: Printing speed: X-pin impact dot matrix Quality High-speed draft Draft Letter Quality Characters per second with continuous feed Character sizes 10 cpi 10 cpi condensed 12 cpi 12 cpi condensed 15 cpi Maximum printed characters LQ-570 LQ-1070 80 136 137 164 96 204 160 233 120 272 7-2 Technical Specifications Unidirectional for...
Printer Specifications Printing Printing method: Printing speed: X-pin impact dot matrix Quality High-speed draft Draft Letter Quality Characters per second with continuous feed Character sizes 10 cpi 10 cpi condensed 12 cpi 12 cpi condensed 15 cpi Maximum printed characters LQ-570 LQ-1070 80 136 137 164 96 204 160 233 120 272 7-2 Technical Specifications Unidirectional for...
User Manual
Page 112
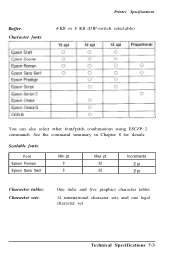
Buffer: Character fonts: Printer Specifications 0 KB or 8 KB (DIP-switch selectable) You can also select other font/pitch combinations using ESC/P 2 commands. See the command summary in Chapter 8 for details. Scalable fonts: Font Epson Roman Epson Sans Serif Min pt 8 8 Max pt 32 32 Increments 2 pt 2 pt Character tables: Character sets: One italic and five graphics character tables 14 international character sets and one legal character set Technical Specifications 7-3
Buffer: Character fonts: Printer Specifications 0 KB or 8 KB (DIP-switch selectable) You can also select other font/pitch combinations using ESC/P 2 commands. See the command summary in Chapter 8 for details. Scalable fonts: Font Epson Roman Epson Sans Serif Min pt 8 8 Max pt 32 32 Increments 2 pt 2 pt Character tables: Character sets: One italic and five graphics character tables 14 international character sets and one legal character set Technical Specifications 7-3
User Manual
Page 113
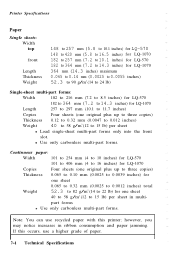
... this occurs, use a higher grade of paper. 7-4 Technical Specifications Printer Specifications Paper Single sheets: Width top front Length Thickness Weight 148 to 257 mm (5.8 to 10.1 inches) for LQ-570 148 to 420 mm (5.8 to 16.5 inches) for LQ-1070 182 to 257 mm (7.2 to 10.1 inches) for LQ-570 182 to 364 mm (7.2 to 14.3 inches... to 0.0039 inches) for one sheet 0.065 to 0.32 mm (0.0025 to 0.0012 inches) total Weight 52.3 to 82 g/m2 (14 to 22 lb) for LQ-1070 Copies Four sheets (one sheet 40 to 58 g/m2 (12 to 15 lb) per sheet in ribbon consumption and paper jamming. If this...
... this occurs, use a higher grade of paper. 7-4 Technical Specifications Printer Specifications Paper Single sheets: Width top front Length Thickness Weight 148 to 257 mm (5.8 to 10.1 inches) for LQ-570 148 to 420 mm (5.8 to 16.5 inches) for LQ-1070 182 to 257 mm (7.2 to 10.1 inches) for LQ-570 182 to 364 mm (7.2 to 14.3 inches... to 0.0039 inches) for one sheet 0.065 to 0.32 mm (0.0025 to 0.0012 inches) total Weight 52.3 to 82 g/m2 (14 to 22 lb) for LQ-1070 Copies Four sheets (one sheet 40 to 58 g/m2 (12 to 15 lb) per sheet in ribbon consumption and paper jamming. If this...
User Manual
Page 114
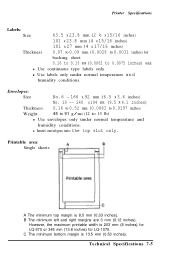
Printer Specifications Labels: Size 63.5 x 23.8 mm (2 ½ x 15/16 inches) 101 x 23.8 mm (4 x 15/16 inches) 101 x 27 mm (4 x 17/16 inches) Thickness 0.07 to 0.09 mm (0.0028 to 0.0031 inches) for LQ-1070. Printable area: Single sheets A The minimum top margin is 13.5 mm (0.53 inches). Technical Specifications ... type labels only. l Use labels only under normal temperature and humidity conditions. However, the maximum printable width is 203 mm (8 inches) for LQ-570 or 345 mm (13.8 inches) for backing sheet 0.16 to 0.19 mm (0.0063 to 15 lb) l Use envelopes only under normal...
Printer Specifications Labels: Size 63.5 x 23.8 mm (2 ½ x 15/16 inches) 101 x 23.8 mm (4 x 15/16 inches) 101 x 27 mm (4 x 17/16 inches) Thickness 0.07 to 0.09 mm (0.0028 to 0.0031 inches) for LQ-1070. Printable area: Single sheets A The minimum top margin is 13.5 mm (0.53 inches). Technical Specifications ... type labels only. l Use labels only under normal temperature and humidity conditions. However, the maximum printable width is 203 mm (8 inches) for LQ-570 or 345 mm (13.8 inches) for backing sheet 0.16 to 0.19 mm (0.0063 to 15 lb) l Use envelopes only under normal...
User Manual
Page 115
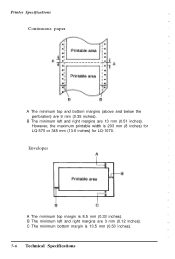
Printer Specifications Continuous paper A The minimum top and bottom margins (above and below the perforation) are 3 mm (0.12 inches). C The minimum bottom margin is 203 mm (8 inches) for LQ-570 or 345 mm (13.6 inches) for LQ-1070. However, the maximum printable width is 13.5 mm (0.53 inches). 7-6 Technical Specifications Envelopes A The minimum top margin is 8.5 mm (0.33 inches). B The minimum left and right margins are 13 mm (0.51 inches). B The minimum left and right margins are 9 mm (0.35 inches).
Printer Specifications Continuous paper A The minimum top and bottom margins (above and below the perforation) are 3 mm (0.12 inches). C The minimum bottom margin is 203 mm (8 inches) for LQ-570 or 345 mm (13.6 inches) for LQ-1070. However, the maximum printable width is 13.5 mm (0.53 inches). 7-6 Technical Specifications Envelopes A The minimum top margin is 8.5 mm (0.33 inches). B The minimum left and right margins are 13 mm (0.51 inches). B The minimum left and right margins are 9 mm (0.35 inches).

User Manual
Page 116
Printer Specifications Mechanical Paper-feed methods: Friction Push tractor Pull tractor Single-bin cut-sheet feeder (optional) High-capacity cut-sheet feeder (optional) Double-bin cut-sheet feeder (by combining both optional cut-sheet feeders) Ribbon: Black ribbon cartridge #7753 (LQ-570) or #7754 (LQ-1070) : Life expectancy: In LQ, at 48 dots/character: 2 million characters In draft...
Printer Specifications Mechanical Paper-feed methods: Friction Push tractor Pull tractor Single-bin cut-sheet feeder (optional) High-capacity cut-sheet feeder (optional) Double-bin cut-sheet feeder (by combining both optional cut-sheet feeders) Ribbon: Black ribbon cartridge #7753 (LQ-570) or #7754 (LQ-1070) : Life expectancy: In LQ, at 48 dots/character: 2 million characters In draft...
User Manual
Page 117
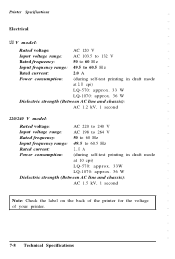
... frequency range: 49.5 to 60.5 Hz Rated current: 1.0 A Power consumption: (during self-test printing in draft mode at 10 cpi) LQ-570: approx. 33W LQ-1070: approx. 36 W Dielectric strength (Between AC line and chassis): AC 1.5 kV, 1 second Note: Check the label on the back of the printer for the voltage of your printer. 7-8 Technical Specifications
... frequency range: 49.5 to 60.5 Hz Rated current: 1.0 A Power consumption: (during self-test printing in draft mode at 10 cpi) LQ-570: approx. 33W LQ-1070: approx. 36 W Dielectric strength (Between AC line and chassis): AC 1.5 kV, 1 second Note: Check the label on the back of the printer for the voltage of your printer. 7-8 Technical Specifications
User Manual
Page 118
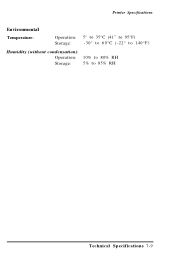
Printer Specifications Environmental Temperature: Operation: 5° to 35°C (41" to 95°F) Storage: -30° to 60°C (-22° to 140°F) Humidity (without condensation): Operation: 10% to 80% RH Storage: 5% to 85% RH Technical Specifications 7-9
Printer Specifications Environmental Temperature: Operation: 5° to 35°C (41" to 95°F) Storage: -30° to 60°C (-22° to 140°F) Humidity (without condensation): Operation: 10% to 80% RH Storage: 5% to 85% RH Technical Specifications 7-9
User Manual
Page 119
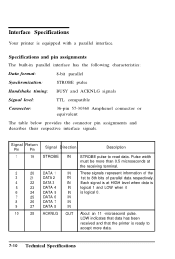
... connector or equivalent The table below provides the connector pin assignments and describes their respective interface signals. Each signal is at the receiving terminal. Interface Specifications Your printer is logical 0. Signal Return Pin Pin 1 19 2 20 3 21 4 22 5 23 6 24 7 25 8 26 9 27 10 28 Signal Direction ...STROBE pulse to 8th bits of the 1st to read data. LOW indicates that data has been received and that the printer is ready to accept more than 0.5 microseconds at HIGH level when data is logical 1 and LOW when it is equipped with a...
... connector or equivalent The table below provides the connector pin assignments and describes their respective interface signals. Each signal is at the receiving terminal. Interface Specifications Your printer is logical 0. Signal Return Pin Pin 1 19 2 20 3 21 4 22 5 23 6 24 7 25 8 26 9 27 10 28 Signal Direction ...STROBE pulse to 8th bits of the 1st to read data. LOW indicates that data has been received and that the printer is ready to accept more than 0.5 microseconds at HIGH level when data is logical 1 and LOW when it is equipped with a...


