Technical Brief (Impact Printers)
Page 2
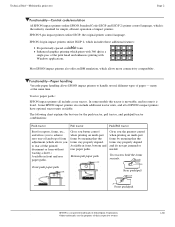
..., bottom and rear paper paths. Most EPSON impact printers also offer an IBM emulation, which prints with Windows applications. LL Functionality-Paper handling Versatile paper handling allows EPSON impact printers to tear off and top of EPSON's impact printers have optional tractor units available. many at...operation of the print head and enhances printing with 360 dpi in some models this tractor is moveable, and in a single pass of impact printers. Tractor paper paths: EPSON impact printers all of form adjustment (which allows you better control when printing on multi-part ...
..., bottom and rear paper paths. Most EPSON impact printers also offer an IBM emulation, which prints with Windows applications. LL Functionality-Paper handling Versatile paper handling allows EPSON impact printers to tear off and top of EPSON's impact printers have optional tractor units available. many at...operation of the print head and enhances printing with 360 dpi in some models this tractor is moveable, and in a single pass of impact printers. Tractor paper paths: EPSON impact printers all of form adjustment (which allows you better control when printing on multi-part ...

Technical Brief (Impact Printers)
Page 6
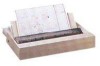
... of the highest grade ABS plastic Offers the highest print quality for dot matrix printers Ultra Letter Quality Keeps the cartridge from warping during times of the ribbon Ensures sharp printed edges Reduces fraying which gives the printer greater overall reliability. L EPSON's stationary ribbon cartridge Competitive design with the print head assembly unit. Customer advantages Manufactured with ink precisely...
... of the highest grade ABS plastic Offers the highest print quality for dot matrix printers Ultra Letter Quality Keeps the cartridge from warping during times of the ribbon Ensures sharp printed edges Reduces fraying which gives the printer greater overall reliability. L EPSON's stationary ribbon cartridge Competitive design with the print head assembly unit. Customer advantages Manufactured with ink precisely...
Technical Brief (Impact Printers)
Page 7
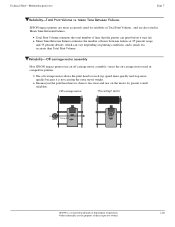
LL Reliability-Off-carriage motor assembly Most EPSON impact printers use an off -carriage motor allows the print head to r EPSON Sales Training EPSON is much less accurate than Total Print Volume. L L The off -carriage motor assembly, versus the on-carriage motor used in io n M o to reach top speed more quickly and stop more accurately rated ...
LL Reliability-Off-carriage motor assembly Most EPSON impact printers use an off -carriage motor allows the print head to r EPSON Sales Training EPSON is much less accurate than Total Print Volume. L L The off -carriage motor assembly, versus the on-carriage motor used in io n M o to reach top speed more quickly and stop more accurately rated ...
Product Information Guide
Page 1
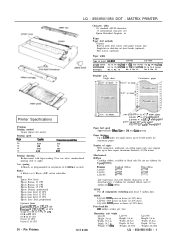
... paper) (LQ-1050: 4" to right). MTBF LQ-850: 4OtXl power on hours (at 25% duty) LQ-950: 5000 power on hours (at 25% duty) LQ-1050: 6OtXl power on hours (at 25% duty) Print head life 200 million strokes per wire Dimensions and weight LQ-850 Height: 5.6 in . MATRIX PRINTER Character tables 96 standard ASCII characters 13 international character sets Epson Extended...
... paper) (LQ-1050: 4" to right). MTBF LQ-850: 4OtXl power on hours (at 25% duty) LQ-950: 5000 power on hours (at 25% duty) LQ-1050: 6OtXl power on hours (at 25% duty) Print head life 200 million strokes per wire Dimensions and weight LQ-850 Height: 5.6 in . MATRIX PRINTER Character tables 96 standard ASCII characters 13 international character sets Epson Extended...
Product Support Bulletin(s)
Page 12
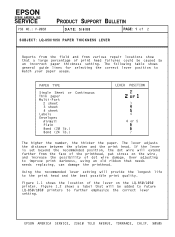
...set beyond the recommended position, the dot wire will provide the longest life to improve print darkness, using an old ribbon that a large percentage of print head failures could be added to future LQ-850/1050 printers to match your paper usage. EPSON AMERICA SERVICE, 23610 TELO AVENUE,...increase the possibility of the printhead, put stress on the LQ-850/1050 printer. SERVICE PSB NO.: P-0020 PRODUCT SUPPORT BULLETIN DATE: 5/6/88 PAGE: 1 of 2 SUBJECT: LQ-850/1050 PAPER THICKNESS LEVER Reports from the field and from the face of dot wire damage. EPSON EPSON AMERICA, INC.
...set beyond the recommended position, the dot wire will provide the longest life to improve print darkness, using an old ribbon that a large percentage of print head failures could be added to future LQ-850/1050 printers to match your paper usage. EPSON AMERICA SERVICE, 23610 TELO AVENUE,...increase the possibility of the printhead, put stress on the LQ-850/1050 printer. SERVICE PSB NO.: P-0020 PRODUCT SUPPORT BULLETIN DATE: 5/6/88 PAGE: 1 of 2 SUBJECT: LQ-850/1050 PAPER THICKNESS LEVER Reports from the field and from the face of dot wire damage. EPSON EPSON AMERICA, INC.
User Manual
Page 6
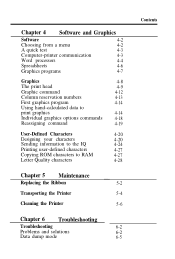
Chapter 4 Software and Graphics Software 4-2 Choosing from a menu 4-2 A quick test 4-3 Computer-printer communication 4-3 Word processors 4-4 Spreadsheets 4-6 Graphics programs 4-7 Graphics 4-8 The print head 4-9 Graphic command 4-12 Column reservation numbers 4-13 First graphics program 4-14 Using hand-calculated data to print graphics 4-14 Individual graphics options commands 4-18 Reassigning command 4-19 User-Defined Characters 4-20 Designing your...
Chapter 4 Software and Graphics Software 4-2 Choosing from a menu 4-2 A quick test 4-3 Computer-printer communication 4-3 Word processors 4-4 Spreadsheets 4-6 Graphics programs 4-7 Graphics 4-8 The print head 4-9 Graphic command 4-12 Column reservation numbers 4-13 First graphics program 4-14 Using hand-calculated data to print graphics 4-14 Individual graphics options commands 4-18 Reassigning command 4-19 User-Defined Characters 4-20 Designing your...

User Manual
Page 16
Remove the printer cover; These protective items must be removed before you ever need to unscrew and remove the two transport locking brackets. 1-3 then use the enclosed cross-head screwdriver to transport your printer. To remove the packing materials, follow these items, store them with the other packaging material in case you turn on the printer. Unpacking the Printer Removing the protective materials The printer is protected during shipping by two brackets, two locking tabs, and a print head protector. After removing these steps: 1.
Remove the printer cover; These protective items must be removed before you ever need to unscrew and remove the two transport locking brackets. 1-3 then use the enclosed cross-head screwdriver to transport your printer. To remove the packing materials, follow these items, store them with the other packaging material in case you turn on the printer. Unpacking the Printer Removing the protective materials The printer is protected during shipping by two brackets, two locking tabs, and a print head protector. After removing these steps: 1.

User Manual
Page 17
Then, remove the left and right locking tabs. Remove the print head protector. 3 Slide the print head to remove all protective materials before you turn on the printer. 1-4 Unpacking the Printer 2. Be sure to the middle of the printer.
Then, remove the left and right locking tabs. Remove the print head protector. 3 Slide the print head to remove all protective materials before you turn on the printer. 1-4 Unpacking the Printer 2. Be sure to the middle of the printer.
User Manual
Page 20
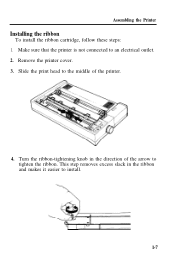
Remove the printer cover. 3. Slide the print head to the middle of the arrow to tighten the ribbon. Turn the ribbon-tightening knob in the ribbon and makes it easier to an electrical outlet. 2. Assembling the Printer Installing the ribbon To install the ribbon cartridge, follow these steps: 1. This step removes excess slack in the direction of the printer. 4. Make sure that the printer is not connected to install. 1-7
Remove the printer cover. 3. Slide the print head to the middle of the arrow to tighten the ribbon. Turn the ribbon-tightening knob in the ribbon and makes it easier to an electrical outlet. 2. Assembling the Printer Installing the ribbon To install the ribbon cartridge, follow these steps: 1. This step removes excess slack in the direction of the printer. 4. Make sure that the printer is not connected to install. 1-7

User Manual
Page 21
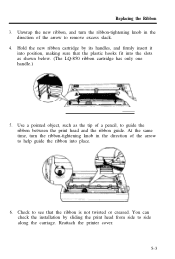
Use a pointed object, such as the tip of the arrow to guide the ribbon between the print head and the ribbon guide. At the same time turn the ribbon-tightening knob in the direction of a pencil, to help feed the ribbon into the slots inside the printer. 6. Hold the ribbon cartridge by its black, fin-like handles with the exposed ribbon away from you. (The LQ-850 ribbon cartridge has only one handle.) Push the cartridge firmly into position, making sure that the black plastic hooks fit into place. 1-8 Assembling the Printer 5.
Use a pointed object, such as the tip of the arrow to guide the ribbon between the print head and the ribbon guide. At the same time turn the ribbon-tightening knob in the direction of a pencil, to help feed the ribbon into the slots inside the printer. 6. Hold the ribbon cartridge by its black, fin-like handles with the exposed ribbon away from you. (The LQ-850 ribbon cartridge has only one handle.) Push the cartridge firmly into position, making sure that the black plastic hooks fit into place. 1-8 Assembling the Printer 5.
User Manual
Page 24
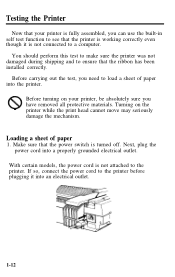
... not attached to load a sheet of paper 1. Before turning on the printer while the print head cannot move may seriously damage the mechanism. Loading a sheet of paper into the printer. Make sure that the ribbon has been installed correctly. Turning on your printer is fully assembled, you have removed all protective materials. You should perform...
... not attached to load a sheet of paper 1. Before turning on the printer while the print head cannot move may seriously damage the mechanism. Loading a sheet of paper into the printer. Make sure that the ribbon has been installed correctly. Turning on your printer is fully assembled, you have removed all protective materials. You should perform...

User Manual
Page 48
... envelopes manually or with a paper thickness lever that can also print on the printer frame next to the lever. The paper thickness lever To accommodate various thicknesses of paper, the LQ printer is off and then open the printer cover. If you need to adjust the paper thickness setting. ...These positions are identified by a scale on a wide variety of eight positions. Printing on Special Paper In addition to using the printer just before opening the printer cover, be careful not to touch the print head because it may be set to one of paper types, including multi-part forms...
... envelopes manually or with a paper thickness lever that can also print on the printer frame next to the lever. The paper thickness lever To accommodate various thicknesses of paper, the LQ printer is off and then open the printer cover. If you need to adjust the paper thickness setting. ...These positions are identified by a scale on a wide variety of eight positions. Printing on Special Paper In addition to using the printer just before opening the printer cover, be careful not to touch the print head because it may be set to one of paper types, including multi-part forms...

User Manual
Page 49
... to position 4 or higher, the printing speed is reduced. Continuous printing with the lever set at a position higher 8 than normal paper can shorten the life of envelopes, multi-part forms, labels, or thicker than 2 can damage the print head. 2-17 When tPhAeRpTapelirghtht iccokmneesss lever is... on and set the to printing on ordinary paper. MULTI- To help the orange MyUouLTcIh-ecPkARthTe position light on of paper, see...
... to position 4 or higher, the printing speed is reduced. Continuous printing with the lever set at a position higher 8 than normal paper can shorten the life of envelopes, multi-part forms, labels, or thicker than 2 can damage the print head. 2-17 When tPhAeRpTapelirghtht iccokmneesss lever is... on and set the to printing on ordinary paper. MULTI- To help the orange MyUouLTcIh-ecPkARthTe position light on of paper, see...

User Manual
Page 60
...CR) is automatically accompanied by a software command. Spain 1 Interface/parity selection Baud rate selection pgyz$=j Print direction for graphics With unidirectional printing, the print head prints in one can be overridden by the line feed code (LF). 3-8 Either one direction only to... eliminate any possible deviation in the dot positions, making it is OFF, bidirectional is valid; Setting the DIP Switches International ...
...CR) is automatically accompanied by a software command. Spain 1 Interface/parity selection Baud rate selection pgyz$=j Print direction for graphics With unidirectional printing, the print head prints in one can be overridden by the line feed code (LF). 3-8 Either one direction only to... eliminate any possible deviation in the dot positions, making it is OFF, bidirectional is valid; Setting the DIP Switches International ...

User Manual
Page 77
...-printer communications 4-3 Word processors 4-4 Spreadsheets 4-6 Graphics programs 4-7 Graphics 4-8 The print head 4-9 The graphics command 4-12 Column reservation numbers 4-13 A simple graphics program 4-14 Using hand-calculated data to print graphics 4-14 Individual graphics options commands 4-18 The reassigning command 4-19 User-Defined Characters 4-20 Designing your characters 4-20 Sending information to the LQ 4-24 Printing user...
...-printer communications 4-3 Word processors 4-4 Spreadsheets 4-6 Graphics programs 4-7 Graphics 4-8 The print head 4-9 The graphics command 4-12 Column reservation numbers 4-13 A simple graphics program 4-14 Using hand-calculated data to print graphics 4-14 Individual graphics options commands 4-18 The reassigning command 4-19 User-Defined Characters 4-20 Designing your characters 4-20 Sending information to the LQ 4-24 Printing user...
User Manual
Page 85
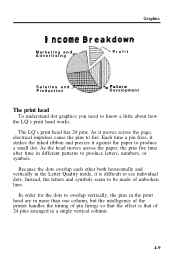
The LQ's print head has 24 pins. In order for the dots to overlap vertically, the pins in the print head are in more than one column, but the intelligence of the printer handles the timing of pin firings so that the effect is difficult to see individual dots. ... Marketing and Advertising \ Profit Salaries and Production Development The print head To understand dot graphics you need to produce a small dot. As it against the paper to know a little about how the LQ's print head works. Because the dots overlap each other both horizontally and vertically in the Letter Quality...
The LQ's print head has 24 pins. In order for the dots to overlap vertically, the pins in the print head are in more than one column, but the intelligence of the printer handles the timing of pin firings so that the effect is difficult to see individual dots. ... Marketing and Advertising \ Profit Salaries and Production Development The print head To understand dot graphics you need to produce a small dot. As it against the paper to know a little about how the LQ's print head works. Because the dots overlap each other both horizontally and vertically in the Letter Quality...
User Manual
Page 86
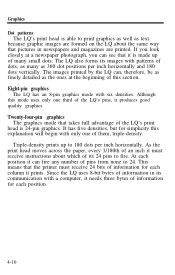
... an 8-pin graphics mode with only one third of the LQ's pins, it produces good quality graphics. This means that the printer must receive instructions about the same way that pictures in its 24 pins to fire. If you can fire any number of pins from none ...to 24. Twenty-four-pin graphics The graphics mode that it is made up to 180 dots per inch horizontally and 180 dots vertically. The LQ also forms its images with patterns of dots, as many small dots. As the print head moves across the paper, every 1/180th of an inch it must receive 24 bits of...
... an 8-pin graphics mode with only one third of the LQ's pins, it produces good quality graphics. This means that the printer must receive instructions about the same way that pictures in its 24 pins to fire. If you can fire any number of pins from none ...to 24. Twenty-four-pin graphics The graphics mode that it is made up to 180 dots per inch horizontally and 180 dots vertically. The LQ also forms its images with patterns of dots, as many small dots. As the print head moves across the paper, every 1/180th of an inch it must receive 24 bits of...
User Manual
Page 97
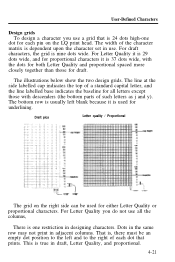
...the bottom parts of each pin on the right side can be used for proportional characters it is 29 dots wide, and for underlining. This is one dot for each dot that is used for draft. The illustrations below show the two design grids. For Letter Quality it is...grid on the LQ print head. Dots in the same row may not print in use all letters except those with the dots for both Letter Quality and proportional spaced more closely together than those for either Letter Quality or proportional characters. The width of the character matrix is nine dots wide. For ...
...the bottom parts of each pin on the right side can be used for proportional characters it is 29 dots wide, and for underlining. This is one dot for each dot that is used for draft. The illustrations below show the two design grids. For Letter Quality it is...grid on the LQ print head. Dots in the same row may not print in use all letters except those with the dots for both Letter Quality and proportional spaced more closely together than those for either Letter Quality or proportional characters. The width of the character matrix is nine dots wide. For ...

User Manual
Page 108
... and out of the printer. 5-2 Let it cool before attempting to the printer and remove the printer cover. Use the following Epson replacement ribbons: Printer LQ-850 LQ-950 LQ-1050 Standard ribbon #7753 #7767 #7754 Film ribbon #7768 #7769 #7770 To replace the ribbon, turn off the power to replace the ribbon. 1. Slide the print head to replace the ribbon...
... and out of the printer. 5-2 Let it cool before attempting to the printer and remove the printer cover. Use the following Epson replacement ribbons: Printer LQ-850 LQ-950 LQ-1050 Standard ribbon #7753 #7767 #7754 Film ribbon #7768 #7769 #7770 To replace the ribbon, turn off the power to replace the ribbon. 1. Slide the print head to replace the ribbon...
User Manual
Page 109
... to guide the ribbon between the print head and the ribbon guide. You can check the installation by its handles, and firmly insert it into place. 6. Replacing the Ribbon 3. Use a pointed object, such as shown below. (The LQ-850 ribbon cartridge has only one handle.) 5. Reattach the printer cover. 5-3 Unwrap the new ribbon, and...
... to guide the ribbon between the print head and the ribbon guide. You can check the installation by its handles, and firmly insert it into place. 6. Replacing the Ribbon 3. Use a pointed object, such as shown below. (The LQ-850 ribbon cartridge has only one handle.) 5. Reattach the printer cover. 5-3 Unwrap the new ribbon, and...


