
Technical Brief (Impact Printers)
Page 1
... type of ownership Flexible paper handling - only impact printers can handle multi-part forms and multiple paper paths that the printer are renowned for their reliability with LQ FX-980-Nine-pin narrow carriage Wide carriage printers have 4 number in their respective owners. EPSON impact printers are capable of Seiko Epson Corporation. 1/00 Other trademarks are either 9- or...
... type of ownership Flexible paper handling - only impact printers can handle multi-part forms and multiple paper paths that the printer are renowned for their reliability with LQ FX-980-Nine-pin narrow carriage Wide carriage printers have 4 number in their respective owners. EPSON impact printers are capable of Seiko Epson Corporation. 1/00 Other trademarks are either 9- or...
Technical Brief (Impact Printers)
Page 2
... push/pull tractor combinations: Push tractor Pull tractor Push/Pull tractor Best for simple, efficient operation of EPSON's impact printers have optional tractor units available. Gives you the greatest control when printing on multi-part forms by ensuring that the forms stay properly aligned. Front push paper path Rear push/pull Front push...
... push/pull tractor combinations: Push tractor Pull tractor Push/Pull tractor Best for simple, efficient operation of EPSON's impact printers have optional tractor units available. Gives you the greatest control when printing on multi-part forms by ensuring that the forms stay properly aligned. Front push paper path Rear push/pull Front push...

Technical Brief (Impact Printers)
Page 3
...read push position. Technical Brief-Multimedia projectors Page 3 Single sheet paper paths: EPSON impact printers all can handle single sheet paper and single sheet multi-part forms, many EPSON impact printers have both front and top paper paths: Front paper path The front paper path... side-bound single sheet multi-part forms Top paper path The top paper path accommodates single sheets, envelopes or postcards and optional cut sheet feeders. L Paper thickness adjustment: Most EPSON impact printers have a Paper Thickness Lever that allows the printer to accommodate various thicknesses of...
...read push position. Technical Brief-Multimedia projectors Page 3 Single sheet paper paths: EPSON impact printers all can handle single sheet paper and single sheet multi-part forms, many EPSON impact printers have both front and top paper paths: Front paper path The front paper path... side-bound single sheet multi-part forms Top paper path The top paper path accommodates single sheets, envelopes or postcards and optional cut sheet feeders. L Paper thickness adjustment: Most EPSON impact printers have a Paper Thickness Lever that allows the printer to accommodate various thicknesses of...
Product Information Guide
Page 1
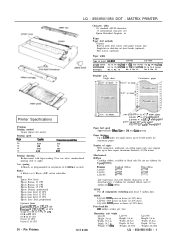
..., or programmable in increments of 1/36Oth of copies With continuous, multi-part, no-carbon paper only; to 12" wdth paper) (LQ-1050: 4" to right). Prmter LQ-850 LQ-950 LQ-1050 Standard ribbon #1153 #1767 #1754 Film ribbon #7768 @7769 $7770...Epson Roman proportional Epson Sans Serif 10 CPI Epson Sans Serif 12 CPI Epson Sans Serif 15 CPI Epson Sans Serif proportional Optional fonts CcNmer IO CPI. Width: 20.5 in . No. 10 No 6. Continuous paper Printer Specifications Printing Printing method 24-pin impact dot matrix Printing speed 10 draft 220 10 LCI 73 12 draft 264 12 LQ...
..., or programmable in increments of 1/36Oth of copies With continuous, multi-part, no-carbon paper only; to 12" wdth paper) (LQ-1050: 4" to right). Prmter LQ-850 LQ-950 LQ-1050 Standard ribbon #1153 #1767 #1754 Film ribbon #7768 @7769 $7770...Epson Roman proportional Epson Sans Serif 10 CPI Epson Sans Serif 12 CPI Epson Sans Serif 15 CPI Epson Sans Serif proportional Optional fonts CcNmer IO CPI. Width: 20.5 in . No. 10 No 6. Continuous paper Printer Specifications Printing Printing method 24-pin impact dot matrix Printing speed 10 draft 220 10 LCI 73 12 draft 264 12 LQ...
Product Information Guide
Page 2
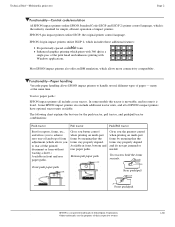
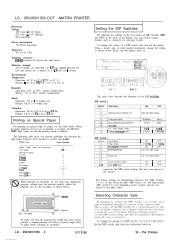
... below ON : OFF ON 1 OFF represents the DIP switch settings that your paper: Paper Type Lever Position Paper (single sheets or continuous) Thin paper Multi-part paper P-sheet 3sheet 4-sheet Labels Envelopes Air mall PIaWl Bond I20 lb.1 Bond (24 lb.1 2 2 or 1 3 4 5 4 4 4 or 5 6 6 7...before printing on the country, and are not shown in the back of DIP switches (SW1 and SW2) in the tables above. Pin Printers LQ - 850/950/1050 DOT - MATRIX PRINTER Electrical Voltage 120 VAC, + 10% (USA) 220 VAC, f 10% (Europe) Non-switchable Power consumption 120 Watts maximum Frequency ...
... below ON : OFF ON 1 OFF represents the DIP switch settings that your paper: Paper Type Lever Position Paper (single sheets or continuous) Thin paper Multi-part paper P-sheet 3sheet 4-sheet Labels Envelopes Air mall PIaWl Bond I20 lb.1 Bond (24 lb.1 2 2 or 1 3 4 5 4 4 4 or 5 6 6 7...before printing on the country, and are not shown in the back of DIP switches (SW1 and SW2) in the tables above. Pin Printers LQ - 850/950/1050 DOT - MATRIX PRINTER Electrical Voltage 120 VAC, + 10% (USA) 220 VAC, f 10% (Europe) Non-switchable Power consumption 120 Watts maximum Frequency ...
Product Information Guide
Page 4
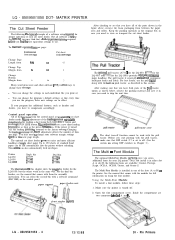
... pull tractor IS especially usefull wth continuous multi-part forms and labels. pull tractor cover A! Before you have both parts of experimentation IS required before you print or;...you need to change your LQ printer. In I I The optlonal pull tractor (A731 I for the LQ-850, #7313 for thts new page length. LQ - 850/950/1050 DOT- Keep the packing materials ...for proper operation of the slots (A or B) m the printer. You may find that you seven additional fonts for assembly instructions. MATRIX PRINTER The Cut Sheet Feeder The following fonts are two connectors labelled ...
... pull tractor IS especially usefull wth continuous multi-part forms and labels. pull tractor cover A! Before you have both parts of experimentation IS required before you print or;...you need to change your LQ printer. In I I The optlonal pull tractor (A731 I for the LQ-850, #7313 for thts new page length. LQ - 850/950/1050 DOT- Keep the packing materials ...for proper operation of the slots (A or B) m the printer. You may find that you seven additional fonts for assembly instructions. MATRIX PRINTER The Cut Sheet Feeder The following fonts are two connectors labelled ...

Product Support Bulletin(s)
Page 9
... do they print on the back of 3 Q: What fonts are the paper thickness specifications for the LQ-950 and LQ-850/1050 with one original and up to serial in the printers? Q: What type of paper feeds do I switch from parallel to 3 copies. A: The dip switches on ? A: Draft Roman...keeps the forms taut for more consistant paper feeding. The maximum paper thickness should not exceed 0.0126 inches. A: When printing on continuous multi-part carbonless forms, with the upgrade (LQ850/1050U). Q: If it need an optional pull tractor? Single bin or dual bin Cut Sheet Feeder...
... do they print on the back of 3 Q: What fonts are the paper thickness specifications for the LQ-950 and LQ-850/1050 with one original and up to serial in the printers? Q: What type of paper feeds do I switch from parallel to 3 copies. A: The dip switches on ? A: Draft Roman...keeps the forms taut for more consistant paper feeding. The maximum paper thickness should not exceed 0.0126 inches. A: When printing on continuous multi-part carbonless forms, with the upgrade (LQ850/1050U). Q: If it need an optional pull tractor? Single bin or dual bin Cut Sheet Feeder...
Product Support Bulletin(s)
Page 11
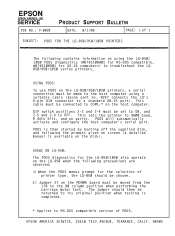
This sets the printer to 9600 baud, 8 data bits, and no . 8297 connects the LQ's 6-pin DIN connector to COM1:* on using a suitable cable (Epson part no parity. USAGE ON LQ-950: The PDOS diagnostics for the LQ-850/1050 also operate on the LQ-950 when the following the prompts given on... screen (a detailed manual is completed. * Applies to MS-DOS compatible version of printer type, the LQ-850 should then ...
This sets the printer to 9600 baud, 8 data bits, and no . 8297 connects the LQ's 6-pin DIN connector to COM1:* on using a suitable cable (Epson part no parity. USAGE ON LQ-950: The PDOS diagnostics for the LQ-850/1050 also operate on the LQ-950 when the following the prompts given on... screen (a detailed manual is completed. * Applies to MS-DOS compatible version of printer type, the LQ-850 should then ...
Product Support Bulletin(s)
Page 12
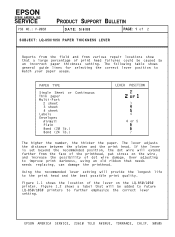
... damage. If the lever is set beyond the recommended position, the dot wire will provide the longest life to further emphasize the correct lever setting. EPSON AMERICA SERVICE, 23610 TELO AVENUE, TORRANCE, CALIF. 90505 EPSON EPSON AMERICA, INC. The following table shows general guide lines for selecting the ... the field and from the face of print head failures could be added to future LQ-850/1050 printers to the print head and the best possible print quality. PAPER TYPE Single Sheet or Thin paper Multi-Part 2 sheet 3 sheet 4 sheet Labels Envelopes Airmail Plain Bond (20 lb.) Bond ...
... damage. If the lever is set beyond the recommended position, the dot wire will provide the longest life to further emphasize the correct lever setting. EPSON AMERICA SERVICE, 23610 TELO AVENUE, TORRANCE, CALIF. 90505 EPSON EPSON AMERICA, INC. The following table shows general guide lines for selecting the ... the field and from the face of print head failures could be added to future LQ-850/1050 printers to the print head and the best possible print quality. PAPER TYPE Single Sheet or Thin paper Multi-Part 2 sheet 3 sheet 4 sheet Labels Envelopes Airmail Plain Bond (20 lb.) Bond ...
Product Support Bulletin(s)
Page 18
... are the Epson part numbers and can be used to printers. This list supercedes PSB-013. EAI # OEM # USAGE 7751 7753 7754 7756 7757 8750 8753 8755 8759 8760 8762 8763 8764 N/A N/A N/A N/A N/A ERC-04 ERC-13 ERC-08 ERC-14 ERC-16 ERC-17 N/A N/A ALL DX LQ-500, LQ-800, LQ-850 LQ-1000, LQ-1050 LQ-2500 (BLACK) LQ-2500...
... are the Epson part numbers and can be used to printers. This list supercedes PSB-013. EAI # OEM # USAGE 7751 7753 7754 7756 7757 8750 8753 8755 8759 8760 8762 8763 8764 N/A N/A N/A N/A N/A ERC-04 ERC-13 ERC-08 ERC-14 ERC-16 ERC-17 N/A N/A ALL DX LQ-500, LQ-800, LQ-850 LQ-1000, LQ-1050 LQ-2500 (BLACK) LQ-2500...
User Manual
Page 3
... additional suggestions. Government Printing Office, Washington, DC 20402. WARNING The connection of a non-shielded printer interface cable to provide reasonable protection against such interference in Subpart J of part 15 of FCC Rules, which can be reproduced, stored in a retrieval system, or transmitted, ... and used properly, that interference will invalidate the FCC Certification of this book, Seiko Epson Corporation assumes no guarantee that is no responsibility for errors or omissions. No part of this equipment has more of the following booklet prepared by the FCC for a...
... additional suggestions. Government Printing Office, Washington, DC 20402. WARNING The connection of a non-shielded printer interface cable to provide reasonable protection against such interference in Subpart J of part 15 of FCC Rules, which can be reproduced, stored in a retrieval system, or transmitted, ... and used properly, that interference will invalidate the FCC Certification of this book, Seiko Epson Corporation assumes no guarantee that is no responsibility for errors or omissions. No part of this equipment has more of the following booklet prepared by the FCC for a...
User Manual
Page 4
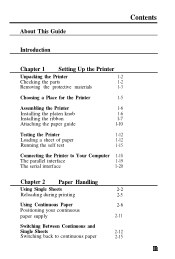
... Chapter 1 Setting Up the Printer Unpacking the Printer 1-2 Checking the parts 1-2 Removing the protective materials 1-3 Choosing a Place for the Printer 1-5 Assembling the Printer 1-6 Installing the platen knob 1-6 Installing the ribbon l-7 Attaching the paper guide l-10 Testing the Printer 1-12 Loading a sheet of paper 1-12 Running the self test 1-15 Connecting the Printer to Your Computer 1-18 The...
... Chapter 1 Setting Up the Printer Unpacking the Printer 1-2 Checking the parts 1-2 Removing the protective materials 1-3 Choosing a Place for the Printer 1-5 Assembling the Printer 1-6 Installing the platen knob 1-6 Installing the ribbon l-7 Attaching the paper guide l-10 Testing the Printer 1-12 Loading a sheet of paper 1-12 Running the self test 1-15 Connecting the Printer to Your Computer 1-18 The...
User Manual
Page 5
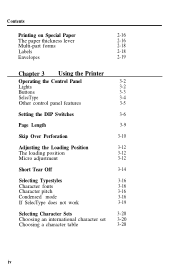
Contents Printing on Special Paper 2-16 The paper thickness lever 2-16 Multi-part forms 2-18 Labels 2-18 Envelopes 2-19 Chapter 3 Using the Printer Operating the Control Panel 3-2 Lights 3-2 Buttons 3-3 SelecType 3-4 Other control panel features 3-5 Setting the DIP Switches 3-6 Page Length 3-9 Skip Over Perforation 3-10 Adjusting the Loading Position 3-...
Contents Printing on Special Paper 2-16 The paper thickness lever 2-16 Multi-part forms 2-18 Labels 2-18 Envelopes 2-19 Chapter 3 Using the Printer Operating the Control Panel 3-2 Lights 3-2 Buttons 3-3 SelecType 3-4 Other control panel features 3-5 Setting the DIP Switches 3-6 Page Length 3-9 Skip Over Perforation 3-10 Adjusting the Loading Position 3-...
User Manual
Page 9
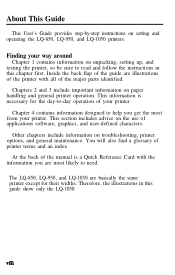
...all of the major parts identified. You will also find a glossary of applications software, graphics, and user-defined characters. Chapters 2 and 3 include important information on troubleshooting, printer options, and general maintenance. Therefore, the illustrations in this guide show only the LQ-1050. vu. .1. ... flap of the guide are most from your way around Chapter 1 contains information on setting and operating the LQ-850, LQ-950, and LQ-1050 printers. Chapter 4 contains information designed to read and follow the instructions in this chapter first. About This Guide ...
...all of the major parts identified. You will also find a glossary of applications software, graphics, and user-defined characters. Chapters 2 and 3 include important information on troubleshooting, printer options, and general maintenance. Therefore, the illustrations in this guide show only the LQ-1050. vu. .1. ... flap of the guide are most from your way around Chapter 1 contains information on setting and operating the LQ-850, LQ-950, and LQ-1050 printers. Chapter 4 contains information designed to read and follow the instructions in this chapter first. About This Guide ...

User Manual
Page 12
... with continuous multi-part forms. Optional Interface Boards A number of optional interfaces can be used with the LQ printers. xi Single-Bin and Dual-Bin Cut Sheet Feeders The cut sheet feeders give you to use programs designed to be fed automatically into the printer without reloading. These... units also can be used to the number of character fonts available in Letter Quality mode. Multi-Font Module The optional Multi-Font Module adds to supplement the LQ's built-in parallel and serial interfaces...
... with continuous multi-part forms. Optional Interface Boards A number of optional interfaces can be used with the LQ printers. xi Single-Bin and Dual-Bin Cut Sheet Feeders The cut sheet feeders give you to use programs designed to be fed automatically into the printer without reloading. These... units also can be used to the number of character fonts available in Letter Quality mode. Multi-Font Module The optional Multi-Font Module adds to supplement the LQ's built-in parallel and serial interfaces...
User Manual
Page 14
Unpacking the Printer 1-2 Checking the parts l-2 Removing the protective materials 1-3 Choosing a Place for the Printer l-5 Assembling the Printer l-6 Installing the platen knob l-6 Installing the ribbon l-7 Attaching the paper guide l-10 Testing the Printer 1-12 Loading a sheet of paper 1-12 Running the self test 1-15 Connecting the Printer to Your Computer 1-18 The parallel interface 1-19 The serial interface l-20
Unpacking the Printer 1-2 Checking the parts l-2 Removing the protective materials 1-3 Choosing a Place for the Printer l-5 Assembling the Printer l-6 Installing the platen knob l-6 Installing the ribbon l-7 Attaching the paper guide l-10 Testing the Printer 1-12 Loading a sheet of paper 1-12 Running the self test 1-15 Connecting the Printer to Your Computer 1-18 The parallel interface 1-19 The serial interface l-20

User Manual
Page 15
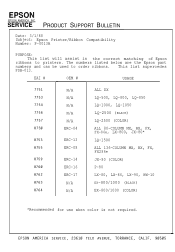
In some locations the power cable is a separate item. 1-2 Unpacking the Printer Checking the parts make sure you have all the parts AS you unpack the printer, shown below and that none have been damaged during transportation.
In some locations the power cable is a separate item. 1-2 Unpacking the Printer Checking the parts make sure you have all the parts AS you unpack the printer, shown below and that none have been damaged during transportation.

User Manual
Page 28
Press the LOAD/EJECT button to stop until the printer runs out of a typical draft self test is slightly different. Testing the Printer 3. everything is operating correctly, After press tchheecOkNingLtIoNsEeebtuhtatot n to eject the page. Part of paper or you press the ON LINE button. The self test does not stop the test. See the...
Press the LOAD/EJECT button to stop until the printer runs out of a typical draft self test is slightly different. Testing the Printer 3. everything is operating correctly, After press tchheecOkNingLtIoNsEeebtuhtatot n to eject the page. Part of paper or you press the ON LINE button. The self test does not stop the test. See the...

User Manual
Page 29
As before, the self test ends when the printer runs out of paper. 6. ononon 11" 0 on on off 12" on off on again while holding down until printing begins. Turn off Inter-face Serial ... quality) mode, load another sheet of paper or when you press the ON LINE button. Part of a typical LQ self test is shown below: Count t-y us+l France Germany U.K. Testing the Printer 5. You need only hold the button down the FORM FEED button. on off off Invalid off on on off on off the...
As before, the self test ends when the printer runs out of paper. 6. ononon 11" 0 on on off 12" on off on again while holding down until printing begins. Turn off Inter-face Serial ... quality) mode, load another sheet of paper or when you press the ON LINE button. Part of a typical LQ self test is shown below: Count t-y us+l France Germany U.K. Testing the Printer 5. You need only hold the button down the FORM FEED button. on off off Invalid off on on off on off the...

User Manual
Page 33
Using Single Sheets 2-2 Reloading during printing 2-5 Using Continuous Paper 2-6 Positioning your continuous paper supply 2-11 Switching Between Continuous and Single Sheets 2-12 Switching back to continuous paper 2-15 Printing on Special Paper 2-16 The paper thickness lever 2-16 Multi-part forms 2-18 Labels 2-18 Envelopes 2-19
Using Single Sheets 2-2 Reloading during printing 2-5 Using Continuous Paper 2-6 Positioning your continuous paper supply 2-11 Switching Between Continuous and Single Sheets 2-12 Switching back to continuous paper 2-15 Printing on Special Paper 2-16 The paper thickness lever 2-16 Multi-part forms 2-18 Labels 2-18 Envelopes 2-19


