Epson 570e Support Question
Epson 570e Support Question
Find answers below for this question about Epson 570e - LQ B/W Dot-matrix Printer.Need a Epson 570e manual? We have 7 online manuals for this item!
Question posted by paul19142 on July 26th, 2012
Replacement Part 'paper Tension Unit' Part#1050319
Where can i buy this replacement part for my epson LQ570e printer? "paper tension unit" part number 1050319
thanks, paul
Current Answers
Related Epson 570e Manual Pages
Product Information Guide - Page 1
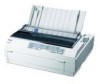
... single sheet mulitpart forms, from the front paper slot. EPSON LQ-570e
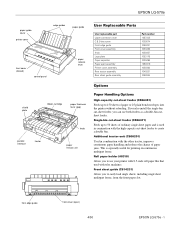
paper guide cover
printer cover
edge guides
paper guide
front cover (closed)
control panel
paper release lever
shield plate
ribbon cartridge
paper thickness lever (gap)
parallel interface
tractor
knob
paper tension unit
User Replaceable Parts
User replaceable part Upper connector cover C.B.S-tite screw Front...
Product Information Guide - Page 11

... paper onto the push tractor.
EPSON LQ-570e
Removing continuous paper with labels
To avoid peeling labels off the backing sheet and jamming the printer, follow these steps when you remove continuous paper with labels from the tractor.
2. Make sure the printer is firmly seated. Remove the paper guide by holding both edges and lifting it and install the paper tension unit...
Product Information Guide - Page 12
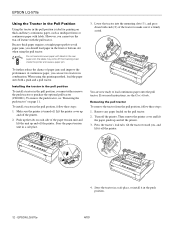
... from the pull position, follow these steps: 1. Remove any paper loaded on page 11. EPSON LQ-570e
4. the labels may come off . Store the paper tension unit in the push position.
4/00 Store the tractor in a safe place, or install it off the printer.
12 - Do not load continuous paper with the pull tractor. To further reduce the chance...
Product Information Guide - Page 13
....
4/00
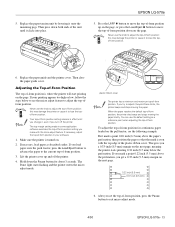
EPSON LQ-570e - 13 Then close the paper guide cover. this may damage the printer or cause it... to adjust the top-ofform position. If you get a 0.37-inch (9.5-mm) margin on the page, or press the Load/Eject U button to the current top-of the plastic ribbon cover. then position the paper so that the mark is turned on the page. Replace the paper tension unit...
Product Information Guide - Page 17
... it thoroughly several times a year. these steps:
1.
Then install the paper tension unit.
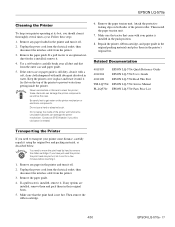
7. Related Documentation
4011805 4011804 4012108 TM-LQ570e PL-LQ570e
EPSON LQ-570e Quick Reference Guide EPSON LQ-570e User's Guide EPSON LQ-570e Read This First EPSON LQ-570e Service Manual EPSON LQ-570e Parts Price List
Transporting the Printer
If you should clean it using the original box and...
Quick Reference Guide - Page 7
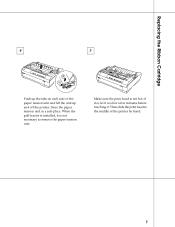
... touching it is not necessary to the middle of the paper tension unit and lift the unit up and off the printer.
if it . Make sure the print head is not hot; Then slide the print head to remove the paper tension unit. Store the paper tension unit in a safe place. Replacing the Ribbon Cartridge
4
5
Push up the tabs on each side...
Quick Reference Guide - Page 10
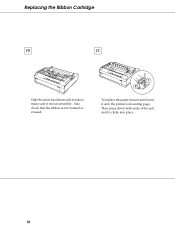
Also check that the ribbon is not twisted or creased.
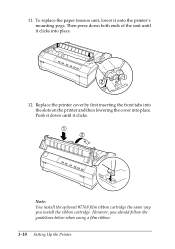
To replace the paper tension unit, lower it moves smoothly. Replacing the Ribbon Cartridge
10
11
Slide the print head from side to side to make sure it onto the printer's mounting pegs. Then press down both ends of the unit until it clicks into place.
10
User Manual - Page 28
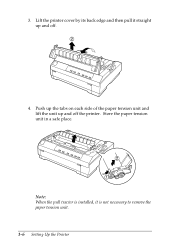
3. Push up the tabs on each side of the paper tension unit and lift the unit up and off the printer. Note: When the pull tractor is not necessary to remove the paper tension unit. 1-6 Setting Up the Printer Store the paper tension unit in a safe place. Lift the printer cover by its back edge and then pull it is installed, it straight up and off .
4.
User Manual - Page 32
To replace the paper tension unit, lower it clicks. Note: You install the optional #7768 film ribbon cartridge the same way you should follow the guidelines below when using a film ribbon: 1-10 Setting Up the Printer Push it down both ends of the unit until it onto the printer's mounting pegs. Then press down until it clicks into...
User Manual - Page 33
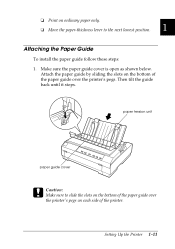
... below. ❏ Print on ordinary paper only.
❏ Move the paper-thickness lever to slide the slots on each side of the paper guide over the printer's pegs. Attach the paper guide by sliding the slots on the bottom of the paper guide over the printer's pegs on the bottom of the printer. paper tension unit
paper guide cover
c Caution: Make sure...
User Manual - Page 48
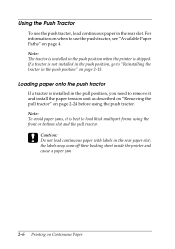
... tractor
If a tractor is best to remove it and install the paper tension unit as described on "Removing the pull tractor" on page 4. the labels may come off their backing sheet inside the printer and cause a paper jam.
2-6 Printing on page 2-13. Note: To avoid paper jams, it is installed in the rear slot.
c Caution: Do...
User Manual - Page 53
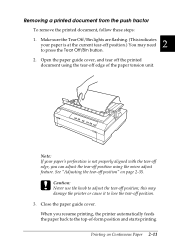
... the tear-off edge, you resume printing, the printer automatically feeds the paper back to press the Tear Off/Bin button. 2. Note: If your paper is not properly aligned with the tear-off position;
Close the paper guide cover. this may need to the top-of the paper tension unit. Removing a printed document from the push tractor...
User Manual - Page 55
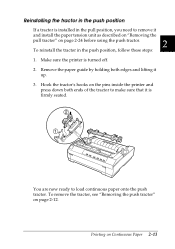
You are now ready to make sure that it is firmly seated. Hook the tractor's hooks on the pins inside the printer and press down both edges and lifting it
and install the paper tension unit as described on "Removing the
pull tractor" on page 2-24 before using the push tractor.
2
To reinstall the tractor...
User Manual - Page 57
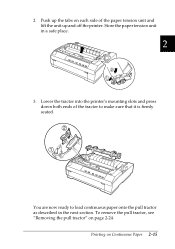
... tractor to load continuous paper onto the pull tractor as described in a safe place.
2
3.
Printing on Continuous Paper 2-15 You are now ready to make sure that it is firmly seated. Lower the tractor into the printer's mounting slots and press down both ends of the paper tension unit and lift the unit up the tabs on...
User Manual - Page 67

Then press down both ends of the unit until it onto the printer's mounting pegs. Replace the paper guide and the printer cover. To replace the paper tension unit, lower it clicks into place.
6. Printing on page 2-13.
2 5. Then close the paper guide cover. 4.
Store the tractor in a safe place, or install it in the push position as described on "Reinstalling...
User Manual - Page 180
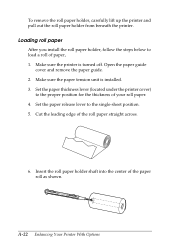
... load a roll of the roll paper straight across.
6. Open the paper guide
cover and remove the paper guide. 2. Cut the leading edge of paper, 1. Make sure the paper tension unit is turned off.
Insert the roll paper holder shaft into the center of your roll paper. 4. Set the paper thickness lever (located under the printer cover)
to the single-sheet position...
User Manual - Page 191

... clips on page 2-24.
7. Then install the paper tension unit as described in Chapter 1. let it as described in the printer. Make sure the printer is installed, remove it cool for instructions.
8. B 6. w Warning: You need to remove the ribbon cartridge. Unplug the power cord from the printer.
3. If any paper loaded in "Removing the pull tractor" on...
User Manual - Page 241
...! Utility, 4-30 EPSON Status Monitor 3, 1-16 Error indicator, 7-2 to 7-3
F
Front paper guide, 2-19 slot, 8, 3-2, 3-11 to 3-13
G
Graphics menu, 4-7
H
Hex dump, 7-19 to 7-20 High-capacity cut-sheet feeder, A-2
I
Installing interface card, A-29 paper tension unit, 1-10, 2-25 ribbon cartridge, 1-5 to 1-10 tractor in font, 5-2
C
Character Tables, C-20 to C-31 Choosing a place for the printer,
1-3 to...
User Manual - Page 242
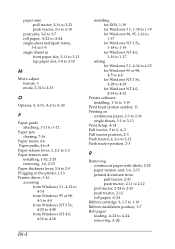
... feature, 3 mode, 2-31 to 2-33
O
Options, 8, 4-15, A-2 to A-30
P
Paper guide attaching, 1-11 to 1-12
Paper jam clearing, 7-16
Paper menu, 4-6 Paper paths, 4 to 8 Paper release lever, 3, 2-2 to 2-3 Paper tension unit
installing, 1-10, 2-25 removing, 1-6, 2-15 Paper thickness lever, 2-4 to 2-5 Plugging in the printer, 1-13 Printer driver, 1-16 accessing
from Windows 3.1, 4-12 to 4-14
from Windows 95...
User Manual - Page 245
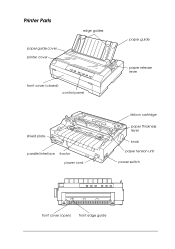
Printer Parts
paper guide cover printer cover
edge guides
front cover (closed) control panel
paper guide
paper release lever
shield plate
parallel interface tractor power cord
ribbon cartridge
paper thickness lever
knob paper tension unit power switch
front cover (open) front edge guide
Similar Questions

Can't Change Setting
The Pause and Paper Out lights are on, not flashing. The Paper Source should be for Tractor, as we a...
The Pause and Paper Out lights are on, not flashing. The Paper Source should be for Tractor, as we a...
(Posted by libjones 7 years ago)

Paper Loading
I am having trouble figuring out how to load the paper
I am having trouble figuring out how to load the paper
(Posted by Anonymous-154120 8 years ago)

Paper Eject Problms
printer to sent print then print .so print out of 1or 2 paper paper out problms
printer to sent print then print .so print out of 1or 2 paper paper out problms
(Posted by karthick1991m 11 years ago)

How To Set The Paper Source Properly?
my printer is Epson LQ-680pro. the senario is this. i set the printer using the paper source to the ...
my printer is Epson LQ-680pro. the senario is this. i set the printer using the paper source to the ...
(Posted by skywind92 11 years ago)
Continuous Paper
How to print a continous paper by using tractor setting in LQ-2190 without no cutt off? because my P...
How to print a continous paper by using tractor setting in LQ-2190 without no cutt off? because my P...
(Posted by denz0376 12 years ago)