Epson 2070 Support Question
Epson 2070 Support Question
Find answers below for this question about Epson 2070 - LQ B/W Dot-matrix Printer.Need a Epson 2070 manual? We have 4 online manuals for this item!
Question posted by karthick1991m on October 24th, 2012
Paper Eject Problms
printer to sent print then print .so print out of 1or 2 paper paper out problms
Current Answers
Related Epson 2070 Manual Pages
User Manual - Page 13
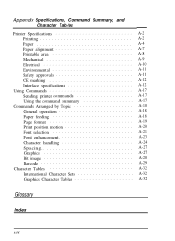
Mechanical Electrical Environmental Safety approvals
CE marking Interface specifications Using Commands Sending printer commands Using the command summary Commands Arranged by Topic General operation Paper feeding Page format Print position motion Font selection Font enhancement Character handling
Spacing Graphics Bit image Barcode Character Tables International Character...
User Manual - Page 28
...-sheet position.
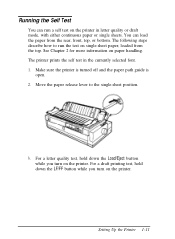
3. Make sure the printer is turned off and the paper path guide is
open. 2. The printer prints the self test in letter quality or draft mode, with either continuous paper or single sheets. For a letter quality test, hold down the Load/Eject button while you turn on the printer.
Running the Self Test
You can...
User Manual - Page 30
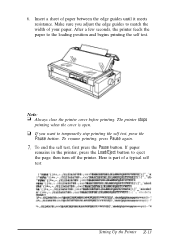
... the width of a typical self test:
Setting Up the Printer Z-13
then turn off the printer. Note: Always close the printer cover before printing. If you adjust the edge guides to temporarily stop printing the self test, press the Pause button. If paper
remains in the printer, press the Load/Eject button to the loading position and begins...
User Manual - Page 50

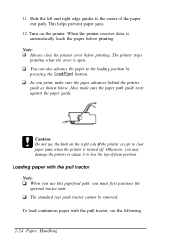
... knob on the printer. then
lock it
automatically loads the paper before printing. When the printer receives data, it in the paper; As you may damage the printer or cause it to the loading position by pressing the Load/Eject button. Make sure the paper path guide rests against the paper guide.
2. 7. Attach the printer cover and paper guide. 10. Turn...
User Manual - Page 62
... edge guides to the center of the printer except to the loading position by pressing the Load/Eject button. Caution: Do not use this paperfeed path, you print, make sure the paper path guide rests against the paper guide. The standard rear push tractor cannot be removed. The printer stops printing when the cover is turned off.
User Manual - Page 65
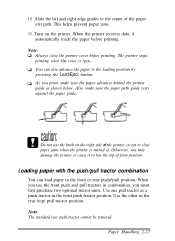
... shown below. 10. Turn on the right side of the printer except to the center of . The printer stops printing when the cover is turned of the paper exit path. Paper Handling 2-27 When the printer receives data, it to the loading position by pressing the Load/Eject button. Note: The standard rear push tractor cannot be...
User Manual - Page 70
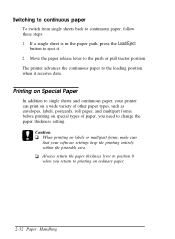
... to single sheets and continuous paper, your printer can print on a wide variety of other paper types, such as envelopes, labels, postcards, roll paper, and multipart forms. before printing on special types of paper, you return to eject it receives data. If a single sheet is in the paper path, press the Load/Eject
button to printing on labels or multipart forms...
User Manual - Page 123

... Character Tables
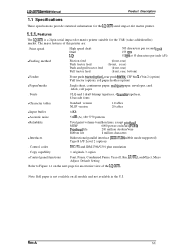
Printer Specifications
Printing
Printing method: Printing speed:
24-pin impact dot matrix
Quality
Character pet inch
Characters/second
High speed draft
10
300
Draft
10
275
12
330
15
413
Draft condensed
I
17 20
I
236 275
Letter quality
10
92
12
110
15
138
Letter quality condensed
17
157
20
183
l The paper thickness lever...
Service Manual - Page 10
...), roll paper holder (option)
q Paper/media
Single sheet, continuous paper, multipart paper, envelopes, card labels, roll paper
. Copy capability
1 original+ 3 copies
q Control panel functions
Font, Pause, Condensed Pause, Tear off, Bin, LF/FF, Load/Eject, Micro Adjust, Default Setting
Refer to Figure 1-1 on the next page for the LQ-2070 serial impact dot matrix printer.
1.1.1. Control...
Service Manual - Page 91
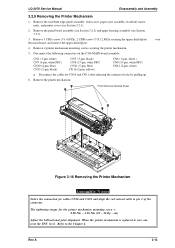
...the rear/front edge guide assembly, front cover, paper eject assembly, rear/front tractor units, and printer cover (see Section 3.2.7).
3. Rev.A
3-13 cm)
Adjust the bidirectional print alignment. Remove 4 printer mechanism mounting screws securing the printer mechanism.
5. Printer Mechanism Mounting Screws
Figure 3-16 Removing the Printer Mechanism
Assembly Notes
Notice the connection for...
Service Manual - Page 92

...Zn ) is used to secure the upper part of the PF motor. Disassembly and Assembly
LQ-2070 Service Manual
3.2.9.1 Removing the PF Motor
1. Remove the CBS screw (3 × 6,... the rear/front edge guide assembly, front cover, paper eject assembly, rear/front tractor unit, and printer cover (see Section 3.2.7). 3. Remove the printer mechanism (see Section 3.2.9). 4. The tightening torque for...
Service Manual - Page 93
LQ-2070 Service Manual
Disassembly and Assembly
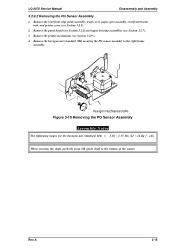
3.2.9.2 Removing the PG Sensor Assembly
1. Remove the rear/front edge guide assembly, front cover, paper eject assembly, rear/front tractor unit, and printer cover (see Section 3.2.9 ).
4. Rev.A
3-15
Hexagon Nut(Standard,M4) Figure 3-18 Removing the PG Sensor Assembly
Assembly Notes
The tightening torque for the hexagon nut (...
Service Manual - Page 94
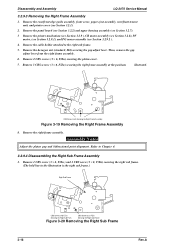
... Sub Frame Assembly
1. Remove the rear/front edge guide assembly, front cover, paper eject assembly, rear/front tractor unit, and printer cover (see Section 3.2.9.2 ).
4.
CBS Screw (3 x6) Securing the Right Frame Assembly
Figure 3-19 Removing the Right Frame Assembly
8. Disassembly and Assembly
LQ-2070 Service Manual
3.2.9.3 Removing the Right Frame Assembly
1. Remove 1 CBS screw (3 ×...
Service Manual - Page 97
... front cover, paper eject assembly, rear/front tractor unit, and printer cover (see ... from the HP sensor.
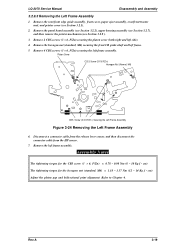
7. cm) Adjust the platen gap and bidirectional print alignment. Refer to Chapter 4. Platen Cover
C.B.S Screw (3 X 6 FZ...F/Zn) securing the platen cover (both right and left side). 4. LQ-2070 Service Manual
Disassembly and Assembly
3.2.9.5 Removing the Left Frame Assembly
1. Assembly...
Service Manual - Page 98
...LQ-2070 Service Manual
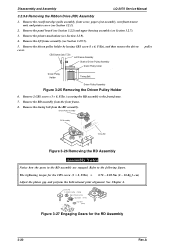
3.2.9.6 Removing the Ribbon Drive (RD) Assembly
1. Remove 2 CBS screws (3 × 8, F/Zn ) securing the RD assembly to the following figure. Remove the rear/front edge guide assembly, front cover, paper eject assembly, rear/front tractor unit, and printer... print alignment. See Chapter 4.
Remove the printer mechanism (see Section 3.2.9.5).
5. Remove the RD assembly from...
Service Manual - Page 99
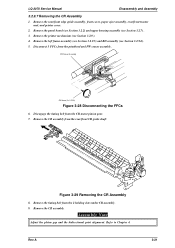
... Remove the rear/front edge guide assembly, front cover, paper eject assembly, rear/front tractor unit, and printer cover.
2. Remove the printer mechanism (see Section 3.2.7) . 3. Disconnect 3 FFCs from ...and the bidirectional print alignment.
Refer to Chapter 4. Remove the panel board (see Section 3.2.2) and upper housing assembly (see Section 3.2.9 ). 4. LQ-2070 Service Manual
...
Service Manual - Page 101

... the Rear PE Sensor Assembly
6. Remove the printer mechanism (see Section 3.2.7). 3. Remove the printer mechanism (see Section 3.2.7). 3. LQ-2070 Service Manual
Disassembly and Assembly
3.2.9.8 Removing the Rear PE Sensor Assembly
1 Remove the rear/front edge guide assembly, front cover, paper eject assembly, rear/front tractor unit, and printer cover.
2. Remove the panel board (see Section...
Service Manual - Page 102
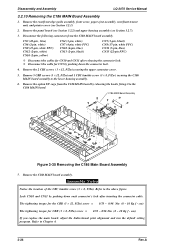
... the C186 MAIN board assembly. cm) If you replace the main board, adjust the bidirectional print alignment and run the default setting program. Assembly Notes
Notice the location of the CBC lamitite screw...guide assembly, front cover, paper eject assembly, rear/front tractor unit, and printer cover (see Section 3.2.7). 3. Disassembly and Assembly
LQ-2070 Service Manual
3.2.10 Removing...
Service Manual - Page 103
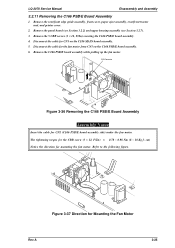
...CBB screw (3 × 12, F/Zn) = 0.78 ~ 0.98 Nm (8 ~ 10 Kg f- Refer to the following figure. LQ-2070 Service Manual
Disassembly and Assembly
3.2.11 Removing the C166 PSB/E Board Assembly
1. The tightening torque for CN2 (C166 PSB/E board assembly ... the fan motor. Remove the rear/front edge guide assembly, front cover, paper eject assembly, rear/front tractor unit, and printer cover.
2.
Service Manual - Page 119
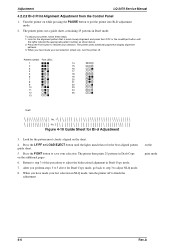
... 3 to adjust NLQ mode.
8. Turn the printer on the additional pages.
6. Press the Font button to finish the adjustment. The printer prints out a guide sheet, containing 25 patterns in NLQ mode, turn the printer off to resister your last selection (sheet LQ), turn the printer off . Adjustment
LQ-2070 Service Manual
4.2.2.2 Bi-d Print Alignment Adjustment from the Control Panel...
Similar Questions


Epson Lq-2070 Printer Driver For Windows 7
why Epson LQ-2070 printing have Left top corner of " 284.2 @EJL " occurred
why Epson LQ-2070 printing have Left top corner of " 284.2 @EJL " occurred
(Posted by winsonwong 11 years ago)

Epson Lq2180 Printer Problem ?
Hello , Iam Gad from Egypt. Iam the Techical Support of Egyptair Company.We have 3 Epson LQ Printers...
Hello , Iam Gad from Egypt. Iam the Techical Support of Egyptair Company.We have 3 Epson LQ Printers...
(Posted by gad89495 11 years ago)

Price Of Epson Lq 2070 Printer Head
Price of Epson LQ 2070 Printer Head
Price of Epson LQ 2070 Printer Head
(Posted by valhitesh 11 years ago)

Epson Dot Matrix Printers
What replaces the Epson LQ-2070 or is it still available for purchase?
What replaces the Epson LQ-2070 or is it still available for purchase?
(Posted by susief 12 years ago)