
Technical Brief (Impact Printers)
Page 1
... from High Speed Draft up Reliability M Ribbon quality M Ribbon cartridge reliability M Total Print Volume vs. or 24-pin, which determines the type of printing and the number of multi-part forms that can handle multi-part forms and multiple paper paths that the printer are either 9- only impact printers can all have the sturdiest printhead pins...
... from High Speed Draft up Reliability M Ribbon quality M Ribbon cartridge reliability M Total Print Volume vs. or 24-pin, which determines the type of printing and the number of multi-part forms that can handle multi-part forms and multiple paper paths that the printer are either 9- only impact printers can all have the sturdiest printhead pins...

Technical Brief (Impact Printers)
Page 6
... respective owners. Because the carriage does not have to every sale 5 Reliability-Ribbon cartridge reliability Most EPSON impact printers use and extreme temperature changes L L Easy to sell with every printer Adds profit to move the ribbon with the print head, and therefore has a longer life. L EPSON brand ribbons are the property of the print head = First Character = 2,000,000...
... respective owners. Because the carriage does not have to every sale 5 Reliability-Ribbon cartridge reliability Most EPSON impact printers use and extreme temperature changes L L Easy to sell with every printer Adds profit to move the ribbon with the print head, and therefore has a longer life. L EPSON brand ribbons are the property of the print head = First Character = 2,000,000...

User Manual
Page 8
...LQ control panel 1-14 1-13 LQ self test in draft and Letter Quality modes . . . 1-17 1-14 Connecting a parallel interface cable 1-18 2-1 Preparing the printer for installation 2-1 2-2 Installing the cut sheet feeder 2-11 3-1 Continuous-feed paper with printer...unit 3-11 vii Figures 1-1 The LQ-800 1-2 1-2 The LQ-1000 1-2 1-3 Installing the paper feed knob 1-3 1-4 Tightening the ribbon 1-5 1-5 Loading the LQ-800 ribbon cartridge 1-6 1-6 Loading the LQ-1000 ribbon cartridge 1-6 1-7 Positioning the ribbon 1-7 1-8 Installing the single-sheet ...
...LQ control panel 1-14 1-13 LQ self test in draft and Letter Quality modes . . . 1-17 1-14 Connecting a parallel interface cable 1-18 2-1 Preparing the printer for installation 2-1 2-2 Installing the cut sheet feeder 2-11 3-1 Continuous-feed paper with printer...unit 3-11 vii Figures 1-1 The LQ-800 1-2 1-2 The LQ-1000 1-2 1-3 Installing the paper feed knob 1-3 1-4 Tightening the ribbon 1-5 1-5 Loading the LQ-800 ribbon cartridge 1-6 1-6 Loading the LQ-1000 ribbon cartridge 1-6 1-7 Positioning the ribbon 1-7 1-8 Installing the single-sheet ...

User Manual
Page 9
... the data 6-14 6-8 Grids for super/subscript characters 6-19 A-1 The DIP switch panels A-1 C-1 Plugging the identity and font modules together C-1 C-2 Installing an option cartridge C-2 D-1 Print head replacement D-9 D-2 Removing the ribbon cables D-10 F-1 Parallel interface timing F-3 G-1 Removing the upper case G-3 G-2 Removing the control panel G-4 G-3 Main circuit board G-5 G-4 Interface board mounted on main circuit...
... the data 6-14 6-8 Grids for super/subscript characters 6-19 A-1 The DIP switch panels A-1 C-1 Plugging the identity and font modules together C-1 C-2 Installing an option cartridge C-2 D-1 Print head replacement D-9 D-2 Removing the ribbon cables D-10 F-1 Parallel interface timing F-3 G-1 Removing the upper case G-3 G-2 Removing the control panel G-4 G-3 Main circuit board G-5 G-4 Interface board mounted on main circuit...
User Manual
Page 17
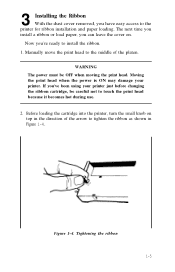
... and paper loading. Moving the print head when the power is ON may damage your printer just before changing the ribbon cartridge, be OFF when moving the print head. Figure 1-4. Tightening the ribbon 1-5 If you can leave the cover on top in Figure 1-4. Manually move the print head to the... touch the print head because it becomes hot during use. 2. Before loading the cartridge into the printer, turn the small knob on . 3 Installing the Ribbon With the dust cover removed, you 're ready to install the ribbon. 1. The next time you install a ribbon or load paper, you 've been using your...
... and paper loading. Moving the print head when the power is ON may damage your printer just before changing the ribbon cartridge, be OFF when moving the print head. Figure 1-4. Tightening the ribbon 1-5 If you can leave the cover on top in Figure 1-4. Manually move the print head to the... touch the print head because it becomes hot during use. 2. Before loading the cartridge into the printer, turn the small knob on . 3 Installing the Ribbon With the dust cover removed, you 're ready to install the ribbon. 1. The next time you install a ribbon or load paper, you 've been using your...
User Manual
Page 18
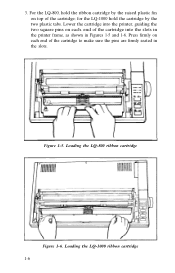
3. For the LQ-800, hold the cartridge by the raised plastic fin on top of the cartridge to make sure the pins are firmly seated in Figures 1-5 and 1-6. for the LQ-1000 hold the ribbon cartridge by the two plastic tabs. Figure 1-5. Press firmly on each end of the cartridge; Lower the cartridge into the slots in the printer frame, as shown in the slots. Loading the LQ-800 ribbon cartridge Figure 1-6. end of the cartridge into the printer, guiding the two square pins on each . Loading the LQ-1000 ribbon cartridge 1-6
3. For the LQ-800, hold the cartridge by the raised plastic fin on top of the cartridge to make sure the pins are firmly seated in Figures 1-5 and 1-6. for the LQ-1000 hold the ribbon cartridge by the two plastic tabs. Figure 1-5. Press firmly on each end of the cartridge; Lower the cartridge into the slots in the printer frame, as shown in the slots. Loading the LQ-800 ribbon cartridge Figure 1-6. end of the cartridge into the printer, guiding the two square pins on each . Loading the LQ-1000 ribbon cartridge 1-6
User Manual
Page 19
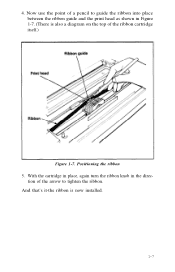
Now use the point of a pencil to tighten the ribbon. With the cartridge in place, again turn the ribbon knob in Figure 1-7. (There is now installed. 1-7 And that's it-the ribbon is also a diagram on the top of the arrow to guide the ribbon into place between the ribbon guide and the print head as shown in the direc- tion of the ribbon cartridge itself.) Figure 1-7. Positioning the ribbon 5. 4.
Now use the point of a pencil to tighten the ribbon. With the cartridge in place, again turn the ribbon knob in Figure 1-7. (There is now installed. 1-7 And that's it-the ribbon is also a diagram on the top of the arrow to guide the ribbon into place between the ribbon guide and the print head as shown in the direc- tion of the ribbon cartridge itself.) Figure 1-7. Positioning the ribbon 5. 4.
User Manual
Page 20
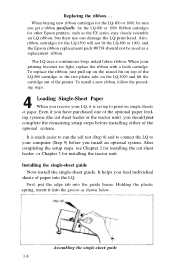
... the single-sheet guide 1-8 Replacing the ribbon. . . Ribbon cartridges for the LQ-1500 will not fit the LQ-800 or 1000, and the Epson ribbon replacement pack #8758 should not be sure you should first complete the remaining setup steps before you feed individual sheets of the printer. The LQ uses a continuous-loop, inked fabric ribbon. Holding the plastic spring, insert...
... the single-sheet guide 1-8 Replacing the ribbon. . . Ribbon cartridges for the LQ-1500 will not fit the LQ-800 or 1000, and the Epson ribbon replacement pack #8758 should not be sure you should first complete the remaining setup steps before you feed individual sheets of the printer. The LQ uses a continuous-loop, inked fabric ribbon. Holding the plastic spring, insert...
User Manual
Page 120
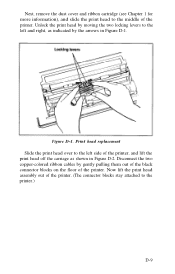
... head off the carriage as indicated by the arrows in Figure D-2. Disconnect the two copper-colored ribbon cables by moving the two locking levers to the left side of the printer. Next, remove the dust cover and ribbon cartridge (see Chapter 1 for more information), and slide the print head to the middle of the...
... head off the carriage as indicated by the arrows in Figure D-2. Disconnect the two copper-colored ribbon cables by moving the two locking levers to the left side of the printer. Next, remove the dust cover and ribbon cartridge (see Chapter 1 for more information), and slide the print head to the middle of the...
User Manual
Page 132
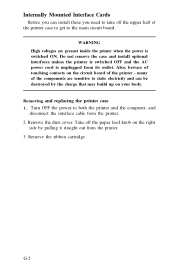
...the circuit board of the printer - many of the printer case to get to both the printer and the computer, and disconnect the interface cable from the printer. 2. Remove the ribbon cartridge. Do not remove the case and install optional interfaces unless the printer is switched OFF and ...the AC power cord is switched ON. Removing and replacing the printer case 1. G-2 Also, beware of touching contacts...
...the circuit board of the printer - many of the printer case to get to both the printer and the computer, and disconnect the interface cable from the printer. 2. Remove the ribbon cartridge. Do not remove the case and install optional interfaces unless the printer is switched OFF and ...the AC power cord is switched ON. Removing and replacing the printer case 1. G-2 Also, beware of touching contacts...
User Manual
Page 141
LQ-1000 3.8 in. 23.5 in. 13.2 in . Power Power 120 VAC + 10% Power usage 70 volt-amperes maximum Frequency 49.5 to 60.5 Hz Environment Temperature Operating 41&#...) Storage 0.50 G, 55Hz (maximum) Insulation resistance . . . . . 10 megaohms between AC power line and chassis H-3 Printer Ribbon Cartridge ribbon, black Ribbon life expectancy . . . . 2 million characters MCBF 5 million lines (excluding print head life) Print head life 200 million strokes Dimensions and weight LQ-800 Height 3.8 in . 17.6 lbs. Width (with paper feed knob 16.5 in . Weight 13.2 lbs...
LQ-1000 3.8 in. 23.5 in. 13.2 in . Power Power 120 VAC + 10% Power usage 70 volt-amperes maximum Frequency 49.5 to 60.5 Hz Environment Temperature Operating 41&#...) Storage 0.50 G, 55Hz (maximum) Insulation resistance . . . . . 10 megaohms between AC power line and chassis H-3 Printer Ribbon Cartridge ribbon, black Ribbon life expectancy . . . . 2 million characters MCBF 5 million lines (excluding print head life) Print head life 200 million strokes Dimensions and weight LQ-800 Height 3.8 in . 17.6 lbs. Width (with paper feed knob 16.5 in . Weight 13.2 lbs...


