
Technical Brief (Impact Printers)
Page 1
... EPSON impact printers: Functionality M Printing technology M Control code/emulation M Paper handling M SmartPark™ settings Versatility M Flexible interfacing M Built-in fonts M Computer-based set-up to Letter Quality LLL The name of multi-part forms that can all begin with FX, LX, or DFX Twenty-four pin printers all have 3 numbers in their respective owners. Reliability - These printers have the sturdiest printhead pins which determines the type...
... EPSON impact printers: Functionality M Printing technology M Control code/emulation M Paper handling M SmartPark™ settings Versatility M Flexible interfacing M Built-in fonts M Computer-based set-up to Letter Quality LLL The name of multi-part forms that can all begin with FX, LX, or DFX Twenty-four pin printers all have 3 numbers in their respective owners. Reliability - These printers have the sturdiest printhead pins which determines the type...
Technical Brief (Impact Printers)
Page 2
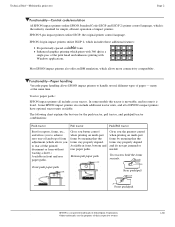
... control when printing on multi-part forms by ensuring that the forms stay properly aligned and do not get jammed or misfed. LL Functionality-Paper handling Versatile paper handling allows EPSON impact printers to tear off the printed document or form without wasting a sheet.) Available in front and rear paper paths. EPSON 9-pin impact printers utilize ESC/P, the original printer control language. Available in front, bottom and rear paper paths. Most EPSON impact printers...
... control when printing on multi-part forms by ensuring that the forms stay properly aligned and do not get jammed or misfed. LL Functionality-Paper handling Versatile paper handling allows EPSON impact printers to tear off the printed document or form without wasting a sheet.) Available in front and rear paper paths. EPSON 9-pin impact printers utilize ESC/P, the original printer control language. Available in front, bottom and rear paper paths. Most EPSON impact printers...
Technical Brief (Impact Printers)
Page 4
... on a printer. EPSON impact printers offers these types of all built-in fonts in fonts that allow you save paper and trouble, and precisely line up printing on the control panel. Technical Brief-Multimedia projectors Page 4 L LL Functionality-SmartPark™ settings EPSON SmartPark settings, which make the printers compatible with virtually any Windows system environment. DOS applications will automatically advance the paper to the top-of their respective owners. After a document is...
... on a printer. EPSON impact printers offers these types of all built-in fonts in fonts that allow you save paper and trouble, and precisely line up printing on the control panel. Technical Brief-Multimedia projectors Page 4 L LL Functionality-SmartPark™ settings EPSON SmartPark settings, which make the printers compatible with virtually any Windows system environment. DOS applications will automatically advance the paper to the top-of their respective owners. After a document is...

Technical Brief (Impact Printers)
Page 5
... Auto Line Feed : OFF Control Code : ESC/P 0 slash : OFF Buzzer : ON Roll Paper : OFF F1 : Execute F10: Previous F2 : Quit CR : Select item F3 : Default F4 : Change Port Printer Status Monitor Utility The Printer Status Monitor provides Windows 95/98 users with automatic error messaging for direct printer to the Printer Status Monitor. L Windows 3.51 and NT 4.0 users can add an optional Ethernet card to have access to host computer connection. EPSON Sales Training EPSON is the DOS-based printer setup...
... Auto Line Feed : OFF Control Code : ESC/P 0 slash : OFF Buzzer : ON Roll Paper : OFF F1 : Execute F10: Previous F2 : Quit CR : Select item F3 : Default F4 : Change Port Printer Status Monitor Utility The Printer Status Monitor provides Windows 95/98 users with automatic error messaging for direct printer to the Printer Status Monitor. L Windows 3.51 and NT 4.0 users can add an optional Ethernet card to have access to host computer connection. EPSON Sales Training EPSON is the DOS-based printer setup...
Product Support Bulletin(s)
Page 3
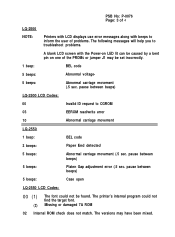
... may be found. PSB No: P-0076 Page: 3 of 4 LQ-2500 NOTE: Printers with LCD displays use error messages along with the Power-on LED lit can be caused by a bent pin on one of problems. The following messages will help you to CGROM 03 EEROM read/write error 10 Abnormal carriage movement LQ-2550 1 beep: BEL code 3 beeps: Paper End detected 5 beeps: Abnormal carriage movement...
... may be found. PSB No: P-0076 Page: 3 of 4 LQ-2500 NOTE: Printers with LCD displays use error messages along with the Power-on LED lit can be caused by a bent pin on one of problems. The following messages will help you to CGROM 03 EEROM read/write error 10 Abnormal carriage movement LQ-2550 1 beep: BEL code 3 beeps: Paper End detected 5 beeps: Abnormal carriage movement...
Product Support Bulletin(s)
Page 4
... of these errors are corrected by new operators who are : a. PSB No: P-0076 Page: 4 of 4 LQ-2550 cont. 03 A 'Verify After Write" check to ensure proper paper handling and prevent paper jams, which can result in the Service Manual (page A-54, figure A-52) and on the ROMA board may have failed or is not connected. 20 CPU error. Errors 0,2, 3, 10, and 20 may require a repair, adjustment or replacement.
... of these errors are corrected by new operators who are : a. PSB No: P-0076 Page: 4 of 4 LQ-2550 cont. 03 A 'Verify After Write" check to ensure proper paper handling and prevent paper jams, which can result in the Service Manual (page A-54, figure A-52) and on the ROMA board may have failed or is not connected. 20 CPU error. Errors 0,2, 3, 10, and 20 may require a repair, adjustment or replacement.
User Manual
Page 4
... 1-8 Loading Single-Sheet Paper 1-8 Installing the single-sheet guide 1-8 Loading the paper 1-9 Adjusting the paper thickness lever 1-12 Turning On the Power 1-12 Operating the Control Panel 1-14 OFF LINE/ON LINE 1-14 FORM FEED/LETTER QUALITY 1-15 LINE FEED/DRAFT 1-15 Selecting the Letter Quality or Draft Mode 1-16 Running the Self Test 1-16 Connecting Your Printer to Your Computer 1-17 The parallel interface 1-18 The serial interface 1-18 Printing Your First Document 1-19 2 The Cut Sheet Feeder 2-1 Installing...
... 1-8 Loading Single-Sheet Paper 1-8 Installing the single-sheet guide 1-8 Loading the paper 1-9 Adjusting the paper thickness lever 1-12 Turning On the Power 1-12 Operating the Control Panel 1-14 OFF LINE/ON LINE 1-14 FORM FEED/LETTER QUALITY 1-15 LINE FEED/DRAFT 1-15 Selecting the Letter Quality or Draft Mode 1-16 Running the Self Test 1-16 Connecting Your Printer to Your Computer 1-17 The parallel interface 1-18 The serial interface 1-18 Printing Your First Document 1-19 2 The Cut Sheet Feeder 2-1 Installing...

User Manual
Page 5
... Loading Paper 3-3 Setting the top-of-page position 3-8 Installing the paper separator and tractor cover . . . 3-8 Removing the Optional Tractor Unit 3-11 4 Using the LQ with Commercial Software 4-1 5 LQ Features 5-1 ESCape and ASCII 5-1 Demonstration Programs 5-2 Running BASIC programs 5-3 Sending Control Codes to the Printer 5-4 Basic Widths 5-5 Pica printing 5-5 Elite printing 5-5 Fifteen mode printing 5-5 Letter Quality and Draft 5-6 Cancelling Modes 5-6 Resetting the Printer 5-6 Disabling a program's reset code 5-7 Print...
... Loading Paper 3-3 Setting the top-of-page position 3-8 Installing the paper separator and tractor cover . . . 3-8 Removing the Optional Tractor Unit 3-11 4 Using the LQ with Commercial Software 4-1 5 LQ Features 5-1 ESCape and ASCII 5-1 Demonstration Programs 5-2 Running BASIC programs 5-3 Sending Control Codes to the Printer 5-4 Basic Widths 5-5 Pica printing 5-5 Elite printing 5-5 Fifteen mode printing 5-5 Letter Quality and Draft 5-6 Cancelling Modes 5-6 Resetting the Printer 5-6 Disabling a program's reset code 5-7 Print...
User Manual
Page 7
Appendixes A The DIP Switches A-1 B The LQ Character Set and ASCII Table B-1 C Installing the Option Cartridge C-1 The Identity Module C-2 The Font Module C-3 Using the Option Cartridges C-3 D Troubleshooting and Maintenance D-1 Diagnosing the Problem D-1 Beeper Error Warnings D-4 Hex Dump Mode D-4 IBM PC BASIC Solutions D-6 Applesoft BASIC Solutions D-7 QX-10 and QX-16 Solutions D-8 Maintenance D-8 Changing the print head D-8 E Widths of the Proportional Characters E-1 F The Parallel and Serial Interfaces F-1 G Choosing and ...
Appendixes A The DIP Switches A-1 B The LQ Character Set and ASCII Table B-1 C Installing the Option Cartridge C-1 The Identity Module C-2 The Font Module C-3 Using the Option Cartridges C-3 D Troubleshooting and Maintenance D-1 Diagnosing the Problem D-1 Beeper Error Warnings D-4 Hex Dump Mode D-4 IBM PC BASIC Solutions D-6 Applesoft BASIC Solutions D-7 QX-10 and QX-16 Solutions D-8 Maintenance D-8 Changing the print head D-8 E Widths of the Proportional Characters E-1 F The Parallel and Serial Interfaces F-1 G Choosing and ...

User Manual
Page 8
... 2-7 2-8 Turning the power on the power switch 1-13 1-12 The LQ control panel 1-14 1-13 LQ self test in draft and Letter Quality modes . . . 1-17 1-14 Connecting a parallel interface cable 1-18 2-1 Preparing the printer for paper loading 3-3 3-5 Moving the pin-feed holders 3-4 3-6 Opening the pin-feed covers 3-5 3-7 Installing the paper shelf 3-5 3-8 Loading paper 3-6 3-9 Fitting the paper over the pin feeds 3-7 3-10 Top-of-page position 3-8 3-11 Installing the paper separator 3-9 3-12 Installing the tractor cover 3-10 3-13 Removing the...
... 2-7 2-8 Turning the power on the power switch 1-13 1-12 The LQ control panel 1-14 1-13 LQ self test in draft and Letter Quality modes . . . 1-17 1-14 Connecting a parallel interface cable 1-18 2-1 Preparing the printer for paper loading 3-3 3-5 Moving the pin-feed holders 3-4 3-6 Opening the pin-feed covers 3-5 3-7 Installing the paper shelf 3-5 3-8 Loading paper 3-6 3-9 Fitting the paper over the pin feeds 3-7 3-10 Top-of-page position 3-8 3-11 Installing the paper separator 3-9 3-12 Installing the tractor cover 3-10 3-13 Removing the...

User Manual
Page 15
... scratching and discoloration. Figure 1-3. WARNING The print head is a clear plastic overlay on the control panel to the center of the LQ and remove the small bumper on the right side of the printer, as shown in Figure 1-3. There is protected by two plastic bumpers during shipping and take the cover off the printer. To install the knob, simply push it on...
... scratching and discoloration. Figure 1-3. WARNING The print head is a clear plastic overlay on the control panel to the center of the LQ and remove the small bumper on the right side of the printer, as shown in Figure 1-3. There is protected by two plastic bumpers during shipping and take the cover off the printer. To install the knob, simply push it on...
User Manual
Page 20
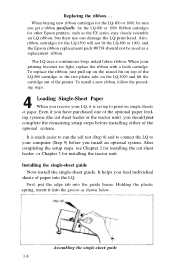
... LQ-800 or 1000. The LQ uses a continuous-loop, inked fabric ribbon. To install a new ribbon, follow the preceding steps. 4 Loading Single-Sheet Paper When you install an optional system. It helps you get a ribbon specifically for the LQ-800 or 1000, be used as the FX series, may closely resemble an LQ ribbon, but their use can damage the LQ print head. Assembling the single-sheet guide 1-8 Also, ribbon cartridges for other Epson printers, such as a replacement...
... LQ-800 or 1000. The LQ uses a continuous-loop, inked fabric ribbon. To install a new ribbon, follow the preceding steps. 4 Loading Single-Sheet Paper When you install an optional system. It helps you get a ribbon specifically for the LQ-800 or 1000, be used as the FX series, may closely resemble an LQ ribbon, but their use can damage the LQ print head. Assembling the single-sheet guide 1-8 Also, ribbon cartridges for other Epson printers, such as a replacement...

User Manual
Page 31
... having trouble printing, read the troubleshooting section in Step 8? q Have you loaded the paper correctly? (Read Chapter 2 or 3 if you are using the correct interface (serial or parallel)? q Is your printer properly connected to work with the LQ. Additional chapters and appendixes cover programming, control codes and ESCape sequences, technical specifications and maintenance . If the red PAPER OUT light is ON, check that you've completed the basic setup and operating...
... having trouble printing, read the troubleshooting section in Step 8? q Have you loaded the paper correctly? (Read Chapter 2 or 3 if you are using the correct interface (serial or parallel)? q Is your printer properly connected to work with the LQ. Additional chapters and appendixes cover programming, control codes and ESCape sequences, technical specifications and maintenance . If the red PAPER OUT light is ON, check that you've completed the basic setup and operating...

User Manual
Page 34
Note When the cut sheet feeder is possible to setting the rear notches of the feeder on the printer. 9. Figure 2-3. Now stand directly over the printer, look through the top of the cut sheet feeder onto the rear mounting pins on the rear mounting pins of the paper supports, as shown in Figure 2-1. 8. 7. To install the two small brackets, squeeze them together and...
Note When the cut sheet feeder is possible to setting the rear notches of the feeder on the printer. 9. Figure 2-3. Now stand directly over the printer, look through the top of the cut sheet feeder onto the rear mounting pins on the rear mounting pins of the paper supports, as shown in Figure 2-1. 8. 7. To install the two small brackets, squeeze them together and...
User Manual
Page 40
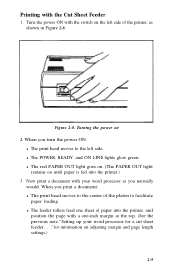
... sheet of the printer, as you turn the power ON: l The print head moves to facilitate paper loading. Now print a document with the Cut Sheet Feeder 1. l The red PAPER OUT light goes on. (The PAPER OUT light remains on the left side. When you print a document: l The print head moves to the center of the platen to the left side of paper into the printer.) 3. Figure 2-8. for a cut sheet feeder. . ." Turning the power on adjusting margin and page length settings.) 2-9 l The feeder rollers feed...
... sheet of the printer, as you turn the power ON: l The print head moves to facilitate paper loading. Now print a document with the Cut Sheet Feeder 1. l The red PAPER OUT light goes on. (The PAPER OUT light remains on the left side. When you print a document: l The print head moves to the center of the platen to the left side of paper into the printer.) 3. Figure 2-8. for a cut sheet feeder. . ." Turning the power on adjusting margin and page length settings.) 2-9 l The feeder rollers feed...
User Manual
Page 43
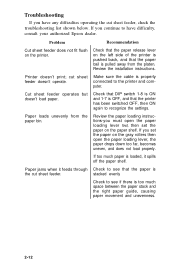
... the paper bin. Cut sheet feeder operates but doesn't load paper. Paper loads unevenly from the platen. Paper jams when it spills off the paper shelf. Review the installation instructions. Review the paper loading instructions-you set the paper on the left side of the printer is pushed back, and that the paper is the cut sheet feeder. stacked evenly Check to see that the paper bail is too much paper is loaded, it feeds through Check to the printer and com- Troubleshooting...
... the paper bin. Cut sheet feeder operates but doesn't load paper. Paper loads unevenly from the platen. Paper jams when it spills off the paper shelf. Review the installation instructions. Review the paper loading instructions-you set the paper on the left side of the printer is pushed back, and that the paper is the cut sheet feeder. stacked evenly Check to see that the paper bail is too much paper is loaded, it feeds through Check to the printer and com- Troubleshooting...
User Manual
Page 114
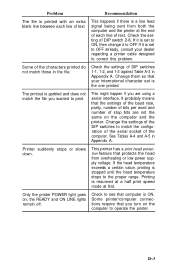
... extra blank line between each line of the computer. This might happen if you turn on the computer to correct this problem. Change them so that your international character set to OFF already, consult your dealer regarding a printer cable designed to operate the printer. Change the settings of the DIP switches to OFF If it is set is the one printed. Check the settings of DIP switch 2-8. D-3 Some printer/computer connections...
... extra blank line between each line of the computer. This might happen if you turn on the computer to correct this problem. Change them so that your international character set to OFF already, consult your dealer regarding a printer cable designed to operate the printer. Change the settings of the DIP switches to OFF If it is set is the one printed. Check the settings of DIP switch 2-8. D-3 Some printer/computer connections...
User Manual
Page 115
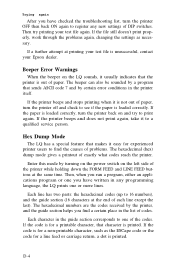
... the printer. If the file still doesn't print properly, work through the problems again, changing the settings as the ESCape code or the code for experienced printer users to a qualified service person. Enter this mode by the printer, and the guide section helps you find the causes of problems. The hexadecimal (hex) dump mode gives a printout of the codes. The hexadecimal numbers are the codes received by turning on the power switch on the LQ...
... the printer. If the file still doesn't print properly, work through the problems again, changing the settings as the ESCape code or the code for experienced printer users to a qualified service person. Enter this mode by the printer, and the guide section helps you find the causes of problems. The hexadecimal (hex) dump mode gives a printout of the codes. The hexadecimal numbers are the codes received by turning on the power switch on the LQ...
User Manual
Page 120
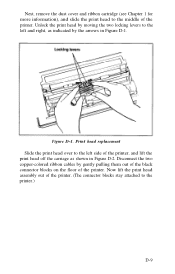
Figure D-1. Next, remove the dust cover and ribbon cartridge (see Chapter 1 for more information), and slide the print head to the middle of the printer, and lift the print head off the carriage as indicated by gently pulling them out of the black connector blocks on the floor of the printer. (The connector blocks stay attached to the left side of the...
Figure D-1. Next, remove the dust cover and ribbon cartridge (see Chapter 1 for more information), and slide the print head to the middle of the printer, and lift the print head off the carriage as indicated by gently pulling them out of the black connector blocks on the floor of the printer. (The connector blocks stay attached to the left side of the...
User Manual
Page 174
...A-3 Continuous-feed paper. See Extra line Double-width mode, 5-8-5-9 DRAFT button, 1-14 Draft mode selection, 1-14-1-15, A-3 Dumping, hex. See ASCII codes; Control codes; See CHR$ function CHR$ function, 5-2 Cleaning. See Paper loading Control codes listed by function, 1-4-I-30 listed by number, I-1-1-3 See also Specific modes and functions Control panel, 1-4, 1-13 Cover. See Dust cover Cut-sheet feeder, 2-1-2-14, A-3 installation, 2-1-2-5 loading paper, 2-6 removing, 2-10 troubleshooting, 2-12 D Data transfer sequence, F-3 Designing graphics. See Interface Character set, shown...
...A-3 Continuous-feed paper. See Extra line Double-width mode, 5-8-5-9 DRAFT button, 1-14 Draft mode selection, 1-14-1-15, A-3 Dumping, hex. See ASCII codes; Control codes; See CHR$ function CHR$ function, 5-2 Cleaning. See Paper loading Control codes listed by function, 1-4-I-30 listed by number, I-1-1-3 See also Specific modes and functions Control panel, 1-4, 1-13 Cover. See Dust cover Cut-sheet feeder, 2-1-2-14, A-3 installation, 2-1-2-5 loading paper, 2-6 removing, 2-10 troubleshooting, 2-12 D Data transfer sequence, F-3 Designing graphics. See Interface Character set, shown...


