Product Support Bulletin(s)
Page 1
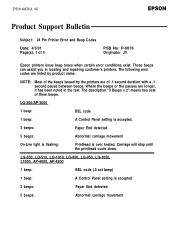
...sets of 4 PSB No: P-0076 Originator JV Epson printers issue beep tones when certain error conditions exist. The following error codes are of the beeps issued by the printers are listed by product name. LQ-200/AP-3000 1 beep: BEL code 1 ...beep: A Control Panel setting is accepted. 3 beeps: Paper End detected 5 beeps: Abnormal carriage movement On-Line light is flashing: Printhead is accepted 3 beeps: Paper End detected 5 beeps: Abnormal carriage movement LQ-500, LQ-510, LQ-1010, LQ-850, LQ-950, LQ...
...sets of 4 PSB No: P-0076 Originator JV Epson printers issue beep tones when certain error conditions exist. The following error codes are of the beeps issued by the printers are listed by product name. LQ-200/AP-3000 1 beep: BEL code 1 ...beep: A Control Panel setting is accepted. 3 beeps: Paper End detected 5 beeps: Abnormal carriage movement On-Line light is flashing: Printhead is accepted 3 beeps: Paper End detected 5 beeps: Abnormal carriage movement LQ-500, LQ-510, LQ-1010, LQ-850, LQ-950, LQ...

User Manual
Page 12
... setting up your new LQ-800 or LQ-1000, this man- l A 7K buffer frees your computer so you from unpacking, through ribbon and paper loading, to printing your printer. In this manual To make it easier to set up your first document. l The compact design and light weight of compressed. These...is used instead of expanded, and condensed is used in place of the LQ make it simple for home and business applications. If you are familiar with word processors, create graphics, define your new printer with earlier Epson manuals, you'll find information. Intro-2 Easy-to make it ideal for...
... setting up your new LQ-800 or LQ-1000, this man- l A 7K buffer frees your computer so you from unpacking, through ribbon and paper loading, to printing your printer. In this manual To make it easier to set up your first document. l The compact design and light weight of compressed. These...is used instead of expanded, and condensed is used in place of the LQ make it simple for home and business applications. If you are familiar with word processors, create graphics, define your new printer with earlier Epson manuals, you'll find information. Intro-2 Easy-to make it ideal for...
User Manual
Page 20
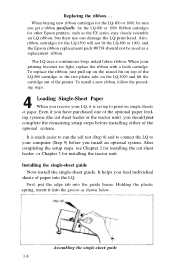
...other Epson printers, such as a replacement ribbon. The LQ uses a continuous-loop, inked fabric ribbon. It helps you feed individual sheets of the optional paper feeding systems (the cut sheet feeder, or Chapter 3 for the LQ-800 or 1000. Assembling the single-sheet guide 1-8 Also, ribbon cartridges for the LQ-800 or 1000,... of the optional systems. It is set up on the raised fin on top of the LQ-800 cartridge, or the two plastic tabs on single sheets of the printer. To replace the ribbon, just pull up to your printing becomes too light, replace the ribbon with a fresh cartridge.
...other Epson printers, such as a replacement ribbon. The LQ uses a continuous-loop, inked fabric ribbon. It helps you feed individual sheets of the optional paper feeding systems (the cut sheet feeder, or Chapter 3 for the LQ-800 or 1000. Assembling the single-sheet guide 1-8 Also, ribbon cartridges for the LQ-800 or 1000,... of the optional systems. It is set up on the raised fin on top of the LQ-800 cartridge, or the two plastic tabs on single sheets of the printer. To replace the ribbon, just pull up to your printing becomes too light, replace the ribbon with a fresh cartridge.
User Manual
Page 25
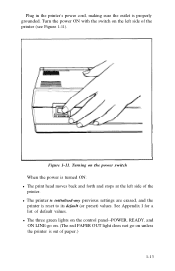
... the control panel--POWER, READY, and ON LINE-go on. (The red PAPER OUT light does not go on unless the printer is turned ON: l The print head moves back and forth and stops at the left side of default values. Turn the power ON with the ... switch When the power is out of the printer. Turning on the left side of paper.) 1-13 l The printer is initialized-any previous settings are erased, and the printer is properly grounded. See Appendix I for a list of the printer (see Figure 1-11). Figure 1-11. Plug in the printer's power cord, making sure the outlet is...
... the control panel--POWER, READY, and ON LINE-go on. (The red PAPER OUT light does not go on unless the printer is turned ON: l The print head moves back and forth and stops at the left side of default values. Turn the power ON with the ... switch When the power is out of the printer. Turning on the left side of paper.) 1-13 l The printer is initialized-any previous settings are erased, and the printer is properly grounded. See Appendix I for a list of the printer (see Figure 1-11). Figure 1-11. Plug in the printer's power cord, making sure the outlet is...
User Manual
Page 26
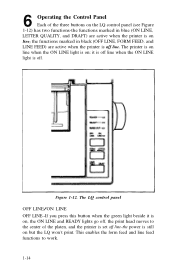
..., and DRAFT) are active when the printer is still on but the LQ won't print. The LQ control panel OFF LINE/ON LINE OFF LINE--If you press this button when the green light beside it is off line when the ON LINE light is off line. The printer is on line when the ON LINE... light is on line; 6 Operating the Control Panel...
..., and DRAFT) are active when the printer is still on but the LQ won't print. The LQ control panel OFF LINE/ON LINE OFF LINE--If you press this button when the green light beside it is off line when the ON LINE light is off line. The printer is on line when the ON LINE... light is on line; 6 Operating the Control Panel...
User Manual
Page 27
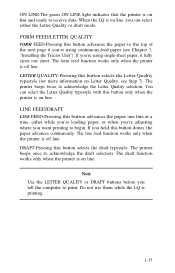
...paper one sheet. Do not use them while the LQ is on line. If you tell the computer to receive data. ON LINE-The green ON LINE light indicates that the printer is printing. 1-15 The draft function works only when the printer is on line and ready to print. When ...the LQ is on Letter Quality, see Chapter 3, "Installing the Tractor Unit"). LINE FEED...
...paper one sheet. Do not use them while the LQ is on line. If you tell the computer to receive data. ON LINE-The green ON LINE light indicates that the printer is printing. 1-15 The draft function works only when the printer is on line and ready to print. When ...the LQ is on Letter Quality, see Chapter 3, "Installing the Tractor Unit"). LINE FEED...

User Manual
Page 31
... ON? trol panel ON? q Is your printer properly connected to your word processor to work with the LQ. If you have you set up your computer? q Did you remove the plastic tab that you've loaded the paper correctly. If the red PAPER OUT light is ON, check that holds the print... head in front of the print head, not riding above it. Additional chapters and appendixes cover programming, control codes and ESCape sequences, technical specifications and maintenance . If not, press the ON LINE button to place the LQ on the con...
... ON? trol panel ON? q Is your printer properly connected to your word processor to work with the LQ. If you have you set up your computer? q Did you remove the plastic tab that you've loaded the paper correctly. If the red PAPER OUT light is ON, check that holds the print... head in front of the print head, not riding above it. Additional chapters and appendixes cover programming, control codes and ESCape sequences, technical specifications and maintenance . If not, press the ON LINE button to place the LQ on the con...
User Manual
Page 40
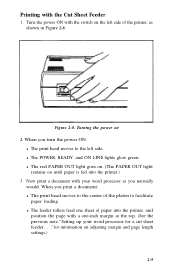
...on the left side. When you print a document: l The print head moves to the left side of the printer, as shown in Figure 2-8. l The red PAPER OUT light goes on. (The PAPER OUT light remains on 2. Now print a document with a one sheet of the platen to facilitate paper loading. l The ... the previous note "Setting up your word processor as you turn the power ON: l The print head moves to the center of paper into the printer.) 3. Figure 2-8. Turn the power ON with the Cut Sheet Feeder 1. When you normally would. for a cut sheet feeder. . ." l The POWER, READY,...
...on the left side. When you print a document: l The print head moves to the left side of the printer, as shown in Figure 2-8. l The red PAPER OUT light goes on. (The PAPER OUT light remains on 2. Now print a document with a one sheet of the platen to facilitate paper loading. l The ... the previous note "Setting up your word processor as you turn the power ON: l The print head moves to the center of paper into the printer.) 3. Figure 2-8. Turn the power ON with the Cut Sheet Feeder 1. When you normally would. for a cut sheet feeder. . ." l The POWER, READY,...
User Manual
Page 41
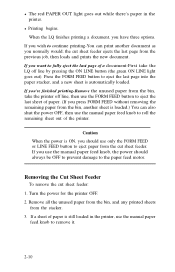
... out). Turn the power for the printer OFF. 2. l Printing begins. l The red PAPER OUT light goes out while there's paper in the printer, use the manual paper feed knob to eject the last page into the paper stacker, and a new sheet is automatically loaded. When the LQ finishes printing a document, you want to fully...
... out). Turn the power for the printer OFF. 2. l Printing begins. l The red PAPER OUT light goes out while there's paper in the printer, use the manual paper feed knob to eject the last page into the paper stacker, and a new sheet is automatically loaded. When the LQ finishes printing a document, you want to fully...

User Manual
Page 44
... the paper. Printing starts too low on the left and right paper guides, Too much paper was loaded into the paper bin. Printing is too light. More than one . Use a soft, clean cloth dampened with nonabrasive household cleaners. 2-13 Make sure paper is 41° to 95°F. Check that paper...
... the paper. Printing starts too low on the left and right paper guides, Too much paper was loaded into the paper bin. Printing is too light. More than one . Use a soft, clean cloth dampened with nonabrasive household cleaners. 2-13 Make sure paper is 41° to 95°F. Check that paper...
User Manual
Page 113
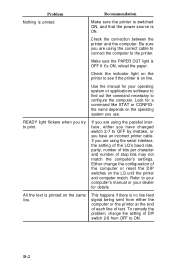
Check the indicator light on the printer to see if the printer is OFF If it's ON, reload the paper. If you are using the parallel interface, either the computer or the printer at the end of each line of the computer or reset the DIP switches on the LQ until the printer and computer ...match. Either change the setting of stop bits may not match the computer's settings. Refer to your computer's manual or your operating system or applications software to find out the command necessary to the printer. D-2 Make sure the PAPER OUT light is on ...
Check the indicator light on the printer to see if the printer is OFF If it's ON, reload the paper. If you are using the parallel interface, either the computer or the printer at the end of each line of the computer or reset the DIP switches on the LQ until the printer and computer ...match. Either change the setting of stop bits may not match the computer's settings. Refer to your computer's manual or your operating system or applications software to find out the command necessary to the printer. D-2 Make sure the PAPER OUT light is on ...
User Manual
Page 114
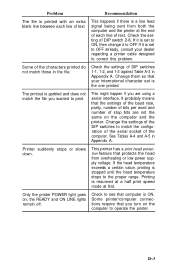
... a print head protection feature that protects the head from both the computer and the printer at first. Only the printer POWER light goes on the computer and the printer. If it is set to ON, then change it to OFF If it is set to OFF already, consult your international character set is the... down. Problem Recommendation The file is printed with an extra blank line between each line of text. the READY and ON LINE lights remain off. Check to operate the printer. Printing is resumed at a half print speed mode at the end of each line of text This happens if there is a line...
... a print head protection feature that protects the head from both the computer and the printer at first. Only the printer POWER light goes on the computer and the printer. If it is set to ON, then change it to OFF If it is set to OFF already, consult your international character set is the... down. Problem Recommendation The file is printed with an extra blank line between each line of text. the READY and ON LINE lights remain off. Check to operate the printer. Printing is resumed at a half print speed mode at the end of each line of text This happens if there is a line...
User Manual
Page 176
... Letter Quality button, 1-14 mode selection, 1-14-1-15, 5-6, 5-8 Lever. See Paper feed knob Margins, 5-18 Master Select, 5-13 O OFF LINE button, 1-13-1-14 ON LINE light and button, 1-13-1-14 Option cartridge DIP switch setting, A-4 Overprinting, D-2 Index-4 See Paper release; See Letter Quality Lubrication, D-8-D-9 M Maintenance, D-8 cut sheet feeder, 2-13-2-14 Manual... feed knob. Pin feed LINE FEED button, 1-14 Lid. I -11 K Knob. See Dust cover Line feed, DIP switch for, A-4 Line spacing, 5-17 Location of printer, 1-3 LQ. See Parallel interface; Paper thickness;
... Letter Quality button, 1-14 mode selection, 1-14-1-15, 5-6, 5-8 Lever. See Paper feed knob Margins, 5-18 Master Select, 5-13 O OFF LINE button, 1-13-1-14 ON LINE light and button, 1-13-1-14 Option cartridge DIP switch setting, A-4 Overprinting, D-2 Index-4 See Paper release; See Letter Quality Lubrication, D-8-D-9 M Maintenance, D-8 cut sheet feeder, 2-13-2-14 Manual... feed knob. Pin feed LINE FEED button, 1-14 Lid. I -11 K Knob. See Dust cover Line feed, DIP switch for, A-4 Line spacing, 5-17 Location of printer, 1-3 LQ. See Parallel interface; Paper thickness;
User Manual
Page 177
See Dust cover Q QX-10 and QX-16, D-8 R READY light, 1-12 Reset code, 5-6-5-7 Resetting. See Top-of . See Widths See also widths by name Power switch, 1-12 Print head replacement, ... 1-9, 2-1, 3-3 feed knob, 1-2 release lever, 1-4, 1-9 separator, 3-8-3-9 thickness lever, 1-11 Paper loading continuous-feed, 3-1, 3-3-3-8 single-sheet, 1-8-1-11 troubleshooting, D-1 Parallel interface, 1-17, F-1-F-4 Parts, printer, 1-1 Pica mode, 5-5 Pin-feed paper. See Reset code Ribbon installation and replacement, 1-5-1-8 Right margin, 5-18 Index-5 See Paper loading, continuous-feed Pin-feed holder and...
See Dust cover Q QX-10 and QX-16, D-8 R READY light, 1-12 Reset code, 5-6-5-7 Resetting. See Top-of . See Widths See also widths by name Power switch, 1-12 Print head replacement, ... 1-9, 2-1, 3-3 feed knob, 1-2 release lever, 1-4, 1-9 separator, 3-8-3-9 thickness lever, 1-11 Paper loading continuous-feed, 3-1, 3-3-3-8 single-sheet, 1-8-1-11 troubleshooting, D-1 Parallel interface, 1-17, F-1-F-4 Parts, printer, 1-1 Pica mode, 5-5 Pin-feed paper. See Reset code Ribbon installation and replacement, 1-5-1-8 Right margin, 5-18 Index-5 See Paper loading, continuous-feed Pin-feed holder and...


