Product Information Guide
Page 1
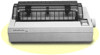
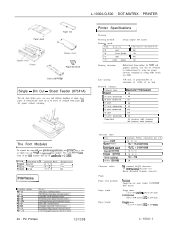
... 13 mtematlonai character sets Epson Extended Graphics character Frictron Single-bin cut sheet feeder gives you can be switched to 75 sheets of single sheet paper. L-1000/LQ-500 DOT-MATRIX PRINTER Paper guide Paper rest %3 Paper feed knob Ribbon cartridge Single - Printer Specifications I 60 Printing...). Sheet Feeder (#7341A) The cut sheet feeder co~tlonai) Pull tractor Single sheets 7.2 to 364 mm) L-1000-1 Bin Cut - II Printing Printing method: 24-pin impact dot matrix Printing speed: Y Pitch Quality : Character/second/line 10 draft i 150 10 Letter Quality 50 12...
... 13 mtematlonai character sets Epson Extended Graphics character Frictron Single-bin cut sheet feeder gives you can be switched to 75 sheets of single sheet paper. L-1000/LQ-500 DOT-MATRIX PRINTER Paper guide Paper rest %3 Paper feed knob Ribbon cartridge Single - Printer Specifications I 60 Printing...). Sheet Feeder (#7341A) The cut sheet feeder co~tlonai) Pull tractor Single sheets 7.2 to 364 mm) L-1000-1 Bin Cut - II Printing Printing method: 24-pin impact dot matrix Printing speed: Y Pitch Quality : Character/second/line 10 draft i 150 10 Letter Quality 50 12...

Product Information Guide
Page 2
L-1000/LQ-500 DOT-MATRIX PRINTER 1 Environment Temperature: Humidity: Shock: Vibration: Printable area: Smgle sheet Co"tlnuous paper Paper ...and chawsr. l 120 V model can wtthstand 1.25 ki rms applied for one onginal plus up to two copies. Pin Printers Single sheets 0.065 to 0.1 mm 10.0025 to 0.004 mchesl Co"tl"uous 0.065 to 0.25 mm (O.W25 ...bema enabled or disabled. the on /&f control characters. Do not use ribbons for another DC1 character. character data 1s bemg received and acknowledged so that the printer can wthstand 3.75 kV rms applied tar one mmute Printing enabled/disabled...
L-1000/LQ-500 DOT-MATRIX PRINTER 1 Environment Temperature: Humidity: Shock: Vibration: Printable area: Smgle sheet Co"tlnuous paper Paper ...and chawsr. l 120 V model can wtthstand 1.25 ki rms applied for one onginal plus up to two copies. Pin Printers Single sheets 0.065 to 0.1 mm 10.0025 to 0.004 mchesl Co"tl"uous 0.065 to 0.25 mm (O.W25 ...bema enabled or disabled. the on /&f control characters. Do not use ribbons for another DC1 character. character data 1s bemg received and acknowledged so that the printer can wthstand 3.75 kV rms applied tar one mmute Printing enabled/disabled...
User Manual
Page 4
... Handling 2-1 Using Single Sheets 2-2 Using Continuous Paper 2-8 Printing on Special Paper 2-20 Chapter 3 Using the Printer 3-1 Operating the Control Panel 3-2 DIP Switches 3-5 Selecting Typestyles 3-11 Selecting an International Character Set 3-14 Choosing a Character Table 3-16 Chapter 4 Troubleshooting and Maintenance 4-1 Problems and Solutions 4-2 Cleaning the Printer 4-6 Replacing the Ribbon 4-8 Transporting the Printer 4-11 Contents iii
... Handling 2-1 Using Single Sheets 2-2 Using Continuous Paper 2-8 Printing on Special Paper 2-20 Chapter 3 Using the Printer 3-1 Operating the Control Panel 3-2 DIP Switches 3-5 Selecting Typestyles 3-11 Selecting an International Character Set 3-14 Choosing a Character Table 3-16 Chapter 4 Troubleshooting and Maintenance 4-1 Problems and Solutions 4-2 Cleaning the Printer 4-6 Replacing the Ribbon 4-8 Transporting the Printer 4-11 Contents iii
User Manual
Page 8
Chapter 1 Setting Up the Printer Unpacking the Printer 1-2 Removing the pull tractor 1-3 Choosing a Place for the Printer 1-5 Assembling the Printer 1-7 Installing the paper feed knob 1-7 Installing the ribbon cartridge 1-8 Attaching the paper guide 1-11 Testing the Printer 1-13 Plugging in the printer 1-13 Loading a sheet of paper 1-14 Running the self test 1-16 Connecting the Printer to Your Computer 1-19 The parallel interface 1-19 Printer Selection Menus 1-21 Choosing from a menu 1-21 Setting Up the Printer 1-1
Chapter 1 Setting Up the Printer Unpacking the Printer 1-2 Removing the pull tractor 1-3 Choosing a Place for the Printer 1-5 Assembling the Printer 1-7 Installing the paper feed knob 1-7 Installing the ribbon cartridge 1-8 Attaching the paper guide 1-11 Testing the Printer 1-13 Plugging in the printer 1-13 Loading a sheet of paper 1-14 Running the self test 1-16 Connecting the Printer to Your Computer 1-19 The parallel interface 1-19 Printer Selection Menus 1-21 Choosing from a menu 1-21 Setting Up the Printer 1-1
User Manual
Page 14
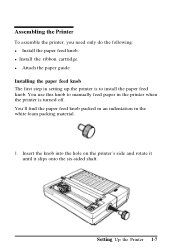
... 1. You'll find the paper feed knob packed in an indentation in setting up the printer is to manually feed paper in the printer when the printer is turned off. Insert the knob into the hole on the printer's side and rotate it until it slips onto the six-sided shaft. You use this... knob to install the paper feed knob. l Install the ribbon cartridge. Setting Up the Printer 1-7 l Attach the paper ...
... 1. You'll find the paper feed knob packed in an indentation in setting up the printer is to manually feed paper in the printer when the printer is turned off. Insert the knob into the hole on the printer's side and rotate it until it slips onto the six-sided shaft. You use this... knob to install the paper feed knob. l Install the ribbon cartridge. Setting Up the Printer 1-7 l Attach the paper ...
User Manual
Page 15
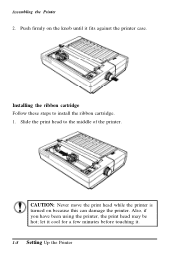
Slide the print head to install the ribbon cartridge. 1. CAUTION: Never move the print head while the printer is turned on the knob until it . 1-8 Setting Up the Printer Push firmly on because this can damage the printer. Also, if you have been using the printer, the print head may be hot; let it cool for a few minutes before touching it fits against the printer case. Installing the ribbon cartridge Follow these steps to the middle of the printer. Assembling the Printer 2.
Slide the print head to install the ribbon cartridge. 1. CAUTION: Never move the print head while the printer is turned on the knob until it . 1-8 Setting Up the Printer Push firmly on because this can damage the printer. Also, if you have been using the printer, the print head may be hot; let it cool for a few minutes before touching it fits against the printer case. Installing the ribbon cartridge Follow these steps to the middle of the printer. Assembling the Printer 2.
User Manual
Page 16
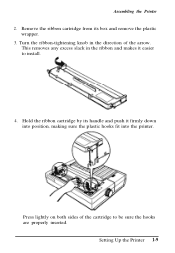
Turn the ribbon-tightening knob in the ribbon and makes it firmly down into position, making sure the plastic hooks fit into the printer. This removes any excess slack in the direction of the cartridge to install. 4. Hold the ribbon cartridge by its box and remove the plastic wrapper. 3. Setting Up the Printer 1-9 Assembling the Printer 2. Remove the ribbon cartridge from its handle and push it easier to be sure the hooks are properly inserted. Press lightly on both sides of the arrow.
Turn the ribbon-tightening knob in the ribbon and makes it firmly down into position, making sure the plastic hooks fit into the printer. This removes any excess slack in the direction of the cartridge to install. 4. Hold the ribbon cartridge by its box and remove the plastic wrapper. 3. Setting Up the Printer 1-9 Assembling the Printer 2. Remove the ribbon cartridge from its handle and push it easier to be sure the hooks are properly inserted. Press lightly on both sides of the arrow.
User Manual
Page 17
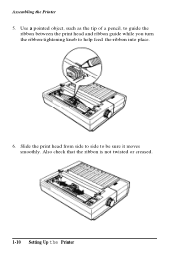
Slide the print head from side to side to help feed the-ribbon into place. 6. Also check that the ribbon is not twisted or creased. 1-10 Setting Up the Printer Assembling the Printer 5. Use a pointed object, such as the tip of a pencil, to guide the ribbon between the print head and ribbon guide while you turn the ribbon-tightening knob to be sure it moves smoothly.
Slide the print head from side to side to help feed the-ribbon into place. 6. Also check that the ribbon is not twisted or creased. 1-10 Setting Up the Printer Assembling the Printer 5. Use a pointed object, such as the tip of a pencil, to guide the ribbon between the print head and ribbon guide while you turn the ribbon-tightening knob to be sure it moves smoothly.
User Manual
Page 43
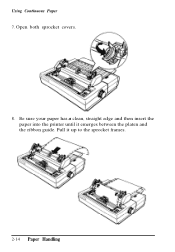
Open both sprocket covers. 8. Using Continuous Paper 7. Be sure your paper has a clean, straight edge and then insert the paper into the printer until it up to the sprocket frames. 2-14 Paper Handling Pull it emerges between the platen and the ribbon guide.
Open both sprocket covers. 8. Using Continuous Paper 7. Be sure your paper has a clean, straight edge and then insert the paper into the printer until it up to the sprocket frames. 2-14 Paper Handling Pull it emerges between the platen and the ribbon guide.
User Manual
Page 46
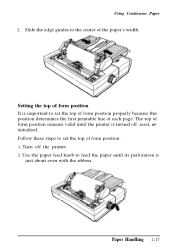
Use the paper feed knob to set the top of the paper's width. Setting the top of form position remains valid until its perforation is turned off the printer. 2. Turn off , reset, or initialized. Follow these steps to the center of form position. 1. Paper Handling 2-17 Slide the edge guides to set the top of form position properly because this position determines the first printable line of each page: The top of form position It is important to feed the paper until the printer is just about even with the ribbon. Using Continuous Paper 2.
Use the paper feed knob to set the top of the paper's width. Setting the top of form position remains valid until its perforation is turned off the printer. 2. Turn off , reset, or initialized. Follow these steps to the center of form position. 1. Paper Handling 2-17 Slide the edge guides to set the top of form position properly because this position determines the first printable line of each page: The top of form position It is important to feed the paper until the printer is just about even with the ribbon. Using Continuous Paper 2.
User Manual
Page 68
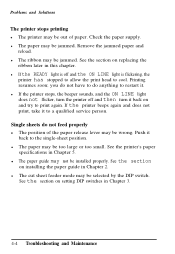
Chapter 4 Troubleshooting and Maintenance Problems and Solutions 4-2 The printer does not print 4-2 The printout is spaced incorrectly 4-3 The printout is faint or uneven 4-3 The printer stops printing 4-4 Single sheets do not feed properly 4-4 Continuous paper does not feed properly 4-5 The printout is not what you expect 4-5 Cleaning the Printer 4-6 Replacing the Ribbon 4-8 Transporting the Printer 4-11 Troubleshooting and Maintenance 4-1
Chapter 4 Troubleshooting and Maintenance Problems and Solutions 4-2 The printer does not print 4-2 The printout is spaced incorrectly 4-3 The printout is faint or uneven 4-3 The printer stops printing 4-4 Single sheets do not feed properly 4-4 Continuous paper does not feed properly 4-5 The printout is not what you expect 4-5 Cleaning the Printer 4-6 Replacing the Ribbon 4-8 Transporting the Printer 4-11 Troubleshooting and Maintenance 4-1
User Manual
Page 70
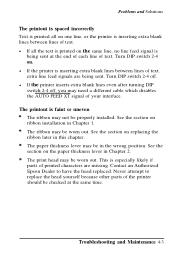
... 4-3 Turn DIP switch 2-4 off , you may be worn out. See the section on one line, or the printer is inserting extra blank lines between lines of the printer should be in Chapter 2. The ribbon may be checked at the end of each line of printed characters are being sent at the same... time. See the section on . Contact an Authorized Epson Dealer to replace the head yourself because other parts of...
... 4-3 Turn DIP switch 2-4 off , you may be worn out. See the section on one line, or the printer is inserting extra blank lines between lines of the printer should be in Chapter 2. The ribbon may be checked at the end of each line of printed characters are being sent at the same... time. See the section on . Contact an Authorized Epson Dealer to replace the head yourself because other parts of...
User Manual
Page 71
...do not feed properly l The position of paper. See the section on replacing the ribbon later in Chapter 2. l The ribbon may be wrong. Push it to print again. See the section on installing the... paper guide in this chapter. l If the READY light is off and then turn the printer off and the ON LINE light is flickering, the printer...Check the paper supply. Printing resumes soon; l The paper may be jammed. If the printer beeps again and does not print, take it back to cool. l The paper may...
...do not feed properly l The position of paper. See the section on replacing the ribbon later in Chapter 2. l The ribbon may be wrong. Push it to print again. See the section on installing the... paper guide in this chapter. l If the READY light is off and then turn the printer off and the ON LINE light is flickering, the printer...Check the paper supply. Printing resumes soon; l The paper may be jammed. If the printer beeps again and does not print, take it back to cool. l The paper may...
User Manual
Page 75
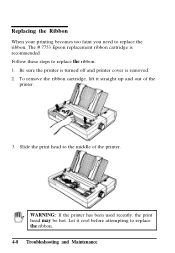
The # 7753 Epson replacement ribbon cartridge is removed. 2. To remove the ribbon cartridge, lift it cool before attempting to replace the ribbon. WARNING: If the printer has been used recently, the print head may be hot. Let it straight up and out of the printer. Replacing the Ribbon When your printing becomes too faint you need to replace the ribbon. 4-8 Troubleshooting and Maintenance Be sure the printer is turned off and printer cover is recommended. Slide the print head to replace the ribbon: 1. Follow these steps to the middle of the printer. 3.
The # 7753 Epson replacement ribbon cartridge is removed. 2. To remove the ribbon cartridge, lift it cool before attempting to replace the ribbon. WARNING: If the printer has been used recently, the print head may be hot. Let it straight up and out of the printer. Replacing the Ribbon When your printing becomes too faint you need to replace the ribbon. 4-8 Troubleshooting and Maintenance Be sure the printer is turned off and printer cover is recommended. Slide the print head to replace the ribbon: 1. Follow these steps to the middle of the printer. 3.
User Manual
Page 76
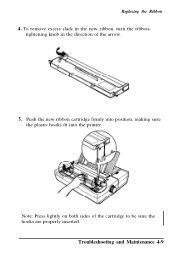
Push the new ribbon cartridge firmly into position, making sure the plastic hooks fit into the printer. Replacing the Ribbon 4. Troubleshooting and Maintenance 4-9 To remove excess slack in the new ribbon, turn the ribbontightening knob in the direction of the cartridge to be sure the hooks are properly inserted. Note: Press lightly on both sides of the arrow. 5.
Push the new ribbon cartridge firmly into position, making sure the plastic hooks fit into the printer. Replacing the Ribbon 4. Troubleshooting and Maintenance 4-9 To remove excess slack in the new ribbon, turn the ribbontightening knob in the direction of the cartridge to be sure the hooks are properly inserted. Note: Press lightly on both sides of the arrow. 5.
User Manual
Page 77
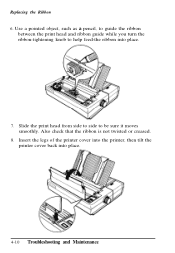
Insert the legs of the printer cover into the printer, then tilt the printer cover back into place. 7. Replacing the Ribbon 6. Slide the print head from side to side to help feed-the ribbon into place. 4-10 Troubleshooting and Maintenance Also check that the ribbon is not twisted or creased. 8. Use a pointed object, such as a pencil, to guide the ribbon between the print head and ribbon guide while you turn the ribbon-tightening knob to be sure it moves smoothly.
Insert the legs of the printer cover into the printer, then tilt the printer cover back into place. 7. Replacing the Ribbon 6. Slide the print head from side to side to help feed-the ribbon into place. 4-10 Troubleshooting and Maintenance Also check that the ribbon is not twisted or creased. 8. Use a pointed object, such as a pencil, to guide the ribbon between the print head and ribbon guide while you turn the ribbon-tightening knob to be sure it moves smoothly.
User Manual
Page 78
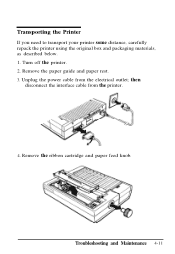
Remove the ribbon cartridge and paper feed knob. Turn off the printer. 2. Transporting the Printer If you need to transport your printer some distance, carefully repack the printer using the original box and packaging materials, as described below. 1. then disconnect the interface cable from the electrical outlet; Troubleshooting and Maintenance 4-11 Unplug the power cable from the printer. 4. Remove the paper guide and paper rest. 3.
Remove the ribbon cartridge and paper feed knob. Turn off the printer. 2. Transporting the Printer If you need to transport your printer some distance, carefully repack the printer using the original box and packaging materials, as described below. 1. then disconnect the interface cable from the electrical outlet; Troubleshooting and Maintenance 4-11 Unplug the power cable from the printer. 4. Remove the paper guide and paper rest. 3.

User Manual
Page 84
Life expectancy (in black only ( # 7753). Do not use ribbons for 9-pin printers. Height: 139 mm (5.5 inches) Width: 390 mm (15.3 inches) Depth: 320 mm (12.6 inches) Weight: 7 Kg (15 lb) Electrical Voltage: Power ...kV (rms), 1 minute AC 1.2 kV (rms), 1 second 220/240 V model: AC 1.25 kV (rms), 1 minute AC 1.5 kV (rms), 1 second Technical Specifications 5-5 Printer Specifications Mechanical Ribbon: Cartridge ribbon, available in Letter Quality characters, at 48 dots/character): 2 million MCBF: For all components excluding print head: 3 million lines MTBF: 4000 power on hours...
Life expectancy (in black only ( # 7753). Do not use ribbons for 9-pin printers. Height: 139 mm (5.5 inches) Width: 390 mm (15.3 inches) Depth: 320 mm (12.6 inches) Weight: 7 Kg (15 lb) Electrical Voltage: Power ...kV (rms), 1 minute AC 1.2 kV (rms), 1 second 220/240 V model: AC 1.25 kV (rms), 1 minute AC 1.5 kV (rms), 1 second Technical Specifications 5-5 Printer Specifications Mechanical Ribbon: Cartridge ribbon, available in Letter Quality characters, at 48 dots/character): 2 million MCBF: For all components excluding print head: 3 million lines MTBF: 4000 power on hours...
User Manual
Page 101
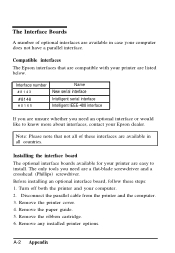
... you need are listed below. Remove the printer cover. 4. A-2 Appendix Remove the ribbon cartridge. 6. Note: Please note that are compatible with your Epson dealer. Before installing an optional interface board, follow these interfaces are available in case your computer. 2. Remove the paper guide. 5. Remove any installed printer options. Interface number #8143 #8148 #8165 Name...
... you need are listed below. Remove the printer cover. 4. A-2 Appendix Remove the ribbon cartridge. 6. Note: Please note that are compatible with your Epson dealer. Before installing an optional interface board, follow these interfaces are available in case your computer. 2. Remove the paper guide. 5. Remove any installed printer options. Interface number #8143 #8148 #8165 Name...
User Manual
Page 110
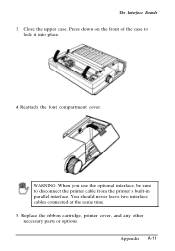
WARNING: When you use the optional interface, be sure to lock it into place. 4. Appendix A-11 Close the upper case. You should never leave two interface cables connected at the same time. 5. Press down on the front of the case to disconnect the printer cable from the printer's built-in parallel interface. Replace the ribbon cartridge, printer cover, and any other necessary parts or options. Reattach the font compartment cover. The Interface Boards 3.
WARNING: When you use the optional interface, be sure to lock it into place. 4. Appendix A-11 Close the upper case. You should never leave two interface cables connected at the same time. 5. Press down on the front of the case to disconnect the printer cable from the printer's built-in parallel interface. Replace the ribbon cartridge, printer cover, and any other necessary parts or options. Reattach the font compartment cover. The Interface Boards 3.


