
Product Information Guide
Page 2
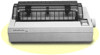
... Printing enabled/disabled signals and control conditions The table below shows the tlrmng tar the parailei lnteriace Ribbon: Cartridge ribbon. Life expectancy (in black only (#7753). L-1000/LQ-500 DOT-MATRIX PRINTER 1 Environment Temperature: Humidity: Shock: Vibration: Printable area: Smgle sheet Co"tlnuous paper Paper feed speed: Paper thickness: Number of copies: Approx. 100 msiline at 48 dots/character): 2 million MCBF: For all components excluding print head...
... Printing enabled/disabled signals and control conditions The table below shows the tlrmng tar the parailei lnteriace Ribbon: Cartridge ribbon. Life expectancy (in black only (#7753). L-1000/LQ-500 DOT-MATRIX PRINTER 1 Environment Temperature: Humidity: Shock: Vibration: Printable area: Smgle sheet Co"tlnuous paper Paper feed speed: Paper thickness: Number of copies: Approx. 100 msiline at 48 dots/character): 2 million MCBF: For all components excluding print head...

Product Information Guide
Page 5
... printer User's Manual for the next-best model selection. Pin Printers 12/12/68 L-1000-5 Sheet Operation The page length will have to 61 lines per page if your software does not properly support cut -sheet paper. DIP Switch Settings The default settings will be identified for most applications, but they should be adjusted (shortened) to be checked before using the printer This will avoid unexpected results. Sheet Feeder/ Single - There will usually work for each software...
... printer User's Manual for the next-best model selection. Pin Printers 12/12/68 L-1000-5 Sheet Operation The page length will have to 61 lines per page if your software does not properly support cut -sheet paper. DIP Switch Settings The default settings will be identified for most applications, but they should be adjusted (shortened) to be checked before using the printer This will avoid unexpected results. Sheet Feeder/ Single - There will usually work for each software...
User Manual
Page 4
... a Place for the Printer 1-5 Assembling the Printer 1-7 Testing the Printer 1-13 Connecting the Printer to Your Computer 1-19 Printer Selection Menus 1-21 Chapter 2 Paper Handling 2-1 Using Single Sheets 2-2 Using Continuous Paper 2-8 Printing on Special Paper 2-20 Chapter 3 Using the Printer 3-1 Operating the Control Panel 3-2 DIP Switches 3-5 Selecting Typestyles 3-11 Selecting an International Character Set 3-14 Choosing a Character Table 3-16 Chapter 4 Troubleshooting and Maintenance 4-1 Problems and Solutions 4-2 Cleaning the Printer 4-6 Replacing the Ribbon...
... a Place for the Printer 1-5 Assembling the Printer 1-7 Testing the Printer 1-13 Connecting the Printer to Your Computer 1-19 Printer Selection Menus 1-21 Chapter 2 Paper Handling 2-1 Using Single Sheets 2-2 Using Continuous Paper 2-8 Printing on Special Paper 2-20 Chapter 3 Using the Printer 3-1 Operating the Control Panel 3-2 DIP Switches 3-5 Selecting Typestyles 3-11 Selecting an International Character Set 3-14 Choosing a Character Table 3-16 Chapter 4 Troubleshooting and Maintenance 4-1 Problems and Solutions 4-2 Cleaning the Printer 4-6 Replacing the Ribbon...

User Manual
Page 7
... first. Notes: contain important information and useful tips on unpacking, setting up and operating your printer. There is necessary for setting up , testing, and connecting the printer. Be sure to read and follow the instructions in this manual is a Quick Reference card. Chapters 2 and 3 include important information on general maintenance, specifications, and printer commands. At the back of this guide WARNINGS: must be followed carefully to...
... first. Notes: contain important information and useful tips on unpacking, setting up and operating your printer. There is necessary for setting up , testing, and connecting the printer. Be sure to read and follow the instructions in this manual is a Quick Reference card. Chapters 2 and 3 include important information on general maintenance, specifications, and printer commands. At the back of this guide WARNINGS: must be followed carefully to...
User Manual
Page 8
Chapter 1 Setting Up the Printer Unpacking the Printer 1-2 Removing the pull tractor 1-3 Choosing a Place for the Printer 1-5 Assembling the Printer 1-7 Installing the paper feed knob 1-7 Installing the ribbon cartridge 1-8 Attaching the paper guide 1-11 Testing the Printer 1-13 Plugging in the printer 1-13 Loading a sheet of paper 1-14 Running the self test 1-16 Connecting the Printer to Your Computer 1-19 The parallel interface 1-19 Printer Selection Menus 1-21 Choosing from a menu 1-21 Setting Up the Printer 1-1
Chapter 1 Setting Up the Printer Unpacking the Printer 1-2 Removing the pull tractor 1-3 Choosing a Place for the Printer 1-5 Assembling the Printer 1-7 Installing the paper feed knob 1-7 Installing the ribbon cartridge 1-8 Attaching the paper guide 1-11 Testing the Printer 1-13 Plugging in the printer 1-13 Loading a sheet of paper 1-14 Running the self test 1-16 Connecting the Printer to Your Computer 1-19 The parallel interface 1-19 Printer Selection Menus 1-21 Choosing from a menu 1-21 Setting Up the Printer 1-1
User Manual
Page 13
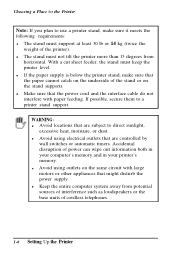
... or on the same circuit with paper feeding. If possible, secure them to use a printer stand, make sure that the paper cannot catch on the underside of the printer). l Make sure that are controlled by wall switches or automatic timers. Accidental disruption of cordless telephones. 1-6 Setting Up the Printer WARNING: l Avoid locations that the power cord and the interface cable do not interfere with large...
... or on the same circuit with paper feeding. If possible, secure them to use a printer stand, make sure that the paper cannot catch on the underside of the printer). l Make sure that are controlled by wall switches or automatic timers. Accidental disruption of cordless telephones. 1-6 Setting Up the Printer WARNING: l Avoid locations that the power cord and the interface cable do not interfere with large...
User Manual
Page 14
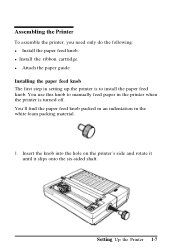
... printer, you need only do the following: l Install the paper feed knob. You use this knob to manually feed paper in the printer when the printer is to install the paper feed knob. Installing the paper feed knob The first step in the white foam packing material. 1. Setting Up the Printer 1-7 You'll find the paper feed knob packed in an indentation in setting up the printer is turned off. l Install the ribbon cartridge. l Attach the paper guide...
... printer, you need only do the following: l Install the paper feed knob. You use this knob to manually feed paper in the printer when the printer is to install the paper feed knob. Installing the paper feed knob The first step in the white foam packing material. 1. Setting Up the Printer 1-7 You'll find the paper feed knob packed in an indentation in setting up the printer is turned off. l Install the ribbon cartridge. l Attach the paper guide...
User Manual
Page 21
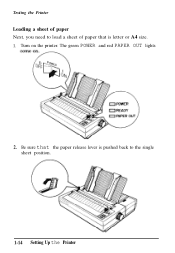
Turn on the printer. The green POWER and red PAPER OUT lights 2. Be sure that is pushed back to load a sheet of paper Next, you need to the single sheet position. 1-14 Setting Up the Printer Testing the Printer Loading a sheet of paper that the paper release lever is letter or A4 size. 1.
Turn on the printer. The green POWER and red PAPER OUT lights 2. Be sure that is pushed back to load a sheet of paper Next, you need to the single sheet position. 1-14 Setting Up the Printer Testing the Printer Loading a sheet of paper that the paper release lever is letter or A4 size. 1.
User Manual
Page 25
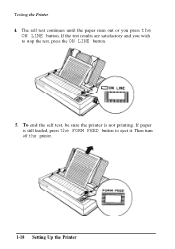
Testing the Printer 4. Then turn off the printer. 1-18 Setting Up the Printer The self test continues until the paper runs out or you wish to eject it. If paper is not printing. If the test results are satisfactory and you press the ON LINE button. To end the self test, be sure the printer is still loaded, press the FORM FEED button to stop the test, press the ON LINE button. 5.
Testing the Printer 4. Then turn off the printer. 1-18 Setting Up the Printer The self test continues until the paper runs out or you wish to eject it. If paper is not printing. If the test results are satisfactory and you press the ON LINE button. To end the self test, be sure the printer is still loaded, press the FORM FEED button to stop the test, press the ON LINE button. 5.
User Manual
Page 49
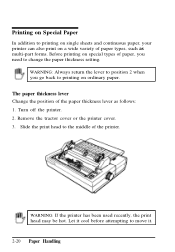
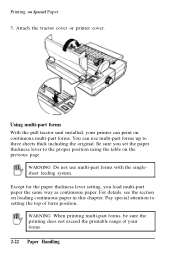
... need to change the paper thickness setting. Remove the tractor cover or the printer cover. 3. Let it cool before attempting to the middle of the printer. Slide the print head to move it. 2-20 Paper Handling The paper thickness lever Change the position of the paper thickness lever as multi-part forms. Before printing on special types of paper, you go back to printing on ordinary paper. Turn off the printer. 2. Printing on Special Paper...
... need to change the paper thickness setting. Remove the tractor cover or the printer cover. 3. Let it cool before attempting to the middle of the printer. Slide the print head to move it. 2-20 Paper Handling The paper thickness lever Change the position of the paper thickness lever as multi-part forms. Before printing on special types of paper, you go back to printing on ordinary paper. Turn off the printer. 2. Printing on Special Paper...
User Manual
Page 51
Be sure you load multi-part paper the same way as continuous paper. Using multi-part forms With the pull tractor unit installed, your printer can print on the previous page. For details, see the section on Special Paper 5. Attach the tractor cover or printer cover. WARNING: Do not use multi-part forms up to setting the top of your forms. 2-22 Paper Handling WARNING: When printing multi-part forms, be sure...
Be sure you load multi-part paper the same way as continuous paper. Using multi-part forms With the pull tractor unit installed, your printer can print on the previous page. For details, see the section on Special Paper 5. Attach the tractor cover or printer cover. WARNING: Do not use multi-part forms up to setting the top of your forms. 2-22 Paper Handling WARNING: When printing multi-part forms, be sure...
User Manual
Page 54
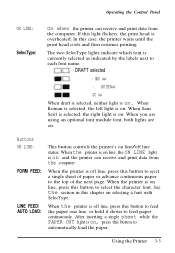
Operating the Control Panel ON LINE: SelecType: On when the printer can receive and print data from the computer. In this button to feed the paper one line, or hold it down to feed paper continuously. When the printer is on line, the ON LINE light is on . Buttons ON LINE: FORM FEED: LINE FEED/ AUTO LOAD: This button controls the printer's on and the printer can receive and print data from the computer. Using the Printer 3-3 When you are using an optional font...
Operating the Control Panel ON LINE: SelecType: On when the printer can receive and print data from the computer. In this button to feed the paper one line, or hold it down to feed paper continuously. When the printer is on line, the ON LINE light is on . Buttons ON LINE: FORM FEED: LINE FEED/ AUTO LOAD: This button controls the printer's on and the printer can receive and print data from the computer. Using the Printer 3-3 When you are using an optional font...
User Manual
Page 68
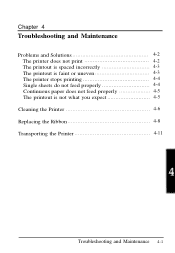
Chapter 4 Troubleshooting and Maintenance Problems and Solutions 4-2 The printer does not print 4-2 The printout is spaced incorrectly 4-3 The printout is faint or uneven 4-3 The printer stops printing 4-4 Single sheets do not feed properly 4-4 Continuous paper does not feed properly 4-5 The printout is not what you expect 4-5 Cleaning the Printer 4-6 Replacing the Ribbon 4-8 Transporting the Printer 4-11 Troubleshooting and Maintenance 4-1
Chapter 4 Troubleshooting and Maintenance Problems and Solutions 4-2 The printer does not print 4-2 The printout is spaced incorrectly 4-3 The printout is faint or uneven 4-3 The printer stops printing 4-4 Single sheets do not feed properly 4-4 Continuous paper does not feed properly 4-5 The printout is not what you expect 4-5 Cleaning the Printer 4-6 Replacing the Ribbon 4-8 Transporting the Printer 4-11 Troubleshooting and Maintenance 4-1
User Manual
Page 69
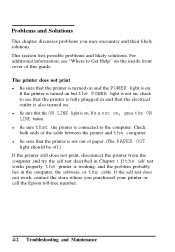
... this guide. The printer does not print l Be sure that the printer is turned on and the POWER light is connected to Get Help" on . Check both ends of paper. (The PAPER OUT light should be off.) If the printer still does not print, disconnect the printer from the computer and try the self test described in the computer, the software, or the cable. If the self test works properly, the printer...
... this guide. The printer does not print l Be sure that the printer is turned on and the POWER light is connected to Get Help" on . Check both ends of paper. (The PAPER OUT light should be off.) If the printer still does not print, disconnect the printer from the computer and try the self test described in the computer, the software, or the cable. If the self test works properly, the printer...
User Manual
Page 71
... installing the paper guide in Chapter 5. l If the READY light is off and then turn the printer off and the ON LINE light is flickering, the printer has stopped to allow the print head to print again. Push it back on replacing the ribbon later in Chapter 3. 4-4 Troubleshooting and Maintenance See the section on and try to cool. l The cut sheet feeder mode may be jammed. l The paper may be jammed. l The paper...
... installing the paper guide in Chapter 5. l If the READY light is off and then turn the printer off and the ON LINE light is flickering, the printer has stopped to allow the print head to print again. Push it back on replacing the ribbon later in Chapter 3. 4-4 Troubleshooting and Maintenance See the section on and try to cool. l The cut sheet feeder mode may be jammed. l The paper may be jammed. l The paper...
User Manual
Page 72
... 3. See Chapter 2 for your software is correctly set may be installed properly. Troubleshooting and Maintenance 4-5 The paper guide may be selected. Your application program may not be some obstacle in Chapter 2. The manual for instructions on the sprockets correctly. The font, pitch, or size may not be selected properly. Pull it forward to change the printing style. The paper may not be mounted...
... 3. See Chapter 2 for your software is correctly set may be installed properly. Troubleshooting and Maintenance 4-5 The paper guide may be selected. Your application program may not be some obstacle in Chapter 2. The manual for instructions on the sprockets correctly. The font, pitch, or size may not be selected properly. Pull it forward to change the printing style. The paper may not be mounted...
User Manual
Page 75
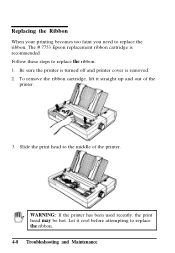
Be sure the printer is turned off and printer cover is recommended. Slide the print head to replace the ribbon. 4-8 Troubleshooting and Maintenance The # 7753 Epson replacement ribbon cartridge is removed. 2. Follow these steps to replace the ribbon. WARNING: If the printer has been used recently, the print head may be hot. To remove the ribbon cartridge, lift it cool before attempting to the middle of the printer. 3. Replacing the Ribbon When your printing becomes too faint you need to replace the ribbon: 1. Let it straight up and out of the printer.
Be sure the printer is turned off and printer cover is recommended. Slide the print head to replace the ribbon. 4-8 Troubleshooting and Maintenance The # 7753 Epson replacement ribbon cartridge is removed. 2. Follow these steps to replace the ribbon. WARNING: If the printer has been used recently, the print head may be hot. To remove the ribbon cartridge, lift it cool before attempting to the middle of the printer. 3. Replacing the Ribbon When your printing becomes too faint you need to replace the ribbon: 1. Let it straight up and out of the printer.
User Manual
Page 101
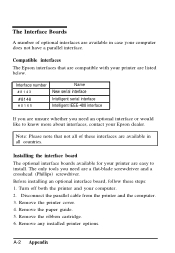
... parallel cable from the printer and the computer. 3. Remove any installed printer options. Before installing an optional interface board, follow these interfaces are unsure whether you need an optional interface or would like to install. Remove the paper guide. 5. Turn off both the printer and your printer are a flat-blade screwdriver and a crosshead (Phillips) screwdriver. The Interface Boards A number of these steps: 1. Compatible interfaces The Epson interfaces...
... parallel cable from the printer and the computer. 3. Remove any installed printer options. Before installing an optional interface board, follow these interfaces are unsure whether you need an optional interface or would like to install. Remove the paper guide. 5. Turn off both the printer and your printer are a flat-blade screwdriver and a crosshead (Phillips) screwdriver. The Interface Boards A number of these steps: 1. Compatible interfaces The Epson interfaces...
User Manual
Page 125
...Paper release lever, 1-14, 2-4, 2-9 Paper rest, 1-2, 2-8 Paper thickness lever, 2-20-21 Parallel interface connecting, 1-19-20 specifications, 5-7-9 Pitches, 3-7-8, 5-2, 5-12 Power light, 2-4, 3-2 Prestige font, 5-3, A-14 Printable area, 5-4 Print direction, 3-7, 3-9, 5-2 Printer assembling, 1-7-12 cleaning, 4-6-7 cover, 1-2, 1-12, 2-3, 2-8 default settings, 5-12 specifications, 5-1-12 testing, 1-13-18 transporting, 4-11 unpacking, 1-2-4 voltage, 1-3 Print head, 1-8, 2-11, 4-3, 4-8 Print speed, 5-2 Problems, see Troubleshooting Proportional pitch, 3-8, 5-2 Pull tractor removing, 1-3 installing...
...Paper release lever, 1-14, 2-4, 2-9 Paper rest, 1-2, 2-8 Paper thickness lever, 2-20-21 Parallel interface connecting, 1-19-20 specifications, 5-7-9 Pitches, 3-7-8, 5-2, 5-12 Power light, 2-4, 3-2 Prestige font, 5-3, A-14 Printable area, 5-4 Print direction, 3-7, 3-9, 5-2 Printer assembling, 1-7-12 cleaning, 4-6-7 cover, 1-2, 1-12, 2-3, 2-8 default settings, 5-12 specifications, 5-1-12 testing, 1-13-18 transporting, 4-11 unpacking, 1-2-4 voltage, 1-3 Print head, 1-8, 2-11, 4-3, 4-8 Print speed, 5-2 Problems, see Troubleshooting Proportional pitch, 3-8, 5-2 Pull tractor removing, 1-3 installing...
User Manual
Page 130
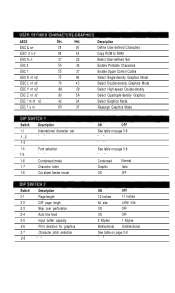
...1-6 1-7 1-8 Descrlption International character set " " " " Font selection " " Condensed mode Character table Cut sheet feeder mode Switch 2-1 2-2 2-3 2-4 2-5 2-6 2-7 2-8 Description Page length CSF page length Skip over perforation Auto line feed Input buffer capacity Print direction for graphics Character pitch selection E * Description Define User-defined Characters Copy ROM to RAM Select User-defined Set Enable Printable Characters Enable Upper Control Codes Select Single-density Graphics Mode Select Double-density Graphics Mode Select High-speed Double-density Select Quadruple-density...
...1-6 1-7 1-8 Descrlption International character set " " " " Font selection " " Condensed mode Character table Cut sheet feeder mode Switch 2-1 2-2 2-3 2-4 2-5 2-6 2-7 2-8 Description Page length CSF page length Skip over perforation Auto line feed Input buffer capacity Print direction for graphics Character pitch selection E * Description Define User-defined Characters Copy ROM to RAM Select User-defined Set Enable Printable Characters Enable Upper Control Codes Select Single-density Graphics Mode Select Double-density Graphics Mode Select High-speed Double-density Select Quadruple-density...


