
Technical Brief (Impact Printers)
Page 1
...-based set-up to Letter Quality LLL The name of an EPSON's impact printer tells you if it has a narrow or wide carriage: LLL L Nine-pin printers all begin with FX, LX, or DFX Twenty-four pin printers all begin with tireless printheads and superior quality ribbons. MTBF M Off-carriage motor assembly Functionality-Printing technology LL Why...
...-based set-up to Letter Quality LLL The name of an EPSON's impact printer tells you if it has a narrow or wide carriage: LLL L Nine-pin printers all begin with FX, LX, or DFX Twenty-four pin printers all begin with tireless printheads and superior quality ribbons. MTBF M Off-carriage motor assembly Functionality-Printing technology LL Why...

Technical Brief (Impact Printers)
Page 6
... of extended use and extreme temperature changes L L Easy to sell with every printer Adds profit to every sale 5 Reliability-Ribbon cartridge reliability Most EPSON impact printers use a stationary ribbon cartridge. Technical Brief-Multimedia projectors Page 6 Reliability-Ribbon quality EPSON brand impact printer ribbons are superior to move the ribbon with the print head assembly unit. Customer advantages Manufactured with ink precisely applied...
... of extended use and extreme temperature changes L L Easy to sell with every printer Adds profit to every sale 5 Reliability-Ribbon cartridge reliability Most EPSON impact printers use a stationary ribbon cartridge. Technical Brief-Multimedia projectors Page 6 Reliability-Ribbon quality EPSON brand impact printer ribbons are superior to move the ribbon with the print head assembly unit. Customer advantages Manufactured with ink precisely applied...

User Manual
Page 9
When replacing the ribbon cartridge or ribbon pack, you can use the cartridge and pack listed below . On page 5-3, add the information below , in addition to the products listed in Japan 96.02-16 Ribbon cartridge Ribbon pack S015086 S010033 Printed in your User's Guide.
When replacing the ribbon cartridge or ribbon pack, you can use the cartridge and pack listed below . On page 5-3, add the information below , in addition to the products listed in Japan 96.02-16 Ribbon cartridge Ribbon pack S015086 S010033 Printed in your User's Guide.

User Manual
Page 13
... provides the following support services in locating your nearest Authorized EPSON Reseller or Customer Care Center Customer Relations EPSON technical information library fax service Product literature on current and new products You can purchase ribbons, supplies, parts, documentation, and accessories for your EPSON products from EPSON Accessories at (800) 922-8911: Technical assistance with the...
... provides the following support services in locating your nearest Authorized EPSON Reseller or Customer Care Center Customer Relations EPSON technical information library fax service Product literature on current and new products You can purchase ribbons, supplies, parts, documentation, and accessories for your EPSON products from EPSON Accessories at (800) 922-8911: Technical assistance with the...

User Manual
Page 17
Contents Introduction Options 2 How to Use This Manual 3 Warnings, Cautions, and Notes 4 Chapter 1 Setting Up the printer Choosing a Place for the Printer 1-2 Unpacking the Printer 1-4 Installing the Ribbon Cartridge 1-5 Plugging in the Printer 1-10 Running the Self Test 1-10 Connecting the Printer to Your Computer 1-14 Setting Up Your Software 1-15 Microsoft Windows and all Windows programs 1-15 Checking the printer driver settings 1-16 Using non-Windows software 1-17 Printer utilities 1-18 ix
Contents Introduction Options 2 How to Use This Manual 3 Warnings, Cautions, and Notes 4 Chapter 1 Setting Up the printer Choosing a Place for the Printer 1-2 Unpacking the Printer 1-4 Installing the Ribbon Cartridge 1-5 Plugging in the Printer 1-10 Running the Self Test 1-10 Connecting the Printer to Your Computer 1-14 Setting Up Your Software 1-15 Microsoft Windows and all Windows programs 1-15 Checking the printer driver settings 1-16 Using non-Windows software 1-17 Printer utilities 1-18 ix

User Manual
Page 20
Chapter 5 Maintenance and Transportation Cleaning the Printer 5-2 Replacing the Ribbon 5-3 Transporting the Printer 5-4 Chapter 6 Troubleshooting Power Supply 6-2 Power is not being supplied 6-2 Printing 6-3 The printer does not print 6-3 The print is faint or uneven 6-4 Dots are missing in printed characters or graphics 6-5 Printed characters are not what you expect 6-5 The ...
Chapter 5 Maintenance and Transportation Cleaning the Printer 5-2 Replacing the Ribbon 5-3 Transporting the Printer 5-4 Chapter 6 Troubleshooting Power Supply 6-2 Power is not being supplied 6-2 Printing 6-3 The printer does not print 6-3 The print is faint or uneven 6-4 Dots are missing in printed characters or graphics 6-5 Printed characters are not what you expect 6-5 The ...

User Manual
Page 22
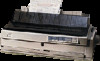
Chapter 1 Setting Up the Printer Choosing a Place for the Printer 1-2 Unpacking the Printer 1-4 Installing the Ribbon Cartridge 1-5 Plugging in the Printer 1-10 Running the Self Test 1-10 Connecting the Printer to Your Computer 1-14 Setting Up Your Software 1-15 Microsoft Windows and all Windows programs 1-15 Checking the printer driver settings 1-16 Using non-Windows software 1-17 Printer utilities 1-18 Setting Up the Printer 1-1
Chapter 1 Setting Up the Printer Choosing a Place for the Printer 1-2 Unpacking the Printer 1-4 Installing the Ribbon Cartridge 1-5 Plugging in the Printer 1-10 Running the Self Test 1-10 Connecting the Printer to Your Computer 1-14 Setting Up Your Software 1-15 Microsoft Windows and all Windows programs 1-15 Checking the printer driver settings 1-16 Using non-Windows software 1-17 Printer utilities 1-18 Setting Up the Printer 1-1

User Manual
Page 26
Installing the Ribbon Cartridge Before installing the ribbon cartridge, make sure that the power cord is not plugged into an electrical outlet. 1. Lift the printer cover up and off. 2. Slide the print head to the ribbon installation position (the indented portion of the paper tension unit.) Setting Up the Printer 1-5
Installing the Ribbon Cartridge Before installing the ribbon cartridge, make sure that the power cord is not plugged into an electrical outlet. 1. Lift the printer cover up and off. 2. Slide the print head to the ribbon installation position (the indented portion of the paper tension unit.) Setting Up the Printer 1-5

User Manual
Page 27
Lay the cartridge flat and press gently until it clicks into the printer so that the notch on each side of the ribbon cartridge and discard the separator. 4. Remove the plastic separator from the middle of the printer. 5. 3. Hold the cartridge with the ribbon-tightening knob facing you. Place the bottom edge of the cartridge into place on each end of the cartridge fits over the small peg on both ends. 1-6 Setting Up the Printer
Lay the cartridge flat and press gently until it clicks into the printer so that the notch on each side of the ribbon cartridge and discard the separator. 4. Remove the plastic separator from the middle of the printer. 5. 3. Hold the cartridge with the ribbon-tightening knob facing you. Place the bottom edge of the cartridge into place on each end of the cartridge fits over the small peg on both ends. 1-6 Setting Up the Printer

User Manual
Page 28
Make sure the ribbon is in the ribbon. 7. Lift the ribbon guide and insert it is not twisted or creased and that it firmly over the metal pins behind the print head. Slide the print head from side to side to remove any slack in place behind the print head. Turn the ribbontightening knob to make sure it clicks into place. Setting Up the Printer 1-7 Press down on the guide until it moves smoothly. 6.
Make sure the ribbon is in the ribbon. 7. Lift the ribbon guide and insert it is not twisted or creased and that it firmly over the metal pins behind the print head. Slide the print head from side to side to remove any slack in place behind the print head. Turn the ribbontightening knob to make sure it clicks into place. Setting Up the Printer 1-7 Press down on the guide until it moves smoothly. 6.

User Manual
Page 91
... pull tractor in the cut -sheet feeder, reverse the steps above . 7. Replace the printer cover. 3. Move the printer head to load paper with your cut -sheetfeeder. 4. You are now ready to the ribbon installation position. 5. If the optional pull tractor is not installed. Fit the notches in ...a safe place; To remove the cut -sheet feeder over the mounting posts on the printer. 6. Insert the cable into the connector as shown above...
... pull tractor in the cut -sheet feeder, reverse the steps above . 7. Replace the printer cover. 3. Move the printer head to load paper with your cut -sheetfeeder. 4. You are now ready to the ribbon installation position. 5. If the optional pull tractor is not installed. Fit the notches in ...a safe place; To remove the cut -sheet feeder over the mounting posts on the printer. 6. Insert the cable into the connector as shown above...

User Manual
Page 103
Chapter 5 Maintenance and Transportation Cleaning the Printer 5-2 Replacing the Ribbon 5-3 Transporting the Printer 5-4 Maintenance and Transportation 5-1
Chapter 5 Maintenance and Transportation Cleaning the Printer 5-2 Replacing the Ribbon 5-3 Transporting the Printer 5-4 Maintenance and Transportation 5-1

User Manual
Page 105
Printer model FX-2170 Ribbon cartridge S015085 Ribbon pack S010032 To replace the ribbon cartridge, follow the steps in "Installing the Ribbon Cartridge" in Chapter 1. Replacing the Ribbon When printing becomes faint, you must replace ribbon cartridge itself. Maintenance and Transportation 5-3 Using any other printer parts. Use the EPSON ribbon cartridges listed below for the print head and other ribbon may damage your EPSON printer; The...
Printer model FX-2170 Ribbon cartridge S015085 Ribbon pack S010032 To replace the ribbon cartridge, follow the steps in "Installing the Ribbon Cartridge" in Chapter 1. Replacing the Ribbon When printing becomes faint, you must replace ribbon cartridge itself. Maintenance and Transportation 5-3 Using any other printer parts. Use the EPSON ribbon cartridges listed below for the print head and other ribbon may damage your EPSON printer; The...

User Manual
Page 106
...-tension unit, and then replace the paper tension unit. 7. Turn off the printer. 2. then disconnect the interface cable from the electrical outlet; Remove the paper guide. 4. Repack the printer, ribbon cartridge, paper guide, and power cord in the original packing materials and place ...them in the push tractor position. 8. Unplug the power cord from the printer. 3. Remove the paper-tension unit. Attach the ...
...-tension unit, and then replace the paper tension unit. 7. Turn off the printer. 2. then disconnect the interface cable from the electrical outlet; Remove the paper guide. 4. Repack the printer, ribbon cartridge, paper guide, and power cord in the original packing materials and place ...them in the push tractor position. 8. Unplug the power cord from the printer. 3. Remove the paper-tension unit. Attach the ...

User Manual
Page 109
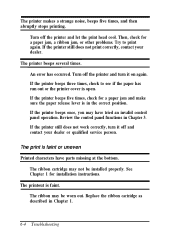
... section if you have problems printing. The printer does not print The Pause light is installed properly for your printer. Make sure the cable meets both ends of the interface cable. Follow the steps in the printer. Replace the ribbon cartridge. Check that the software is off ... it is printing, but nothing is installed correctly. Check the software's printer settings. The printer may be worn out. The printer sounds like it is printed. The ribbon may not be installed properly. The ribbon cartridge may be out of your dealer immediately. The lights come on ...
... section if you have problems printing. The printer does not print The Pause light is installed properly for your printer. Make sure the cable meets both ends of the interface cable. Follow the steps in the printer. Replace the ribbon cartridge. Check that the software is off ... it is printing, but nothing is installed correctly. Check the software's printer settings. The printer may be worn out. The printer sounds like it is printed. The ribbon may not be installed properly. The ribbon cartridge may be out of your dealer immediately. The lights come on ...
User Manual
Page 110
... abruptly stops printing. Turn off and contact your dealer. If the printer still does not print correctly, contact your dealer or qualified service person. An error has occurred. The ribbon may be installed properly. The ribbon cartridge may have parts missing at the bottom. Then, check for ...a paper jam, a ribbon jam, or other problems. Try to see if the paper has run out or the printer cover is in the correct position...
... abruptly stops printing. Turn off and contact your dealer. If the printer still does not print correctly, contact your dealer or qualified service person. An error has occurred. The ribbon may be installed properly. The ribbon cartridge may have parts missing at the bottom. Then, check for ...a paper jam, a ribbon jam, or other problems. Try to see if the paper has run out or the printer cover is in the correct position...

User Manual
Page 111
...graphics A line of dots is too much slack in the printout. Stop printing and contact your software did not print. Reinstall the ribbon cartridge as described in your software program. Select the font in Chapter 1. Printed characters are not what you expect The typestyles or ... Check that the software is damaged. For instructions, see "Setting Up Your Software" in Chapter 2. Either there is missing in the ribbon or the ribbon has come loose. The paper thickness lever may be set properly. See "Adjusting the paper thickness lever" in Chapter 1. Your software may...
...graphics A line of dots is too much slack in the printout. Stop printing and contact your software did not print. Reinstall the ribbon cartridge as described in your software program. Select the font in Chapter 1. Printed characters are not what you expect The typestyles or ... Check that the software is damaged. For instructions, see "Setting Up Your Software" in Chapter 2. Either there is missing in the ribbon or the ribbon has come loose. The paper thickness lever may be set properly. See "Adjusting the paper thickness lever" in Chapter 1. Your software may...

User Manual
Page 127
B The minimum left margin is 3.0 mm. The minimum right margin is 3.0 mm. The maximum printable width is 4.2 mm. Mechanical Paper-feed methods: Ribbon life: Total print amount: Print head life: Dimensions: Weight: Friction feed (front and rear) Push tractor feed (front and rear) Push/pull tractor (with optional ...
B The minimum left margin is 3.0 mm. The minimum right margin is 3.0 mm. The maximum printable width is 4.2 mm. Mechanical Paper-feed methods: Ribbon life: Total print amount: Print head life: Dimensions: Weight: Friction feed (front and rear) Push tractor feed (front and rear) Push/pull tractor (with optional ...
User Manual
Page 156
...18 setting up, l-15-16 Windows, l-15-16 Special paper, 2-25-29 Specifications, A-l-35 See Paper release lever Ribbon cartridge installing# 1-5-9 replacing 5-3 Ribbon pack, 5-3 Roll paper, 2-29, 4-9-11 holder, 4-9-11 S Safety instructions, vii, viii Second bin cut-sheet... in, l-10 Power supply problems, 6-2-3, Print head warning, 2-l 1 Print quality problems, 6-4-7 Printer drivers DOS software, l-17-18 installing l-15 settings, l-15-16 Printer functions table, 3-8-9 Printer stand, l-3 Printer utilites, l-18-20 Problem solving, 6-l-11 Protective materials, saving 14 Pull tractor, 2-3, 2-8, 2-19...
...18 setting up, l-15-16 Windows, l-15-16 Special paper, 2-25-29 Specifications, A-l-35 See Paper release lever Ribbon cartridge installing# 1-5-9 replacing 5-3 Ribbon pack, 5-3 Roll paper, 2-29, 4-9-11 holder, 4-9-11 S Safety instructions, vii, viii Second bin cut-sheet... in, l-10 Power supply problems, 6-2-3, Print head warning, 2-l 1 Print quality problems, 6-4-7 Printer drivers DOS software, l-17-18 installing l-15 settings, l-15-16 Printer functions table, 3-8-9 Printer stand, l-3 Printer utilites, l-18-20 Problem solving, 6-l-11 Protective materials, saving 14 Pull tractor, 2-3, 2-8, 2-19...


