
Technical Brief (Impact Printers)
Page 5
.... 1.22 Copyright (C) SEIKO EPSON CORP. 1992 Printer: FX-2180 Mode: ESC/P Port: LPT1 Font : Roman Pitch : 10CPI Print Quality : LQ Character Table : PC 437 Continuous Rear : 11 inch Continuous Rear : 8.5mm Continuous Front : 7 inch Continuous Front : 8.5mm CutSheetFeeder 1 : 11 inch CutSheetFeeder 1 : 8.5mm CutSheetFeeder 2 : 11 inch CutSheetFeeder 2 : 8.5mm Manual Rear : 14 inch Manual Rear : 8.5mm Help...
.... 1.22 Copyright (C) SEIKO EPSON CORP. 1992 Printer: FX-2180 Mode: ESC/P Port: LPT1 Font : Roman Pitch : 10CPI Print Quality : LQ Character Table : PC 437 Continuous Rear : 11 inch Continuous Rear : 8.5mm Continuous Front : 7 inch Continuous Front : 8.5mm CutSheetFeeder 1 : 11 inch CutSheetFeeder 1 : 8.5mm CutSheetFeeder 2 : 11 inch CutSheetFeeder 2 : 8.5mm Manual Rear : 14 inch Manual Rear : 8.5mm Help...

User Manual
Page 17
Contents Introduction Options 2 How to Use This Manual 3 Warnings, Cautions, and Notes 4 Chapter 1 Setting Up the printer Choosing a Place for the Printer 1-2 Unpacking the Printer 1-4 Installing the Ribbon Cartridge 1-5 Plugging in the Printer 1-10 Running the Self Test 1-10 Connecting the Printer to Your Computer 1-14 Setting Up Your Software 1-15 Microsoft Windows and all Windows programs 1-15 Checking the printer driver settings 1-16 Using non-Windows software 1-17 Printer utilities 1-18 ix
Contents Introduction Options 2 How to Use This Manual 3 Warnings, Cautions, and Notes 4 Chapter 1 Setting Up the printer Choosing a Place for the Printer 1-2 Unpacking the Printer 1-4 Installing the Ribbon Cartridge 1-5 Plugging in the Printer 1-10 Running the Self Test 1-10 Connecting the Printer to Your Computer 1-14 Setting Up Your Software 1-15 Microsoft Windows and all Windows programs 1-15 Checking the printer driver settings 1-16 Using non-Windows software 1-17 Printer utilities 1-18 ix
User Manual
Page 37
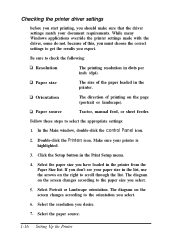
...The direction of the paper loaded in the Print Setup menu. 4. Paper source Tractor, manual feed, or sheet feeder. Double-click the Printers icon. Click the Setup button in the printer. Follow these steps to get the results you must choose the correct settings to select the...settings match your document requirements. Select Portrait or Landscape orientation. Select the paper source. 1-16 Setting Up the Printer While many Windows applications override the printer settings made with the driver, some do not. Paper size The size of printing on the screen changes ...
...The direction of the paper loaded in the Print Setup menu. 4. Paper source Tractor, manual feed, or sheet feeder. Double-click the Printers icon. Click the Setup button in the printer. Follow these steps to get the results you must choose the correct settings to select the...settings match your document requirements. Select Portrait or Landscape orientation. Select the paper source. 1-16 Setting Up the Printer While many Windows applications override the printer settings made with the driver, some do not. Paper size The size of printing on the screen changes ...
User Manual
Page 81
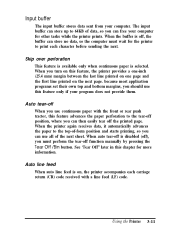
... feature advances the paper perforation to 64KB of -form position and starts printing, so you turn on this chapter for other tasks while the printer prints. Skip over perforation This feature is available only when continuous paper is disabled (off , the buffer can then easily tear off the printed...line printed on one page and the first line printed on , the printer accompanies each character before sending the next. Auto line feed When auto line feed is off ), you can store up to the tear-off function manually by pressing the Tear Off /Bin button. The input buffer can ...
... feature advances the paper perforation to 64KB of -form position and starts printing, so you turn on this chapter for other tasks while the printer prints. Skip over perforation This feature is available only when continuous paper is disabled (off , the buffer can then easily tear off the printed...line printed on one page and the first line printed on , the printer accompanies each character before sending the next. Auto line feed When auto line feed is off ), you can store up to the tear-off function manually by pressing the Tear Off /Bin button. The input buffer can ...

User Manual
Page 87
... completing Bid adjustment, turn on the printer. Then press the Tear Off/Bin button until the two lights on the printout. 4. Hold down the Pause button while you can also manually feed the paper back to the loading position by following the steps below: 1. Follow the instructions on... the control panel start flashing. When you resume printing the printer feeds the paper back to the loading position and begins printing...
... completing Bid adjustment, turn on the printer. Then press the Tear Off/Bin button until the two lights on the printout. 4. Hold down the Pause button while you can also manually feed the paper back to the loading position by following the steps below: 1. Follow the instructions on... the control panel start flashing. When you resume printing the printer feeds the paper back to the loading position and begins printing...
User Manual
Page 90
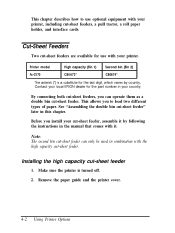
... combination with it by country, Contact your printer. This allows you can only be used in your printer, including cut -sheet feeder. This chapter describes how to load two different types of paper. By connecting both cut -sheet feeder 1. Printer model High capacity (Bin 1) Second bin (Bin 2) Fx-2170 C80673* C80674* The asterisk (*) is turned...
... combination with it by country, Contact your printer. This allows you can only be used in your printer, including cut -sheet feeder. This chapter describes how to load two different types of paper. By connecting both cut -sheet feeder 1. Printer model High capacity (Bin 1) Second bin (Bin 2) Fx-2170 C80673* C80674* The asterisk (*) is turned...
User Manual
Page 94
See the cut-sheet feeder option manuals for details. Select the bin number by pressing the Tear Off/Bin button. Switching to the continuous ...pages of continuous paper, guide the paper over the center support and out the back of the currently selected bin comes on the printer. Note: You may be able to create a double bin cut -sheet feeder" in the paper path, press the Load/... second bin cut-sheet feeder to specify the bin number using your application programs. See your software manuals for more information. If any single sheets are in the previous section. 2. The light of the...
See the cut-sheet feeder option manuals for details. Select the bin number by pressing the Tear Off/Bin button. Switching to the continuous ...pages of continuous paper, guide the paper over the center support and out the back of the currently selected bin comes on the printer. Note: You may be able to create a double bin cut -sheet feeder" in the paper path, press the Load/... second bin cut-sheet feeder to specify the bin number using your application programs. See your software manuals for more information. If any single sheets are in the previous section. 2. The light of the...

User Manual
Page 102
... the sections below to indicate that it cannot receive data. Handshake timing When the unused area for data in the C82305* or C82306* interface card manual. Selecting a baud rate You can select from the following baud rates: 300, 600, 1200, 2400, 4800, 9600, and 19200 bps (bits per second). To set... code or sets the DTR flag to 1 (MARK) to set the baud rate, see the C82305* or C82306* interface card manual. When the unused area increases to 512 bytes, the printer outputs an X-ON code or sets the DTR flag to 0 (SPACE) to indicate that it is ready to receive data. 4-14...
... the sections below to indicate that it cannot receive data. Handshake timing When the unused area for data in the C82305* or C82306* interface card manual. Selecting a baud rate You can select from the following baud rates: 300, 600, 1200, 2400, 4800, 9600, and 19200 bps (bits per second). To set... code or sets the DTR flag to 1 (MARK) to set the baud rate, see the C82305* or C82306* interface card manual. When the unused area increases to 512 bytes, the printer outputs an X-ON code or sets the DTR flag to 0 (SPACE) to indicate that it is ready to receive data. 4-14...
User Manual
Page 135
... depends on the software you are indicated. The software manual should explain the required format and punctuation. The examples below show how the parameters are using printer commands, see the comprehensive ESC/P Reference Manual published by your software. ESC @ is a command with... n. If it has parameters, they are controlled by EPSON. For further information about using . Using Commands Sending printer commands Most actions your printer performs are explained. ESC D D is merely listed. The commands your printer recognizes are indicated by topic. The parameters are listed...
... depends on the software you are indicated. The software manual should explain the required format and punctuation. The examples below show how the parameters are using printer commands, see the comprehensive ESC/P Reference Manual published by your software. ESC @ is a command with... n. If it has parameters, they are controlled by EPSON. For further information about using . Using Commands Sending printer commands Most actions your printer performs are explained. ESC D D is merely listed. The commands your printer recognizes are indicated by topic. The parameters are listed...


