Product Information Guide
Page 7
...create a push/pull tractor combination. The paper path from the paper guide without obstruction. 11/98 EPSON FX-880/FX-1180 - 7 The pull tractor provides the best paper jam prevention, and allows you to load continuous ... table below summarizes the paper paths available for continuous paper printing. EPSON FX-880/FX-1180 Status Monitor The EPSON Status Monitor 2 utility program comes with the printer and is for use the tractor in the pull position. The ... rear, and bottom) for printing on a page of the printer, indicates when errors occur, and provides troubleshooting tips.
...create a push/pull tractor combination. The paper path from the paper guide without obstruction. 11/98 EPSON FX-880/FX-1180 - 7 The pull tractor provides the best paper jam prevention, and allows you to load continuous ... table below summarizes the paper paths available for continuous paper printing. EPSON FX-880/FX-1180 Status Monitor The EPSON Status Monitor 2 utility program comes with the printer and is for use the tractor in the pull position. The ... rear, and bottom) for printing on a page of the printer, indicates when errors occur, and provides troubleshooting tips.

User Manual
Page 8
...EPSON Status Monitor 2 About the EPSON Status Monitor 2 Utility 6-2 Installing EPSON Status Monitor 2 6-2 Accessing EPSON Status Monitor 2 6-3 Status Monitor Overview 6-4 EPSON Status Monitor 2 window 6-4 Printer Status window 6-9 Using the Background Monitoring Feature 6-10 Setting monitoring preferences 6-10 Using the background monitoring icon 6-12 Chapter 7 Troubleshooting...Printout 7-14 Printing a Self Test 7-15 Printing a Hex Dump 7-17 Appendix A Enhancing Your Printer With Options Paper Handling Options A-2 Using the Optional Cut-Sheet Feeders A-4 Installing an optional cut-...
...EPSON Status Monitor 2 About the EPSON Status Monitor 2 Utility 6-2 Installing EPSON Status Monitor 2 6-2 Accessing EPSON Status Monitor 2 6-3 Status Monitor Overview 6-4 EPSON Status Monitor 2 window 6-4 Printer Status window 6-9 Using the Background Monitoring Feature 6-10 Setting monitoring preferences 6-10 Using the background monitoring icon 6-12 Chapter 7 Troubleshooting...Printout 7-14 Printing a Self Test 7-15 Printing a Hex Dump 7-17 Appendix A Enhancing Your Printer With Options Paper Handling Options A-2 Using the Optional Cut-Sheet Feeders A-4 Installing an optional cut-...
User Manual
Page 42
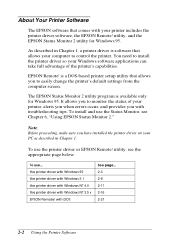
... 95. It allows you to control the printer. EPSON Remote! the printer driver with Windows 95 the printer driver with Windows 3.1 the printer driver with Windows NT 4.0 the printer driver with troubleshooting tips. As described in Chapter 1. To install and use the printer driver or EPSON Remote! To use... utility, and the EPSON Status Monitor 2 utility for Windows 95. Note...
... 95. It allows you to control the printer. EPSON Remote! the printer driver with Windows 95 the printer driver with Windows 3.1 the printer driver with Windows NT 4.0 the printer driver with troubleshooting tips. As described in Chapter 1. To install and use the printer driver or EPSON Remote! To use... utility, and the EPSON Status Monitor 2 utility for Windows 95. Note...
User Manual
Page 119
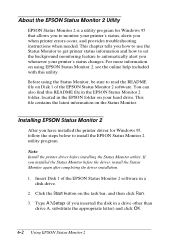
... substitute the appropriate letter) and click OK. 6-2 Using EPSON Status Monitor 2 For more information on the task bar, and then click Run. 3. Installing EPSON Status Monitor 2 After you when printer errors occur, and provides troubleshooting instructions when needed. Click the Start button on using the... Status Monitor, be sure to read the README file on Disk 1 of the EPSON Status Monitor 2 software in a...
... substitute the appropriate letter) and click OK. 6-2 Using EPSON Status Monitor 2 For more information on the task bar, and then click Run. 3. Installing EPSON Status Monitor 2 After you when printer errors occur, and provides troubleshooting instructions when needed. Click the Start button on using the... Status Monitor, be sure to read the README file on Disk 1 of the EPSON Status Monitor 2 software in a...

User Manual
Page 122
... Job Count title bars. Using EPSON Status Monitor 2 6-5 Icon appearance Description Green The printer is a communication problem between the printer and the Status Monitor. Red A printer error has occurred and your printer cannot print. Note: You can rearrange the order of the printers in the Installed Printers list. See online help for troubleshooting information. The appearance of the...
... Job Count title bars. Using EPSON Status Monitor 2 6-5 Icon appearance Description Green The printer is a communication problem between the printer and the Status Monitor. Red A printer error has occurred and your printer cannot print. Note: You can rearrange the order of the printers in the Installed Printers list. See online help for troubleshooting information. The appearance of the...

User Manual
Page 126
... see detailed information on the status of the selected printer. Using EPSON Status Monitor 2 6-9 The current printer status is described in the lower message box. Current Status menu This menu gives you detailed printer status information using a graphic display and a status message box. If a printer error occurs, troubleshooting tips appear in the upper message box. To...
... see detailed information on the status of the selected printer. Using EPSON Status Monitor 2 6-9 The current printer status is described in the lower message box. Current Status menu This menu gives you detailed printer status information using a graphic display and a status message box. If a printer error occurs, troubleshooting tips appear in the upper message box. To...

User Manual
Page 131
... source is not fed to eject the paper; the printer resumes printing automatically once the print head cools. If your printer stops working and one or more control panel lights are on page 7-13. then turn on loading the type of beeps (five beeps) 7-2 Troubleshooting the Pause light goes off , f = flashing short series...
... source is not fed to eject the paper; the printer resumes printing automatically once the print head cools. If your printer stops working and one or more control panel lights are on page 7-13. then turn on loading the type of beeps (five beeps) 7-2 Troubleshooting the Pause light goes off , f = flashing short series...
User Manual
Page 132
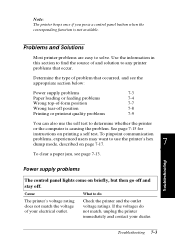
...this section to find the source of and solution to any printer problems that occurred, and see page 7-13. Troubleshooting Power supply problems The control panel lights come on printing a self test. Troubleshooting 7-3 Note: The printer beeps once if you press a control panel button when the... corresponding function is causing the problem. Check the printer and the outlet voltage ratings. Cause What to determine whether the printer or the computer is not available...
...this section to find the source of and solution to any printer problems that occurred, and see page 7-13. Troubleshooting Power supply problems The control panel lights come on printing a self test. Troubleshooting 7-3 Note: The printer beeps once if you press a control panel button when the... corresponding function is causing the problem. Check the printer and the outlet voltage ratings. Cause What to determine whether the printer or the computer is not available...

User Manual
Page 133
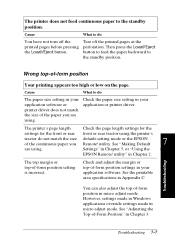
... position and insert a new sheet. (See Chapter 3 for your printer. What to do Press the Load/Eject button to feed the continuous paper back to turn on the printer. single-sheet position. 7-4 Troubleshooting Then press the Operate button to the standby position. Cause The power... cord is not properly plugged into the electrical outlet and the printer, if necessary. work and the control panel ...
... position and insert a new sheet. (See Chapter 3 for your printer. What to do Press the Load/Eject button to feed the continuous paper back to turn on the printer. single-sheet position. 7-4 Troubleshooting Then press the Operate button to the standby position. Cause The power... cord is not properly plugged into the electrical outlet and the printer, if necessary. work and the control panel ...

User Manual
Page 134
See Chapter 4 for single-sheet paper in Appendix C. The printer does not fully eject a single sheet. Troubleshooting The paper does not feed properly with the optional cut -sheet feeder is not installed properly. The paper thickness lever is not loaded ... Appendix A. Reinstall it is there. See "Setting the Paper Thickness Lever" in or too thick. Troubleshooting 7-5 The paper on loading single-sheet paper. Appendix C and use new, clean sheets of your application or printer driver. Move the paper (and the edge guides) a little to eject the sheet. Single-sheet ...
See Chapter 4 for single-sheet paper in Appendix C. The printer does not fully eject a single sheet. Troubleshooting The paper does not feed properly with the optional cut -sheet feeder is not installed properly. The paper thickness lever is not loaded ... Appendix A. Reinstall it is there. See "Setting the Paper Thickness Lever" in or too thick. Troubleshooting 7-5 The paper on loading single-sheet paper. Appendix C and use new, clean sheets of your application or printer driver. Move the paper (and the edge guides) a little to eject the sheet. Single-sheet ...

User Manual
Page 135
Too many sheets are loaded in Load less than 150 sheets of your paper's width. The printer does not load continuous paper or does not feed it properly. Cause What to use. For more than 150 sheets of the cut-sheet feeder ... you want to use . Set the paper thickness lever to the cut -sheet feeder. Align the left in Add more information. There is in Chapter 3. 7-6 Troubleshooting the bin.
Too many sheets are loaded in Load less than 150 sheets of your paper's width. The printer does not load continuous paper or does not feed it properly. Cause What to use. For more than 150 sheets of the cut-sheet feeder ... you want to use . Set the paper thickness lever to the cut -sheet feeder. Align the left in Add more information. There is in Chapter 3. 7-6 Troubleshooting the bin.
User Manual
Page 136
... Chapter 2. See the printable area specifications in micro adjust mode. The printer's page length Check the page length settings for the settings for the front or rear front or rear tractor using . Troubleshooting 7-7 Check and adjust the margin or top-of the continuous paper you... are using the printer's tractor do not match the size default-setting mode or the EPSON of -form position settings in Chapter 3. utility. ...
... Chapter 2. See the printable area specifications in micro adjust mode. The printer's page length Check the page length settings for the settings for the front or rear front or rear tractor using . Troubleshooting 7-7 Check and adjust the margin or top-of the continuous paper you... are using the printer's tractor do not match the size default-setting mode or the EPSON of -form position settings in Chapter 3. utility. ...

User Manual
Page 137
.... Cause What to do The tear-off position. this may damage the printer or cause it to lose the top-of -form position; Windows desktop or in your application before printing. 7-8 Troubleshooting micro adjust feature. Adjust the tear-off position" in your application before ...printing. Adjust the top-of -Form Position" in Chapter 3. You moved the paper using the knob while the printer was on (or too far away from...
.... Cause What to do The tear-off position. this may damage the printer or cause it to lose the top-of -form position; Windows desktop or in your application before printing. 7-8 Troubleshooting micro adjust feature. Adjust the tear-off position" in your application before ...printing. Adjust the top-of -Form Position" in Chapter 3. You moved the paper using the knob while the printer was on (or too far away from...
User Manual
Page 138
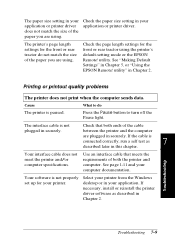
... are plugged in securely. Your software is not plugged in Chapter 5, or "Using the EPSON Remote! utility. utility" in your application. Troubleshooting 7-9 Printing or printout quality problems The printer does not print when the computer sends data. Select your printer from the Windows desktop or in Chapter 2. The interface cable is not properly set...
... are plugged in securely. Your software is not plugged in Chapter 5, or "Using the EPSON Remote! utility. utility" in your application. Troubleshooting 7-9 Printing or printout quality problems The printer does not print when the computer sends data. Select your printer from the Windows desktop or in Chapter 2. The interface cable is not properly set...
User Manual
Page 139
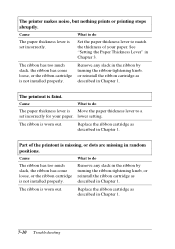
... Cause What to match the thickness of the printout is worn out. See "Setting the Paper Thickness Lever" in Chapter 1. 7-10 Troubleshooting Replace the ribbon cartridge as described in Chapter 1. The printout is not installed properly. Part of your paper. The ribbon is missing,... come loose, or the ribbon cartridge is worn out. lower setting. Replace the ribbon cartridge as described in random positions. The printer makes noise, but nothing prints or printing stops abruptly. The ribbon is not installed properly. Cause What to a set incorrectly. Remove...
... Cause What to match the thickness of the printout is worn out. See "Setting the Paper Thickness Lever" in Chapter 1. 7-10 Troubleshooting Replace the ribbon cartridge as described in Chapter 1. The printout is not installed properly. Part of your paper. The ribbon is missing,... come loose, or the ribbon cartridge is worn out. lower setting. Replace the ribbon cartridge as described in random positions. The printer makes noise, but nothing prints or printing stops abruptly. The ribbon is not installed properly. Cause What to a set incorrectly. Remove...
User Manual
Page 140
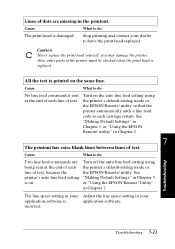
Stop printing and contact your application software is replaced. Also, other parts of the printer must be checked when the print head is application software. or "Using the EPSON Remote! Utility" in Chapter 5, or "Using the EPSON Remote! Troubleshooting 7-11 Troubleshooting Cause What to have the print head replaced. Lines of text. Cause What to do...
Stop printing and contact your application software is replaced. Also, other parts of the printer must be checked when the print head is application software. or "Using the EPSON Remote! Utility" in Chapter 5, or "Using the EPSON Remote! Troubleshooting 7-11 Troubleshooting Cause What to have the print head replaced. Lines of text. Cause What to do...

User Manual
Page 141
... card, also see page A-25. Cause What to select the font. 7-12 Troubleshooting utility. See page 1-11 and your software, the default-setting mode, or the EPSON Remote! Make sure that the communications protocol is selected in your printer. Use your printer. The character table setting in your software overrides settings made in Chapter 2.
... card, also see page A-25. Cause What to select the font. 7-12 Troubleshooting utility. See page 1-11 and your software, the default-setting mode, or the EPSON Remote! Make sure that the communications protocol is selected in your printer. Use your printer. The character table setting in your software overrides settings made in Chapter 2.

User Manual
Page 142
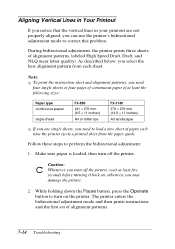
... to turn on the left side of the printer to do Bidirectional printing, which is the printer's standard printing mode, is out of the printer. Use the printer's bidirectional adjustment mode to remove the paper in the printer. Troubleshooting c Caution: Use the knob on page 7-14. Open the printer cover. 3. If continuous paper is off position. 5. Cause...
... to turn on the left side of the printer to do Bidirectional printing, which is the printer's standard printing mode, is out of the printer. Use the printer's bidirectional adjustment mode to remove the paper in the printer. Troubleshooting c Caution: Use the knob on page 7-14. Open the printer cover. 3. If continuous paper is off position. 5. Cause...
User Manual
Page 143
...least the following sizes: Paper type continuous paper single sheet FX-880 241 × 279 mm (9.5 × 11 inches) A4 or letter size FX-1180 376 × 279 mm (14.8 × 11 inches) A3 landscape q If you use the printer's bidirectional adjustment mode to load a new sheet of paper... set of alignment patterns, labeled High Speed Draft, Draft, and NLQ (near letter quality). During bidirectional adjustment, the printer prints three sheets of alignment patterns. 7-14 Troubleshooting c Caution: Whenever you turn on ; otherwise you select the best alignment pattern from each time the...
...least the following sizes: Paper type continuous paper single sheet FX-880 241 × 279 mm (9.5 × 11 inches) A4 or letter size FX-1180 376 × 279 mm (14.8 × 11 inches) A3 landscape q If you use the printer's bidirectional adjustment mode to load a new sheet of paper... set of alignment patterns, labeled High Speed Draft, Draft, and NLQ (near letter quality). During bidirectional adjustment, the printer prints three sheets of alignment patterns. 7-14 Troubleshooting c Caution: Whenever you turn on ; otherwise you select the best alignment pattern from each time the...

User Manual
Page 146
... on loading single sheets. otherwise you can print a hex dump using either single sheets or continuous paper. Troubleshooting Troubleshooting 7-17 Printing a Hex Dump If you are an experienced user or a programmer, you may damage the printer. 7 2. You can print a hexadecimal dump to turn off . c Caution: Whenever you press the Operate button to isolate...
... on loading single sheets. otherwise you can print a hex dump using either single sheets or continuous paper. Troubleshooting Troubleshooting 7-17 Printing a Hex Dump If you are an experienced user or a programmer, you may damage the printer. 7 2. You can print a hexadecimal dump to turn off . c Caution: Whenever you press the Operate button to isolate...

